Making a Barbute (Re-Edit)

HTML-код
- Опубликовано: 16 окт 2024
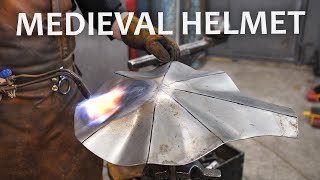
- This video shows the creation of a 15th Century Milanese Barbute using both historical and modern metalworking techniques. In 2011, I posted an original video of a medieval barbute helmet in production. Due to issues with the background music, the video was restricted and wasn't available to everyone on RUclips. So, to make a more copyright-friendly version, I've remixed the video with different music. Unfortunately, the original audio had to be removed along with the original music... But I've added notations explaining my process to give a greater understanding to those interested. Please enjoy!


Even with modern tools, it still is a hell lot of work.
No wonder Armor used to cost a fortune in the middle ages.
If it took you 43 or so hours imagine how long it took armors when those things were used in combat. You do very good work and thanks for the nice video.
Another thing i love about this particular helmet design is that it is one piece -as far as moving pieces anyway. The reason this is important is that any one who has ever built anything knows that the more moving, interacting parts you have on an object the more potential failure points you have. This design is going to serve reliably, and consistently, with minimal maintenance requirements.
*Looks at Cardboard and Ducttape*
Shits just about to get real...
Thank you all for your positive responses! I have recently relocated my shop, but I hope to have some new and exciting videos up in the future :).
This is almost exactly the same method I use to make barbutes and other helmets containing complex curves. The results are very close to the curves in three dimensions of original helmets. The jigsaw is a cheaper option to the sheetmetal shear. It takes longer to cut but can curve sharper than a shear. Tape patterns are a great method too. I've been a journeyman armourer since 1989 and specialize in high-gothic German style armour harnesses. This was an excellent tutorial video for apprentices out there!
Thanks very much for the kind feedback! Do you have a website?
I used to have a website, but took it down to save money several years go.
I have no welding skills as of yet, but I would gladly use this method to produce a similar helmet in the Mandalorian style. It shows how you can use separate pieces of metal to make an item that looks in the end like it was made from a single piece, and also shows how working with sheet metal and manual tools can produce satisfying results. Thank you for this video!
I've worked with metal my whole life and you have definitely made this look easy when I know it is terribly hard! Great work! The tig welding and grinding was done very well to where you cannot tell where the joints are. Well done my friend
+NoFace Adams Thanks very much!
This is so impressive. You sir are extremely talented & dedicated. I hope to reach this level of craftsmanship with my own projects someday.
I think the voice over is easy to listen to, is regards to the audio. Fascinating process, even though its not historically accurate, as is mentioned so often (not that I care). Enjoyable video, great work.
Thank You :-)
Parker, I've always admired your craftsmanship and passion for what you do. Keep up the great work and can't wait to see more videos. I miss ARMA!
Parker Brown! You Rock! You have Inspired Me. Thank You!
Thank you for posting such an informative video. I like to see alternative building methods and personally think the use of historical methods when not requested is a huge waste of time. The final product looks great and I am happy to hear that it is getting used.
+wwg5079 I do work using historical and non-historical methods. It really depends on how much a client is willing to pay. But yes, this barbute has been used in HEMA fighting for about 6 years now. It certainly has some dents, dings and repairs on it, but it still does its job ;-).
interesting way to bring out the back, Parker, smart idea giving yourself the extra material
Since I made this helmet in 2010, I now use welding as a means of creating a general form that I then finish out with hot raising. The origins of this method began in the bringing out of the back of this barbute :-).
That helm is unbelievably beautiful.
@Adam Maxwell: If you are thinning the metal during raising, be aware that your hammer strikes need to be just off center of where the metal touches the stake. The idea is to push the metal down onto the stake. Check out my video on raising for a better explanation. Raising isn't easy, so keep working on it and don't get discouraged :-).
awesome, I'm making a medieval helmet for my school project and this video has helped a lot with shaping techniques. I'll now look as some of your other videos for some more tips!
I have got one looking quite similar. It was my first helmet ever and I am still very happy with it after 15+ years now.
Historically accurate or not. It's a great piece of work. Well done. Just a hint though, Best to tell people that TIG welding is actually a pretty slow process. good work, mate. I'll look for more of your videos.
Very cool video and very cool piece. Nice work!
amazing work parker. thank for the vid.
That was really impressive. I was hoping to see the procedure done completely old school though, with the making of the sheet metal and what not, how it was done without the tig welding. I'd love to be able to do something as nice as that. Great job.
I love videos like these. I don't need it as a tutorial, but just seeing little things in it gives me ideas.
I think my girlfriend hates me watching them too. She sees you using some tools that I don't have. :)
My pleasure! I intend to do some more of these videos, but they are extremely time-intensive....
Well done Parker. I like you work.
Thank you very much, I appreciate it :-)
Nice video, mate! Very well explained.
nice work man! wow it sure does look amazing
Thank you!
A brass mallet could certainly work and it's something I might try in the future. But, the rawhide mallet doesn't really produce a hugely disturbing smell, lol. Everyone does things differently and this is just my method, but I always encourage new and inventive techniques! Thanks for sharing!
From a parker to a parker. You are an awesome parker
Thanks Parker!
Wow! Incredible workmanship!
You're very welcome!
Screw the haters, this is awesome.
great vid and don't worry about the historical accuracy of hi w they did it if they had had better tech than they did you can bet they would have used it after all they were in business to make money lol
Yup. Any of us that do metal or wood work know for a fact if they had access to it back then they would have used it.
Awesome Mr. Brown thanks for sharing!!
My pleasure!
its all around his head you cant attack him in the head
Roman spears: “hold my beer.”
Seargent Pancakes with the exception that a 15th century knight would use a Roman spear xD 👌🏻
I use steel hammers for all kinds of applications. For dishing or sinking larger pieces, I prefer the rawhide mallet but it's just a personal preference. I know of many armourers using steel hammers to sink their pieces. Just be careful to not thin the sheet if you're hammering with a steel hammer onto a steel surface. Of course the preferred method would be to raise the whole with a steel hammer onto a steel stake!
Bravo... Thanks for sharing. Jolly well done.
Halberds Thank you!
I have a copy in fiberglass of the original.
I think it is one of the best helms ever.
Thanks for the great video. Jolly well done.
Thank you very much :-).
i think it is awesome the way you create all these compound radii in to this. even car body-shop does not do this type of craftsman ship metal work any more.
Excellent work . I’m curious though ,the crested ridge on the top of the helmet from front to back just magically appears . How was it achieved ?
Wow, it's a beautiful piece... Great job!
And screw the purists that say you shouldn't use modern methods, it's sure nice to know them instead of them becoming a lost art, and I even understand the ones that specifically have "using old blacksmithing techniques" as their hobby, but if you do it for a living, it's just handicapping yourself.
Modern armourers need to be capable of producing pieces using a variety of techniques both historical and modern. Given that I do make armour for a living, this welding method is simply a cost-effective means. I do appreciate and practice historical techniques as well :).
Of, course, that's why I said that it's good to know them :)
It's really a shame when an important technique is lost in history, like what happened with Damascus Steel until very recently.
But unless they are somehow superior in either cost, efficiency or end result, I only see a handful of opportunities when they are the best option (If the client specifies it, for example)... and see far more people rabidly criticizing anyone that doesn't use the historical methods. That's part of my overall hate for closed minded fanatics of anything, I guess.
Gran Gurbo I think everyone is certainly allowed to state their criticism and as long as it's respectful, I got no problems. When it turns disrespectful, the only people they're really hurting is themselves. Inflexible ideals (like inflexible armour) is more harmful to the owner than they might realize.
I appreciate it!
Just watched this.....Welded or not..Beautiful job.
Thanks very much. There is a video showing a fully raised helmet that's in the works ;-).
Parker Brown Will look out for that then..cheers.
This is probably the best medieval helmet i have ever seen i have only two questions
1. How many days/weeks did it take to build ?
2. Whats the price of the materials and the tools or whats the price of a already constructed helmet like this one ?
1. As stated in the video, it took 43 hours to produce. This helmet was not done in one go. I worked on it in my spare time between other projects and it took 4 months. But the actual production time came to 43 hours.
2. The cost of materials is very cheap...less than $100. My tools have been collected over many years and are valued in between $20,000 to $30,000. Some individual tools have been hand made by me. Other tools have been major investments costing $4,000. The price of the final helmet is stated on my website at $1,042
www.crescentmoonarmoury.net/Crescent_Moon_Armoury/Custom_Helmets/Pages/Milanese_Barbute.html
Hey Parker, great video! I've seen several people using that type of cast-iron dishing form, but can't find anywhere that sells them - do you remember how you got them? I'm planning on making some dishing forms from wood (tree stumps, mostly), but a metal form would be nice too!
I think I might have answered my own question, but was it Iron Monger Armory, perhaps?
Yes, it was :-).
I have seen people cut the bottom off of steel fire extinguishers and use that, as many have a dished bottoms and it is thick heavy gauge steel.
Yes, I love crafting things.
Looks good but is it historically accurate or even battle ready to weld it like that?
Won't those be weak points? Just asking.
@Jeramy neeley:
1) While this is a very interesting piece of fantasy concept costuming, it is not functional armour and would be horrifically uncomfortable....
2) That said, we would start at around $80,000 considering it would easily require over three years to make.
Nice job parker
Juan Carlos Lopez Jurado thank you :-)
do a mandalorian helmet!
Awesome video, I learned a ton from watching this. Thank you for uploading!
Very cool, wish I had some of the toys you do.
Toys are acquired through a mixture of time, effort and money ;-).
I really liked this video, inspirational. just wondering: can this helmet actually be used in a fight? how does the weld hold?
Absolutely beautiful helmet!
Very nice work!
Thank you very much :-)
does anyone know where I can get 2nd hand workshop tools? I want to get into metalwork but i don't have much of a budget...
great job Parker!
Rough estimate, since you don't know my measurements, etc.:
How much would it cost for you to make an Italian Armet de Rondelle with a wrap, preferable 12-14 gauge steel, for jousting.
I'd prefer stainless steel, despite that it's not accurate to history, as I don't want to attempt to keep up with cold-rolled.
Thank you for your time!
You sir, are an artist.
Thank you for your interest! Depending upon specific details, an Italian Armet would be anywhere from $900-$1500. If you would, email me at crescentmoonarmoury@yahoo.com so we can discuss details.
Awesome job 👍
Thanks very much! I've been making armour since around 2004.
Genial. Abonniert.
medieval storm trooper or the red guards of emperor palpatine @ 14:13 ..Great video sir.. I enjoyed it.. ty
+Kalel: Design features from the barbute have been used in a variety of icons of popular culture. I did another barbute in 2013 that was also an homage to the helmet worn by Magneto:
ruclips.net/video/sHup_elfygE/видео.html
2 questions: how much would a full armor set cost ?
can i have a link to order it from ?
Jolly well done.
Thanks for the movie.
Great video! And nice helmet. How did you get the raised ridge going front to back? Did I miss that part?
I also think that you can make it however is right for you. You know what you're after, how you get there is up to you and the client. Haters gonna hate, pay them no mind!
Thanks for sharing.
Thanks for the feedback! There are other videos on my channel showing my raising capabilities, but usually my clients prefer the cost-effective methods allowed by welding. I appreciate the sentiment and I hope to have more videos this next year :-).
When raised from a single sheet how to you deal with the thinning of the metal?
Could you use something like a brass mallet to avoid the smell? They also make synthetic mallets. I find they last longer. At least for making dies they do. :)
wow man, you got guts doing hot work in shorts and shoes
...I do?
You must not live in Texas
Parker Brown you're right, i live in Ohio
Nice Craftsmanship, I'd be a proud owner.
Great work! How long have you been making armor?
This is such a great helmet design. If i were wearing it i think the only modification i would want would be ear openings. I would gladly sacrifice some protection in order to be able to hear my surroundings more clearly. But for physical protection, respiratory functionality, & visual liberty this design strikes a rare balance. Not to mention the fact that it looks damn sexy! ;)
The Renaissance Italians knew what they were doing when the designed it. There are some barbutes that feature openings for the ears, but I just wanted to keep things simple :-).
understandable... and it probably has more structural integrity too.
@ParkerBrown seven years later, what can you tell us about what you have learned and how your techniques have changed?
Thanks for this demonstration .....
beautiful work man, one question is the helmet as strong as authentic ones , or is it more a show piece ?
This is a fully functioning piece. It is my own personal helmet that I've used in martial arts for over two years and it has protected me from a countless number of blows from wooden and steel weapons.
Yea let me tell you this guy can make some GOOD SH*T!! No joke! I know other armorers & there good or much better then the replicas made in India or China. But Parker is just better then any armorers I know. I really hope he keeps it doing it!
Best job ever!
Nice work and a good video. What I'd really like to know though is what kind of block you are using there to do the round head rivets (which are a particular enemy of mine)
I use a cast lead block to set my round-headed rivets. The use of lead blocks in smithing is a time-honored technique, but some people aren't comfortable with its presence in the shop due to its toxicity. There are pneumatic rivet setting heads which can be used as well. Instead of putting them in a pneumatic tool, just clamp it in your bench vise and place the round head of the rivet into the tool's dimple and hammer the interior of the rivet as normal. Of course, you can always just make a rivet setting tool out of scrap steel rod and a careful application of a drill and ball burr ;-).
Be patient and remember that it takes making mistakes to learn. Be humble and take the time to learn how to draw. Go to museums and look at original pieces and draw them, this will develop your eye and teach you a historical aesthetic. Once you begin to see the visual and functional differences between historical pieces and modern attempts at recreation and fantasy, you'll see what makes a good piece of armour vs. a good piece of costume. Learn how to fight, it teaches you HOW armour worked.
Do you have a website where I can order a helmet made?
beautiful!!! how much do you charge for this type of helmet?
Thank you! A custom fit barbute like this with a historical interior liner would run around $1,000. You can find more of my work on the website listed on my RUclips channel page :-).
This was labeled as a video about cars in my recommendations list.
You really are amazing,In the video, are you weldling helmet by laser?
Thank you! No, that's not a laser, it's a TiG welder. It uses an electrical plasma arc to melt only a portion of the metal to produce a weld.
Parker Brown thank for your patience
Found my new hobby.
Step 1: read
Step 2: empty your wallet
Very impressive! How much would a helmet like that fetch?
Nicky Critic www.crescentmoonarmoury.net/Crescent_Moon_Armoury/Custom_Helmets/Pages/Milanese_Barbute.html
Any suggestions for sites/videos for a first helmet project? I am a pre-dental student in an art class where we have access to brazing equipment, a tool that can hole punch sheet metal, hammers, a metal bending machine, a variety of wire, scrap sheet metal, a spot welder, and some other things. I have roughyl 15-30 hours to work on it (a big time range but depending on how excited I get some time may become available. I am on a tight budget and would like to spend as little as possible. I have looked at pepakura and it looks cool but a constraint of the project is using some kind of metal to form something wearable. The metal can be the base but we can layer it however we want and what not.I would appreciate any feedback possible!
A good first-time helmet would be a spangenhelm. But with any armour project, you might want to prepare for it to take much longer than you expect. Here's a helpful starting link:
www.arador.com/armour/how-to-make-a-spangenhelm/
Parker Brown thanks! I found out the other day that we have a bit more time than I had originally thought (like 2 weeks longer so about 15-20 hours longer than I thought). We also have a bit more flexibility with the materials we can use and so I may consider using some EVA foam, but we have to at least have some reinforcement of brazing with wire as armature. I would have considered possible peparuka but the instructor said we cannot do templates; however, the general template in the link should still help me increase my awareness and understanding of what it would take to go through the metal route because we do have sheet metal available. I am trying to pool a bunch of ideas together to make it look badass, and any other feedback for possible material alternatives other than what I have mentioned would be much appreciated.
matt12721 img2.wikia.nocookie.net/__cb20120224210256/elderscrolls/images/2/2b/Helmofyngol.png
this helm is kinda where my inspiration comes from. That, gladiatator, the Witch King from lord of the rings, and some video game armor are kinda where I hope to attempt to take this project
matt12721 If you want to make something like this for cosplay purposes, there are MUCH simpler alternatives than learning armoursmithing. Fantasy armour can be a lot of fun to make, but it MUST be approached from an understanding of real practical historical armour first. A lot of fantasy armour looks good, but is simply too impractical and uncomfortable to wear. I would strongly advise looking at real original pieces first before delving into "armour" shown in movies and video games.
Stormthecastle.com
Exactly which technique that you use here is historical/medieval?
+Toshi Buntaro
-sinking
-hot working
-edge rolling
-raising
-planishing
-sanding
-polishing
-riveting
The primary modern technique here was the use of the TiG welder to assemble the various pieces of the helmet before final raising.
How much would you charge for this, with the fencing mesh? Also, do you do heat colouring?
$1,042 and yes I do heat bluing. However, I am not taking any commissions at this time.
Thank you, yes I assumed you weren't, but I wanted an idea of the general cost involved.
You are certainly suitable for manual labor.
You might also have a webshop where I can order things?
I found this movie cool to see.
My website is listed at the end of the video :-).
Hi how you know what shape you must cut, and how long sholud be this shape. I mean the steel in first few seconds of film. I whan't to make this same barbute making this your way, everything is clear to me but how i know what shape sholud i cut ? You have some pattern ? So i can cut steel for my head ?
+MrGaurdians Patterning is a separate skillset. You should not try and make armour based on one standard pattern. A pattern is made for each new piece since armour must be custom fit to the individual wearer.
+Parker Brown How long you make this helmet ?
+MrGaurdians As it says at the end of the video, it took 43 hours to produce.
Any tips for a beginner armorer?
Great video
Owesome!
bc c: I'm sorry I haven't been able to reply properly, but to hopefully answer your question, the initial cost of materials for a helmet like this tends to run around $75 to $100.
bc c Most people don't realize that the vast majority of an armour's cost is the labor, not the material :-).
Just wondering, but why don't you wear safety glasses while you are hammering?
The voices told me not to.
But, seriously, I generally do wear safety glasses or a face shield while working...but sometimes I forget...only human.
Man , that helm is amazing ! I like so much ! i'm from brazil and for try do one i will need the model you use in paper to take the sizes ( will be the first time i try do something like that ).... you have a e-mail to talk about this ?
i know that is your work but i can't go there to buy some stuffs , i can only do one of this ...
that is amazing! really well done, but what's the thickness of the helmet?
Thanks very much! The top of the helmet is 12 ga. while the sides are 14 ga.
What kind of sand paper do you use to get the metal to shine?
I don't use sandpaper per se, instead much of the finish work is done with 3M 2" wide 72" long sanding belts in 60, 80, 120 and 220 grits. At the time of this project, I would do much more finishing on the belt sander and then take it straight to a polisher using bobbing compound, but now I do an intermediary step using 80, 120, 300 and then 400 grit Satin Glo compound using separate dedicated cloth wheels. This produces a much more even finish.
How long doe sit take to make a piece and can it be worn for replica or actual use?
As stated in the video, the project took 43 hours to complete. It is a fully functioning helmet used in martial arts training. I have personally used it these past 5 years and it has certainly kept my brains where they belong :-).
+Parker Brown Martial arts training? Amazing that they still use 15th century designs for protection (if it ain't broke don't fix it I guess). So what sort of damage does it go through anyway? Could it go through the same as one would expect in a medieval battle with hatchets and swords striking it etc etc? (Whenever looking at these helmets I always assume that it is too thin so would I be wrong in assuming that?)
+Jim Island: I've used this helmet in HEMA/ARMA martial arts training since about 2010 and it has taken many hits from blunted high-carbon steel training federschwerts and wooden wasters. You can see me (briefly) in action with the helmet here:
ruclips.net/video/10B4oCreJDo/видео.htmlm47s
The thickness of the skull is about 12 ga. thick. The sides and bottom are about 14 ga. This helmet is plain mild steel, not heat-treated carbon steel. It has a few dents and dings in it today, but it has done its job remarkably well. After making this video, I did fit the occular area with fencing mesh so a blade couldn't slide in, but with a properly made interior liner, this helmet has served me quite well.
Congratulations on the art, what do you do to not rust after
Rust prevention is about constant moisture control. This helmet (which is now almost 10 years old) has been kept rust-free by always keeping a can of either Rem Oil gun oil or CLR handy along with my kit. After every use, I would wipe the piece down thoroughly and then apply a little oil. Any scratches or serious scuffs would be immediately tended to with a file and sand paper. Basically, if you know how to clean a gun, you know how to clean your armour. Take a few minutes after each use to keep it in good shape and it will last you a very long time.
Ok, my friend, he has won one more subscriber here in Brazil. I also work with steel, but I never made armor, seeing his work made me feel like trying. Hugs
What's the price on something like this?
Hey I recognize that anvil! I have the same one!
Impressive!
Thank you.
Brilliant!