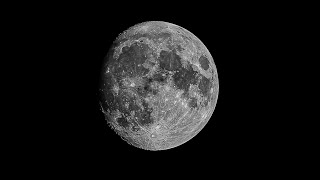
How to edit the full moon in Lightroom to pull out detail

HTML-код
- Опубликовано: 12 янв 2015
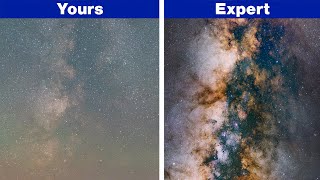
- If you like shooting the moon, here's one way to process using Lightroom to pull out some serious details.
My other video on this topic shows a process using Photoshop and Topaz Adjust.
• How to edit the full m...
I prefer Lightroom now.


Newbie watching this in 2023 and very grateful for the clear direct instructions!
I thought I snapped some great shots of the latest Supermoon on my camera, but then I followed your advice, and wow! I had no idea how much better they could look! I'm just getting started with Lightroom, and this tutorial helped me so very much. Thanks!
I was out tonight shooting the Super Hunters Moon and just decided to search around for tips, this was a great lesson, Thanks...
Your video really helped me to bring out the details in my moon shots. Thank you for posting!
Exactly what i need, full moon tomorrow...so excited.
Thank you for this...
Took some good shots on my camera of the moon!
Hey man, thank you for this tutorial. Just went out and took some pics of tonight's full moon and it's looking kinda neat.
Very informative thank you. I just took a great shot of the moon and used your editing techniques. Thanks 😁🍻
Cheers Kim. Have the same lens and a d7200, will try this out in Lr myself 👍
Thanks so much for a great tutorial.
Great video. I went back to some moon photos I took last year and used your tips here. Absolutely brought them to life! Thank you for posting
You are very welcome. Glad it worked for you.
Kim Letkeman I think it turned out OK! flic.kr/p/SrG3mA
Kim Letkeman This one is a bit better, not as cool. I like them both. flic.kr/p/SFx1u6
Such a brilliant tutorial as i was able to follow you with ease. Thank you. I must take a look to see what other video's you have compiled
Thanks so much!
wow thanks. i'm new at this and encouraged to learn.
Beautiful !
Love it, thank you.
Love it. I learned a lot.
sooo those black smudges are there ! it's not from my camera ! xD nice work
Thank you so much. Best video I have found. Excellent. Helped loads. :-)
this tutorial is straight cheese
great video! thank you!
Thank you. Now time to go to work.
Wow! Awesome
Marvoulous
I will surely try
Thanks
Wow very nice one thank you very much
Good workflow but I think I would have liked to have had sharper focus and higher magnification to start with to see better detail.
The focus was accurate. The lens was not the sharpest. I am shooting now with m4/3 bodies and the Leica 100-400 and the raw images are vastly sharper. In the end, though, the images after processing are quite nice either way.
@@KimLetkeman - Good process workflow like I said. I also shoot MFT, they're very good and double the magnification of the lens compared to FF. I've used MFT for a long while, Leica lenses are just so sharp. I have the older Panny 100-300, but also a Tokina 400 prime (charity shop, cheap) and most recently got a really good moon shot with the 4/3 (not MFT) Bigma 50-500 APO on the E-M5ii, the camera can body stabilise it even on a tripod/mount. Me, I don't like to saturate it out to black, white and grey because the moon has delicate colours www.flickr.com/photos/jefrs/49729255141/in/datetaken-public/
@@jeffslade1892 The Bigma acquitted itself very well, although I assume that tracking the moon helped somewhat with micro sharpness on the edges. I have processed the moon many times in color and in black and white. I like both, but that may be because I am apparently a strong protan color-deficient and thus have serious color confusion for anything but primaries. Anyway, great shot.
@@KimLetkeman I used f/13 ISO 200 1/100s (the moon is very bright) so the Star-Adventurer was only used to keep the moon wandering out of shot as I took multiple photos. The Sigma 50--500 was the first Bigma produced, for Olympus DSLR mirror 4/3 cameras, adapted with the DMW-MA1 4/3 to MFT. The lens is APO so no nasty fringing, and it is "full frame" so it weighs a ton. The AF is slow and clunky by modern standards but using focus peaking in MF even on the moon terminator works. The trick is getting the focus spot on at the point of interest, the DoF is about 1,700km from the centre to the rim, and yes that comes into play so small aperture. For some reason it works better on the E-M5ii than the GH4, the body stabilisation probably takes vibration out of the tripod mount (no Lens OIS on it). The moon has subtle sandy golds which aids me to see detail. I processed the raw in Olympus Workspace as Abode PS/Lightroom don't recognise the Olly ORF properly and reduce bit depth.
This was informative - thank-you. I've tried adapting your Lr5 techniques for 1/2 moons too. My attempts do not get enough details ~ Feel free to post a vid on that too ;-)
theoschela Great idea. I thought I had used the same processing, but perhaps not. I will see what I can do.
Thank you. I have several photos of the very orange Flower Super Moon and wondered if you have a tutorial on editing for the full colour at moonrise?
I don't. But remember that the moon at the horizon is colored by the dust in the massive amount of air the light has traveled through to get to you at such a low angle. So don't be afraid of setting the color balance however you like. The rest of the processing is basically the same.
Great tutorial! Is It possible to do the same editing using ACR? Thank you!
I did that one first. Just search for it on my channel.
Thanks for the Video. I have an issue. I shot the image RAW on nikon D5300 with Tamron 70-300 VC lens at 300mm. Still after cropping just as you did, i see significant pixalation on the edges. The focus looks fine but it looks over-cropped. Can you please explain. Thanks!
Hassaan Khan that's pretty weird. You are shooting a 24 megapixel sensor, Which is higher resolution than the camera with which I shot the image on showing. About all I can imagine is that somehow you ended up editing the embedded jpeg preview or something weird like that.
Well I am pretty sure about it. Also when i removed chromatic aberration, i ended up with blue color on the top right side. That might be a lens defect. In my pic, the edges does not look round and pixalated as i said :(
What if I only have a 90mm lens, can I still use that?
On aps-c that's a 135mm equivalent, which is low for the moon. On m4/3 it is 180mm which is getting a bit better. But both will require heavy cropping so don't expect to much. But it can still be fun to try...
I have a mooin photo to edit, but do I do it with photoshop or lightroom or both?
I made a video for each as I used Photoshop for many years before moving on top Lightroom. I find that 98% of my editing is doable in Lightroom, and the moon is easily processed only in Lightroom. However, when there are advanced things to do (advanced layering, smart fill, etc) then other tools like Photoshop become necessary. So use the tool that you are most comfortable for the job.
Hi Kim, thank you for this video. It is very helpful. And the settings are not intuitive and I would have never gotten to this end result without your video.
This is version based on your video:
www.flickr.com/photos/jimmyk-photo/31076481685
This is version that I edited based on my typical post processing edits:
www.flickr.com/photos/jimmyk-photo/31009517616
I definitely like the version based on your video.
Man! You made my day and look what I did with a cheap set of gear!
Here's a sample - yourshot.nationalgeographic.com/photos/8996344/
This might be over-sharpened, will try another day when ther's less light pollution.
Mine didn't turn out nearly as good as yours!! Mine is cloudy with little detail.
Hi... I'm sorry to hear that... If you make the original available I can take a shot at it... Also, if you make both available I'd be happy to take a look...
@@KimLetkeman Very cool! How do we make this happen?
@@hitmhard one of the easiest ways to make this happen is for you to drop the original and your processed versions in OneDrive. You can then select the folder in OneDrive where you put them and get a link to it that you can send to me. I can then copy them over and take a look...
I tried this with a tamron 70-300mm 70-300mm f/4.0-5.6 Di LD, at 300mm it was not nearly as sharp as yours. I did mine with a nikon d3100, is the lens body combo not good for clear moon shots?
+Black Thug Life There are many factors at play with moon shots:
-- how high in the sky, higher is better
-- how clear is the air, need to take a lot of shots to be sure of one great one
-- how stable is the tripod
-- did you use the timer to trigger
-- did you use the shutter delay to dampen some of the vibrations?
-- is the lens set to f11, never shoot the moon wide open with an older zoom lens
-- did you use a reasonable shutter speed, the moon is moving so better to slightly underexpose than allow shutter speed to be too long
-- did you clean the front and rear elements
-- did you shoot raw
-- is the lens sharp normally
Be patient and try all the things above. Tripod is especially important as you do not list VC on your lens. Timer is equally important and touching the camera vibrates for seconds afterwards.
Let me know how that works for you ...
is the wind speed affecting the quality as well?
If there is wind, then your tripod must be extremely stable. Wind can physically move the camera on top of a less than stable tripod, and it can also set up vibrations that will blur the shot. Best not to shoot in wind, but if you must then a solid carbon fibre tripod with a pack slung from the centre post hook would be very helpful. Also, make absolutely certain that you use self timer with at least 2s of delay so that the legs can stop ringing from your touch.
My problem with the wind was not that the tripod was shaking but there were moving air masses in the air that caused the image of the moon to flicker in my camera.
Perhaps I should had also waited for the moon to rise higher, but I had wanted to take advantage of the natural magnification of the atmosphere when the moon is closer on the horizon.
This is the edited result with my nikon P900
i.imgsafe.org/cb60270941.jpg
Eh, I am not a fan of your final result. It looks more a processed image than an natural image.
When it comes to Special Visual Effects in films, the best VFX are the one that the viewer does not notice.
Just my two cents.
And worth every penny. LOL. Fact is, the person watching can make the choice at any point to perform more or less contrast adjustment and sharpening. Once they know how, that result can fall anywhere on a Continuum from barely touched too heavily processed. I kind of thought that was probably obvious.