How To Make A Shaker Bedside Table

HTML-код
- Опубликовано: 7 окт 2024
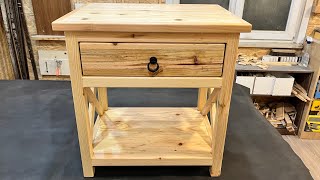
- In this video I show you how to build a Shaker style bedside table from Red Oak. These could also serve as end tables in a living space. I used mortise and tenon joinery as well as through dovetails for the drawer. Stained with Gunstock Oak and finished with shellac. They measured about 17"x17" and 16" tall.
Music was provided by Jason Dennie. Copyright
JasonDennie.com
Follow me @: / way_wood_working
/ waywoodworking
/ woodworkingway


Nice add with the little one. My baby daughter will be 40 in July. Her father's day card this year thanked me for all that I taught her. Your reward is coming over and over. Nice table too ;)
Thank you. I can never turn down bonding time!
I'm glad to hear! Honestly i really liked the overall look! It's good to know they will last a lifetime. Nice work 👍
Nice work! I made four similar of my own design in clear Fir and enjoyed watching your process. They are a nice addition to our home.
@deanp1823 thanks, it's satisfying to have furniture you invested so much time in as opposed to just buying them.
Beautiful work. Wish you still made things.
I appreciate that very much!
This just popped up in my feed. Glad it did. Well done, bud. They came out great!
Thank you!
Awesome Video, Gooo Detroit
Thanks for taking the time to video your work and post. I like the relaxed pace which you explain.
Thanks! I still love these tables
Just a little tip - volume down the music a bit, so we can hear you better :)
You're right! A definite learning curve to editing.
I'm sorry to see that you're no longer making content on youtube. That's a beautiful table and I liked the video.
Appreciate it! Life is strange sometimes. I moved on to other things but still have a few tools in the shop.
You have a great personal narrator voice. Very calming. Looking forward to trying a shaker project. - BTW in the video title you may have intended "Bedside". just sayin'
Thank you, I appreciate it! My thoughts are these tables could also be a side table near chairs or ends of couches so I didn't title it bedside. I do believe I added tags as such though. Thanks, good luck on your project!
You deserve more than only106 likes, Holy Moly !!! Beautiful Job...
Wow, thanks I appreciate it!
These turned out great man! I love the gunstock oak color. I havn't had much experience with wipe on shellac. I'm going to give it a shot because this looks really nice. Very precise and professional. Nice work!
Thanks! A good reference for a real good build up of a shellac finish is one of David Picciuto's old videos. I think he called it his favorite finish. I didn't put the effort he did. But, it dried quick and you can get a lot done in a short period of time. Take care!
You are the only woodworker on RUclips I have ever seen who uses the table saw correctly by turning the blade off after every single cut before removing the cut wood
I've had some boards kick back before. I respect the machine!
Good job, everyone does things differently, just do it your way and you'll be happy!!!
As long as the road leads to the results you're after! Sometimes I have no idea where the road is going but I just keep going.
Very nice looking tables.
Thank you! I lucked out i think. I had a table top size I wanted and a height but winged the rest.
@@WayWoodworking Came out great.
Im a little worried that there wasnt room for bottom shelf to expand. It may end up blowing that table apart. Otherwise really nice job!! It looks great
@russellmitchuk9105 I left an 8th inch at least in my notches across each set. I also didn't glue them in. It's been close to 5 years and they don't move at all! I think the wood stays really stable in an air conditioned environment. I was more worried about the top and everything's been good.
Dude! Those look great!
Thanks so much! I appreciate your support!!
we'd be able to hear you much better if you'd illuminate the background music or whatever that is. 2:05
Very nice video
Not cut corners and great quality
Just subbed
Thank you!
all your videos would be better without the music
disagree
Thanks for sharing. I'm in the process of building a very similar table and was looking for ideas of how to attach the shelf. Do you have any concerns about wood movement with the shelf fixed to the legs like that?
It's been a few years I believe with no issues. I never glued them in and left some room for seasonal movement. It appears to be a good method!
Very nice...congratulation.
Thank you!
Really nice! Great color.
Thank you! I love this stain on Oak.
Very nice job.
Thank you. Thanks for checking it out!
Would dowels be easier?
Dude! Outstanding job and that dtain is awesome, love the tables and keep up the good work, Happy Thanksgiving
Thank you, Happy Holidays
awsome dude!!!!
Thanks!
I know this is a long shot, but any chance you would have the blueprints for this nightstand?
No I made this from scratch without any drawings. I just made it to match the height of our bed. I could give you measurements if you'd like.
That would be awesome! And thank you for your time!
Top is 17.5" X 17.5"
Body is 16" x 16"
Drawer is 14.5" long by 13" wide
Shelf is 14" x 14" and is 6" from the floor.
Legs are tapered 5" from the bottom
do you have a plan with dimensions?
Sorry, I don't. The top is about 20" x 20" base it slightly smaller
Wow those are awesome !! How long does a project like this take
THANKS BUDDY! depends on how good you are with wood! 😁 Took me a long time but I'd say plan on a few weeks for sure.
Nice job!!! Do you worry about wood movement for the lower shelf with the snug fit? If not, why? Sorry, newbie woodworker!
I do actually! However, I did not glue those joints and my mortises that hold it in are a bit loose which will help. I think the wood stays quite dry in the house as well. So far so good! Thanks for watching!
Looks really great! Will you be building any coordinating pieces?
All in time, these took me a while to complete. Thank you so much!
I use stain. No problem. Oak stain makes your pine end table look good. I stain my pine too.
What's that? You put oaK stain to stain oaK to make your oaK look more like oaK? Oh, umm 🤔.
Nah I'm just making fun
Looks great man!
Stain can be a trigger for some people! I'm ok with it! Thanks for checking it out!
Did you glue the bottom shelf at the end of the assembly or not, nice job!
Thanks! No, free floating to allow for movement through the seasons. It's working out great!
Beautiful work! I noticed your brass corner braces at the very end which are for the small pieces you used pocket holes on. Were they for extra strength or do you think you could get by without them?
Sorry, never saw your text. Yes, the one pocket hole made it kind of spin in its place. So I just added those.
Nice work! Did you build these from a set of plans, and if so, where did you get the plans?
THANKS! No plans. I measured the space between our bed and the wall and the height of the bed to make them level. I just decided I wanted a 4" drawer and added and inch to the top and bottom giving me a 6" apron. I winged the hole job and got lucky!
How thick are the legs?
1.5" squared with a taper down to about 3/4" if I remember correctly.
Get rid of the music.
Too late, video is already made...
Really looks nice, great build. Not trying to be a safety Nazi, but if you ever saw a board fly out of a planer, you may want to reconsider having your daughter stand to the side next time.
Thanks, no I have never seen that. I guess power tools can be unpredictable though.
Do yourself a favor and ditch the crap music, but great video otherwise. Check out Jimmy deresta, he just narrates most everything
Thanks appreciate it... 🙏