Again, cool piece! I like the fact that its imperfect because it shows that its handmade. In this instance, if it had come out perfectly lined up it wouldn't be as lovely. It would feel too mass market machine made, there for not so beautiful! Great job!
Thank you, Jayson! I have to tell myself the same thing sometimes when pieces don't come out quite the way I'm expecting. Sometimes, there's beauty in the imperfections!
Hypnotic to look at, love it. Every time you start turning a new piece on the lathe I always worry about your wrist with the kickback. Obviously you know what your doing. Keep it up.
It's definitely rough (and my least favourite part) when you first start turning a piece that isn't round, but it's actually not too bad on your hands/wrists/joints. The cutting tool takes the brunt of it, and you mostly just feel the vibrations going up your arms. It also doesn't last too long, which is nice. I think I was able to get this piece fully round in about 10 minutes or so, and from then on, it's a much smoother experience.
The blank looked so snotty and gross when you took it out of the pressure pot that I laughed out loud, but trusted you to make it beautiful, and you did! 😍
What is the purpose of the pressure cooker? Does it eliminate bubbles? How long is it under pressure? For the full cure? Second question. How do you decide which finish to glaze the finished project? Really soothing to watch these videos. Thanks.
That’s one if I could afford it I would really love in my kitchen right in the center of my table! I just found your channel tonight and what work I have seen so far it is fantastic! You are a very skilled artist! Thank you very much for sharing
I was surprised to see that there was a problem with the bowl. It looks beautiful and a true craftsman can make the problems go away, good job. Anyone could do it if it all went as planed. Would it be possible for the resin to cure in the freezer or a refrigerator? That would be a more controlled environment if it would work.
Thank you! And that's a great question/suggestion! I've only come across two other channels on youtube that have tried casting resin in a freezer/refrigerator (for the same reason that I had problems with here; too much volume and curing too quickly), and they actually did have success with those castings. It's something I'm considering, because as you said, it would definitely lend better control and consistency to the process.
I'm looking to get a bowl saver in the future (it's a tool that carves out another bowl from a larger blank and helps reduce waste), but as of now, the shavings are tossed out.
A superb method of creating such a unique piece ... it's amazing to see the bowl transforming before your eyes as more and more material is removed, going from flat blocks on the sides to lovely and curvy ... superb 👍
@@morgancalvi6675 The boards I used weren't perfectly straight, nor were the cuts I made to turn the whole thing into a hexagon, so there were slight variations in the positions of the wood and the resin. I believe that created the variety of patterns (hopefully that answers your question :) )
Hi Joe! For the bottom, I used some foam core (a paper/foam poster board), and for the outside, I cut off a strip of plastic from this plastic poster board I got from Michael's craft store (in the section with the rest of their posters for things like school projects). I've also had leaking issues in the past, and in my experience, it's not so much the material you use but rather how dilligent you are with applying sealant. I typically just use hot glue, and in the past, I would seal up a mould in about 5-10 minutes and almost always get a leak somewhere. Now, I really take my time and go over every single crack, crevice, or joint and ensure everything is thoroughly sealed before pouring. Fingers crossed, but I haven't had a leak in quite some time now.
@@formanwoodworking thanks for the insight and encouragement. I’ve tried multiple different ways but I think I need to stick with one and be more patient and diligent with the sealant as you suggested. I seamed to have had better results with wood boxes and wood screws along with silicone. However, I’m trying to get used to circular forms so that I can make a bigger bowl. I lose a lot cutting off corners and epoxy isn’t cheap and you are limited to a 6-7” bowl. I’m a beginner and only been doing this since December.
@@joerowell300 I hear ya on the round forms! I was using mostly squares myself when I started out, and yeah, I was having the same problems. Losing a lot on the corners and it really limits the max bowl size you can turn
@@formanwoodworking I noticed at the beginning of the pour there was nothing in the center of the form but at the end it looked like you had inserted a round tube. If so what did you use and why. The dimensions of the wood helps a lot. Thanks for your info. I think I'm going to try it.
@@joemrowell Good eye! I was going to leave the center empty, but I knew I'd be turning that mostly down anyways, so I stuffed a paper towel cardboard roll (with one end taped shut) down the middle just to save me some resin


From Italy : only one word : INCREDIBLE !
WOW! UTTERLY BEAUTIFUL! SO COOL AND RELAXING TO WATCH!!
Again, cool piece! I like the fact that its imperfect because it shows that its handmade. In this instance, if it had come out perfectly lined up it wouldn't be as lovely. It would feel too mass market machine made, there for not so beautiful! Great job!
Thank you, Jayson! I have to tell myself the same thing sometimes when pieces don't come out quite the way I'm expecting. Sometimes, there's beauty in the imperfections!
Hypnotic to look at, love it.
Every time you start turning a new piece on the lathe I always worry about your wrist with the kickback. Obviously you know what your doing.
Keep it up.
It's definitely rough (and my least favourite part) when you first start turning a piece that isn't round, but it's actually not too bad on your hands/wrists/joints. The cutting tool takes the brunt of it, and you mostly just feel the vibrations going up your arms. It also doesn't last too long, which is nice. I think I was able to get this piece fully round in about 10 minutes or so, and from then on, it's a much smoother experience.
@@formanwoodworking I thought the hips take the brunt of it, no?
Very beautiful!
Always a joy watching what begins as a complete mystery to me evolve into something beautiful! Great craftsmanship fella.
The blank looked so snotty and gross when you took it out of the pressure pot that I laughed out loud, but trusted you to make it beautiful, and you did! 😍
Very cool bowl
What is the purpose of the pressure cooker? Does it eliminate bubbles? How long is it under pressure? For the full cure? Second question. How do you decide which finish to glaze the finished project? Really soothing to watch these videos. Thanks.
...pretty unique...and beautiful...👍
Matt
Вы архитектор своих изделий! Это прекрасно!
That’s one if I could afford it I would really love in my kitchen right in the center of my table! I just found your channel tonight and what work I have seen so far it is fantastic! You are a very skilled artist! Thank you very much for sharing
I love watching all the processes to make such beautiful items ❤
That is Beautiful
Love your work. So fresh and unique💜👍
Love your work,never stop thank you best regards Hans from denmark
Thank you, Hans! That's very kind of you to say. I'll do my best! :)
Wow, it is an amazing work.
What a beautiful bowl. Even though you are not satisfied with it, I am. Your work is simply amazing.
Thank you, Eileen!
Stunningly beautiful as usual. ✨💖
Wow it is magnificent and spectacular.
Uno più bello dell'altro, veramente, 💯💯💯💯💯💯💯💯👍👍👍👍👍👍👍
Excellent work! Thanks for sharing 👌
Awesome beauty! Thanks for sharing!!
I love it so much!
Beautiful
Very cleaver, you've earned my Subscription.
Thank you, Moe! Appreciate the support!
Hermoso trabajo 👏🏻👏🏻👏🏻🙌🏻
Amazing!!!!
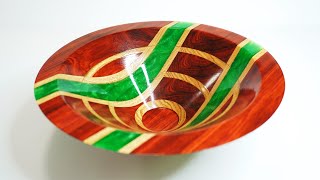
incredible! it looks a lot like a spider web which i think is pretty badass 🕸️ 🕸️🕸️
Excellent, wonder if you had visualized this before you started 😎
Looks great
Мастерски выполнено...БРАВО
Nice. Please also make Harry Potter wands.
I was surprised to see that there was a problem with the bowl. It looks beautiful and a true craftsman can make the problems go away, good job. Anyone could do it if it all went as planed. Would it be possible for the resin to cure in the freezer or a refrigerator? That would be a more controlled environment if it would work.
Thank you! And that's a great question/suggestion! I've only come across two other channels on youtube that have tried casting resin in a freezer/refrigerator (for the same reason that I had problems with here; too much volume and curing too quickly), and they actually did have success with those castings. It's something I'm considering, because as you said, it would definitely lend better control and consistency to the process.
Beautiful. What do you do with all the scrapped material? Can it be utilized for some other project?
I'm looking to get a bowl saver in the future (it's a tool that carves out another bowl from a larger blank and helps reduce waste), but as of now, the shavings are tossed out.
realer nice good job
A superb method of creating such a unique piece ... it's amazing to see the bowl transforming before your eyes as more and more material is removed, going from flat blocks on the sides to lovely and curvy ... superb 👍
아주 아주 좋아유~~~~~~~~
It's heart-breaking watching someone carve away all that resin that costs so much lol
Jolie pièce 👍
How did you do this at 6:14? Interesting...you hot glued handles? I have that same shop vac...well at least the top part.
Hi Morgan! My apologies, I'm not quite sure I understand your question. Are you sure it's at the 6:14 mark?
@@formanwoodworking how you got alternating patterns.
@@morgancalvi6675 The boards I used weren't perfectly straight, nor were the cuts I made to turn the whole thing into a hexagon, so there were slight variations in the positions of the wood and the resin. I believe that created the variety of patterns (hopefully that answers your question :) )
@@formanwoodworking oh, ok...I was just making sure there wasn't a pattern I was missing.
🥇
❤❤❤❤❤❤❤
Imperfect, it may be; but it's still beautiful. :)
Wahouuuu !!!!!
What kind of plastic did you use for the form and where did you get it? I've had a lot of problems with forms and them leaking. I need some advice.
Hi Joe! For the bottom, I used some foam core (a paper/foam poster board), and for the outside, I cut off a strip of plastic from this plastic poster board I got from Michael's craft store (in the section with the rest of their posters for things like school projects). I've also had leaking issues in the past, and in my experience, it's not so much the material you use but rather how dilligent you are with applying sealant. I typically just use hot glue, and in the past, I would seal up a mould in about 5-10 minutes and almost always get a leak somewhere. Now, I really take my time and go over every single crack, crevice, or joint and ensure everything is thoroughly sealed before pouring. Fingers crossed, but I haven't had a leak in quite some time now.
@@formanwoodworking thanks for the insight and encouragement. I’ve tried multiple different ways but I think I need to stick with one and be more patient and diligent with the sealant as you suggested. I seamed to have had better results with wood boxes and wood screws along with silicone. However, I’m trying to get used to circular forms so that I can make a bigger bowl. I lose a lot cutting off corners and epoxy isn’t cheap and you are limited to a 6-7” bowl. I’m a beginner and only been doing this since December.
@@joerowell300 I hear ya on the round forms! I was using mostly squares myself when I started out, and yeah, I was having the same problems. Losing a lot on the corners and it really limits the max bowl size you can turn
@@formanwoodworking Some final questions about the wood. You said it is poplar but would you share the dimensions of the wood?
You should call this the spider bowl!
Very different
This even beats the blue bamboo bowl.
@Forman_Woodworking f u
What did you use for the finish??
Waterlox's Original VOC Compliant varnish: waterlox.com/originalvoc/
Can we have soups in this bowl
will you share the size of the wood used?
Hi Joe! The planks I used were 1/4" thick, 5.5" wide, and I cut them down to 2 feet in length before making the blank. Hope that helps!
@@formanwoodworking I noticed at the beginning of the pour there was nothing in the center of the form but at the end it looked like you had inserted a round tube. If so what did you use and why. The dimensions of the wood helps a lot. Thanks for your info. I think I'm going to try it.
@@joemrowell Good eye! I was going to leave the center empty, but I knew I'd be turning that mostly down anyways, so I stuffed a paper towel cardboard roll (with one end taped shut) down the middle just to save me some resin
Is this hexagon bowl for sale?
Hi Judy! And it will be in the next week or two when we get our online store launched, so check back here for updates!
@@formanwoodworking I will be sure too. Thank you.
👍Beautiful!👏👏👏 Bye😊
Really sorry , this one i didn't like it...but loved the way you work.🫡
Beautiful