Building a Simple Fence Gate with No Digging

HTML-код
- Опубликовано: 30 мар 2023
- This video shows how to build a simple and (hopefully) easy fence gate without any digging. Using lightweight pressure-treated lumber and welded wire (or chicken wire), this gate should hold up to moderate use and weather for many years. Step by step instructions on basic construction and some optional bells and whistles.
Shopping list:
Wood to wood Post Spike - www.lowes.com/pd/Simpson-Stro...
4 inch Strap Hinge - www.lowes.com/pd/National-Har...
Zinc Gate Hinge - www.lowes.com/pd/National-Har...
1 & 1/4 Exterior Wood Screws - www.lowes.com/pd/Fas-n-Tite-8...
5 inch Corner Brace - www.lowes.com/pd/ReliaBilt-RB...
Poultry Net Staples - www.lowes.com/pd/Grip-Rite-3-...
2 inch Lag Screws - www.lowes.com/pd/Hillman-3-8-...
Exterior Wood Glue - www.lowes.com/pd/Titebond-Bro...
Galvanized Exterior Nails - www.lowes.com/pd/Grip-Rite-2-...
Oak Dowel Pins - www.lowes.com/pd/Madison-Mill...
Dowel Kit - www.amazon.com/General-Tools-...
Follow me on Instagram: / building_with_blake
Check out this video for a simple fence build: • How to Install a Welde...
Video of the double gate coming soon. When it's ready, it will be linked HERE.  Хобби
Хобби


Thanks so much, I’ve made this gate and as a 60yr old female I’m pretty proud of myself 😂 Thanks for telling all the important info without waffling and showing each step carefully. Best videos out there 👍
Okay. You have inspired me. I watched the video with my jaw on the floor... I made it to 67 (easy as a female, as you no doubt know!) without learning how to do any of this stuff. His videos are amazing.
@gizzygirl2022
You’ve inspired me too… I’ve been waiting on help to build a fence
With these materials already purchased
it is driving me crazy I’ve got way too much plants and starter pots and it’s late in the planting season.
This guy made it very easy to understand, and the 60+year-old “females” women that are building them themselves inspires me to do it myself.🎉😅
And I’m much younger!
Well done Video instructor, and ladies!
This video is exactly what I have been looking for. Thanks for being thorough and showing us everything in detail, but not long winded or making it too long! Appreciate you!
Thank you this could not have come at a better time! We are taking on your fence project and had no idea what to do about the gate
Thank you for your video and great instructions. I need to build a gate for under our porch to keep out critters. The heavy lumber I was looking at was too much for me to handle at my age (71). The spikes will work better and the gate is lighter. My dad was a finish carpenter and I prayed to him for help. I know he led me to your video. Bless you for taking time to make this video. My prayers were answered. By the way, your work shop is so nicely organized. My dad’s was too.
Thank you. We just purchased a house on 4 acres and need a temporary solution to keep our dogs in. This video gave me some great ideas!
Giving your directions a go twice, two sides of the house. Appreciate your directions, list of items and your video was the perfect length. I'll let you know how it comes out...thanks.
Thank you for making this video!! We have 5 boys and 3 dogs. The newest puppy being 8 weeks. Ive been wanti g to put a fence in our front yard with 4' welded wire. You just saved me about $100 and a lot of headache to make a gate! I watched your other video on how to put the fence up. You got a new subscriber!!
thanks for subscribing!
Thanks so much for this video. I’m a suburban mom who never made anything like this before 😂 and I was able to follow along and build my own garden gate!! I’m so pleased with how it turned out!
Awesome!! So glad to hear it.
That looks great! I’m going to build this for my daughters house! They need something easy like this. THANKS
Thanks for the great video--detailed, thorough, and straightforward. You're a fantastic teacher❣
Awesome video and perfectly timed! Thank you so much for the help. Truly appreciated
Excellent, I really appreciate your attention to and explanation of the details. Thanks!
I'm so grateful to have run across your video. ❤ ur teaching style the most.. very clear and explain why you're doing whatever it is that you're doing. I learned so much from this.. esp holding the u shaped nails 😊 I'm feeling more confident as a senior DIYer to try to tackle this project. Thank you for all that you share. ~Kaitlyn
This is exactly the gate we'll build thanks to you. Putting up the fence with 4 x 4" posts, T-posts, and fencing wire will be easy; we did it before, but it was a worry as to how to build simple, light-weight gate. Then *BINGO* we found this video! We only have to keep in 5 cats and a Chihuahua, so we don't need a heavy duty gate.
We did wonder why you didn't add a third cross brace at the bottom of your gate so as to attach that other hinge, seemingly giving your gate a bit more strength. It actually convinced us that we'll use three hinges, not just two, and because we're using 4 x 4" posts, we don't have to worry about those metal anchors...there won't be any. We'll cement our posts in the ground and have a gas auger to dig the holes.
Thanks for your help!
You’ve inspired me to build this myself. I have all the materials already and I’ve been waiting on help. Thanks for the video.
Your videos have blessed our family! Needed a temporary dog fence for back yard and needed gates to access yard and riding lawn mower into yard so this smaller gate video and your double gate video has completely changed our world! We are very happy! Thanks so much for taking the time and step by step instructions and shopping list have helped so much !! Be blessed!
Thanks for sharing. Glad they were helpful
Thank you so so much!! You made this so simple to follow!
Great video! Thank you for sharing.
Thanks for sharing. I'll be building two gates soon!
Thank you , thank you, thank you! This is perfect for someone like me who is bit less than handy. Not to mention I need a gate that's an odd width, so this allows me to get just the right length. Cheers! Keep up the good work! It's much appreciated.
Omg. Could you just build this for me? Your work is such perfection.
This was so helpful, but the best part is that I have two of those same huge nails and have no idea where they came from. Like you, I use them a lot for marking spots in the garden!
Nice video will be doing the fence and gate the way you did for a 15tf x 10ft for my dog
Planning to build a like fence on my property, and your video was an excellent tutorial! Thanks well done from start to finish!
Thanks so much for the tips !! It was very helpful ! Be well !
Great video man, really.
Hey, man - It's good to see you're on the mend after all of those punches life threw at you. Thanks for the content and I hope you and yours are well.
getting there, thanks!
Thanks for this! I want to use the same wiring you have here to build a fence for my chicken run. I wanted to have a gate and this is exactly what I needed. First time visiting your page, but definitely subscribing! Thanks again!!
Thanks!!
Great work, will be trying soon, thanks!
Nicely produced video, and very thorough. Thank you
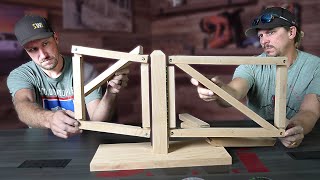
Over the years I've found that simple lap joints work really nicely for projects like this. I glue them up generously with epoxy, clamp them square on a flat surface, then later chisel and sand off any squeezeout. These are strong clean joints, and any reinforcing hardware goes on afterward, so there's no concern for alignment or throwing the joints out of square during drilling and assembly.
I used to think, oh no, that's too much joinery, I'm not doing cabinetwork here. But they don't take much time compared to the overall project, and it's pleasant work besides. It's just a few saw cuts to the desired depth, a rough pass with the chisel to remove stock, and a final pass or two to bring the face down to the line. Thickened epoxy fills any irregularities and makes the joint extremely strong.
Once the joints are dressed, I'll often put a bevel or cove cutter on my small router and make a pass around the interior of the frame. It's a foolproof way to get a sharper, more finished look on the piece, even with rough lumber. For very little work, it ups the game significantly.
I did a heavier fence with lap joints and agree with you they are excellent. I wanted to try something different with this and they worked out fine but when I’m doubt it’s hard to go wrong with half laps.
Really nice details Thanks for sharing
Looks great!
You made. That look. So easy
There are some handy tools out there to help with dowling. Mine is basically set of metal plugs with a centerpoint. Drill the holes on one piece, install the right diameter plug and line the pieces up. A couple of taps and you have perfectly located dowel holes! Great video!!
Which is what he used to attached the cap pieces. 🙄 Did you miss that part?
Love this video. I'm probably going to make a ton of these. I have a cattle gate I'm currently using that I found in the brush on my property. The cattle gate is bent and to make matters worse, the T-post I set next to it is crooked. The gate is being held shut with chains, but it is really annoying to open and close. You have to chain it just right or my goats and puppies will soon be screaming for attention from my front porch instead of in the yard where they belong. To make matters worse, my daughter loves being in the yard, but she is autistic and has dexterity issues. Every time she tries to close my bent cattle gate, the goats or puppies escape. This type of gate will probably be a lot easier for her to use.
I'll keep my cattle gate, but if I put one of these near the entrance, I'll only need to use the cattle gate for my riding mower.
I already have the wood and welded wire in my yard. I might even have some of the hardware too if I check my tool room.
I might have to add a small hook latch on the bottom of each side because I have a few fence challengers in my yard that I'm sure will press the bottom of the gate warping it over time.
I'd also recommend using the metal snips to cut the fencing instead of a saw, but that's my preference. Not sure about curling the ends, I usually just try to cut close to the weld. Hammering in the points is genius though.
I'll probably make a bunch of these for my internal garden sections where I plan on growing watermelons, pumpkins, and wildflowers. I won't need the extra hook latches at the bottom though on those, just the entry gates I plan on making. I recently fenced in 2.5 acres and it will be nice to have more than entry gate especially since my yard is long and narrow instead of square.
I also love the idea of using those other pieces of wood to keep things even while installing the hardware.
Thanks man!
Thank you so much
I am in the process of making two of these gates. Man issue is one of my spikes for the posts got a bit twisted in my heavy clay. Otherwise a really helpful video and easy design.
Thanks for sharing!👏🏽👏🏽👏🏽👏🏽
Nice job for a quick & dirty simple gate. I think I would have put the latch down to the next cross piece.
That would be sturdier but harder to reach from the opposite side.
I will use some of your ideas. Thanks! But I will put my posts in first before making the gate frame.
That will avoid you having to reset any posts. Will you use the spikes or dig?
Very helpful if one knows how to use the directions and the needed parts. Can you recommend anyone? Thanks
I’m working on my fence this week using this method. Thanks for sharing. ALSO - you sound exactly like Rob Lowe 😅
That is literally the first time I've ever had that comparison. Thanks for watching. Hope your project goes well!
@@BuildingWithBlake 😂 I can’t tell if you’re kidding or not because I listen to Rob’s podcast called “literally”. I’m half way done with the fence and just built the gate!
Just a shoutout to Parks & Rec. He was great in that show and in his new Netflix show, but I have never been compared to him. I've gotten John Krazinski once or twice.
Dang! You obviously don't live on solid rock like we do. I'd have to use a jackhammer to install those spikes. But the gate itself looks good!
Might sound silly, but for a vegetable/flower garden WORK purposes, could just sand/grind the base of those two posts to where they slide in and out of those spikes easily.
Then, slide a single bolt through each base to keep them steady. Make a door that's a solid panel. Then when you go in or out of the garden, you just pull the entire door up out of the "sockets" of the spikes and set it aside. Heck of a lot more room to get in and out of the garden to work/haul/wheelbarrow materials, etc.
That could work if you only need occasional access. The spikes already have a fair amount of play, so they could probably be used as is.
What is the dealt miter saw as looks like a nice model
Any tips for getting the scrap pieces of 4x4 out of the spike collars? They’re really wedged in there from driving in the spikes 😅
Still holding up? Just curious on the actual gate part since it’s 2 x 2s. Bought material and decided to research some and found your video. Very similar idea but slight differences. Looks good though. Curious on if the 2 x 2s are sagging at all. Thanks.
An alternative for your corners that are stronger and in many ways simpler is a half lap joint.
Check out my other gate video with half laps. Those are a little trickier to make.
Checked out my own half laps. Been there. Done that. Speaking from experience.
How would you stop the gate from shaking when you close it at the start of the video? I'm thinking magnets mounted into the bottom of the gate and posts that attract so the bottom is more stiff without additional latching hardware.
Thanks for the build advice and great detailed video. Only problems I ran into is I had to dig anyway because the Arizona soil made the E-Z spike start to buckle and I was splitting several blocks tying to drive that thing down into the clay. Also the hardware listed for the E-Z spike is too big and will not fit into the hole. Need 1/4 and not 3/8
The spikes are pretty big so they’re not going to split any rocks. Maybe try after a good rain if you ever get one. Or instead of spikes maybe try some rebar. Leave it stick out of the ground a foot or two and then bolt your posts to it.
Yes! I wish I had seen this before buying the too-big size of bolts. I found that they can be used with the larger holes in the spike because the heads of the bolts were big enough to hold.
When placing the gate into the fenceline , did you just center it on a post, remove the post and cut accordingly? Thanks
Are those spikes still holding strong after a year? Does the gate sag without a diagonal support? I'm curious how this is holding up.
Nice video. Thank you. You should have diagonal bracing rather than two horizontal pieces in the middle. The diagonal bracing should be at 45⁰ angles or greater with the lower end on the hinge side. The gate will last far longer if you do this.
I just saw your video on larger gates. You obviously know what i said above. Sorry.
Maybe set your post first, then build the door. This way stressing the gap distance in minimal as you can do an exact measurement of how wide to cut your door width
I have two big dogs that I know are going to jump up on the gate. Do you have an option to make a little stronger gate? Maybe 2x4 instead of 2x2? Not sure if that would work?
Wonder how wide you can stretch that gate door. Since it's only wire and the frame is so light.
We tore down our garage leaving 2 open sides to our fenced in yard. While we wait for permits and build a new garage do you think those no dig posts would work for a 10 ft stretch of fence vs a gate? Using something similar like the 2x2 frame and wire as the fence between posts
They would work for a fence but probably overkill if it’s just a few weeks. I have a wire fence video as well with U posts that are easier to install. How to Install a Welded Wire Fence the Fast & Easy way with Elevation Changes, No Digging
ruclips.net/video/ttYtTEsQXOU/видео.html
Great video! ? 4 u, is your gate wide enough to fit a walk behind mower through?
Yes. My mower is 22 inches wide, pretty standard. So the gate is just right. Check out my insta page @building_with_blake for photos.
Thanks for posting this. I'm having trouble getting the lag bolts flush and can't figure out why. They stop with about a half inch sticking out and won't tighten in flush. Any ideas?
This is on the collar of the spike? Are you drilling pilot holes? The bolts might be running into each other. They should be staggered but if they’re off a bit they will intersect. Try inserting a nail and see if you hit the bolt. If not you might just need to drill a deeper pilot hole.
Yes, I drilled pilot holes. I'll try the nail method and try a deeper pilot hole. Thanks
I saw your other video on how to use the wire fencing to build a fence. What was the saw that you were using to cut the Fencing mesh? Doing it manually is not my happy place. I lack upper body strength.
It was an angle grinder. You can pick one up at pretty much ent hardware store.
I live in Florida, and we have pretty sandy soil here. Would these spikes still work here?
❤
LIKE!
Seriously having trouble getting the short block out of spike once it’s in the ground. Any tips??
I saw someone else had that question too; read down the comments a little farther and you might find your answer.
Does anyone have tips on removing the 1 foot 4x4 from the Simpson strong tie? After using the 1 foot piece of 4x4 to hammer the Simpson strong tie into the ground... I can't get the 1 foot piece out of the strong tie, and of course i need to remove it in order to put the longer permanent 4x4 into place. Otherwise it's all going according to plan. Yay. Thx!
Tap the 4x4 on the sides near the top to loosen it.
This was BRUTAL for us!
TLDR PRO-TIP: Fill that spike sleeve with some gravel, or something that will prevent the sacrificial wood from becoming one with the X-shaped metal at the bottom of the sleeve before hammering the wood to sink the spike. That way, wood and whatever buffer material should come out easy peasy. Or better yet, do this >>>>>>>>>
Also, I HIGHLY recommend that if there is any struggle to put the 4x4 sacrificial wood into the spike, that you stop and slice some off. We wiggled-forced our 4x4 sacrificial wood into the spike sleeve. The issue turned out to be the X made of metal inside the bottom of the spike. The wood sunk around it and that was all she wrote!
Also, be sure to leave plenty of wood sticking out to give you leverage. Two of us spent over an hour, prying, hammering, drilling through and inserting rebar to pull and attempt to get it out with leverage, drilled out the perimeter to make it like swiss cheese, etc etc.. nothing worked until we split the 4x4 into chunks with a chisel.
Also having a tough time getting the sacrificial wood out of the spike once in the ground 😅😫
Could you build it a little bit bigger…. Like 4-5 foot wide?
I think 4ft would be safe. Wider than that you would probably want 2 doors.
I'll take diggin' any day! Thanks, though.
How far do the posts need to be apart from each other?
Mine were 31 inches apart. You could do more or less depending on the size opening you need.
How far apart are your posts around the whole fence? 🙂
6ft How to Install a Welded Wire Fence the Fast & Easy way with Elevation Changes, No Digging
ruclips.net/video/ttYtTEsQXOU/видео.html
How much did this cost you to build?
I think I spent about $120. The most expensive part was the spikes.
What’s the grey shirt your wearing?
It’s made by Levi’s. Fleece line and very warm. That’s the first time I’ve been asked a clothing question!
🎉🎉🎉🎉❤❤❤
Dowels to hard for me. But the rest I'll try
I would so do this if I had a saw :/
I checked Lowes and those spikes were $40 each!
I'd rather dig a hole!! LoL
That’s fair.
Oh no ,too complicated 😢
You can skip the corner dowels. Just use brackets and it's pretty easy.
Neat idea. But I bet you spent $100 or more on the gate materials. Cool project for a carpenter though
Clamps level to post being driven into ground and hammers on it. 😂🫣