DIY Macro Keyboard - Raspberry Pi Pico (Affordable & Awesome!)

HTML-код
- Опубликовано: 23 июл 2023
- Thanks JLCPCB who kindly provided the PCB:
JLC Free 6-8 Layer PCBs via Coupon(50*50mm): jlcpcb.com/?from=NerdCave
Get more Coupons: jlcpcb.com/coupon-center
Sign up using:
jlcpcb.com/?from=NerdCave
This will be no extra cost to you and will help support the channel.
It has been a whole year but finally a new version of the Macro Keyboard using the Raspberry Pi Pico is done
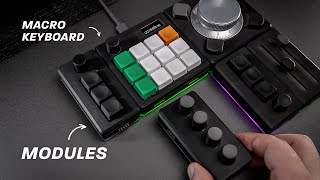
The macrokeyboard has 12 programmable keys and two rotary encoders with 2 programmable push buttonswhich is , all customizable to fit your unique needs. The addition of the SSD1306 OLED display ensures you have a clear view of your current mode or software macros at a glance. Plus, the dedicated side button makes switching between modes a breeze!
I am making a course on this so whether you're a beginner or an experienced maker, Get ready to become a Macro Keyboard expert, or atleast know a bit more.
🔗 For all the files mentioned in this video visit at nerdcave.xyz/docs/projects/ma...
💬 Don't miss out on any updates! Subscribe to our channel and hit the notification bell 🔔 to be the first to know when the course launches. I can't wait to share this amazing journey with you and build a fantastic community of creators and learners together!  Наука
Наука


![Remble - Colors (ft. Mozzy & Stoneda5th) [Official Music Video]](http://i.ytimg.com/vi/KF-3AU9g9xg/mqdefault.jpg)

Leave a like for FLOKI - and remember to subscribe if you want a full loooong course on how to create your own custom macro keyboard.
Thank you for the video. I took this idea in a completely different direction. I provide IT support for a small office. The receptionist has confidential information up on her computer screen quite frequently as part of her normal tasks. The reception desk wraps around so customers can (and often do) position themselves so they can see the screen. They tried a privacy filter, but everyone in the office absolutely hated it. This project helped me make a "panic button" for her, which hides what she's working on and the information that should be protected. It only takes one simple action to hide the screen and an equally simple action to restore her workspace.
I know I could do it better, but I did it in one evening and it does exactly what she needs. When she turns on her Windows 10 PC, she opens a second desktop (Windows + Ctrl + D). She returns to the first and does all of her work on it - the second is there but basically invisible and completely out of her way. I connected two capacitive touch sensors (30 cents each) to the pico. One (the "panic button") is attached on the right edge of her keyboard tray and the other (the restore button) is attached to the right back top of the keyboard tray. Both sensors are in a place she never accidentally touches. When someone comes up and can see the screen, she simply brings her hand to the edge of the keyboard tray. That activates the panic button and the second unused desktop is brought to the foreground. When the person leaves the desk area, she touches the restore button and her screen returns to exactly the same state it was in before. It's a simple "Windows + left control + left arrow" for panic and "Windows + left control + right arrow" for restore. This is faster to hide and restore than locking the screen, it doesn't require finding a remapped F7 button (for example) on the keyboard, mounting a couple of physical buttons that are awkward to find and doesn't rearrange anything on either desktop. The USB cable to the PC and the wires to the two capacitive sensors are all hidden under the desk. Interestingly, the most expensive part of this is the USB cable itself.
Of course, this is a perfect tool for a kid to hide what he's _really_ doing on the computer when he should be doing homework, but I make stuff for good, not evil. ;-)
You are welcome, If you have a second desktop running does take up a lot of resources for example extra ram / cpu when you switch between the two, or it is only basically a second desktop and not different user that you need to sign out
@@NerdCaveYT Second desktop, same user. As far as I'm aware, this strategy uses very little RAM while still providing single-action "protection" since the second desktop is simply an organizational tool, which provides no additional access or capabilities. I haven't discovered a solution that uses less RAM and requires so little pre-planning.
Thank you so much for making this and making a written version!
My pleasure!
Awesome video, awesome intro ❤
I made my own version with cherry mx switches. Thx for the work you put in to the code. 😊
No problem 👍 the code does need some work still but for now I think it does what it needs to
@@NerdCaveYT ATM it does what I want. Keep up the work. 👍
Nice project. Thanks for posting!
Thank you for watching
You've got some pretty cool projects Mr Cave. I gotta try one out some day.
Thank you, I am trying to make more but procrastination is awful
Excellent job! Thanks for sharing
Thanks for watching, I am planning to do a more detailed video once I have free time, but got a new puppy so been putting this channel to the side.
@@NerdCaveYTsure, family is always the first 😂 enjoy and thanks again!
Great project! I love that its made in python and that the code is somewhat easily readable for people to understand (i understand because i am a hobbyist programmer), would deffinitly give it a try and maybe tweak it to my taste.
I like using micropython, and also use it in the classroom to teach students about microcontrollers, my first experience with microcontrollers was using assembly
keep it up man!
Thanks, will do!
got my board ordered
great, but I am actually doing a follow up video soon on this, I think most people probably prefer normal keys then these push buttons I used.
Awesome waiting on the update with Cherry MX Switches
hopefully soon I moved again, should stop moving around so much hopefully now once I unpacked can be making videos nonstop
New and improved. Now with 2 knobs.
and more modes XD the previous one could not change modes so that is the game changer right there ;)
@@NerdCaveYT its a great setup and the code looks good and easy to modify.
Im a KMK fan. Its even easier to modify, but sadly I haven't gotten any OLED to work like your project (which is really cool)
I struggled for a week trying to implement modes into my own macro keyboard. Banging my head up against the wall last year. This last week I have found two people who implemented it the exact same way including handling it with custom files for each mode. Now I'm feeling pretty damn stupid! 🤣😅
Great video and you taught an old man a new trick!
Thank you, It took my a while as well to implement it, I am not super great at coding so asking coding friends and chatgpt helped me to get it working
@@NerdCaveYT Well, the way you implemented it was very professional. So be proud of what you did! It was a damn fine job. I subscribed too.
Videos are looking more and more polished. Good job.
Thank you, to be honest I was very self conscious and keep trying to create this professional studio and setup and hated to be infront of the camera, but then I just thought one day "screw it" I want to just be myself show my goofy dog and make videos and projects I enjoy and share it and hopefully it helps other people.
bro your videos are sooo good.
i saw (kinda) all of your videos about this macro things you do
and i have a question.
can you do a next level video and make a simple application for this keyboard???
it's gonna be so damn good if you can make that
Hello thank you, what do you mean in terms of application, because you can program this to be used with any software you want to use it for. So if you are doing for example photoshop and have specific macros you can just code it or do you mean something else?
@@NerdCaveYT no no, i mean a application that is .exe and when you open it you can change the macro of each key in the app with out any coding
i love doing codes but i think that be so much cooler,
and i know it's kinda hard but we need it too be simple at first you know
@@poisontoon-ytyou could always get some self locking push buttons and then code it to where if that buttons is pushed then they'll do that code and each locking push button can be for a certain application
@@ITSYEBOISteven thanks
for a project like this to get better open source support you gotta make a deal with some manufacturer and start selling this stuff. I'd gladly buy one to use just because of the flexibity it provides in software, but I have no time to make my own.
I understand completely it is an effort to source all the components etc. I am actually looking at creating a store on gumroad or something where I can sell kits of the projects I make. Still figuring out the process of it all.
hello, first i need to tell you that your work its awesome.
and last, i have a question, how can you bind a custom key in the code (like f20) for keyboard buttons in programs.
let me expalin,i have severeal keys for my keyboard assigned for specific stuff in premiere, but i dotn want to use the "a" key, i want to use a key that not phisically exist that i can put in the macrokeypad to bind it
thanks for all your videos, im a junnior programer and i think this is very usefull
Hi you are welcome, I am not sure if it is possible the library goes up to F12 - docs.circuitpython.org/projects/hid/en/latest/_modules/adafruit_hid/keycode.html
but if you can do something like ctrl or alt plus a key as a shortcut / macro then it should be possible to assign more shortcuts keys then possible on a normal keyboard
The video is very good. Do you believe it is viable to use a board with buttons connected in a matrix to expand the inputs? Thank you very much
yes, you can definitely do that, my last video on the super cheap macro keyboard I used a keypad that is in a matrix and the code on that video how you would do it, if you are making your own matrix I would say include diodes to avoid the ghosting effect
@@NerdCaveYT i already made the board with diodes. You learn the hard way to use diodes when you build your first matrix. Thank you very much, I will download and analyze the codes. Thank you very much
Great vid man. I just have one question, how would I use an L2C display where the oled display is?
Thank you, I have a video on it: ruclips.net/video/Unfr-vbTpkU/видео.html
it is a bit old but good starting point
please make a video about connecting WIFI module to the pico pi
You mean the Pico W? There is the pico W with a wifi module and bluetooth
@@NerdCaveYT no. I have i regular pico pi and i have bought a wifi module to connect to it but i couldn't do it.
Can you do a version with QMK and Vial? With layers too
I will look into it, someone asked QMK before I think there is support for the RP2040 few years ago there wasn't any.
define the loop variable at the top of the code
You mean for the rotary encoder? or which one
Amazing. Is there a possibility to add mouse into the code. Like middle click, left, right? Thanks
Hello, yes there is a mouse library -> docs.circuitpython.org/projects/hid/en/latest/api.html#adafruit_hid.mouse.Mouse which will allow you to do left right middle or even use a joystick to move mouse around
Thanks. I've found the library but I couldn't get it work. All sorted now. 👍@@NerdCaveYT
hello! me again...
I like your implementation and it fits almost perfectly to what I want to do.
I want to add 2 ports for Atari Joysticks.
I plan to use mechanical keyboard switches (9 keys). So, from your configuration, I would have to remove 3 buttons... 1 click of one encoder and the led strip, in order to have enough gpios available for the 10 atari Joystick port cables.
According to what I understood, soon you will make another video using key switches instead of buttons like in this one... Could you help me by creating a configuration similar to the one I mentioned above (my setup) mainly for the pcb, since I don't know how to design it accordingly to my needs.
The modified code would also work for me, although I know something about Python (thanks to you), so there wouldn't be a problem if you don't implement the atari Joysticks ports, for example.
The most critical thing for me would be the PCB, especially the part of the distribution, centered, of the keys.
I understand if you can't do it, as it's a very specific personal request, which might not suit general users.
I thank you in advance for your help and I congratulate you for your videos, which are very interesting, clear and useful!!
Greetings from Chile..
Un saludo para Floki!!
Would it be possible that you can send me a link of the Atari joystick or part number so I can read a bit more about it on how it works, since you want to add two of them are you planning on building a multiplayer controller box or something. If you are able to send me sketch or something that would be useful. Here is my discord community link discord.gg/BWerHKKVZF it would be better to talk there under the project chat help
great project
i could not find the gerber file to sent to pcbway on your website, am i missing it?
Thank you, I see now I didn't link to it - github.com/Guitarman9119/Raspberry-Pi-Pico-/tree/main/MacroKeyboard%20Budget%20Version here is the github article showing you how to send it to JLCPCB ;)
yööööööö, so schön hünd
Thank you, he is super awesome
Sorry for my question, but i didn't find any file, for printing case and file to get pcb, where i can find it ?
My apologies I just saw the links are not on my site will update in the meantime here you can download the PCB and STL github.com/Guitarman9119/Raspberry-Pi-Pico-/tree/main/MacroKeyboard%20Budget%20Version
Instead of hard coding the number of elements for the dictionary in the code, could you not simply get the length of the dictionary?
I could have done that yes, do you mean the section where I check which mode is active
@NerdCaveYT yeah that way you only have to enter the mode name into the dictionary.
@@TheTitaniumBunker Thank you will update the code
This is very cool, but way better to just buy a used stream deck off of facebook marketplace or something 😆
if you can get it for very cheap and more cost effective then this project then it won't be bad idea. Can the stream deck allow you to create any custom macros and operate as keyboard input?
Choose any [s]haft length if mode > len(mode_names) removes the need for a *magic number*
Did I do something wrong? Been coding so long on this I hope I didn't make a mistake - but well done for watching the code section that is the part everyone skips
@@NerdCaveYT Your code works 💯 but my short Python example improves it (a little) by removing the need to update the _number_ on that line (it prevents errors and reduces work)
Great will update it