Nice DIY. I like the idea of the negative switching, and you are correct, it is safer. One suggestions- I typically don't run my grounds to chassis. I've been running a separate negative from the battery to a ground bar and then home running my ground to the bar. More reliable than the chassis. In your design it would just mean one more wire thru the fire wall to your switch bank, and since it's only powering relays, it down't have to be a large gauge wire. Aside from the negative switching, I have a similar design on my Jeep for lighting & compressor circuits. Works well. Safe Travels and God Bless!
Gm started doing tons of this with the c5 Corvette since the amount of ecu control and relocating half the drive train to the rear end most the signals are sent with negative switching.
Also many people may argue this one but switches on negative side arcs less. To prove this pull the negative side of the battery then reconnect then try the positive side. You will notice alot less arcing. I have also tried experimenting with switches on a positive side versus the negative side and checked the contact points after a ton of switches accomplished by a sailing servo. The negative side has alot less arcing. Keep up the good work. Truck still needs a diesel and your hair is still on point (by the way that means it looks good in military).
Thanks for the videos. I have been considering building a block like this, I'm just really cautious with electrical so I have spent more time watching videos than doing. I like the combination in the three videos.
Your wiring is a thing of beauty!! I always said about switch pro type technologies is putting too much faith in a stand alone unit. I'm glad other people believe the same thing. Love the videos. Keep on keepin on.
Nice video, love the message about leaving the place better than you found it. We are 1 year on the round in East Africa and some places are so full of thrash.
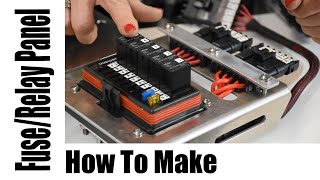
Excellent video. Building a serviceable relay / fuse block like this seems be be a much better option than spending several hundred dollars on a fancy name brand unit that can't be repaired out on the trail.
marine grade heat shrink tubing also have a glue/sealant that also helps with protecting the wires. Really nice to see wiring done right, and with thoughts about how it should be done. Best point was early on about the fuse being smaller than the amp load of the wire so that the fuse(something designed to fail) fails and not the wire, when wires fail fires often start. I used to be a sparky, so using the torch while it works is not the best idea, a heat gun is so much better, with torches you can crack and cause the heatshrink to be brittle.
Thanks for making this video. Very well done. There is one thing that is confusing me though which is the white wire on the relay. You said it goes to + 12 volts and that's where I get lost. Based off the diagram, it looks like the red and while wires are spliced together going to the fuse box but you don't show that in the video. Could you please clarify how you use the white wire?
Both the RED wire and the WHITE wire need to be powered, preferably with fuses for safety. Looks like he will be adding the WHITE wires to the opposite side of the Fuse Block, based on how he labelled them at least. This just an assumption though
Thanks for the video.I have a high- end car audio system (running around 5000 watts, and I have a mess of relays and fuses that I need to clean up. Very thorough info. Thanks again.
I'm confused about the white wire, so it is also going to the battery, but isn't fused? How did you join all of those white wires together and connect them to the battery? did you make this connection without a breaker? If you can share a diagram, that would be amazing!!
Wonderfully clean wiring set up. I wonder why you did not use marine grade wire as it has better insulation and more strands per gauge so it is able to carry greater loads ( redundant overload protection). Also I would suggest marine relays as they are better for possibly wet environments. They also do better handling dirt and grime. I am in the process (when I get back to the states) of rewiring my Suburban and will be using as much marine wire, connectors, relays, and junction blocks as I can get so I do not have any problem with possible shorting. I will also use through bulkhead connectors to run the wiring in order to support and protect the wiring.
I am just blown away totally by the gorgeous workmanship and ground trigger arrangement. I have repeatedly looked at the video, especially of the diagram and your immediate explanation around it. However your final summary immediately after explanation got the better of me. The diagram shows the white wire from terminal 86 going to the positive of the battery and the black from 85 going to the switch ground. But you might have referred to exactly the opposite setup when summarizing. I am now confused, as I thought the negative trigger would mean that 85 would go to the switch and from switch to ground. And 86 and 30 going to the same source or 86 going to some other 12V source that's on when ignition is on (engine off). Please clarify. 🙏🙏🙏🙏🙏
HI Vineet, I believe you have this correct. 30 is Battery Positive. 86 is Positive (or ignition positive as appropriate), Black is the relay switch (trigger) ground. Blue or 87 goes to the device (pos). I hope I didn't get it wrong in the summary - I did re-watch and it sounded right. Feel free to PM me on our forums www.overlandbound.com/forums (I'm Michael)
I'm just a mechanical engineer so I'm not 100% sure but I think that negative switch is actually hot until you switch it. I would have to know some more about how the internals of a relay is actually made vs just the basic diagram that represents a relay that I know. I would check that but even if it is hot, I wouldn't worry to much, just make sure any wires aren't going to rub up on any sharp metal and short out. Although if it does it'll only switch the relay, acting as if it were switched on but could potentially get hot from a small contact area. Also if there are any electricians, please correct me if I'm wrong. I'm more than willing to learn
The switch I’m referring to is the switch (negative lead) that activates the rely. That is a negative wire going from the relay box to the switch in the cab. If it shorts, it will turn the accessory on, true, but that’s better than a hot lead short.
Great explanation, the best I’ve seen. I recently added a Blue Sea system but I do have power going into the cab. I might have to sort of start over with this relay idea, although my accessories are all low amp. An I only have two switched circuits, to power two iPads. But the relays certainly would not result in any negative performance. Thanks for this.
Old video but I have question: Why did you not connect the white wire to your power distribution block with a small fuse (5A) for the switch side? Would this not work for some reason? Sorry not an electrician but looking at building something like this for my truck. Trying to learn.
That negative switching is a cool idea I think. Ive heard people complain or at least show concern about doing that because of trouble shooting issues. But If you work on your own stuff ....then you know whats going on with it. Where did the 12v hot come from ? Like some stuff comes on with the ignition typically and some stuff is switched. I just got comfortable with the regular way to wire relays and now I see another way... GREAT , lol
might look into a crimp tool. not just a pair of "pliers" as these tools give a specific amount of psi onto the connectors, not just a crush and hope it holds, also pending what you are crimping there are different shaped jaws. simple hand held for general wiring, up to hydraulic for larger cables. he "crush" they give removes any real chance for water to get in, and start any corrosion. aka: no air space between the wire strands.
I like your old-school thinking. 😃 - You’re absolutely right about negative switching the relays inside the vehicle. As you, I am in favor of soldering. However, as an engineer, please keep in mind that the solder material is sensitive to vibrations where it ends up inside the cable. Meaning, soldered cables needs to be firmly zip tied down to eliminate the risk of breaking over time. One last thing… Dipping a naked wire in a little grease before crimping it to a cable shoe will prevent future corrosion.
What a great video and explanation of negative wiring switches, its genius. Ive cruised through your existing videos and did not see, so forgive me for asking if you have one to satisfy my question. Do you plan on doing a video to show your switch panel configuration and wiring assembly, as well as going over what each switch does and how you routed it to the relay box and the accessory.. it may be asking alot, but i think many would benefit from how thorough your content is. Thanks again for the post..
Great Video thanks for making it, however, early on in the video 5:35 the "Blue Wire is terminated" and the "Yellow" 87A connected to the bus. Where as, 9:20 the Yellow wire is terminated and blue to the bus. Is there a difference in the two? They both supply power to the device correct?
With negative switching wouldn’t your accessory turn on (get power) if your switch run chaffed and grounded out? Seems like it could be fairly big problem depending on the type of accessory.
@@OverlandBound I have to second your decision to use ground switching. People forget that this is only grounding the relay and not the actual accessory which is grounded at its mounting location.
Why not have your spare relay pre-configured? So as to not have to do any soldering/shrink tube work. Just plug it in and connect the wires to the terminals.
Thanks for the video, just a question, why not use just one big relay instead of 6 relays ? Im about to build in my car and want to make sure that im not d, to it wrong. Thanks
Basically, yes. I have a 4GA wire from my positive terminal to the fuse block, and its attached to that. Make sure to look at the wiring diagrams in the description!
Wow. Thank you so much for this great film. Subbed before your video was done and will join in a few. We think a lot alike. I am doing a frame off on my Yj at this moment. Originally I planned a crawler of sorts but now have the Overlander bug. I gave away the complete dash, heater and threw away all the wiring. (It is an '87 never driven in snow, rare here in NE.) The only differences in mine are: I am using mostly Bussmann blocks to conserve space where possible, All but one of my blocks and distribution are in waterproof abs boxes, and I am relocating the Odessey battery to the rear. I completely agree with the negative switching, Blue Sea and marine cable where ever possible and exposed. Again Thank You Sir.
Can anyone explain to me how to run this or a similar setup with light up rocker switches? I could just be missing something but either way I’m not good at electrical😅
It wouldn’t be a bad idea to connect all the ends of your spare relay with the ends so your not doing that in the bush. Make sure that you extend the red wire to the furthest relay in your case #12. I would hate to try and make the ends in the bush.
Nit picking here, you burned a blue wire insulation with an iron or heat gun. the zoomed in shot of soldering before heatshrink had thinner wires sticking out, sometimes the can poke through the heatshrink. Otherwise awesome video!
I have watched both your videos, I have built my relay box and have everything ready to go! but still wondering about the white wire and where you are connecting it?
i understood everything except when it came to the relays. where are you suppose to get the 12volts to operate the relays to closed the high power circuit?
I need to see it mounted. Also, how are you connecting your white wire? piggybacking with on the red on the bluesea block? or are you connecting them all to a common buss bar to be fused on the bluesea in an open slot? Im just about to pull the trigger on a bussman setup for my 80 series but I'd rather have something with regular ATC sized fuses and relays you can buy anywhere, plus I already have the same bluesea fuze block ready to go. Looks pretty clean.
Ive looked all over web looking for where this was mounted under hood. I have a factory made fuse box/ relay and cant figure where to mount on my 14 Toyota tundra crewmax
If the relays have their own negative wire, what do you do with all the negative wires that each accessory already has? If you combine all the negatives wires into one from the relays do you send that back to the battery or do you attach to chassis of vehicle?
Great video. Appreciate the effort to show logistically how to wire up a circuit, then make it multiple in parallel for the number of accessories you've added. However, confused on the white wire requirement to be 12v power. Red powers through the relay to the blue wire to the accessory. What does the white do? Can the white wire be sourced to the same red wire terminal for power or does it have to be its own source to the 12v supply (battery)? If its own, does it have its own fuse? Thanks.
can be connected to the same red wire, normally you would use the white wire to trigger the relay. since he is switching the negative this wire can be directly connected to the battery, can be fused for best practices but will most likely use less than 1amp
Just a comment, when you choose to run negative switch, make sure the switch, wiring to the switch and also the ground wire can handle the amount of current you are pulling from your relay. Since you want your ground cable being same size as your positive to being able to actually pull the required amp from the relay.
Just wondering where you are tying in all the white wires of your relays? are you going to set up another busbar tied in somewhere with fused 12V power?
As a recent OB member I was pleased to stumble on these videos. This guy makes great content about things that are relevant to the community. Question though, as this is not a battery the negative switched relay thing doesn't compute for me. Whether you switch with negative or positive you are still completing a circuit to ground. The guts of the relay, for the purpose of switching, is just an inductor coil, so it's still passing 12v, right? Since the circuit is fused I don't see the point of this, other than being able to ground at the switch, that's cool, but I would be concerned about ruining the relay, as it might act as the fuse in this circuit seeing as how the windings are such small gauge wire. I know relays are cheap, but when you are in BFE they could get hard to find. Of course, it's entirely possible I don't know what the heck I'm talking about either...
So if you were to run the ground wire from the bus bar to a switch, then tie off that connection and run the ground to another switch, that would essentially work to power a set of light pods from 2 separate locations if both switches are also grounded, correct? Or would one of the switches being open effect that? My goal is to have a switch in the cab of my truck and also a switch in the bed, so if I decide I need the side lights on to see something, I don't need to go inside the truck and can just flip a switch in the back.
I love wiring and trying to make things simple but I cant seem to figure out a system properly lol. Trying to create a system like this is so confusing for me lol. I want to buy an FJ cruiser soon and I've been trying to figure out a power supply system. I have a small 6 slot fuse block, and I have some relays as well. Most of my powered things will be some LED lights, maybe an air compressor but I'm not fully sure yet
n my 1968 VW Beetle I'm trying to add a Fuse box because I want to stop cutting into my harness but I was wondering if its only going to be for radio and some interior light if I should add a relay to the system or the fuse box alone will do just fine?
I would have nut and bolted those components. Those screws will pull out with all the vibrations of offroading. And using negative switching also eliminates a hot wire under the dash where it could cause an electrical fire.
You could have done everything here in one single Eaton SSVEC out of waytek for less than 150 and in 1/3 the foot print. (no apps or IC's all done via internal bus bars and external wiring.) For something going off road I would want it sealed up good myself. Either way there are always options but not a bad job.
? So from the relay to the accessory it's power side switched? Am I correct? And then if I use an illuminated rocker switch 5 pin how do I wire that for the lights to work on the switch?
Nice one, liking this - practical stuff. How does this compare to something like the EGON DC-HUB - I wondered if thats a readymade solution which makes things more streamlined...
So, here is my question. Say we want to have the switch backlight lit up so we can see which one we are hitting in the dark. How do we do that with this setup? Is there a way to wire up an interior cable from the dash lights to power the backlights on the switches or do we just have to fumble around? Honest question because I love the ground switch setup, but I also want to see which switch I'm hitting, thus would need power running to it from somewhere.
@@OverlandBound Sorry for the long question. I am new to the whole "trying to do things correctly instead of just throwing it together as I did in my younger days" thing. There are a ton of resources to learn from out there for my truck, but not a ton of things you can just buy to make it work (like backlighting the switch)
@@OverlandBound if you happen to know the best way to tap into the stock accessory switches backlight on a 2017 Tacoma without having to cut into the wire 😁
Just got done watching your video and learned a lot, thanks. I have one question about the relay. I’m noticed you said the white wire will be connected to positive. Are you connecting that straight to the battery or connecting it to the blue sea block.
I plan on doing something similar to mine for a couple different lights and other small accessories what is a good size wire to use and can you make a jumper to power another block in the back


Me being a electrical idiot, this made a ton of sense in its design. I'm actually going to follow in this design doing mine. Thank you for this.
Nice DIY. I like the idea of the negative switching, and you are correct, it is safer. One suggestions- I typically don't run my grounds to chassis. I've been running a separate negative from the battery to a ground bar and then home running my ground to the bar. More reliable than the chassis. In your design it would just mean one more wire thru the fire wall to your switch bank, and since it's only powering relays, it down't have to be a large gauge wire. Aside from the negative switching, I have a similar design on my Jeep for lighting & compressor circuits. Works well. Safe Travels and God Bless!
Gm started doing tons of this with the c5 Corvette since the amount of ecu control and relocating half the drive train to the rear end most the signals are sent with negative switching.
Thank you for this because I absolutely hate the idea of fuse taps and ugly wires going everywhere…
Also many people may argue this one but switches on negative side arcs less. To prove this pull the negative side of the battery then reconnect then try the positive side. You will notice alot less arcing. I have also tried experimenting with switches on a positive side versus the negative side and checked the contact points after a ton of switches accomplished by a sailing servo. The negative side has alot less arcing.
Keep up the good work. Truck still needs a diesel and your hair is still on point (by the way that means it looks good in military).
I’m very familiar with electrical circuits but I watch because love neat wiring😍. Thanks for the inspiration.
Nice job with this especially the negative switching... 👍🏼👍🏼👍🏼
Thanks for the videos. I have been considering building a block like this, I'm just really cautious with electrical so I have spent more time watching videos than doing. I like the combination in the three videos.
Such an awesome idea! You could probably make a nice side gig just marketing and selling that box.
I hope that you have that Series 80 forever, Michael. I love that truck. The bag o' fuses was brilliant.
Awesome lesson, thank you very much. I have little knowledge in electrics, but is growing over time. Learning is fun
The spare bag is so clever. Great work!
EXCELLENT ! Installing my driving light Tom and a 12v triple in rear of truck . I like this
Great video ! Appreciate the straight forward and easy to understand explanations during the process.
I have no idea what you did there but it looks very well thought out and constructed! 😆
Can you explain what you have the white wire connected to? You show it dangling in the video but not connected to anything....
Thank you for the great ideas and information! Electrical is my weakest skillset and this is geting me on the right track. Cheers
Your wiring is a thing of beauty!! I always said about switch pro type technologies is putting too much faith in a stand alone unit. I'm glad other people believe the same thing. Love the videos. Keep on keepin on.
Love the idea of the spares bag. What about a removable clear cover over the entire box to help keep moisture and dirt out?
Nice video. I have been planning my electrical system and am doing all ground switch’s to eliminate hot wires from being inside the cab.
That was a very clean install with great info. Thank you.
Nice video, love the message about leaving the place better than you found it. We are 1 year on the round in East Africa and some places are so full of thrash.
So clean! Im glad I ran across your video!
Excellent video. Building a serviceable relay / fuse block like this seems be be a much better option than spending several hundred dollars on a fancy name brand unit that can't be repaired out on the trail.
Great school lesson for a Sunday in isolation.
Hey Mikey, I liked it a lot, but don't forget to apply the terminals to your spare relay!! Cheers, Mate.
The relay just unplugs from the already wired relay socket. Not sure why he put an extra socket in the bag
@@mrfixit____3651 might just be to protect the terminals of the relay, saves them getting bent
marine grade heat shrink tubing also have a glue/sealant that also helps with protecting the wires. Really nice to see wiring done right, and with thoughts about how it should be done.
Best point was early on about the fuse being smaller than the amp load of the wire so that the fuse(something designed to fail) fails and not the wire, when wires fail fires often start.
I used to be a sparky, so using the torch while it works is not the best idea, a heat gun is so much better, with torches you can crack and cause the heatshrink to be brittle.
Where does the white wire pull 12v from and how is it fused?
Very proffessional job and simple setup that couldnt be safer 👍
Thanks for making this video. Very well done. There is one thing that is confusing me though which is the white wire on the relay. You said it goes to + 12 volts and that's where I get lost. Based off the diagram, it looks like the red and while wires are spliced together going to the fuse box but you don't show that in the video. Could you please clarify how you use the white wire?
Yea id like to know aswell where the white wire goes
Here also
Both the RED wire and the WHITE wire need to be powered, preferably with fuses for safety. Looks like he will be adding the WHITE wires to the opposite side of the Fuse Block, based on how he labelled them at least. This just an assumption though
Thanks for the video.I have a high- end car audio system (running around 5000 watts, and I have a mess of relays and fuses that I need to clean up. Very thorough info. Thanks again.
Just a fyi, regular heatshrink tubing isn't waterproof unless it's glue lined. Not sure if those crimp connectors are or not.
I'm confused about the white wire, so it is also going to the battery, but isn't fused? How did you join all of those white wires together and connect them to the battery? did you make this connection without a breaker? If you can share a diagram, that would be amazing!!
Wonderfully clean wiring set up. I wonder why you did not use marine grade wire as it has better insulation and more strands per gauge so it is able to carry greater loads ( redundant overload protection). Also I would suggest marine relays as they are better for possibly wet environments. They also do better handling dirt and grime. I am in the process (when I get back to the states) of rewiring my Suburban and will be using as much marine wire, connectors, relays, and junction blocks as I can get so I do not have any problem with possible shorting. I will also use through bulkhead connectors to run the wiring in order to support and protect the wiring.
I am just blown away totally by the gorgeous workmanship and ground trigger arrangement. I have repeatedly looked at the video, especially of the diagram and your immediate explanation around it. However your final summary immediately after explanation got the better of me. The diagram shows the white wire from terminal 86 going to the positive of the battery and the black from 85 going to the switch ground. But you might have referred to exactly the opposite setup when summarizing. I am now confused, as I thought the negative trigger would mean that 85 would go to the switch and from switch to ground. And 86 and 30 going to the same source or 86 going to some other 12V source that's on when ignition is on (engine off). Please clarify. 🙏🙏🙏🙏🙏
HI Vineet, I believe you have this correct. 30 is Battery Positive. 86 is Positive (or ignition positive as appropriate), Black is the relay switch (trigger) ground. Blue or 87 goes to the device (pos). I hope I didn't get it wrong in the summary - I did re-watch and it sounded right. Feel free to PM me on our forums www.overlandbound.com/forums (I'm Michael)
I'm just a mechanical engineer so I'm not 100% sure but I think that negative switch is actually hot until you switch it. I would have to know some more about how the internals of a relay is actually made vs just the basic diagram that represents a relay that I know. I would check that but even if it is hot, I wouldn't worry to much, just make sure any wires aren't going to rub up on any sharp metal and short out. Although if it does it'll only switch the relay, acting as if it were switched on but could potentially get hot from a small contact area.
Also if there are any electricians, please correct me if I'm wrong. I'm more than willing to learn
The switch I’m referring to is the switch (negative lead) that activates the rely. That is a negative wire going from the relay box to the switch in the cab. If it shorts, it will turn the accessory on, true, but that’s better than a hot lead short.
Great explanation, the best I’ve seen. I recently added a Blue Sea system but I do have power going into the cab. I might have to sort of start over with this relay idea, although my accessories are all low amp. An I only have two switched circuits, to power two iPads. But the relays certainly would not result in any negative performance. Thanks for this.
Old video but I have question:
Why did you not connect the white wire to your power distribution block with a small fuse (5A) for the switch side? Would this not work for some reason?
Sorry not an electrician but looking at building something like this for my truck. Trying to learn.
Excellent explaining and demonstrate.
Love your videos man. Great work explaining everything...keep it up
That negative switching is a cool idea I think. Ive heard people complain or at least show concern about doing that because of trouble shooting issues. But If you work on your own stuff ....then you know whats going on with it. Where did the 12v hot come from ? Like some stuff comes on with the ignition typically and some stuff is switched. I just got comfortable with the regular way to wire relays and now I see another way... GREAT , lol
might look into a crimp tool. not just a pair of "pliers" as these tools give a specific amount of psi onto the connectors, not just a crush and hope it holds, also pending what you are crimping there are different shaped jaws. simple hand held for general wiring, up to hydraulic for larger cables. he "crush" they give removes any real chance for water to get in, and start any corrosion. aka: no air space between the wire strands.
Very good advice.
Makes it sounds so easy...Turns out I don't get electronics/wiring at all.
Whats the point of the terminal block? Why not just join the two wires together (crimp,solder) to the switch/aux item?
I like your old-school thinking. 😃
- You’re absolutely right about negative switching the relays inside the vehicle.
As you, I am in favor of soldering. However, as an engineer, please keep in mind that the solder material is sensitive to vibrations where it ends up inside the cable. Meaning, soldered cables needs to be firmly zip tied down to eliminate the risk of breaking over time.
One last thing…
Dipping a naked wire in a little grease before crimping it to a cable shoe will prevent future corrosion.
Incredible video. Your best video yet! 👍🏿
What a great video and explanation of negative wiring switches, its genius. Ive cruised through your existing videos and did not see, so forgive me for asking if you have one to satisfy my question. Do you plan on doing a video to show your switch panel configuration and wiring assembly, as well as going over what each switch does and how you routed it to the relay box and the accessory.. it may be asking alot, but i think many would benefit from how thorough your content is. Thanks again for the post..
Great Video thanks for making it, however, early on in the video 5:35 the "Blue Wire is terminated" and the "Yellow" 87A connected to the bus. Where as, 9:20 the Yellow wire is terminated and blue to the bus. Is there a difference in the two? They both supply power to the device correct?
Wheres are the white wires at?
This is great. Following now!
With negative switching wouldn’t your accessory turn on (get power) if your switch run chaffed and grounded out? Seems like it could be fairly big problem depending on the type of accessory.
Yes, but that’s WAY better than shorting out!
@@OverlandBound I have to second your decision to use ground switching. People forget that this is only grounding the relay and not the actual accessory which is grounded at its mounting location.
With negative switching the wire between the coil and your switch is always 12v till you flip the switch to ground it.
Nice video, but interested to see where you connected the 12v power via the white wire?
Very Clean,
I'm not electrically inclined, if the red goes to the fuse block that is powered, where would you plug white into? Is there a good diagram?
Why not have your spare relay pre-configured? So as to not have to do any soldering/shrink tube work. Just plug it in and connect the wires to the terminals.
The relay just plugs in to the existing socket. No soldering or wiring required.
Michael your wiring looks awesome! But use flux when soldering you'll make a better connection
I am confused on his wiring Martin he only crimp connected to the bus bar he didn’t solder that connector isn’t that more critical?
Great video although the negative grounding is making my head spin. I would need a diagram to fully understand
Great video, very helpful.
Thanks for the video, just a question, why not use just one big relay instead of 6 relays ? Im about to build in my car and want to make sure that im not d, to it wrong.
Thanks
Great install.
Fantastic video, thank you so much
Im still confused where im supposed to wire the white wire. Do i connect it straight to the battery?
Basically, yes. I have a 4GA wire from my positive terminal to the fuse block, and its attached to that. Make sure to look at the wiring diagrams in the description!
Wow. Thank you so much for this great film. Subbed before your video was done and will join in a few. We think a lot alike. I am doing a frame off on my Yj at this moment. Originally I planned a crawler of sorts but now have the Overlander bug. I gave away the complete dash, heater and threw away all the wiring. (It is an '87 never driven in snow, rare here in NE.) The only differences in mine are: I am using mostly Bussmann blocks to conserve space where possible, All but one of my blocks and distribution are in waterproof abs boxes, and I am relocating the Odessey battery to the rear. I completely agree with the negative switching, Blue Sea and marine cable where ever possible and exposed. Again Thank You Sir.
Thank you so much for watching! I'm glad it was useful!
Can anyone explain to me how to run this or a similar setup with light up rocker switches? I could just be missing something but either way I’m not good at electrical😅
It wouldn’t be a bad idea to connect all the ends of your spare relay with the ends so your not doing that in the bush. Make sure that you extend the red wire to the furthest relay in your case #12. I would hate to try and make the ends in the bush.
Nit picking here, you burned a blue wire insulation with an iron or heat gun. the zoomed in shot of soldering before heatshrink had thinner wires sticking out, sometimes the can poke through the heatshrink. Otherwise awesome video!
I have watched both your videos, I have built my relay box and have everything ready to go! but still wondering about the white wire and where you are connecting it?
i understood everything except when it came to the relays. where are you suppose to get the 12volts to operate the relays to closed the high power circuit?
Well that was a pretty quick show where's the other videos?
Nice job
By doing a ground trigger source (switch), if you have a 3 or 5 pin switch with LEDs, can you still wire the switch so that your LED turns ON?
yo, did u ever figure this out? This seems to be the flaw with this method?
What if you are using 87a? How would I wire it
I need to see it mounted. Also, how are you connecting your white wire? piggybacking with on the red on the bluesea block? or are you connecting them all to a common buss bar to be fused on the bluesea in an open slot? Im just about to pull the trigger on a bussman setup for my 80 series but I'd rather have something with regular ATC sized fuses and relays you can buy anywhere, plus I already have the same bluesea fuze block ready to go. Looks pretty clean.
Check out most recent IG story and posts for that info! Also, feel free to PM me on the forums (Michael) for pictures and info.
@@OverlandBound This comment doesn't help me.
@@RobertSavello just wire them to a common bolt and fuse it like Patrick said
Ive looked all over web looking for where this was mounted under hood. I have a factory made fuse box/ relay and cant figure where to mount on my 14 Toyota tundra crewmax
If the relays have their own negative wire, what do you do with all the negative wires that each accessory already has? If you combine all the negatives wires into one from the relays do you send that back to the battery or do you attach to chassis of vehicle?
Body ground it. You can ground at the accessory source, but individual accessories have specific needs so double check.
Great job !
Can you use 3 pin illuminated switches!!!????? None of mine light up, even when piggy backed. Are there other illumination switches I should use?
Great video. Appreciate the effort to show logistically how to wire up a circuit, then make it multiple in parallel for the number of accessories you've added.
However, confused on the white wire requirement to be 12v power. Red powers through the relay to the blue wire to the accessory. What does the white do? Can the white wire be sourced to the same red wire terminal for power or does it have to be its own source to the 12v supply (battery)? If its own, does it have its own fuse?
Thanks.
can be connected to the same red wire, normally you would use the white wire to trigger the relay. since he is switching the negative this wire can be directly connected to the battery, can be fused for best practices but will most likely use less than 1amp
Where did you splice the white wires? I know it's battery power... but can it be differectly powered from the second aux battery?
Just a comment, when you choose to run negative switch, make sure the switch, wiring to the switch and also the ground wire can handle the amount of current you are pulling from your relay. Since you want your ground cable being same size as your positive to being able to actually pull the required amp from the relay.
Just wondering where you are tying in all the white wires of your relays? are you going to set up another busbar tied in somewhere with fused 12V power?
As a recent OB member I was pleased to stumble on these videos. This guy makes great content about things that are relevant to the community. Question though, as this is not a battery the negative switched relay thing doesn't compute for me. Whether you switch with negative or positive you are still completing a circuit to ground. The guts of the relay, for the purpose of switching, is just an inductor coil, so it's still passing 12v, right? Since the circuit is fused I don't see the point of this, other than being able to ground at the switch, that's cool, but I would be concerned about ruining the relay, as it might act as the fuse in this circuit seeing as how the windings are such small gauge wire. I know relays are cheap, but when you are in BFE they could get hard to find. Of course, it's entirely possible I don't know what the heck I'm talking about either...
So if you were to run the ground wire from the bus bar to a switch, then tie off that connection and run the ground to another switch, that would essentially work to power a set of light pods from 2 separate locations if both switches are also grounded, correct? Or would one of the switches being open effect that? My goal is to have a switch in the cab of my truck and also a switch in the bed, so if I decide I need the side lights on to see something, I don't need to go inside the truck and can just flip a switch in the back.
Love this video, neg switching is a great idea, changing my wiring plans now! What items do you use the relays for?
I use them for all accessories - lights, inverter, fridge.
I love wiring and trying to make things simple but I cant seem to figure out a system properly lol. Trying to create a system like this is so confusing for me lol. I want to buy an FJ cruiser soon and I've been trying to figure out a power supply system. I have a small 6 slot fuse block, and I have some relays as well. Most of my powered things will be some LED lights, maybe an air compressor but I'm not fully sure yet
n my 1968 VW Beetle I'm trying to add a Fuse box because I want to stop cutting into my harness but I was wondering if its only going to be for radio and some interior light if I should add a relay to the system or the fuse box alone will do just fine?
The diagram is wrong or different than your relay pigtail. 86&85 are opposite as you explained????
Wooooo hooooooooo new video time! Miss you guys
I would have nut and bolted those components. Those screws will pull out with all the vibrations of offroading. And using negative switching also eliminates a hot wire under the dash where it could cause an electrical fire.
You could have done everything here in one single Eaton SSVEC out of waytek for less than 150 and in 1/3 the foot print. (no apps or IC's all done via internal bus bars and external wiring.) For something going off road I would want it sealed up good myself. Either way there are always options but not a bad job.
? So from the relay to the accessory it's power side switched? Am I correct?
And then if I use an illuminated rocker switch 5 pin how do I wire that for the lights to work on the switch?
This is sweet, but I have 5 pin rocker switches and I'm assuming the pin that would send signal to the relay would now be different?
Needed video, great job!
Thank you!
Nice one, liking this - practical stuff. How does this compare to something like the EGON DC-HUB - I wondered if thats a readymade solution which makes things more streamlined...
great job
Where did you get all the wiring?
So, here is my question. Say we want to have the switch backlight lit up so we can see which one we are hitting in the dark. How do we do that with this setup? Is there a way to wire up an interior cable from the dash lights to power the backlights on the switches or do we just have to fumble around? Honest question because I love the ground switch setup, but I also want to see which switch I'm hitting, thus would need power running to it from somewhere.
Yes correct. For illuminated switches, you need power.
@@OverlandBound Sorry for the long question. I am new to the whole "trying to do things correctly instead of just throwing it together as I did in my younger days" thing. There are a ton of resources to learn from out there for my truck, but not a ton of things you can just buy to make it work (like backlighting the switch)
@@tamccullough88 Absolutely. And it’s often very hard to find just what you are looking for in a sea of Internet information. I’m here, glad to help!
@@OverlandBound if you happen to know the best way to tap into the stock accessory switches backlight on a 2017 Tacoma without having to cut into the wire 😁
Where'd you get the spare ABS plastic sheet? I need to start with that as well!
Just got done watching your video and learned a lot, thanks. I have one question about the relay. I’m noticed you said the white wire will be connected to positive. Are you connecting that straight to the battery or connecting it to the blue sea block.
Same question here
Spares bag is a great idea....
I plan on doing something similar to mine for a couple different lights and other small accessories what is a good size wire to use and can you make a jumper to power another block in the back