well done. I've been painting for 38 years and I would love to paint your work my friend. Proud of you and your craftsmanship. Love the post and install great job
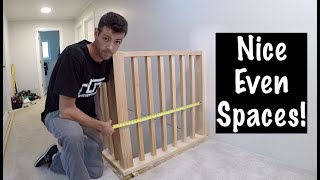
Another great video. To step up your production, layout, mark and drill baluster holes in both the rail and the sole plate before installing the rail. Always do this on flat work. On sloped rails when possible, I mark and transfer the marks before installing the rail but always drill them after the rails are in place.
Retired Custom Home Builder now Cabinetmaker. Nice Job, Good system as long as the hardware are quality materials. I’ve seen Stair Builders use nothing but pocket screws. The system you used is far superior. I like it‼️👍👍 Enjoy your channel, Vinny 🇺🇸
You have helped me so much in my own house. As a kid i got into carpentry from building subwoofer enclosures. Very armature at best. Then i bought a finish nailer. Router etc then instead of screws it was counter sunk brad nails and glue and miter joints. Now im doing crown amd everything else. The progression has been great. And your vids answer all my questions on point. Great vids.
Leave the top caps off the newels until you install the rails, then you can use either lag/bolt combination (lag into handrail, bolt onto newel) or bolt/bolt combination (drill hole in bottom of rail as you did here, bolt on both newel and rail). But looks great. Also you'll want to plug holes in bottom of rails, you can see them as you walk up the stairs. Nice job!
I've worked with a lot of carpenters in my life, including my father. Your talent and skill, is unmatched even if you combined all of there skill together. My ultimate vacation would be to work as your helper for a couple of days.
50 years in. I am still learning. Your videos have taught me a lot and have also refreshed my memory on little tricks of the trade. You give me encouragement that there are some younger true Craftsmen coming up. I'm hoping that there are many more following in your footsteps. Us old guys are dying off. You give us confidence that we are leaving the trades in good hands.
Just as it is with framing floors and walls, marking the top and bottom rails for balusters BEFORE you install permanently makes life so much easier. I’ve done it both ways. Saves time and effort. BUT it looks great. As usual!!
Installing stairs is a specialty all by itself. There are so many measurements for different situations that have to be remembered. As a stair installer for nearly 15 years, I was patient with your demonstration.
Great video! Glad to see you back at your house. I’ve learned so much watching you. Putting the screw in was a good idea, peace of mind and everything. Looking forward to the next video. Thanks Richard
Love the Newel Zip bolt system...secures well, creates clean look. Thanks for the measures...it helps when going from the Forsner to “spadle “...like the modification of the name.
Good solid work. I've been watching your videos lately and you have gave me the confidence to remodel my trim in my house. I've learned alot from your videos. Doing trim in house 1 room at a time. And it's coming out great. Thanks to you.
The newel posts came out looking great! The attachment hardware are pretty good. The old school method of attaching the rails was to drill a hole through the newel and the end of the rail. Drive a lag into the rail with a ratchet. Great looking project.
When I installed our stain grade square wood balusters, I first twisted them onto double sided screws into the flooring for a clean look (without a shoe rail) and then slid a plowed hand rail over the top of the balusters. Adding the handrail first will probably limit you to a paint grade baluster (to hide fasteners marks) or a metal/iron baluster that goes into a bottom hole on the floor and then slides up through a hole under the hand rail.
Black iron balusters would give a nice contrast if the railings are going to be white, but squares would look real good too...I'd probably coin toss it
Great teaching vids! I have enjoyed the making of the Newell posts which turned out nice. I also use Sommerfeld router table and bits. The fence is large and allows larger project pieces. Also, the sanding flapper with grinder for back cutting crown looks like a worthwhile investigation and trial. Thanks for shooting the v-log.
Looks great. A tip for the next time you build box newels, or have to work with them, is to either leave the cap off and bolt the rail on from the inside, or add material behind where the rail will connect so you can use rail bolts. Rail bolts are super strong. Plenty of piece of mind, no extra screw needed.
What a great video! You explained each step very clearly and I good see every detaul. And thanks for not putting loud metal banging music in the background. Not sure why but so many guys think it makes the video better. It doesn't just makes the talking hard to hear. I really think that I could do this job on my own so thanks a bunch!
Very nice newel post. I thought it will be the last time we see you till the next year. The cable railing look will look nice I think. Keep sending us videos.
I love everything about finish carpentry, and have been inspired by many of your videos to take on such projects, id like to send a few of my pics just so you can have more ideas for your stair project, it’s funny how much really goes into stairs, and I’m not a stair guy but I’ve had to teach myself and research everything, and we used the same bolt set up for handrail
Richard, you do outstanding work ... I myself planned to stay in my house for two to three years than buy a house with a really big garage, well 20 + years later I am still here .. do it exactly the way you want it you may be there longer than you thinck , you will get your money back .. Semper Fi Pete M
I hated carpentry until I began watching your videos. You make me want to learn everything and switch from the professional painting business to carpentry.. Good job man, I apllaud you. Hey, share some of those secrets and advice that you got from the Idaho painter when you went and visited him last year....LOL
Did you consider or have access to railing stock with the channel for the pickets on the bottom? Suggestion - on the floor - use masking tape and a compass and scribe to plot before drilling holes in the nosing.
Awesome job. 3” screw is good enough that zip bolt system takes to long to setup and install. But it’s going to look amazing when it’s all done . Keep pumping out those videos
If you’re going with that look some white 3.5” plantation shutters on the windows would really make it pop. Plus your trim work it would all look like a million bucks
Another great video. I've been holding off on my stair project because of this issue. I've never installed railings but feel I can do it correctly with your video guide. Thank you very much.
Great video. I learned something new. By now you have already installed the balusters but I would have voted for using iron balusters to compliment the woodwork you have done. Bravo!
Looks good, if the caps on the post were removable you could have bolted the rails from inside but it still looks great it would look good with black metal balusters.


well done. I've been painting for 38 years and I would love to paint your work my friend. Proud of you and your craftsmanship. Love the post and install great job
Literally one of the few channels I watch religiously 🙏
stupididiotkitty same lol. And i have ZERO carpentry skills. I’m a nurse. Haha.
Amen
Me too 😁
Me 3
Iron ballasts would look sweet in them
Another great video.
To step up your production, layout, mark and drill baluster holes in both the rail and the sole plate before installing the rail. Always do this on flat work. On sloped rails when possible, I mark and transfer the marks before installing the rail but always drill them after the rails are in place.
Retired Custom Home Builder now Cabinetmaker. Nice Job, Good system as long as the hardware are quality materials. I’ve seen Stair Builders use nothing but pocket screws. The system you used is far superior. I like it‼️👍👍 Enjoy your channel, Vinny 🇺🇸
You have helped me so much in my own house.
As a kid i got into carpentry from building subwoofer enclosures. Very armature at best. Then i bought a finish nailer. Router etc then instead of screws it was counter sunk brad nails and glue and miter joints. Now im doing crown amd everything else. The progression has been great. And your vids answer all my questions on point. Great vids.
Leave the top caps off the newels until you install the rails, then you can use either lag/bolt combination (lag into handrail, bolt onto newel) or bolt/bolt combination (drill hole in bottom of rail as you did here, bolt on both newel and rail). But looks great. Also you'll want to plug holes in bottom of rails, you can see them as you walk up the stairs. Nice job!
Great install demonstration. Makes perfect sense. Thanks.
Excellent demo, big help !
These came out so nice
The posts turned out great.
I've worked with a lot of carpenters in my life, including my father. Your talent and skill, is unmatched even if you combined all of there skill together. My ultimate vacation would be to work as your helper for a couple of days.
50 years in. I am still learning. Your videos have taught me a lot and have also refreshed my memory on little tricks of the trade.
You give me encouragement that there are some younger true Craftsmen coming up. I'm hoping that there are many more following in your footsteps.
Us old guys are dying off. You give us confidence that we are leaving the trades in good hands.
Love your channel and work
Excellent effort!!! And this from a grumpy old nitpicker!
Dude, you got such a great attitude. The way you approach learning new skills will get you far. Best wishes from Denmark.
Just as it is with framing floors and walls, marking the top and bottom rails for balusters BEFORE you install permanently makes life so much easier. I’ve done it both ways. Saves time and effort. BUT it looks great. As usual!!
Amazing good to hear you are having fun.
Installing stairs is a specialty all by itself. There are so many measurements for different situations that have to be remembered. As a stair installer for nearly 15 years, I was patient with your demonstration.
Props to the camera operator. Excellent camera movements and focusing on the area.
Looks good I agree with everything you've done and I've been doing construction work and carpentry for 40 plus years
Thanks for all the great content!
yup
Love the content dude, I followed a lot of your wainscoting ideas in my home remodel and it all worked fantastic. Thanks
Looks great 👍
Looks pretty awesome
Beautiful job! Professionally done !
Great video! Glad to see you back at your house. I’ve learned so much watching you. Putting the screw in was a good idea, peace of mind and everything. Looking forward to the next video. Thanks Richard
Just Wow!
Love the Newel Zip bolt system...secures well, creates clean look. Thanks for the measures...it helps when going from the Forsner to “spadle “...like the modification of the name.
Good solid work. I've been watching your videos lately and you have gave me the confidence to remodel my trim in my house. I've learned alot from your videos. Doing trim in house 1 room at a time. And it's coming out great. Thanks to you.
Very informative and I find myself getting a smile or a chuckle every time I watch one of your videos. Thank you for the great content.
The newel posts came out looking great!
The attachment hardware are pretty good. The old school method of attaching the rails was to drill a hole through the newel and the end of the rail. Drive a lag into the rail with a ratchet.
Great looking project.
Nice!
Love your work 👍
This is the only channel I watch regular. Thanks for the great work.
WOW!! That really looks great.
Your how to videos are great!
Great work dude👍
Looks great
Looks great
Great Job!, I'm a little older then you and have been a carpenter for 40 years, and I've learned a lot from your videos!
Grate job brother.!
Great job bud 👌.
Those look awesome man nice job
When I installed our stain grade square wood balusters, I first twisted them onto double sided screws into the flooring for a clean look (without a shoe rail) and then slid a plowed hand rail over the top of the balusters. Adding the handrail first will probably limit you to a paint grade baluster (to hide fasteners marks) or a metal/iron baluster that goes into a bottom hole on the floor and then slides up through a hole under the hand rail.
Looking good Richard!💥👊🏻 Those zip bolts are pretty slick!👍🏻 Take Care bro.😎
Black iron balusters would give a nice contrast if the railings are going to be white, but squares would look real good too...I'd probably coin toss it
*25 years later you’re still living in the same house.* Whatever choice you make be sure it’s something that you can live with forever. 😂
Great teaching vids!
I have enjoyed the making of the Newell posts which turned out nice.
I also use Sommerfeld router table and bits. The fence is large and allows larger project pieces.
Also, the sanding flapper with grinder for back cutting crown looks like a worthwhile investigation and trial.
Thanks for shooting the v-log.
They look great. 👍
Looks great. A tip for the next time you build box newels, or have to work with them, is to either leave the cap off and bolt the rail on from the inside, or add material behind where the rail will connect so you can use rail bolts. Rail bolts are super strong. Plenty of piece of mind, no extra screw needed.
always produce the best videos for each woodworking task. love the extra tips that are practical.
What a great video! You explained each step very clearly and I good see every detaul. And thanks for not putting loud metal banging music in the background. Not sure why but so many guys think it makes the video better. It doesn't just makes the talking hard to hear. I really think that I could do this job on my own so thanks a bunch!
Very nice newel post. I thought it will be the last time we see you till the next year. The cable railing look will look nice I think. Keep sending us videos.
Posts are beautiful
That's a pretty good system. 👍
I learn a lot following your channel. Great stuff. And all can be used around your house and more. Awesome work.
Absolutely beautiful work man
On The Money!!
Very well explained thanks bud.
Great job
Great job
Watching your vids r so relaxing.
Awesome! Well done!
I like it. Good job!
Looks good 👍
Looking good
Great job👏👏👍🇮🇪
Beautiful! I would go with the wooden balustrades.
I love everything about finish carpentry, and have been inspired by many of your videos to take on such projects, id like to send a few of my pics just so you can have more ideas for your stair project, it’s funny how much really goes into stairs, and I’m not a stair guy but I’ve had to teach myself and research everything, and we used the same bolt set up for handrail
Woah that's a cool method for the handrail. Love a good pun to finish a video too 😂
Scott Brown Carpentry hey hey, SCOTT BROWN CARPENTRY HERE 😂
@@scottsog7635 haha I knew you watched the channel didn't think I'd ever be able to find you
Richard, you do outstanding work ... I myself planned to stay in my house for two to three years than buy a house with a really big garage, well 20 + years later I am still here .. do it exactly the way you want it you may be there longer than you thinck , you will get your money back .. Semper Fi Pete M
It looks great! I’m doing stairs and have gone for toughened clear glass in 10mm to keep it open
Looks fantastic!
I hated carpentry until I began watching your videos. You make me want to learn everything and switch from the professional painting business to carpentry.. Good job man, I apllaud you. Hey, share some of those secrets and advice that you got from the Idaho painter when you went and visited him last year....LOL
Looks bad ass and like always best work ever
Did you consider or have access to railing stock with the channel for the pickets on the bottom?
Suggestion - on the floor - use masking tape and a compass and scribe to plot before drilling holes in the nosing.
Awesome job. 3” screw is good enough that zip bolt system takes to long to setup and install. But it’s going to look amazing when it’s all done . Keep pumping out those videos
After watching your videos, I have so far tackled wainscoting and shiplap.
Thanks for the videos
If you’re going with that look some white 3.5” plantation shutters on the windows would really make it pop. Plus your trim work it would all look like a million bucks
Smart, simple system that works.
Beautiful job, I never expect anything less. Enjoy your progress on the house, I know we all do.
I like the way you work. Everything looks easy. Thanks.
Another great video. I've been holding off on my stair project because of this issue. I've never installed railings but feel I can do it correctly with your video guide. Thank you very much.
Glass inserts.👍
Great video. I learned something new. By now you have already installed the balusters but I would have voted for using iron balusters to compliment the woodwork you have done. Bravo!
Very nice job, you are a true professional!
The posts make my eyes happy!
K
Those posts are a work of art 👍👍👍
They turned out awesome
Looks sweet👌👌
Learn something new everytime here! Looks real nice!😀👍
Great Work, It is nice to watch someone who wants things Perfect...
well-done!!!!
Looks good, if the caps on the post were removable you could have bolted the rails from inside but it still looks great it would look good with black metal balusters.
Those fasteners are crazy...I was wondering how that was going to work... then you showed how they go in and out. Amazing!!!
Beautiful work!!
Solid.
Love your videos. Please keep them coming!
Looks great! Good job.
Looks nice, 👍