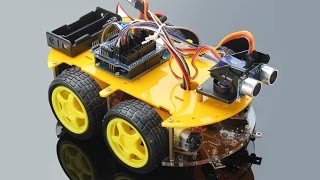
4WD Arduino Sonar and IR Robot Test Run

HTML-код
- Опубликовано: 3 окт 2024
- PLEASE READ THE INSTRUCTIONS BELOW !!!!!
Finally got this Arduino sonar and IR robot to run properly. Many many thanks to facz10 who shared his code for this robot and provided valuable help to address build and performance questions. Several modifications were made to make the robot a little easier to put together, otherwise, the kit was essentially complete - except of course for the all important code and assembly instructions ...
Ended up using a 3S Lipo connected to a 5V/5A UBEC to bring the operating voltage down to 5V which the robot likes better - could have used PWM through the ENA / ENB to control the speed - but that's for another day....
Changed the turn time (rate) from 900 to 600 to change the turn ratio closer to 90 deg. and it works better this way.
Second build using the same code ... • 4WD Arduino Sonar and ...
Please visit the facz10 channel for help .... • Arduino Obstacle Avoid...
Other helpful sites for tips and wiring help.
A) adhocnode.com/a...
B) arduino-info.wi...
C) adhocnode.com/m...
D) adhocnode.com/a...
Get the updated IR robot code on the link below ... courtesy of "facz10" ...
E) letsmakerobots....
Good luck on your builds!


You noticed that? It's the latest fashion for Arduino robot builders .. probably because nobody want to step on a moving robot with shoes on ... he, he... thanks for dropping by DG !
Amazing, I'm a big fan, you have my support, I'll do my best to find you an investor, who can support your industry and research. Best of luck
Greetings! Thanks for dropping by ...
Ha ha! It's saying, "I'm TRAPPED and I can't get out!" That's pretty cool!
I just bought and built the same robot, but the only thing I have working is the servo. I'm not sure what the next step. Can someone please explain and help me with the coding?
Very cute. Now I'm focusing on a 2WD chassis (see my channel or my website dedicated: www.dallaf.it/simo/arduinorobots.php ) but the next step will be a four-wheel drive and I had thought of this kit that I found on the internet.
Great job!
What's up. Is there anyway I can get ur email. I really love what you do. I need help with the codes.
Me too, I have the same robot but only got the servo moving. Do I drop the code for each part?
I really like those clear acrylic bumpers, they look awesome! Great build.
It came with the kit ...
Hi, I have two motors from your video. I use Arduino Uno, Arduino Uno Motor Shield, I have problem with power robot. Sorry for my english. I want power my robot 5x AA recharger baterries, but I cannot achieve success. Arduino If direction motors change, then Arduino is a resets and starts the program again. Please help with my problem. Thank you in advance
The robot requires more power than what you are providing. Try using alkaline batteries instead of rechargeables or use a 5A UBEC set to 5v output.
" Try using alkaline batteries instead of rechargeables or use a 5A UBEC set to 5v output. " have you tried using the alkaline and/or UBEC ???
How to rotate grade did you do? please help me
We built a similar project. However, we used a RC vehicle and the IOIO board to control the vehicle. Here is the result:
ruclips.net/video/vkvkfcqEUkk/видео.html
So what happens when your robot follows the green balloon to a corner ?
Al B I have Tracked Rover 5 with encoders ... got in on sale for about $50 with free shipping. Thinking of putting an Atmega 2560 based controller with GPS for AUV missions and FPV capabilities - should be interesting.
It's not a sonar, not even a little.
Interesting ... very ...can you share the robots you have built? Curious minds want to know.
@@tsisapik I've built more advanced devices than a robot. But it's irrevelant, check on wikipedia what a sonar is and start using words which meaning you know.
@@KindaStrang3 Prove it ... words are cheap. Whales use echolocation ... bats use echolocation ... humans can be taught to use echolocation. "Sonar - the method of echolocation used in air or water by animals such as bats or whales."
I'm connecting my Arduino Uno which has a motor shield piggybanked on it to a 12 v lipo battery . But withing about 20 -30 seconds the motor driver IC heats up or sometimes the voltage regulator on the Arduino turns extremely hot. What could be the issue?
Not sure what motor shield you are using. Be sure the input voltage is set correctly. Using 12v (3s) is one sure way to burn out the component if the jumpers are set to 5V. Try using 7.4V (2S) instead.
tsisapik if you google adafruit motor shield you'll know which one I'm using. Now my lipo battery is 11.1v and I connected it directly at the Arduino power slot. The voltage regulator on the Arduino got extremely hot and the L293d on the motor shield got burnt. Someone told me to step down the voltage now technically I guess 11.1 v should not have created a problem
I'm not using a UBEC . Is it necessary?
Not needed if you want to burn out the board regulators. Notice the heat - that is never normal.
tsisapik haha yeah . So I ordered the UBEC . It's on its way I thank you a lot for the help here with he project. I'll try the UBEC and surely update if any issues. Thanks again
this is awesome, is the robot however checking for possible directions way to soon and way too fast? I'm surprised to see the ultra sonic can pick up reflected sound that fast I guess maybe it's not visualizing the speed of sound but one thing I did notic is the robot doesn't choose an angle that was picked by ultrasonic am I correct? it's almost as though it just changes direction/rotation to other way almost 180 degree
One thing I observed is that the acoustic properties of the objects around the robot greatly affects its performance. Objects in front at the right distance that reflect sound efficiently cause the robot to change direction almost instantly. Objects that absorb sound - well the robot does not see those and easily bump into them (fabrics for example). If you have one, make a 90 degree cardboard wall and you will see a very confused robot ...
Hi verry nice presentation...I would like to oknow if you could response to me how you connected the battery more exactly ? it can be connected to the arduino and the motor driver same time ? what charger uses this kind of battery ?
thanks so much
I have question how the car is rotate is there is any motor make him rotate Or its rotate by speed down one motor and speed up another
Turning is done by having the wheels on each side move in different rates and direction similar to how a tracked vehicle would move and turn. It can turn on itself if the program would allow it.
thank you
how much money you spent for this ??? Please answer
+Shah Md. Ahasan Siddique How much .... when I bought this kit it was around $99.
Hi ! im receiving this msg when trying to compiling ! What i need to do ?
C:\Program Files (x86)\Arduino\libraries\RobotIRremote\src\IRremoteTools.cpp:5:16: error: 'TKD2' was not declared in this scope
int RECV_PIN = TKD2; // the pin the IR receiver is connected to
+Futukids .. Sorry no idea .. I did not come across that error in my compile...
Hi brother! Its seem you didn' t use speed decoder with the dc motor, if yes may i know what the difference betwen using speed decoder and without. Thanks
+doni mart Hi .. you mean motor encoders? Encoders allow precision movement of a motor where rotation and direction can be described as pulses and the number of pulses can be programmed accordingly. For this robot, precise movement is not a necessity. I have a Doodle Bot that require encoders as the letters are formed from precise movements of the two wheel.
+tsisapik please share link of the doodle bot. thank you
+doni mart ... Doodel Bot it is ...ruclips.net/video/P367UqzhGG8/видео.html .. edit the code to spell any word you like.
Hi! Have a bit problem seeing how you connected everything. Could you send me a text with which pin goes where pleas? Best regards Kevin
I just ordered the kit for my son. i really appreciate if someone can share the code or any additional information that can help. by the way, which program language can be used?
Go through the links on the video description .. it has the code and info on how to make the robot to work - with the IR controller. Each build would be different depending on your preferences. Using the linked code is a start.
Will this battery work if I am using the same components as you are? How many mAh should be appropriate, 1500, 1200 or less?
Especifications
Minimum capacity: 1500mAh
Configuration: 3S1P / 11.1v / 3CELL
Constant Descharge: 20C
Maximum discharge (10 seg): 30 º C
Weight: 133g
Size: 107 x 35 x 19 mm
Charging plug: JST-XH
Enchufe de alta: XT60
The battery capacity is more related to how long the robot can function before the power runs out. The higher the capacity the longer the run time which has to be balanced out by the battery weight. I can run the robot with as little as 600 mah but will not run very long.
Awesome! How big is the gap between the bottom of the chassis and the ground? I want to know if there is enough room to fit some IR sensors
i know ,,, but factz10 not responses!! i need the code, please send me yours code! tanks :)
Sent. The ino file works on my end. I do not what you are doing on your computer so if you get a *_compile error_*, you have something or missing something that is making Arduino unhappy.
Very good work !!! I just want to ask you if I don't have an Arduino Shield what shoud I do :)) thanx a lot
+hamed hedi ... Connect the signal wires of the servo, IR and motor connections directly to the Arduino Uno ... you need to replicate the positive and negative connection several times or use a bus bar (which the Arduino shield is essentially ...).
what is yout distance that determines when the robot stops and turns around? I am playing around with my ping sensor and trying to find a good distance cutoff. Thinking of mounting mine to a servo too, I just have two sensors angled at 45 degrees but they dont pick up surfaces perpendicular to the robot very well
Hi, which encoders go with this gearbox? I have seen this chassis before, the gearbox is 1:48 if I am not wrong? Thanks in advance, great job.
Personally do not what encoders would be needed - I did not use any for this project. This motor/reduction gears came with the kit. It had no instructions or specifications included so I cannot tell you what the ratio is.This should be the same as those found in Ebay but I am not 100% sure.
tsisapik i have a 4 wheel drive robot but the code is not working. share your good code please.
Where do I send the code to?
tsisapik, thank you for giving a reply. pls. send to my mail: deville2k1@gmail.com. i will appreciate it very much -ruben
Ruben Banez Done ...
tsisapik, i'm so excited to open it..... thanks again my friend.
I am using the same components as you are. Will this battery work for me?
bateria-turnigy-3s-20c-lipo-1500mah-_JM
A 3S Lipo will work but since the motors do not have speed regulators or motor encoders, running anywhere more than 5V will make the robot run faster than what would logically be needed for proper control (and avoid early mechanical failure of the gears.) Even with 2S, the motors run hot. What I did was use a 5V/5A UBEC so I get regulated 5V - you can judge by the robot's speed if the 5V is "okay". I would encourage you to experiment ... but use a 2S instead of a 3S ... now because Lipo's are "dumb", be careful you do not fully discharge them.
Hey, great video! I am very new to arduino and was wondering - what are the jobs of each microchip board?
Hmmmm.... The there are two blue microchip boards - one on top of the other. The lower board is the Arduino UNO which contains the "brains" of the robot - the Amtel 328 chip that houses the instruction/code. Along the edges of the UNO board are connectors that the other Blue board connects to from the top. The top Blue board (connector shield) just makes it easier to connect to the various "legs" of the computer at the bottom so you can use servo wires instead of single wires and separate ground / power wires. The red microchip board inside the robot body houses the motor controller. The signals from the brains are sent to the controller which is connected to the motor - which you can call the muscles of the robot. There is a small IR sensitive component at the top of the robot - that captures the IR signals from the IR controller that sends special signals to the brain to run specific programs / code to make the robot run on the object avoidance code or run the direction stop/go code.
Got to put that puppy in a pen that that does not absorb sound .. otherwise it just rams into it as if it were invisible .... nice thing about this is the performance can be improved by changing the code. I was able to change the turn angle to be closer to 90 deg so it moves better. TBD ... getting proportional turns with IR will be one improvement as well as bluetooth control with an Arduino cellphone
Look at the video description for the links to the robot build and Arduino sketch
to rotate only the front wheels are moved. Is that correct?
your video is absolutely amazing!! but i need your help as i got my science exhibhition day after tomorrow. i need to know will the code be different if i use l298n motor shield instead of l293d motor shield?
+Sayantan Talukdar ...The I298n and I293d motor shields have similar wiring diagram so the I298n should work. You may have to play around with the motor connections to make the robot move properly ... just as a FYI.
Amazing project
Thank you ....
Hi! thanks a lot for the links!!!!!!!! I have a quick question.... Since the motors are connected in parallel, will there be any difference in speed if you used only two motors on either side and attatched a castor ???
You can have two powered wheels and a buggy (swivel) wheel and this would still work. So each side of the motor controller powers the two motors on each side of the robot with the motors connected in parallel.
tsisapik
Thanks man!!!
Nice video, Would you recommend this kit as there are no good reviews and was wondering what you think of it. Thanks
The kit is composed of parts you can build from material blanks and buy from the Internet ... nothing special. The code and assembly instructions are not included ... but that's the challenging part. You are limited only by your imagination. For example, install line following sensors and you can make this run on virtual tracks like a train ...
good,
I have liked very much your videos.
Not long ago I have acquired kit and soon I will start mounting it, but I would like to know that you have used exact model of battery in your assembly as also it is interesting to me to know the type of support that you have used for the ultrasonic sensor and where I can buy them.
A greeting...
if I have doubts for the assembly can I write to you?, if you like
+MrSantravis
I was not remembering the previous post on the support of Inclination of Chamber of FPV and Casserole, remain with the question of the battery.
+MrSantravis .... The battery is a 1000 Mah 3S Lipo and because I use a 5V BEC, can run the robot for a long time. You are correct - the soanr support is a pan and tilt machanism. If you have any questions, I will try my best to answer - please read the instructions on the video description as it has the links to the code and schematics.
+tsisapik Thank you, this way I will do it.
maan this is cool. how to move the sensor left & right?
The sonar sensor is connected to a servo that is programmed to sweep from one side to the other ....
cool! may i hv the code as well? syamilah91@gmail.com
Syamilah Nur Sent ... good luck ...
Good effort
Yep as much good effort you put into your channel. Good luck.
great work !!
plese can you give me a general schema of this robot
Abd Elghati Schematic is in the video description links. The pin outs to the Arduino board you can get from the code as well ... also on the links.
okay thanks bro !
I think this robot is mad but also amazing
which battery u r using?
can this battery get in online?
Nithin Dominic Hi Nithin, the battery I am using is a 3S 1560 mAh Lipo battery with a BEC unit used for RC models. This is available in any RC hobby store in your location of course you can always get one on-line.
is one motor driver really enough? I am currently building exactly the same robot but i was planning to use 2 drivers.
+Jonas Van Der Donckt ... One motor controller is enough at least for the code used. All you need is to make the wheels on each side to turn in one direction or turn in opposite directions or one set moves while the other remains stationary. Think of a M1 A1 Tank with tracks and you will understand how it works better.
+tsisapik well, i looked up the data sheet of the driver and the 4 dc motors I used, and it appearently seemefmd that the driver was powerful enough. but my professor of Electronics said I needed to use 2 drivers, so that's why I was confused. thank you for taking your time to reply :) (btw, I made mine after gathering some extra information also with 1 motor driver and it works perfectly ;) )
I make one with 2 motors
There are kits that only have two motors and those work okay.
tsisapik yes agree I will do big project just wait im electronic engineer
caymanguy123 Good for you ..
Do you have a list of the parts you used. I'm looking for the motor drive that you used along with a lot others and can't find any of them.
Mike G I have no list as this robot came as a kit in a box with zero instructions and a bunch of parts. Go through the video that shows the build by sections and the individual parts. I noticed these motors are cheap on Ebay (which is where I bought the parts for my second robot) just look for Arduino motors and a bunch should show up. Do the same for Arduino motor controller and Arduino sonar. You might find it cheaper to buy the kit as well and go from there. Good luck !
Okay, thanks
lovely, just love it. just a question: by what criterion does the servo turns the robot "head" checking obstacles?
The servo moves automatically so the ultrasonic unit can scan the immediate surroundings - I forget the range. When it picks up a ping / echo it calculates the distance and decides the course of action, stops then takes the action. A lot of times the action is not correct and it ends up boxed up in a corner ... funny to watch that happen.
yes i know but how often does the servo turns?
Elia Pacciolla Watch the video and the servo behavior ...
+Elia Pacciolla - it seems when it run in one direction , it will run with the scanners orientend straight in front at 0 degree . When it detect an obstacle approaching it start scan +90-90 degrees until it find a map of front situation . If is blocked it choose to turn back
On what voltage does the motors run and is that the maximum speed?
+x0rify .... The controller voltage is set to work at 5V but the actual voltage would be determined by the controller. Max speed? I have not measured ...
Ok, but what voltage is applied to the Vmot pin of the motor driver? May be 5V too.
it's really nice work ! , but did you put an PID on The arduino code ? plz answer me i need this on my project and thnx
+Ahmed Akkari ... No PID needed at least for this robot. See my other robot ruclips.net/video/fIZYdYqyBEM/видео.html that has PID algorithms for better performance.
i just need a dimonstration of how the PID works on DC motor , without sensor if could help me on it
+Ahmed Akkari ... a) Build the Arduino PID line following robot. Construct a table of the different P, I and D values / combinations and include a brief description of the robot behavior. When you attain the correct matrix of P, I and D values, you will find that the robot does not oscillate and reverts to the line even when it leaves the line ... very interesting behavior to say the least. b) You can also build a quadcopter based on the Multiwii code and vary the P, I and D values in the GUI and note performance ... does not matter if brushed DC or brushless AC, the behavior would be the same. or ... c) Build a self balancing robot like this ruclips.net/video/dmnXyD69PtQ/видео.html with the same PID table and watch the miracle happen when you get P, I and D correct.
okay thank you very much :D your work was awesome
I did the same
how to make it plzplz plzlpzlpzlpzlp make a video on it
+parwez ... The pictures are the start of the video are not enough?
I need to run the car for more than an hour of time
??What type of battery do I need
Battery is a 1300 mAh two cell (2s) Lithium Polymer battery putting out 7.2V. The battery is connected to a Battery Eliminator Circuit (BEC) that drops the voltage to a steady 5V so the robot runs at a reasonable speed (so it has time to react to it's sensors).
Did this require soldering
+dave Cena Yes ... making the power leads from the BEC and replacing/repairing the motor wires. Not at all hard to do.
Where can i buy the gearbox and the chassis ?
Try HobbyPartz or go to Ebay and do a search ... about $90 for the kit.
tsisapik Thanks bro!
в конце видео, (по сценарию) надо бросить девайс об пол! =)))))
+Андрей Васильев ... I did but it gave birth to another one. Where's the video of the beautiful smart robot you built and programmed ?
Meu amigo me ajude!!!
Comprei esse mesmo kit, mas não to sabendo fazer as conexões!!!
Please refer to the links in the video description.
I already checked but still can not ride , I have problem in sensor connections to the board, where I connect
luan nakamura Link D) in the video description. Has a picture and a table of the connections. You can also figure out what the connections are based on the code and the Arduino pins that are called out.
Hello, I am currently building one of these and I am having trouble with turning the robot CW and CCW. It seems like the robot hasn't got enough torque to turn on a wooden surface. Hevent tried it yet on marble though.
Any advice ?
How are you powering your robot? Specs please ...
Hello, I am using a kit robot of this kind: www.keyestudio.com/keyestudio-4wd-bluetooth-multi-functional-car.html
I am powering it using 2x18560 batteries bought of ebay (they are poorly made Ultrafire brand batteries, putting out only 500-600 mAh).
Could this be the problem ?
I am using a 200/255 fill rate on the PWM motor enable commands, could PWM fill ratio improve torque ?
Thank you very much for the reply.
You have a better robot that what I have ... feature wise. Suggest you get in touch with the seller and ask the question you have ...
Ok, I will contact them, thank you for your time.
What did you use to keep your SR04 in place? I would love to pick one of those up!
+frost Hi ... the part/s came with the kit. They are really pan/tilt mechanisms - cameras, lights or anything that needs to be pointed with the use of two servos.
+tsisapik Ah okay! Do you happen to know where I would be able to purchase one of these?
+frost ... Google "FPV Camera Tilt and Pan". Get the items that are close to what you like.
ноги у чувака, как у черепашки ниндзя
+Artem Mashin ... Like? I am a Ninja Turtle ...
can someone give me the link for the chassis that he uses?
dx.com/p/arduino-compatible-bluetooth-controlled-robot-car-kits-146418 The information you seek was in a link found in the video description. There are other sources ... even at Ebay.
Pls help. I need this sketch , tell me where to get?
Read the video instructions for the sketch.
Pls, give me a link
Letter E) in the video description. You are welcome.
geekelectronics.org/arduino/vedroid-mobil-robot-na-arduino-chast-4-podklyuchaem-ultrazvukovoj-dalnomer.html but text in russian language
woof woof? guau guau? гав - гав?
Qwack, qwack, qwack, qwack !!!
Hello ! I'm retro robot dog, under construction.
Please look at my youtube channel (and G +)
Subscribe if you want to look like is formed,
or you want to watch crazy promotional channel.
Have a nice day :)
I would comment but you do not allow it, so I can't.
You can comment here.
The channel is in the process of formation
when I have more time to conduct his UNLOCK comments.
I'm sorry =:]
You can subscribe to my channel, so as not to miss this moment.
Cool design, you have something walking?
How about an honest to goodness robot dog ... Bow, wow, wow. ruclips.net/video/ZlukYGzB-Tk/видео.html
What was the main function of the robot?
Move around and not bump into anything. It could have remained steady and have accomplished the same thing ... but it chose to go forward.
To learn how hard it is to make it work! I have found that this configuration (two parallel rubber wheels) consumes a lot of energy to change direction depending on the type of floor. So I put a simple loose wheel (it's ugly, I know) but it got very battery friendly and allows for many more trials.
I guess I am lucky to be a RC Pilot at the same time. Never out of supply of 7.2V Lipos used for Parkflyers ... of course two balanced charges always available helps.
Bechaini hai kya
????
Please send me the code to your Arduino robot . Thanks!
Done ...
tsisapik Super fast! Thanks!!!
bonjour ton projet me plait je peux prendre contact avec toi ??
No problem ... but be sure you understand how the code works by going through the instructions on the video links ... this will help you a lot.
I like your socks...