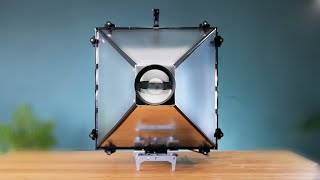
How to make an AMAZING video ring-light for just $25

HTML-код
- Опубликовано: 27 июл 2014
- Ever wanted to get that glamour look in your videos, or have an amazing flattering light? Well, in this video I will show you how to make an LED ring light so that you can give your footage that little 'extra something' to make it special.
The total cost of this build comes to about $25.
Parts links:
Disclosure: These are affiliate links. If you click them and make a purchase from the various merchants they link to, DIY Perks may earn a commission. Affiliate programs and affiliations include, but are not limited to the eBay Partner Network and Amazon Associates.
Can't be bothered to make this? Here's an option from Amazon: amzn.to/2irnLRv
LEDs: ebay.us/e608GL
Voltage booster: ebay.to/2ySKFaX
OFFICIAL LINKS:
Support me on Patreon: / diyperks
Official Website: www.diyperks.com/
Discord: diyperks.com/discord-server/
Forums: diyperks.com/community/
Twitter: / diyperks  Хобби
Хобби


If you don't fancy making this yourself here's an already made one from Amazon: amzn.to/2irnLRv
The link for the ebay LEDs doesn't work anymore. Also, I'd be kind of interested in seeing this project again, with the suggestions Fabian made.
Not bad, however, at full power having 20x 10W LEDs is 200W. That's definitely way too much for LEDs to run at without a beefy heatsink, and definitely too much for Ni-MH AA batteries.
Furthermore, AAs max out at 2500mAh (or so) capacity so runtime will be incredibly short, especially if you're only providing it with 7.2V (6 x 1.2V). Boosting 7.2V up to 24V+ will result in a much higher current being drawn from the batteries - those Ni-MHs will probably not be designed for that much current.
My recommendation would be to lower the current on the LEDs (this will mean reduced brightness, but should be fine for enhancing images in low lighting conditions) and switch to a multi cell Li-Ion battery pack.
WOW I am so happy that you added subtitles!!!! That means a lot to me! So many channels don't add subtitles, it really suck so I don't watch their videos and then I noticed you added subtitles, thank you!! You made a deaf guy happy!!!
MicBergsma You and your videos are awesome, sir.
+Mister R Thank you!
I know this might seem completely random but i never thought about that. I have made a few videos for some products over the years but never thought about deaf people. I know this has nothing to do with this video or anything really but you made me realize that we should all add subtitles every single time. All i ever thought about was not to use too much flickering to not affect those with eye problems or epilepsy. Not once did i ever consider deaf people and i would like to apologize for that. Luckily i never made more then 5 videos i think but i have some plans for a channel under another account for the future. Because of you, i will add subtitles to all my videos from now on no matter what topic it is so thank you for raising awareness about this issue so many of us don't think about.
Interesting project but from a engineering point of view a bit weird. Here a few suggestions to make the design better:
- If you run the LEDs@ 24V-25V they run at 3.xx Watts rather than 10W, so you might use 5W LEDs to begin with..
- 6 AA Battieries can only supply around 100W safely. If you draw more power thy might explode. Not exacly safe to carry around in your pocket.
- Usually you should run LED with a current source not an voltage source. Leds don't like voltage sources. The 5W version runs on 8V@700mA so no need for an inefficient voltage booster
This might even work without current source (Directly connected to 6 AA Batteries) as the internal resistance would limit the current automatically.
- Why on earth would you use paper clips?? Just use 2mm-copper wire, wrap it around an bottle and solder the ends - done...
- You can get small LED Heat-sinks with sticky-pads on them to cool the LEDs this will increase their lifetime greatly. Good cooling is imperative if you run LEDs in parallel mode as they tend to destroy themselves (LED gets warmer - draws more current away from the other LEDs - gets warmer- melts....)
- There are plenty of plugs you cannot connect the wrong way (Like Molex). No risk of burning anything...
- Just use a racing-battery pack. They are more stable and easy to charge. Usually they already come with a Molex connector.
***** it would basically be the same video, but with a more efficient and safer end-product.
couldn't agree more and i would add a switch to turn on and off the leds ;D
***** But as you said that they're only running at 3.x watt rather than full 200W then there's no problem in using 6 AA batteries, that will supply 100W since the LEDs are only using around 60-70W, there's no risk of overdrawing power and exploding of the batteries..
LEDS over 1W need heatsinks when they run at full power. I believe that's why he used 10w LEDS. Because with 10w LEDS you can have the same amount of Lumens as 5w's, without having to add any kind of heatsink, while on the 5ws you would need heatsinks if run at full power. Look at 4:48
I wish I understood what you were talking about Fabian... I like to actually understand what I'm doing when I'm doing it, and not blindly following directions. It would be great to know how to implement rc battery packs and what not, I'd also be interested in doubling the amount of leds.
Matt, dude, DIY Perks.... You don't have enough videos. I've already watched all your uploads and I'm craving more. I already have the materials to make my own "Cloud PC" and "Control Hub" ordered and soon to ship. I also plan to make a Headphone Stand, Flood Light and Bluetooth Amp like you've done. NOT ENOUGH CONTENT MATT!!!
I agree :) I need to make more content... been working hard at stuff the past month though, so will have some up soon.
+DIY Perks where did you get the pin connectors ? I am trying to find them online but can't find anything similar
+DIY Perks first off, I don't know how you don't have more subs and second, couldn't 22 awg kanthal resistance wire replace the paper clips??
Kanthal is used as a heating element, meaning if you run current through kanthal wire it gets HOT (that's it's purpose). So no please don't try and use kanthal wire to connect components.
Unless you wanted a ring heat-lamp and fire hazard combo!
In addition using paper-clips as wiring is also not something any electrician would recommend.
Paper clips are usually comprised of steel so they definitely aren't a recommended conductor for electricity, not to mention the fact that they aren't insulated(risk of electrical shock).
all these planning but do you even have results?
This may be one of the most underrated channels on RUclips. Great job!
5 years later still underrated
IKRRRR
7 years later, still underrated
love the results! Great examples of what it can do at the end. Good job fellow creator.
I've been watching your videos and seriously, you need to be a presenter on TV. You need your own show.
This channels videos have consistently put every other DIY channel on RUclips to shame. The production quality is beyond anything I've ever seen before! Amazing videos.
Wow your videos have a much higher quality than some of the other DIY channels I'm subscribed too and they have 500 000 + subscribers. The editing, the music and the quality of your audio really raises the bar. I'm 100% sure that if you just keep doing what you're doing you'll be BIG! It's privilege to watch your work, thank you!
I've done a similar experiment before I saw this. Being an electronics engineer, I see some flaws in your design that can be easily corrected.
1. Power. There's never enough power in a set of household batteries and a power booster. Buy a 12V 200Watts power supply for about $ 35. Add a led dimmer for $ 9 and you are more flexible.
2. Heat. Using the full 10W from every LED, they need a heat sink. I couldn't touch mine after a few minutes. So you should screw them on an aluminium ring using the little mounting holes. Don't forget heat paste you can buy for a few bucks.
So it's more work but then you have a real good ring light. Believe me, you can't look directly in 200W LED ;-). If you stick with the battery solution however, just save money and buy 2-5 Watt LED's.
One more tip: buy a piece of metal wire in a hardware store. Much quicker than the paper clips.
Too lazy for that.
I love this! I just ordered 100 white LEDs that I won't need now since I fixed the project I was buying them for. Now I have something new to use them for, thanks!
Best channel on Earth. Thank you for sharing these awesome DIY stuff.
My... GOD!!! It's... GORGEOUS!!!
Haha! I loved the intro zooming out! With the Star Trek music!
THIS GUY MAKES IT LOOK SO EASY WHY IS HE SO GOOD AT ENGINEERING
Great to see another of your projects!
Dude that look awesome especially when the dog is running.
I've missed this one in the past, but what an awesome and slow video.. It is so great! (Slow as in, no rush and easy to understand and all just good things)
Really awesome video! =)
i love your channel, you are a true inspiration!! Thank you very much!!! you give me so many ideas!!
5:31 the happiest face ever
Micbergsma commented on this video. And gave you a compliment. You should feel honored. He's the man and always helps me out with my gopro questions.
That's bloody genius mate, well done
That ending was so beautiful with that song. Lord I don't know, it gave me the feels.
The fact that he asked so politely!
Wow this is amazing, you're so creative! I don't think I could do this though...my circle would look like a blob and I would end up blowing something up LOL, but it does look like a fun project! Looking forward to seeing more xx
Interesting, as always, Matt! From the refreshing quality of your clearly spoken English to the high quality of your videos and engineering, you're a true professional! I plan to build this LED ring to put around the lens of my lupe stand (5 inch magnifying lens) which should make it much easier for my aging eyes to focus on the tiny SMT circuit boards I increasingly find myself building. However, to mitigate the high heat and current problems some people have reported I plan to use 12V LEDs, a 3S lithium-ion (18650 type) battery pack, and a small buck converter to drop the voltage to perhaps 9V instead of raising it to 24V as you have done. This SHOULD lower the heat and current demand considerably while allowing a simple way to dim the light, and replacing the trim pot on the buck converter with a standard pot and range limiting resistors should give easier dimming control. If the voltages work out I could later replace the battery and buck converter with an appropriately sized power brick and run it off mains. Thanks for the inspiration!
This is one of the best videos iv seen in ages!!
You are a genius!! I regret not understand everything you say, English is not my native language i from Argentina
Saludos!
Amazing tips! Great results!
Cool design!
wow. love it, making it.
AWESOME IDEA
Pretty cool! I would add a hotshoe adapter to hold the battery pack, that way you'll have more freedom of movement.
Thanks for takingt he time of making a video and sharing!
Да он просто гений !!! Где б ещё найти такие здоровенные диоды ...
Fantastic just awesome.
That is so cool! Great job!
Beautifully edited!
Brilliant, love it.
This is fantastic!
Well... I have to say that your ideas and tutorials are AMAAAZIIING Matthew :D
Thank you for this!
THIS IS AMAZING!!!!!!! THANK YOU SO MUCH!!!!
Editing genious!!!!!
Love it man!
That was the coolest DIY EVER!!! I felt calm and exited at the same time
rather me make a ring light, imma make a table lamp faceing the wall to give it a cool effect or even my own hidden lighting for me desk, thank you for this tutorial, best ive seen in ages
REF paper clips (take some fine grit sand paper and sand if the solder does not want to attach) flux is also good to assist.
Thanks for sharing!
Work Of Art, your a genius
Awesome DIY and it looks really cool too!
Amazing video as allways! Thumbs up!
Very good idea...many thanks
I ordered all the parts apart from the voltage booster, I choose to order the XL6009E1 (as it should be a more recent design) and yours I wasn't in. I only have to manage to order 19 (odd number, I know) power leds and my ring will be existing of 16 or 18 leds. The spare leds will be used to make other projects.
Looking forward to build this myself.
For the casing, I'm not sure what I will choose, as I don't use CD's for years any more ...
Thanks for the guiding!
Another method of mounting the filter ring more securely would be to use what are known as "stepping rings", (the idea is to allow larger / smaller filters to be used on an existing lens) Suppose the lens filter is 42mm, you could buy a ring that steps it down to say 38mm. You then use a step-UP filter to being is up to 42mm again. This effectively gives you a "H" shape, (in this example, a 4mm groove) and the perspex fits in the groove between two larger filters. Also, you could use an actual CD as this has a shiny surface which will help reflect even more light onto the subject
The advantage of underrunning leds is the raised efficiency (besides easier thermal management). Driving the ring @ 200W will result in the same amount of light as driving it at about 130W. But with way more heat created.
this is actually so awesome!!
This is awesome and professionally done
Points for video editing! Amazing :)
Man, this is so relaxing to watch. I didn't even realize I was binge watching this channel.
Omg!!! Genius.
Awesome, can't wait for the led panel tutorial
your life is so aesthetic 🥰
I hope youy know that you are the best Maker in the internet. Your videos are just amazing.
It's very nice. One thing though, if you film reflecting objects it is clearly to see all the separate LEDs. Wouldn't it be good to add something like a diffuser to make the light less sharp and pointy. Maybe let the light reflect on a piece of cardboard, you think of something.
GENIUS
WoW This is actually so amazing!
Amazing video, great work!
Great stuff man!
fantastic!
Wow! It's great job man!
thats, FREAKING AWESOME!!!!!!!!!!!!!!!!
im going to try this! thank you!
Great tutorial, short and clear.
This is so cool!
Excellent job !
The intro was amazing
This is the most epic tutorial I've seen yet! Great job!
Very cool and well-done! Thank you for sharing!
Bloody clever.
I wish I could give this video more thumbs up. Ordered everything needed and I can't wait to make this thing :D
This is a fantastic tutorial. Thanks!
This is excellent
Dude... super clean video.
Perfect!
dude u are an amzing video editor!! this felt like i was in a movie!!
Very awesome.
Well this video totally worth my subscription!
Very cool bro! Congratulations!
there's too much good stuff on this channel, jesus man. I start watching one video and literally wanna click the other 3 on the recomended bar
Hey DIY Perks , I just finished my light ring and it works like a charm! Thanks a lot for your great explanation.
thats pretty damn impressive
Best channel ever.
this is awesome!!!
Definitely should put a diffuser from those lcd screen and a nice 3d printed enclosure :) reallynice diy technic
Sooo awesome thank you
Good job!
cant wait for the light panel video
You are amazing!!! Where have you been all my life! I only found you yesterday!
love your channel!
wow perfect!
And as of Nov 9, 2017, 173 people are jealous of your mad skills. Your videos are too cool for school.