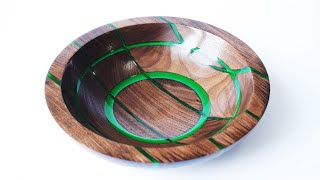
How CUTE is this bowl!?

HTML-код
- Опубликовано: 27 сен 2024
- This bowl is available for purchase at: formanwoodwork...
_____________________________________
Today's video: Last year, I tried my hand at turning inlay bowls for the first time, and for the inlays themselves, I used both blue ( • Woodturning | Walnut B... ) and black ( • Woodturning | Cherry B... ) craft stones. I really liked how they turned out, and so ever since then, I've continually been thinking about what else I could use as an inlay to create unique looking projects. For a while, I considered using rope, given its intricate and wavy pattern, but my one concern was that I had no idea whether or not it would turn, even if cast in resin. A few weeks ago, I finally decided to be brave and give it a shot! For the bowl, I used a cherry round with a few interesting voids and cracks. I first turned it down to about 95% of the shape I wanted for the final bowl before turning out the inlay. To make sure the rope didn't float, I hot glued it down to the bottom. For the resin, I used a relatively faster curing epoxy resin (Alumilite's clear cast), just so I didn't have a bunch of resin soaking into the wood and darkening the grain. This, however, became a bit of a problem. As far as I could tell, the resin seemed to struggle to fully soak into the rope, and even though I let the bowl cure in my pressure pot, the rope introduced a TON of bubbles into the final casting. When I took the bowl out of the pot (as you can see in the video), I was nearly ready to start over. However, just out of curiosity, I decided to toss it back on the lathe, trim the rim down half an inch or so, and just see how bad the bubbles were deeper into the rope. Although bubbles were definitely still present, they ended up being very difficult to see against the grains of the rope, and after I applied the final coats of finish, they almost seemed to just blend together. In the end, I'm pretty happy with how it came out!
In the future, I think a walnut round with a much lighter rope would make for an interesting project! What do you think?
_____________________________________
Want to use the same pigments shown in our videos? Check out the following affiliate code for a discount on SquidPoxy products! squidpoxy.ca/?...
_____________________________________
Check out our Instagram! www.instagram....
_____________________________________
Key equipment/products I used:
Rikon 70-220 VSR Midi Lathe: www.leevalley....
Woodstock 1/2 inch bowl gouge: www.amazon.ca/...
CA Technologies Resin Casting Pressure Pot: www.finishsyst...
Alumilite clear cast: www.alumilite....
Waterlox Original Varnish: waterlox.com/o...


![Tee Grizzley - Blow for Blow (feat. J. Cole) [Official Video]](http://i.ytimg.com/vi/wNLN5xsx5dc/mqdefault.jpg)


Very nice indeed, and adding a new dimension to wood turning! Your thinking here just seems to reassure my belief that wood turners are the mad scientist’s of the art world. 👍🏻👍🏻
Thank you, Kev! No evil ambitions just yet, but you never know ;)
You could make that bowl a million times and never repeat what you put in that groove, great work. Cheers
Thank you, Darryl!
What a fun idea that rope inlay is! Your project turned out great. I will have to admit that the crack down the center of the bowl had me on the edge of my seat! I was so concerned that mounting it on the check with a mortise would put enough pressure on the wood that it would split. 😨 I was so happy to see that it didn't happen! 🙂
Really like the Waterlox finish. Nice piece and great work.
Thank you, Jay! Glad you like it!
My dad would love this one, gonna give it a try once my skills are a little more honed.
Very nice!
Very nice work 👍
Thank you!
Congratulations on what you do !!!
Thank you, Gabi!
Very nice save. I was looking forward to seeing how you trimmed the butt ends of the rope to fit the groove.
Thanks, Greg! I forget, did I not show that? If not, I recall it not being very exciting. I took the sharpest scissors I had to get a nice clean cut, and then as I pushed the rope down into the groove, the two ends just blended together really easily without any additional steps on my part. I thought it might be really obvious visually where the ends met, but in the finished bowl, I couldn't find that point; it all looked the same!
It's amazing what can be put with resin. Cool bowl.
Thank you, LaNell!
Nice! Really nice. You inspire all kinds of ideas. Thank you.
Thank you, Ed! I'm glad you like it!
The rope is very porous and even the pan was not enough to eliminate the bubbles. The ideal would be to have sealed the rope before applying the resin over it. Congratulations on the job. Very inspiring.
Definitely, although I'm not quite sure how best to seal the rope. If I seal it before I put it into the rim, then it will harden and become much more difficult to work with. If I try and seal it in the rim with perhaps a thinner and longer curing resin, to give more time for the air to escape and clear out, then some of the resin will undoubtedly soak into the wood and leave it darker around the rim.
Will need to give some time to this!
I would immerse the rope in the resin, let it drain well and before it hardened, in a gel point, I would place it in the crack. I would let it dry to fix it well and seal the pores of the rope and then I would apply the final resin. but everything is always a learning experience. even more so when we work with resin.
I've seen this type of inlay done before and yours looks fantastic ... the resin seemed to be quite thick when you were pouring, was that due to temperature and is that why you got the bubbles?
I've just started my woodturning journey and I'll definitely be trying resin at some point ... you and other provide a massive source of inspiration for people like me ... thank you so much for sharing 👍
Thank you, Barry! As for the resin, I chose to go with a faster curing resin as I didn't want it sinking into the wood (which would have darkened the cherry). Faster resins are usually thicker by their nature, so that was probably the biggest reason. Had I used a slower curing and thinner resin, it might have worked better with the rope, but then it might also have darkened the wood a bit. Definitely need to experiment a little more with this!!
@@formanwoodworking Ah, another thing I've learned ... faster = thicker 👍
I see what you mean about staining the wood, you could have brushed on a thicker type to seal the wood then used the thinner stuff, but more time, and I don't think it'd have made much difference ... still turned out beautifully 😀
Maybe a less viscous penetrating epoxy next time? 🤷🏼♂️
That might be my next step in trying to solve that issue!
Luinko oikein että kirsikka puuta? Upea kulho
😀 NICE
Thank you, Jeff!
A beautiful bowl!…I could see in the video you had some issues with the rope, but it is a stunning detail to your design!!👏👏👌👌🌟🌟
Thank you, Fran!
Super cool piece! I'd love to see you experiment more with the rope theme to see what you would come up with. Great work as always!!!
Thank you, Jayson! I've been considering making a pair of side tables for our couch out of walnut tiles (or maybe some other wood) and a light-coloured rope for the "grout." Thought that might look interesting
@@formanwoodworking that sounds super cool! I hope you record the work process and share it here in your channel! Would love to see that!