Easy-to-make Belt Sander/Grinder Wheels

HTML-код
- Опубликовано: 7 сен 2024
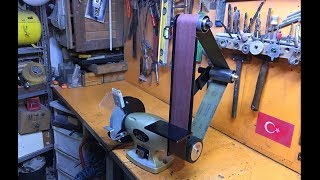
- I'm going to show you how I made these wheels for my new belt sander. I needed them to have a small diameter, so I decided to use aluminum pipes rather than wood.
More info on my website: bit.ly/3q0dInI
Plans for this project: bit.ly/3lgnNJS
Where to get some materials and tools used in this project:
Modular Workbech Plans: bit.ly/2V1VzaS
X-Motion DIY Portable Mortiser Plans: bit.ly/3fT7lQE
Band Saw Plans: bit.ly/2JisRjf
Multi-Function Workbench Plans: bit.ly/39eKtrr
Saw Blade & Router Bits Sharpener Plans: bit.ly/2V4YSy7
Lathe & Disc Sander Plans: bit.ly/3fFh1fa
3D Router Plans: bit.ly/37f6HH0
Portable Workshop Plans: bit.ly/36iYmTp
Router and Saw Table Plans: bit.ly/33q7xj1
T-shirts and Stickers: bit.ly/2RMYDET
www.skil.co.uk...
Follow:
/ paosonwoodwork
/ paoson_woodworking
/ paoson_woodworking
Music from Bensound
#woodworking #homemade #diy #beltsander #wheel


Edge Belt Sander Table Plans: bit.ly/3lgnNJS
I've never seen anyone make their own snap ring using a washer. Love it.
thanks Tony!
Using a standard washer pressed onto a groove in the threaded rod is such a great idea.
Your kind of a genius. A true inspiration to watch your videos. Thank you for sharing.
thanks!
This is a waaaay underrated channel. You should be up there with Matthias and the rest!
Thanks for comment! :D
Es increíble el mimo y la calidad con lo que haces estos videos, tienes uno de los mejores canales de brico que hay. Bravo!
gracias Juan!
Hi mate I think you are one of the best RUclipsrs going thanks.
Hi Martin, I share you your opinion. One of the best.
If you'd like to help me, you can upload subtitles in your own language following this link:
ruclips.net/user/timedtext_video?v=uaiu-sJ9nAM&ref=share
Puedes contribuir con subtítulos en tu idioma en el siguiente enlace:
Paoson WoodWorking Nice job, I have already made a steel one (my first), then I made another from aluminium which turned out great, but because of the thick aluminium I used to build it, it did turn out to be quite expensive. Mind you, it cost a lot less than those silly £1300 ksg (?) Models, and mine is superior in every way! Mine has a fully speed controlled 3hp motor. At any speed the belt is moving at I can stand a 50p piece on any part of the grinder with virtually no vibration. But, on this version I added dampers to the motor housing to reduce the vibration to virtually non existent. Also the I love the super strength of the aluminium frame with how lightweight it is. It also looks like a beast with a lot of it being solid square bar stock. I will never need to build another, but I do like making them, so I might make more....maybe to sell. Who knows.
(Paoson WoodWorking) Hello !
I wish to congratulate you as much as I can thank you for the amazing work and video you present.
Watching I got to that particular video and motivated me, furthermore, your report to help compilation. So I felt like my obligation, after so many nice constructions and I wanted to offer ... a small lively flower in your big and beautiful garden.
I hope that the translation I gave (in the Greek language) will help the possible approach by Greek viewers who would like more than information than the good and detailed viewing of the audiovisual works you present.
On my part (with finding time) I will try to translate and some of your other videos , always in the same spirit of the support of the beautiful activities.
I wish you health, also imagination and creativity!
Cannot wait to see the next part! Thanks for sharing!
Hai, i like the way you made the Stopper Rings for the rods
(Cuts the rings with a grinder and smash it with hammer)
you are simply a genius...thanks for sharing your knowledge
Buena idea, un trabajo muy fino y bien acabado!. Saludos
This guy is incredible!! If you read this Paoson; are you an engineer? Did you study any kind of design?
His designs and inventions are just fantastic!
Well done una vez más!!! Simple, práctico y eficaz. Como todo lo que he visto de ti. Bo traballo Suso
gracias Pablo!
Absolutely brilliant!
I don't know if I need another machine, but this looks like it could find a space in my workshop :D Looking forward to the upcoming project. Thanks for sharing :)
thank you!
Excelente trabajo, muy buen video, estaré atento a la continuación. Gracias y Muchos Saludos.
Super! Will follow the whole process! Thanks for share this Suso!
thanks Lluis!
Amazing construction! 👍👍👍
You could use heat shrink tubing for underground cables to wrap your drum wheels in something rubbery. Plus it is easy to replace later. I saw in your other vid you used epoxy
It is a good idea, thanks for sharing!
Wow you'r a Genius!! That's Awesome!! "Thank you for sharing your super videos"
Excellent video and design . I am intrigued by that strange vice you have
Great video.
Thank You Paoson!!
Bom dia, como vai ? Gostei novamente, uma sugestão, é possível um vídeo de uma lixadeira de cinta para cutelaria ? Por sua ótima explicação, riqueza de detalhes, e pela confiança depositada em seu canal, abraço
obrigado! Vou tentar algum dia
Is that easy. I wonder the difficult one. Good work.
Always great content and quality!
excellent work mate I have an idea and thanks for your ideas it will help in mine.
Looking good man, great work 👌
thanks as always!
Subscription earned.
Gracias por los subtitulos.
Very useful video. Thank you.
thanks as always!
Wow this is so amazing
cool mechanics
thanks Maxim
Very nice
En vez de desgastar el interior del tubo de aluminio podrías enfriar el rodamiento y calentar el tubo, lo que te daría un ajuste perfecto.
Martín Alfredo Burcheri Voet buena idea se dilata el tubo y al enfrentarse se ajusta.
You need a sponsor
Hooray! New video.
thanks! :D
man this in fantastic! saw the post in instagram and ran to watch the video. You even made your own "snap" ring, wtf xD. If you ever need something turned on a metal lathe or milled, just let me know :D I know you can manage, but I still wanted to offer :P cheers!
thank you so much mate! I'll let you know if I ever need turned parts in metal :D
a great idea thanks for the video
thank you so much!
Super!
Very useful video!
thanks mate!
Good work thank you and hope more
Great video man,very helpful thanks..I wonder if you have a video on how to build a drill press
I'm having a hard time deciding which project of yours to build first, I'm leaning towards the lathe / disc sander / thickness sander / belt sander.
www.paoson.com/en/blog/why-should-i-build-my-own-tools-n101
Hi! Thank you for all your videos, I just subscribed to your forum etc today. Quick idea, do you think it would be complicated to combine it with a kick powered flywheel (think old school Singer sowing machine) in order to make it oscillating?
muito bom
Suso, veo que en tu sierra de mesa ya adaptaste la caladora (jigsaw), tienes vídeo, el post en tu página o los planos de cómo lo hiciste? Ya que en los planos originales sólo viene para el router... Gracias!
hola Anuar, mira esto:
www.paoson.com/es/blog/guia-para-caladora-invertida-n60
De donde viene este Plywood? parece perfecto! no consigo encontrar una tal qualidad en Francia. beautifull Work by the way!
debería ser fácil de encontrar por Francia, has preguntado en almacenes de carpintería? Normalmente procede de paises nórdicos...
Hi, it's so nice
But I have a problem that my bearing is not fiting in pipe and I don't have dremal machine, so you have any other idea please
hi Praneet, you can use a drill with the sanding drum instead of a dremel
if the diameter difference is not so big you can heat up the pipe, snap in the bearing and let it cool down...
Parabéns pelo trabalho ficou muito bom.
You should have put the bearing in the freezer for an hour and heated up the Aluminium tube
what is the diameter of aluminum and steel pipe and what gauge?
puedes inventar algo para hacer bien redondas y planas las hamburquesas caseras??
segura que ya existen moldes... pero pensaré qué más se puede hacer. Gracias por tu comentario
aja! existe algo asi como una prensa de metal.. pero tus trabajos son mas elegantes, practicamente son objetos de diseño cuando "descansan". como sea.. gracias por responder! saludos!
Je pense que le diamètre des rouleaux est beaucoup trop petit et que cela induit une usure accélérée de la la bande textile emeri . Il ne faut pas descendre en dessous de 5 cm (2 pouces).
Excelente!!!!!
Amigo, como se llama el programa para ver los planos en 3D?
mira esto:
www.paoson.com/es/blog/tutorial-del-sketchup--n36
2:47 ... that drill press. Where can I buy that drillpress. ?
check this out:
www.paoson.com/forum/viewtopic.php?t=204
Hola Socio! Tengo una duda. Qué tipo de contrachapado usas? Abedul? y de qué grosor? 18 mm? 20 mm? Un abrazo!
hola, normalmente uso el de abedul 18mm
Lo digo porque he apreciado que la tapa superior del motor del torno, la que está doblada con surcos, es de 15 mm? Quiero decir; si es de 15, con ese delicado espesor se pueden hacer los surcos para doblar el contrachapado sin temor a que quiebre?
esa pieza es de 9mm, para doblar de ese modo mejor usa el de 9. Como ves en el vídeo, corta hasta casi la última capa del tablero, luego humedece un poco el tablero y te funcionará sin problemas!
De 9mm solamente??? Vaya... parece increíble que no se rompa... ok ok... Es que necesito doblar contrachapado de esa forma para un proyecto y necesitaba saber el grosor para ir seguro al hacerlo. Pues muchísimas gracias tío! ^_^
👍
thanks!
What kind of drill press you are using at 2:44.
take a look:
www.paoson.com/en/blog/drill-press-stand-n43
What software did you use to draw your projects?
take a look:
www.paoson.com/en/blog/sketchup-tutorial-n36
This is great but not so easy
Hi, I know the name of the program you are working on
Can i have the builet from today
Чем зарабатывает этот кулибин себе на жизнь
🌟🌟🌟🌟🌟👌!
not good video presentation.