Arduino Tutorial: Tachometer (RPM Counter)

HTML-код
- Опубликовано: 13 июл 2024
- Making a tachometer with arduino has never been so easy. I am not only going to show how you can make your own, but also will mention the pros and cons of a few types of RPM sensors, mainly the IR proximity sensor and the hall effect sensor.
Arduino sketches:
- Simple tachometer (Serial): drive.google.com/open?id=1fF-...
- Simple tachometer (Serial) with 2 sensors: drive.google.com/file/d/1k9AA...
- Tachometer with 0.96” OLED display: drive.google.com/open?id=1oll...
- Tachometer with Nextion display: drive.google.com/open?id=1KU-...
Nextion display tachometer gauge (3.5” enhanced): drive.google.com/open?id=1HcQ...
Components:
- Hall Effect Sensor A3144: amzn.to/2zjmkx3
- IR Sensor: amzn.to/2Fgm3AG
- Arduino nano: amzn.to/3iru0op
- Nextion 3.5" Enhanced: amzn.to/3qMfjTd
- OLED 0.96" I2C: amzn.to/2UNDCLO
Recommended Tools:
- Electronic Parts Tester (ESR LCR-T4): amzn.to/2QvQJlP
- Breadboard (good quality): amzn.to/2QsyY3C
- Storage Case for Jumper Wire: www.walmart.com/ip/The-Hillma...
- Multimeter (Fluke 17B+): amzn.to/2L3PNQk
- Rigol DS1054Z Digital Oscilloscope: amzn.to/2C5ZwD7
Note: As an Amazon Associate I earn from qualifying purchases.
Website: www.interlinkknight.com/
Patreon: / interlinkknight  Наука
Наука


Thanks for sharing, that is exactly what I've looking for. This is the best video about arduino tachometers I found on youtube.
Best RPM sensing video! Can't thank you more!!!
One of the cleanest code and greatest outputs I've seen so far. SUBBED!
Aww. You are so nice. Thank you
the Video is very very good and that is exactly what I've looking for. This is the best video about arduino tachometers...
Wow very interesting, I'd never considered measuring the time between pulses over number of pulses per time period before. Thanks for including links to your hard work, much appreciated from the UK.
I'm glad I could help. Cheers
after 2 days search in google, finally, this is what i want. THANK YOU...
Thanks for the video! Helped me understand a few things about a hall sensor tach I bought for my old boat. Cheers!
Very nice project and well documented. Thanks a lot!
Many thanks for the video. This was a real life saver for me. Keep up the good job bro.
SO great. This video is SO great. I'm in a project right now just that requires just this (except my output must be directed to an analog 0-10V pin). You just saved me an ETERNITY of trial and error. GREAT job, kudos!!!!
I am so happy to hear that. Thanks for the comment
LOL i have to do the exact same on an 1993 Audi 100.
Really good set-up mate love your work
Thanks so much for this awesome video and code. It's really well put together and the code is very well documented/commented. I'm really new to coding and Arduino, and just by reading your code and comments (and a lot of furious googling) I have learned so much. You have probably saved me months of work. Cheers.
Thanks for those words. You have no idea how happy I am knowing that I could help you in that way. Your comment makes me smile :)
Good luck.
@@interlinkknight InterlinkKnight please show how to automatically lock a car when the car reached 40 kmph and AUTO unlock when engine is off from start. Awaiting with much appreciation. Thanks.
@@tnamen1307 You should be able to do that with a simple loop + function. When RPM > SETVALUE = Lock(1) and set lock to one on setup
Thanks for sharing! I was working with a hall effect sensor today and was frustrated by the inaccuracies and refresh rates. I will have to try your code.
Hi @InterlinkKnight by far your tutorial is the best video about RPM meter/tachometer with Arduino (DIY). Thank you very much!!!
Thanks :)
Hi, fantastic stuff. Really helped me out.
Your code comment " CurrentMicros should always be higher than LastTimeWeMeasured, but in rare occasions that's not true."
Arduino documentation: "micros() This number will overflow (go back to zero), after approximately 70 minutes."
Hope this helps.
Thanks for your examples, it perfect for my project.
This was the one the tachometer in arduino was searching Thankyou so much 🙏🏻🙏🏻🙏🏻🙏🏻
:)
Oh man thank you AGAIN. I've past the last 2 days trying to figure out why my tachometer wasn't working. Tried the number of pulses per time interval but had no success. But now you gave me a new way to look at the problem and it seems so much better! Thank you very much, I'll probably be able to retrofit my '69 car gauges with a more accurate one! :)
That's awesome! I am really happy that I could help.
@@interlinkknight it worked like a charm! Now I need to refine it and include it in my full sketch. Thank you again!
@@interlinkknight when I said refine I wasn't saying it's not good. I mean to Match the rest of my code! No misunderstood here, thanks again
I understand. Don't worry. Good luck with your project.
@@interlinkknight InterlinkKnight please show how to automatically lock a car when the car reached 40 kmph and AUTO unlock when engine is off from start. Awaiting with much appreciation. Thanks.
Nice project as always. I was actually looking for a smoothing code. Cool!
Great!
Great work (as always) many thanks for sharing.
best vid on youtube. thanks a lot.
Great video I haven't played with Arduino in a very long time and this was very useful I actually took this code and added in a function to activate a relay as a kill switch at a set RPM with a set delay to use as a Small engine rev limiter
That's great. I'm glad I could help
I love it! I will use in my car, your code looks so great!
Thanks!!!
Cool! It's always nice to know I could help. Good luck
The best code and you too!!! Thank you very much!!!
Thank you man, appreciate your work soooo much
Great presentation !
Thx a lot
Damn your tutorial is very very good)),
Thank You very much!!!
Excellent project. I like it 👍
respect...!!! thanks for great tutorial & example codes...
Excellent work!!
A really good Arduino program. Most of the Tachoprogram count the impulses per time. For a low rotation (city car) and for a use as speed control the reaction time they are to slow. And you thought on all situations. But even using a Hall Sensor Switch with Schmitt Trigger it was nescessairy to implement a RC Filter to avoid false interrupts.
I use a disc with 36 magnets on a wheel with 60 cm diameter to measure and control up to 45 kph down to 2 kph until it shows Zero.
Thank you verry much.
That's great! I'm glad you like it :)
You are great, love these
Good article on tachometers -- thank you.
This code worked a treat. Thanks!
I'm glad I could help
amazing info. congrats !
Thank you very much!! It worked perfectly for my application!
I'm glad I could help :)
Nice project, thanks for share
this is exactly what I need, thanks so much!
No problem
@@interlinkknight I have a project to.auto lock and unlock car
please show how to automatically lock a car when the car reached 40 kmph and AUTO unlock when engine is off from start. Awaiting with much appreciation. Thanks.
Amazing. Thanks for sharing!
Work Amazing :D
Very clever. Thanks.
subD!! awesome video!! Thanks for your hard work and very helpful video!
woow it is a great idea!
Super vielen DANK! VIEL gelernt!!! Thanks a lot!
excelent proyect!!
Cool stuff
very nice! thanks much
very cool, thanks !
Wow , you are Boss!
thank you man . you are nice man
that`s cool! thx!
This guy is playing waaaaaaaaaaaaaay too much with Arduinos. Great video!
Interesting RPM implementation, I've combined it with ESP32 PCNT and the results are really impressive. To do test in noisy pulse environment by reading RPMs from my gocart 2-stroke engine from spark coil (via induction coil). Thank you for sharing!
I'm glad I could help
Hi sir can you help me for code for esp32 ?
@@interlinkknight thanks for sharing really help me
Wow anyway u could share code?
Superb, in-fact thanks a lot. Actually I was searching and got an idea from this project.
I'm glad. What was your idea?
@@interlinkknight actually I have a 3D printer and its filament sensor is only detecting filament either 0 or in 1 condition but I want to make a device which detect while filament is stucked ( non moving position ) for few seconds
@@interlinkknight please advise will it work or not
Yeah, that would work. Make a wheel spin with the filament and a few magnets on the wheel. With the hall effect sensor detecting the rotation, if for a while doesn't detect pulses, then create an action like an alert. Although it has to detect if it's printing or not, so that way doesn't alert you when you are not printing.
@@interlinkknight thanks dear
I love you bro
Nice job. I am using a Pro Mini board connected to Pin 2. I did find it necessary to use pinMode(2, INPUT_PULLUP) to avoid extraneous signals resulting in unstable results at higher speeds.
Was it?
where i can write it?
that got a sub
Glad to see the solution I was trying to find, I am having no knowledge of electronics if you plz can help me build this.
Not sure what do you want me to do. I already show the connection and i provided the code
Thank you and I will start to do this Tacho for my E-Go kart
That's cool!
@@interlinkknight I already did build this set with Hall sensor and your program calculation quite accurate on Frequency reading compared with my Frequency Counter. Thank you.. Nice work
I'm glad. I'm happy to help :)
@@interlinkknight I have Question , Can I use the Basic NX4832TO35-011 instead of Enhanced version on this HMI file? because cost too expensive for the Enhanced version
Yes
unlike others u did a grate work, keep it up.
i m happy to see the code for different platform , which is nice, also u explained.
Thanks for your kind words. I'm glad I could help.
Thanks
Hi. Great Job. What kind of electrical/signal protection/filtering circuit do you use for the entries of pulses signals from sensors to arduino pins ? Do you think any kind of this protection/filtering circuit will be a must when tacho signal comes from a 12V PWM fan mainly used for Computer Liquid coolers ? Should i be confident about signal comes correctly filtered and protected from the origin at fan circuitry ? Thanks in advance and again, great, great job.
What you need is a schmitt trigger to filter noise, but I prefer using sensors with included filters, like that ones I mention in the video.
As far I know, those computer fans already have a filtered sensor. Only one way to find out (trying).
I guess you don't have an oscilloscope? That would help to see if the signal is clean. Basically if works, it's fine. If you see weird readings, then you need to add the schmitt trigger.
I hope it helps. Good luck
Ur video is really awesome and Helpfull and very smart coding process.
I have just one question , if I need to add another interrupt so i can calculate the rpm for two wheels , Is all i need is to replicate the same code with different variables ofc ? is that going to slow the calculation process?
Someone told me they tried it and worked. The arduino uno/nano has 2 interrupt pins (pin 2 and pin 3) so just use those. Let me know if works
Thanks for this! I want to try to build this system on a motorbike (but I'm not quite sure if it will be enough with a small magnet). Will try to update this comment in the future with my results, in case it can help someone!
Hi Alejandro, maybe does your project requires a tft lcd module?
Thank you, this is a great project! The most comprehensive guide. I am running this succesfully with one sensor and 4 magnets, but my readings are only starting at 18-20 rpm. I was wondering if adding more magnets and a second sensor would get me lower readings between 1-18 rpm. Also should I place the second sensor on the opposite side of the 1st sensor?
I don't recommend adding another sensor. To read low speed you just need more magnets in the wheel/shaft. The more pulses per revolution, the lower RPM you can measure
@InterlinkKnight Thank you so much for this insightful video! It helped a lot on my current project. However regarding this "map(PeriodBetweenPulses, 40000, 5000, 1, 10);", how do you determine the values of 40000, 5000, 1, and 10? Are the values of 40000 and 5000 through the calibration? And are the values of 1 and 10 for the purpose of calculation? Appreciate if you can explain it, thank you so much.
I have a lot of comments around that line in the sketch explaining what it does.
Line 238:
// Change the amount of readings depending on the period between pulses.
// To be very responsive, ideally we should read every pulse. The problem is that at higher speeds the period gets
// too low decreasing the accuracy. To get more accurate readings at higher speeds we should get multiple pulses and
// average the period, but if we do that at lower speeds then we would have readings too far apart (laggy or sluggish).
// To have both advantages at different speeds, we will change the amount of readings depending on the period between pulses.
// Remap period to the amount of readings:
int RemapedAmountOfReadings = map(PeriodBetweenPulses, 40000, 5000, 1, 10); // Remap the period range to the reading range.
// 1st value is what are we going to remap. In this case is the PeriodBetweenPulses.
// 2nd value is the period value when we are going to have only 1 reading. The higher it is, the lower RPM has to be to reach 1 reading.
// 3rd value is the period value when we are going to have 10 readings. The higher it is, the lower RPM has to be to reach 10 readings.
// 4th and 5th values are the amount of readings range.
I want to implement this in a control system for measuring rpm to find a transfer function of a motor using a bump test. For that, I need a transient as well as steady-state response. Does smoothing give me an accurate transfer function or it will filter out values?
The smoothing takes multiple readings and average them
Hallo , thank you for replying for a lot of my questions before ur projects are amazing. I just have one more question , i am working on two hall effect sensors that are integrated on the two wheel and i use your code to calculate the speed of each one then i calculate the median of the two wheel to get the speed in middle rear axle wheel. I am getting a lot of noise or more of non constant value of the speed , i solved that by increasing the value of numreadings which helps in stabalizing the value but uses a lot of dynamique memory of the arduino. Do you have any advices of what i can change to get more of a stable result value? , Thank you.
I'm glad you like my projects.
About your problem, I'm guessing you are using a different hall effect part than mine? You put the pullup resistor in the output?
Absolute Genius... Code Works fine...
Could you suggest adding calibration factor according to diameter of wheel... I want to use it to monitor speed of flywheel
I think you can just add a simple equation that converts RPM into speed
Great video thanks for the info! I am looking to measure the shaft deceleration. When applying a brake, I would be interested in taking a speed measurement every fraction of a second (maybe every tenth?) and seeing how quickly it came to a stop on a graph. I'm assuming I would have to increase the number of magnets to get this kind of accuracy. Do you think these components in your video would be capable of achieving this?
Yes
You use a 3D printed disc with 36 magnets, every 10° and run the hall sensor to the first interrupt pint of an arduino uno.. Then you use the library "elapsed Millis" which also features a elapsed micros time..
You setup the interrupt and a big variable
You start the timer
You enable the interrupt and set the time to 0....
When interrupt hits you store the time in an array or whatever you want...
You get declaration by declining timer events, arduino uno is very much fast for this if your code is efficient
@@MoesKeckeEcke thanks for the reply!
Nice video, thanls.
BTW, what about display on the upper right corner? Did you buy it or did you made graphic interface in some way?
It's called "Nextion display" and I designed the graphics using the Nexiton Editor. I made a few video tutorials about that display, so you can check it out
Great tutorial! Can I trigger on falling edge instead of rising? Do I need to modify something else in the code?
Of course you can change the trigger type. The only thing you might want to change is the pulses per revolution. By default it's 2 pulses per revolution, but each person put different amount of magnets in their wheel/shaft
Thanks - this was very informative and easy to set up.
Now I am trying to add onto your code to have it calculate rotational acceleration from changes in RPM over time.
Do you have any suggestions on the best way to implement this - where to add this within your code and what variables would make the most sense to use?
That's interesting. I never done that but what comes to my mind is something similar with what I do with smoothing the RPM, which it stores several values in an array of variables. You just have to do simple math between the current reading and the old reading.
@@interlinkknight thanks a lot for your reply. I realized the current and previous recorded RPM values are saved in the array in your smoothing code, like you said.
Now, to get the time that has passed between the instant those two RPM measurements were taken, would that be equal to your "PeriodBetweenPulses" value, or would I need to set up a new array with the timestamps corresponding to the RPM values?
I would do a new array, so the values are smoothed already. To get the time that has passed, you need to record the time in a variable using the micros function
Hi,
thanks for this video and the information.
I have a question if I may, is there a way to use a panel meter etc for the display, like a vintage amp meter or volt meter with a modified face panel to display RPM.
Many thanks
Of course you can. Using PWM. But those gauges are not always linear so you might need to add a asymmetrical remap
InterlinkKnight many thanks, a bit more learning for me.
That's really nice. But what if I need to work with the IR sensor ! What to do then ? Like the one used in car speed capture system. That I must record the signal very fast without any bouncing.
If you need to use an IR sensor, just keep it enclosed so it doesn't get external light.
And if you have to use a sensor that is very noisy, you need to add a schmitt trigger which will filter the noise. You can make one with an op-amp and a few resistors. This would only work if the output of the sensor is analog, not digital.
I am also doing some similar automation.Thanks for the information.I have a question. Is it possible to take signals from any two wheeler to arduino and also the working of fuel gauges. Please share if you have any ideas.Thanks in advance.
No idea what sensors they have so I can't know for sure but it should work
Hello.
Do you think I can use your project to read the speed of a turntable?
The speeds are extremely low: 33, 45, 78 revolutions per minute.
I want to use an IR sensor (like the one you showed in the video).
I tried to increase the calibration period to 1 second (1000000 uS), but I have false readings.
Thanks
What's the name of the variable you are changing?
For slow speeds, I recommend having a lot of pulses per revolution
Thank you very nice project, I want to get a warning light with a led below 500 rpm, please help me I don't know how to do it
Search on google for "Arduino if function"
I'm thinking of building a digital meter for my manual treadmill. So i can use "hall effect" chip with your code and multiple the rpm with distance the belt will cover when roller complete a rotation. Should work right? I never did any projects with arduino.
I'm not sure you want to measure the belt instead of the roller
Thank you for your service to the rest of us. Please forgive me if I'm overlooking it, but do you have the schematic for the hall effect sensor and the nano in here somewhere?
I show that in the video
@@interlinkknight thanks for the reply. I do see the schematic showing the pull up resistor for the sensor, but what about the rest of the tachometer. I'm a little ignorant
You mean the display? The pins are listed on the sketch comments, on the top
@@interlinkknight we don't see any schematic for the sensor wiring
Hi! By any chance do you know why when using an IR sensor I'm getting reading way above the right RPMs I have? I have tried with different IR sensors for the same result
thanks!
Like I mentioned on the video, you need to add a schmitt trigger to remove the noise of the signal. Or use a sensor that already has it included.
I am attempting to repurpose a treadmill motor. It has 2 leads for 0 to 90 vcd and two for the feedback sensor. Since that motor was given to me, I have no idea as to brand. I figure that leads just go to a magnetic coil rather than a hall effect transistor. Do you think a simple op-amp would bring up the signal enough for the ardiuno?
An op-amps can send a signal to arduino. The real question is: can you really get a clean signal from that setup?
Hi, Could you tell me how many magnets do you have in your set up? and if the variable "PulsesPerRevolution" is equal to the number of magnets or to the number of magnets + 1?
Thanks
You can clearly see it in the video. It's only 2 magnets. And yes, "PulsesPerRevolution" is equal to the number of magnets. In my example you can clearly see that by default is 2.
Thanks a lot for this tutorial! I have few questions: I would like to make a "shifter" for my motorcycle. The system would work like this: when I press the speed selector pedal, via a micro-contact I cut the ignition for xx ms depending on the engine speed while I shift into gear. The micro-contact would be connected to an input of the Arduino and an output of the Arduino would control a Mosfet to cut off the ignition. Would these inputs/outputs prevent your program from functioning correctly? Can you help me?
You could run that program without affecting the tachometer code because the tachometer counts the pulses using interrupts that are not affected by the main loop
Many thanks for sharing this proyect, I am trying to put a 7 segment display to show the rpm value with ledcontrol library but it enter in conflict with the code. Maybe the problems is the clock? also trying to do a shift light with some ws2812 leds via fastled library and I have the same problem.
Do you know how to solve the problem to use this libraries?
Thanks!!
No idea what could be the problem. But since you also have a problem with a library, the cause might be on the code for the 7 segment display.
What I do in those cases is to copy parts of the code, one a the time and see when stops working.
@@interlinkknight Many thanks for the answer! the problem where on the fastled library, I changed it to Adafruit_NeoPixel.h. Now I have woking the RGB led Strip as a shift light and the 7 segment display showing the rpm.
Your code is the best with diference because you have real time rpm. Congrats and thanks for sharing!!
I'm glad I could help :)
I hope it is ok to ask another question
In your code - Simple tachometer (Serial)- you have: "FrequencyRaw = 10000000000/ PeriodAverage" to calculate the frequency using the period between pulses.
but I think we need to use just 1000000 instead of 10000000000
If I am not mistaking the " PeriodAverage " in microseconds (1second = 1000000 microseconds).
Thanks in advance
I'm not using any unit there so don't pay attention to how many zeros does it have
Hi, thanks for this video, and code. I'm currently trying to use it with ESP32 to build a Wifi SpeedGauge. I'm having some trouble using "attachInterrupt" with ESP32 that make it to Reboot ... Do you have any clue ?
I'm sorry but I don't know anything about converting Arduino code to esp32
Hello I've build it myself and it works amazingly!! But I'm facing an issue, how can I change the sensor PIN which is number 2? is it the part of the code where it's written " attachInterrupt(digitalPinToInterrupt(2), Pulse_Event, RISING); // Enable interruption pin 2 when going from LOW to HIGH."
or how can i change hall effect sensor pin input signal?
thanks
Yes, that's the lone that selects the pin. But you most use a pin that has an interrupt. In the Arduino uno and nano it's only pin 2 and pin 3. This means you can't use pins 4, 5, 6, etc. Why? We need to use a pin with interrupt because that's the only way to be sure it never miss a pulse, no matter how quick is the pulse
Great video👍 could u make tutorial making the gauge with that tft screen please?
I already did a few video tutorials about that display. It's called nextion display
@@interlinkknight okey i will check it later, thanks😁
Hi!, Thank you for share!, There any chance you can help me with my project ? trying to make a tachometer for car but planning to use TM1638 display and leds, Leds for tachometer and display digit for speed, also the leds are bicolor. Thank you in advance
I wish I could but I'm very busy with my projects already.
Hi, congratulations for the excellent video. I would like to make a tachometer that reads 23/24,000 rpm. Do you have information on the maximum readable frequency with the Hall sensor? Thanks
100% you are not going to have problems with that speed. I've seen it measuring above 50,000 RPM with 2 pulses per revolution.
👌👌@@interlinkknight
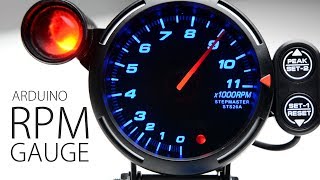
Thanks for sharing. Just what I need. I tried the hall transistor and oled and now have the nextion display. Can you tell me how you made the 208 gauge images? I would like to do the same but up to 11000 rpm and red line at 8000.
It's a bunch of images. I explain that on one of the video tutorials about the nextion display. Also, the file is in the description so you can open it and see
@@interlinkknight thanks, I know it’s a bunch of images and have found the images in the file. I was wondering if the images were generated with some kind of scripting tool. I don’t fancy doing 208 images by hand in MS paint
I did it in Photoshop and PowerPoint
Hi! Im doing this project and id like to know if the project of hall sensors can read 40k rpm above? Thanks!
I haven't test at such high speed, but it should work
This great and the codes works very well. Is there a way I can also display miles per hour?
Of course. Remap the rpm to whatever you calculate the mph is. I mean, to really say how many mph is in rpm depends on you setup. You can't say the speed of a disc in mph, for example. You would have to convert the motion in to linear.
@@interlinkknight please help how to AUTO lock and unlock car after reaching some speed. Thanks.
Just bumped into your videos. How can I thank you for sharing. ?
Hey! For me, knowing that I'm making a positive difference in the world, however small, is enough. But if you want to become a patreon it would help me.
@@interlinkknight guy please i need to get in contact with you.
Outstanding, Just subbed! Any way to shift the "RPM" to the center of the oled and have the actual rpm digits centers too? Thanks again!
You can always do anything you want with the display
@interlinkknight Can you advise how you would shift it to the center ?
Thanks
Do you mean the OLED display? You would have to put a few if statements that if RPM is between 0 and 9 the text x position is a value in the center. If RPM is between 10 and 99 the text x position is a value in the center. If RPM is between 100 and 999 the text x position is a value in the center. Etc.
Thanks for sharing your code.
When I run your code, the rpm value is fixed even if i changed the speed. sometimes the values that appear seems like actual rpm (1000rpm) come out, but usually stays at 400~ 500 rpm. I only changed the ppr value in the code, is this a sensor issue?
The problem is always the signal of the sensor. If you have an oscilloscope, check the signal. You need to get a clean pulse from below 1v to above 4v.
Is there a way to clean up the signal of the first photoelectric sensor? I'm stuck with these sensors (I use 4 at the same time) and their readings are way off. Also adding a 1 µF capacitor between DO and GND does only help up to a certain rpm. Do you have any idea on how to use these, despite the noisy output?
Using Schmitt Triggers
@@interlinkknight Thank you very much for your suggestion! I will try that.
Hi! Thank you for this code. How did you determine the refresh rate RPM error at 3:10? Thanks
Trial and error. There's a part in the code that changes this depending on the speed.
Could you theoretically add many magnets to 'take up' the gap between pulses for low RPMs? Then specify in the code how many pulses per rev? I'm new to Arduino and I'd like to expand my knowledge. Thanks!
Yes, that's exactly right