Transforming/Painting Countertops - DIY!

HTML-код
- Опубликовано: 13 сен 2024
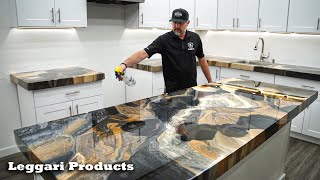
- After transforming my countertops using a $69 (currently on sale for $54!!! 3-4-13) Giani Granite Countertop kit (www.gianigranit...) purchased at Walmart (no not the $200-$300 kits that are TOTALLY different found at some home improvement stores), some friends encouraged me to make a DIY video showing the technique I used -- which is VERY simple, but a tad bit different than what is presented in the kit instructions. If you decide to go for it, you will still need to watch the Giani video for instructions on prep, primer and top coats. =) All I can say is, If you don't like your old, don't be afraid to try it!
UPDATE -- in answer to some questions. The kits used were the Chocolate Brown on the kitchen --DEFINITELY my favorite but would not have gone with my bathrooms so I used the Sicilian Sand in those rooms. The sane technique was used for all of the counter tops, the color combination is what made the difference.
The kitchen sink was painted withwww.klasskote.c.... It still looks great a year later.
The counter tops have NOT chipped. I did have a problem areas where hot water sat on it. (coffee pot leaked and didn't realize it -- my fault, cannot blame the product for that). The top coat is water based and it bubbled in that area. Leting it dry, it settled back down pretty well... and it is under the coffee pot, so OH WELL! none seed it. I HATED my old countertops, so even if it is not perfect, it was WELL worth the time and money and I am very happy.
Sink paint $39
Countertop kit $69x2
Estimated Savings (had I gotten new countertops and sink=$4,800


Good job Nancy 🏅👍😃
Love it. Beautiful
Great Job and thanks for the wonderful inspiration!!!!!
Wow you did a great job !! Looks amazing.
Nice job
very good job ...
Good job
I'm gonna try this in our kitchen..... wish me luck!!!
sheree kiplinger GOOD LUCK! You will do great!
I have to say that you have captured the look of granite better than most of the tutorials on this process. Nice job.
5and 50 Thank you!
5and 50 if
Agreed, I think the veining is great, so glad I found this video.
The veins you added make it so much more authentic looking!!! Great job!! I can't wait to try this in my kitchen.Thanks for sharing!
I know that this is an older video but out of all the video's i watched your counter tops look the most like granite. Thanks for sharing !! Heather
Your technique is the best one I've seen ! The result is so much better than the " all over" with each color technique.
You really have the technique down and and an eye for the right color combos. I'm going to be doing my laminate kitchen counter this spring. I'm getting excited to do it now. Not scared anymore. LOL. Thank you!!
roxyloveslucy Good luck! You will do great!
(and thank yo so much for the warm fuzzies!)
I've watched quite a few of these D.I.Y. clips tonight on how to paint counter tops and your finished look is by far the best I've seen. The veining effect made all the difference, your kitchen looks amazing. Great job Nancy... Thanks for sharing
I agree. The veining makes it look more authentic. Not just dabbing the paint on. I love it. I'm so using this same technique in my kitchen. Cannot wait. I didn't realize this was a kit tho. I jot it was single items purchased to do it.
Love, love, love your 'brush dabbing/glopping and mitt' technique! Thanks so much for sharing! This looks just awesome!!!
Beautiful job!!!
Oh wow. You did an awesome job! That is gorgeous.
They look awesome. Great job
When you first started painting I was so skeptical so HAPPY I kept watching Love it!!
THANK YOU, THANK YOU, THANK YOU!!!! I have been researching for weeks now before repainting my counters and have not been able to find a tutorial that I felt worked. This is great! The mitt idea is incredible!! I cannot wait to test this and see how it comes out!
beyondanytherapy How did it turn out??? GREAT I assume. =) Hope you had fun... and if you haven;t done it yet.. GO FOR IT!!
Wow! Such a pro. Inexpensive, fun and and turned out to be so gorgeous! I'll do the same but in my dining table. Hope it turns out acceptable to the eye. Thanks for the demo!
i still cant belive what i just saw.Just amazing.
I'm going to do this, looks easy and your You-Tube video was excellent..........OMG just beautiful what were the names of the color choices you used?
Jacqueline Jackson THANK YOU! Go for it! I cover the colors in the description of the video: The kits used were the Chocolate Brown on the kitchen --DEFINITELY my favorite but would not have gone with my bathrooms so I used the Sicilian Sand in those rooms.
I wish you would've shown the entire project..esp the around the sink and corners.
Beautiful... simply awesome!
Wow! You have a way better technique than I have seen on other Giani videos!! Thank you for that!! I will be using your method as I feel the other ones just look like speckles of sponged on paint...
I’m always impressed when someone does nice veining!
I didn’t do that on my last project but I will try it -again- on my dresser this week! My first attempt at veining was an epic fail! It looked like a child had scribbled with a black sharpie!
Excellent job! Thank you for the video.
Thank you so much for this video. I love how you used the car wash mitt and the veining detail! I can't wait to experiment. We are doing a kitchen and bath makeover on a budget we painted the walls the furniture, the grout, and covered appliances and did a gorgeous back splash with vinyl floor tiles. My blue laminate counters are screaming to be painted!
Gosh what a great job you did..I have all the products needed for this project ..just not in a kit form..your veining really gave me some good ideas..thank you
love this want to try it, you mostly talk about the beauty i was wondering about the durability. How has it held up? does it scratch easily? what does it look like after normal wear and tear?
Rebecca Trevino Click on the description under the video and it covers that. GO FOR IT!
That looks great. The mitt is a good idea to spread color faster too.
Best tutorial I have found on using this technique!!
Crystal Brunton WOW! Thank you! I am actually shocked that ANYNE looked at it! Really just made it for a couple of friends that asked. if you try it GOOD LUCK and HAVE FUN!!!
nancyjeanschram Great Job! It is the best tutorial on youtube. I love your attention to detail by adding the vein. No other video mentions
that. I cant wait to start my home project.
Wow that looks amazing
Wow, you did a great job.
Well done!!!!! Thanks for sharing!
Thanks! Best video I watched so far on doing this. Thanks for getting right into and to the point of how to do it. You did a great job! I will be doing this to my counter tops...nervous about picking the right colors. :-)
I love it! You did a amazing job!
do tell us how you did the sinks!!!! WOW- you did a GREAT JOB on counters! What kind of Primer did you use?
Sorry for the delay. I made this video for a friend and never realized that others would actually look at it! ha ha! A bit embarrassed!
I used the primer that comes in the Giani Granite kit.
The primer was included in the Giani Granite kit.
I gave a link to the paint used for the sink in the description above. It was mostly rolled on and brushed where needed.
When you started doing the bathroom I thought oh my gosh this looks like crap. But the longer I watched I was amazed how good it looks. I personally don't have the balls to do that just because I feel like I would totally screw it up. Your kitchen looks brand-new with fresh coat of paint and your countertops.
Great video beautiful job on countertops too! You have inspired me so I am so going to do it!
Wow, you did a beautiful work. Thank you for share.
Thank you for making this great video! I just finished mine today and I feel like if I had just used the CD that came with it it wouldn't have turned out nearly as well. Super happy! Cheers!
Hurrah!!! Thank you. Glad you love yours!
Excellent! Thank you so much. Can't wait to get started.
Good luck!
That's beautiful! Thank you!
Beautiful! Thank you for inspiring and sharing!...
You did an awesome job! I am going to do mine also and learned a lot from your video. Thank you so much for posting the video.
Nancy,how did u paint the sink?
The info is in the contents of the video. it was a different product and I just rolled it on. :)
Amazing I am speechless !!!
@Nancy Jean
How look did the painted sink last?
Loved how your countertops turned out! Im currently wanting to redo some blue...yes blue....laminate countertops and I was thinking about using giani. I was wondering if you had any problems with the top coat peeling after awhile? Im still a little unsure about this and if I do it I want them to last!
Topcoat did not peel! Just be careful not to let hot water sit on it. (For example, if your kuerig malfunctions And spills hot water all over it and you do not discover it.....you may have an Issue. If that should happen however, careful pick up the coffee maker, no sliding! Then, gently pat, NO RUBBING, up the water up with a towel and let it sit. It will dry up and settle back to itself. Bubbles will work themselves flat if left alone....at least that is my experience.)
So, are you saying water can compromise the top coat? I drain my dishes on the counter with a towel under the dish drainer. Will I no longer be able to this? Water is bad for the finish? Yikes. Please tell me no. Thank you.
roxyloveslucy Sorry for the delay in responding --I did not see the message until now. =( The problem was HOT HOT water from a coffee maker spilled as it malfunctioned and we did not discovered it immediately so it SAT n the countertop and softened the top coat ...and then instead of lifting it up and dabbing it and letting it settle, the coffee maker got slid across it scratching off the softened top coat. Normal use and water getting on it is not an issue. If your dishes towel is pretty wet from the draining and it sits on the counter for an extended time, I would have concern.... I would put some kind of plastic or rubber protection underneath the towel.
Wow,i would so pay you to do that for me......Extra cash....GREAT JOB...
Steve A. Lol Where so you live?!! ;)
Great,and I subscribed,but I want to do it and still don't have a clue as to what the heck I'm buying!!!!! What kit??? Do I make my own kit???? Oil based paint? Flat paint??? What the heck is the name of the top coat????what's thenames on anything???! Help!!!! We want to paint or bathroom sink and the 70's counter.
Sorry for the delay, I made this for friends and didn't actually think anyone else would stumble across it. LOL I have not thought of it since posting until I saw it come through my newsfeed on Facebook today! I am sure you have already figured it out, and have a masterpiece of your own, but if not, I tried to answer some of the questions people had by updating the video description above. Happy creating!
Great job,it looks really good
As you said : if you are thinking about it go for it
And i am
Thank you so much
And thanks to your friend who encourage you to make the video 😊
Wow!
Great.... job. The sink was a nice touch.
YOU are my hero!! Thanks!
This stuff peels after awhile, I would suggest using techstones countertop kit. much better quality.
It has not yet peeled!!!!
Great Job!!! I am so doing this in my house. Please make more videos such as how you painted your kitchen sink....Thank you and hope to see more ideas :)
***** If I paint another sink I will =) I did include the paint that I used in the description of the video though... and I just rolled it on. SOOOOOooo easy and such an improvement on what I had! GOOD Luck on your countertops! (ad sink if you try it!)
nancyjeanschram
After looking at a couple vids I'm going with your way thanks for making it look easy 😜 I hope it's this easy 🙃
Hope it went well!! :)
what were the materials that you used?
outstanding!
wow...
Could you tell me what you used to make your kitchen sink black?
No it is not the primer. If you look at the video description, it tells that it us a different product: www.klasskote.com/bathtub-re-finishing?gclid=CJLB-PPFzbUCFYZcMgodf38A8Q
What kind of paint did you use? Latex? Oil based? Does it matter if you are going to finish with a sealer?
Beautiful, yours are the best I've seen so far, you should be getting paid to do this.
I agree. She could make this a business. Make bank!!!
roxyloveslucy You both are too kind. Im just a housewife trying to make her kitchen better! You can do it too!
Ok what kind of paint did you use. You are not showing us what to buy.
How did you put topcoat on around the sink area? Did you just use a brush there instead of a brush?
Sorry for the delay, I made this for friends and didn't actually think anyone else would stumble across it. LOL I have not thought of it since posting until I saw it come through my newsfeed on Facebook today! I am sure you have already figured it out, and have a masterpiece of your own, but if you have not done it yet -- Yes, I used a brush and then rolled next to it. It evened out naturally. Very simple.
How is the counter top holding out? Want to try this, but heard from others that it chips and peels. I was thinking of doing an epoxy topcoat instead...would hold up better?
It had held up great. Only problem is you can't let hot water sit on it. (I.e. coffee maker malfunction and overflow and not catch it so it puddles and softens the surface.). Leaving water sit and just dabbing it up with a towel actually remedies that problem. It will bubble, but settle down as it dries and hardens normal. It's if you move something or wipe it. (I.e. SLIDE said coffee maker) that you may cause damage to the countertop.
no issues with chipping or pealing.
very good..not dorky. iam doing my kitchen counter tops the same way..hopefully. thanks.
I am sure they turned out fabulous! ....and thanks for the "not dorky" comment.
(blush) Not buying it though. Ha! ha!
so on the primer is there a reason you chose black? and also did u seal it at all? great video looks good!
+Mark Vidales I used the flat black that came with the kit. (That info can be found on the discription of the video)
my sink came out great too but i could not draw the veins not good at that but this video helped alot thanks!
Amazing!!
I like the results, I like the bathroom finish best, I prefer the lighter colors. I wish the paint types were mentioned and whether water or oil based
I would like to see the video on painting your sink. I am thinking of doing that also. My kitchen sink is a rough texture and was wondering why type of primer and paint to use.
your new tops look so great. No one would ever know they're not marble tops that someone paid a lot of money for. You make it look very simple. I'm with the person that is skeptical about how long it lasts. I haven't seen a comment regarding that. What do you do if it starts peeling if it does?
The water doesn't affect the paint after a while? And how about whenever you clean your countertops I'm a freak with disinfectants and Clorox. Would those products ruin the pain?
First, Thanks for the video, and great job! I am getting ready to do this and have seen lots of videos and instruction but nothing looks as good as your kitchen around the 40-50 second mark of your video. Your bathrooms took a different look so I was wondering how you got the kitchen to look so diff and good. I don't know where you are located but I would even hire you to do mine If you could make it look like your kitchen. I love it. Can you give any more detail as to how you did the kitchen?
What did you use for a top coat?
The top coat came with the kit
I swear it looks terrible when you're applying it but the finished product is AMAZING!
Nice !! I've watched a lot of videos and I like your method. I already started on my counters with primer (white) and Bavarian cream second base sponged on coat with some white showing through. How I want to add the accent colors and veining as you did.
Omg! Your colors sound similar to what I will be doing. How did it turn out? That's so exciting to me. I cannot wait to do mine now. It seems there are no mistakes possible. Just go easy with the paint. Love it.
Great video thanks for sharing. I am looking at doing this which colour kit did you use?
Great job, it looks wonderful. It's looks like you also changed the cabinet color. If so, what product did you use? I'm swimming in classic natural oak and would love to go darker, without stripping the whole surface, completely covering the surface, or replacing the wood.
The cabinet color was not changed....just the handles. Gianni does make a product to paint cabinets though. Sometimes just changing one thing changes the appearance of another though!
Hello, what technique did you use to paint your sink
Love it
thats amazing .did you do two top coats
So what paint did you use for the sink and by the way it looks great everything
love this,
Sweet !!!!!!!!!!!!!!!!!!!!!!!!
I noticed your kitchen counter tops are a different style than you did in the bathrooms, when you did your kitchen did you water those colors dowm wt all? Use different colors?
Thank's for the video. After removing the old caulk/sealant, did you or do you re-caulk around the sink edge, faucet and back-splash area with some type of silicone caulk, clear or colored, before or after the process is complete or at what point in the process, or do you need to caulk at all? Thanks ahead of time.
From all the research I've been doing on that subject: it's best to remove old caulking first, paint your project, then apply caulking after the item has cured completely. I would use white caulking on white items (sinks, toilets, tubs, and such) and on something like this I would use a clear caulking (white would be distracting from all the work you've already done). Another tip: after you cut the tip of the tube of caulk, if you still have some left when finished, stick a large enough nail or screw in the hole to prevent the caulk from drying out.
Was this some sort of kit or did you just buy the paints separate? If so what brand did you use for the black primer? Thank you for your help!
Nice...what kit did you use or no kit, just paint etc...?
what are all the colors did you use and where did you buy theme and how much paint need it?
Very nice*
Can you tell me if it is holding up good? i have read some people loving this when they are done, but it starts peeling after a year......I'm scared :(
Were your original kitchen countertops laminate or tile?
how did you paint your kitchen sink?
What kind of glove are you using?
Never apologize for being a "dork"!! The alternative is being an elitist! eeeeewwwww!!
The counters look great.
What was the topcoat material?
what kind of sealer did you use? polyurethane, acrylic, epoxy?
I used what came in the Giani kit. the info it all in the video comments!