Это видео недоступно.
Сожалеем об этом.
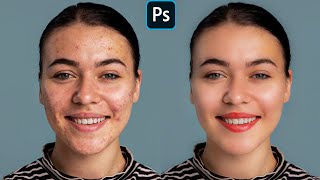
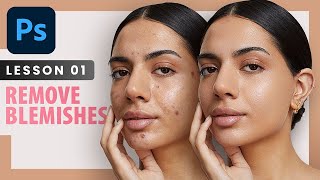
Photoshop: Quickest Way to Effectively Smooth SKIN & Remove Blemishes
HTML-код
- Опубликовано: 9 сен 2023
- Photoshop CC 2023 tutorial showing the quickest way to smooth skin and remove blemishes while retaining the skin’s natural texture.
IMPORTANT!!!: At 2:17, Alt or Option-click the layer mask icon; NOT Ctrl or Cmd-click.
Photo by Ron Lach / Pexels: 1drv.ms/i/s!Ar...
Music: Carcassi - Etude Opus 60 No.18
All of my Patrons and Channel Members receive VIP Early Access Passes to watch my new Photoshop tutorials one week before the public can see them! 😊💙
Join my Community of Patrons on Patreon!: www.patreon.co...
Become a Channel Member!: bit.ly/2J3fP8c
To become a Channel Member on IOS & other "unsupported devices": bit.ly/2OoJnwO
Support Blue Lightning TV on Patreon for as little as $2/month!
www.patreon.co...
Subscribe to Blue Lightning TV!: bit.ly/2WkFbkj
BLTV MERCH:
Redbubble.com: rdbl.co/35HhA4y
TeeSpring: teespring.com/...
Society6: society6.com/b...
bluelightningt...
RUclips Channel: / bluelightningtv
Website: bluelightningtv...
Facebook: / bluelightningtv
Facebook “Subscriber Page”: bit.ly/2WmWIbw
Instagram: / bluelightningtv
Tumblr: / bluelightningtv
Twitter: / bluelightningtv
Pinterest: / bluelightningtv
LinkedIn: / martygeller
#photoshop #skin #blemishes


![Create Highly Realistic SKIN TEXTURE In Photoshop! [FREE Download]](/img/1.gif)
This is the same method used in many other videos, but you actually explain what each step does. That's more helpful than just listing some magic numbers, as each photo is different.
This is definitely straight to the point and effective. I’ve seen other channels talk about skin smoothing and they make everything so tedious and confusing. Thanks for this tutorial!
It's "option" + "mask" for those of you using a mac with Photoshop 2024. Other than that, this video was great; thank you!
Thank you so much! I'm on a Mac and that was the point I got lost.
Thank you so much my friend
Thx
thanks
use the alt or option key instead of command/control button for a black mask
Yes.
thank youu
thanks! I thought I was going mad!
Thank you! Was losing my mind... lol
Thanks for this. I couldn't get it to work.
Love a quick, straightforward tut like this that helps me get the job done. Thank you!
That was extremely good. I appreciate your straightforward instructions and..... no music. Thank you.
Thank you. Yeah, music in instructional videos always bothered me, too.
Amazing!! I've been looking for a tutorial like this. Most others reduce the overall texture and make it look too artificial. I like this more natural look.
Great tutorial, Marty!! Used this instruction to touch up a photo for a memorial -- the original photo was a smartphone snapshot of a passport photo from the actual passport. Thanks to this tutorial, the resulting portrait looks almost studio like!!
Thank you so much, Marty. I love your step-by-step method of teaching Photoshop. You are the man!
Thank you! clear instructions at a pace that is easy to follow!:-)
This is just what is needed when I look for tutorials no fluff
Brilliant!!! I wish I had this when editing a nightmare of a project last year.
Thanks for posting. I'll be sure to keep this tutorial in my creative arsenal.
Absolutely love this. It is just what I needed! Thank you.
Amazing! And so fast Thank you.
Fab stuff, going to study this repeatedly to Understand the measures being used so i can apply them in future, as oppossed to simply copying the steps, thanking U
SUCH a great video!! Thank you for the easy-to-follow directions! I still had to pause along the way to do it with you, but you speak so clearly and simply and get right to the point! Thanks!
If it paints black after adding layer mask, tap the layer mask and invert. It should work properly after that.
This video was extremely helpful. More progress ahead 📈
Thank you! clear and cuts straight to it. Nice glitch effect at the end :)
Thank you so much!! Straight to the point
This was so helpful and easy to follow!
Great Tutorial. I have to say, I've been following you for a while now and I finally see the man behind the voice. Its nice meeting you Marty
Thank you so much ❤️❤️❤️
I really needed this ❤️❤️
Thank you again☺️❤️
I love your patience....❤️
You're indeed a father
Excellent tutorial, much prefer this to standard frequency separation.
Fantastic tip there Marty, thanks for sharing it with us.
Absolutely love it easy to follow and straight to the point tysm ❤
Brilliant! Thank you.
Excellent, very well explained.
Great video and explanation!
this video is a classic, thank you
Watched soo many videos and this is the best one! Thank you!
Glad it was helpful!
The most useful channel I've seen. Thanks!
Great, straight forward lesson. Thanks Marty!❤
loooong time i see youlove u
Outstanding tutorial sir.
great tutorial video, thank you :)
God bless you Sir, this really helped me😩
Thank you, Matty; I have yet to watch it. But thank you in advance; I know this will be beneficial. I'll watch it when I have time.
Thanks, Marty!
The way you're explaining is so good 👍🏻
Great video.. thank you very much
OMG! Thank you very much!
You still the best Marty thank you 🙏🏼
It's amazing❤❤❤
Thank you for this highly informative tutorial!
You made my life better. I needed this tutorial ❤
Glad I could help!
Thank you!
Very good tutorial
Great
Thank You a lot!!
Thanks sir ❤❤❤
Helpful
👍👍👍👍 exatly
great guide ever!!!
Good
優質皮膚效果非常讚👍方法簡單實用
Thank you for your amazing work. This video was so helpful! Could you tell me which is the bracket button on Mac? It seems to be a common and I am unsure with what shortcut I can make the brush smaller or bigger
I don't own a Mac, but I looked it up - They are on the right side of the keyboard next to the P key. Unshifted is the standard [] bracket, shifted is the curly {} bracket.
For creating the black mask, on PC is Alt, not Ctrl, if it serves anybody. Very good explanation. Thank you :)
Yes. After I published the video, I saw the error. I corrected it in the video's description.
keep it up
Many thanks master, greetings from El Salvador in Central America
Sen çok kral adamsın!👑
Good.
Thanks!
This is fantastic and so easy to follow, I've saved it to my fav list. Thank you and I hope you're well Sir?
👍
A+
Very interesting and helpful. Thank you very much!
dang NO FLUFF just dives HEAD FIRST!! LOVE IT.. best and easiest video i have ever found!!!
but its Alt on a PC for the Layer Mask
Thanks. Yeah, every now and then, I say Ctrl instead of Alt and vice-versa. 🙄
is there a way to save this process as a one click so you can apply it to multiple photos? or does it need to be done step-by-step for each photo? thanks in advance.
Each photo
Tried following along. However, at the point you create the Mask (Ctrl + Layer Mask) I don't get a Black "Layer Mask". Mine looks White. My Foreground is set to Black and Background is set to White. So pretty much at this point, it all falls apart.
Do this: Once you have a white Layer Mask, you can invert it by pressing Ctrl + i.
@@BLTV_PhotoshopThank you very much for that ❤
Thanks
You are "Guru" Respect from Bharat.
Thank you for this video, I got stuck in the part of masking. When I hit CRLT on the layer a white mask appears instead of black. Can you advice a fix for this pls ?
Below the video in my video's description, I state to press Alt, not Ctrl. Sorry for the confusion!
I would like to know which photoshop use
I did this in version CC 2023.
arigatoooo
İ CLICK THAT SUBSCRIBE BUTTON
hi there for me no working I'm stuck with ctrl mask and my mask generated is white, and no working next steps
When is this in the video please (minute:second). Please reply with your question again.
Any alternative to the patch tool for photoshop elements users?
Sorry, I never used Elements.
You can put a blank layer above the composite and use the clone stamp (set to current layer and below) sampling a clear area, 100% layer opacity and then decreasing the opacity to a point where the cloned layer looks natural.
🙏
How to make layer mask black, please help ?!
Alt-click or Option-click the Layer mask icon. Alternatively, if you have a white layer mask, press Ctrl or Cmd + i.
Профессионально
👏👏👏👏👏👏.
2:33 how to press white inside the black layer mask
To create a black layer mask, Alt-click the Layer mask icon. TO brush white into into it, go to 2:38 in the video
Following all the steps... but anyone know why my layer mask comes up white instead of black?
In the video's description, I state, "IMPORTANT!!!: At 2:17, Alt or Option-click the layer mask icon; NOT Ctrl or Cmd-click." 👍
You have to hold down the alt key then click this is not stated in video but still after figuring it out it works grate 🙌🏾
"Alt + Layer masks" on Windows to create a black layer mask ...
Yes. Please read my note in the video's description.
You made this seem like cake work.
why after i click the add a mask, the white background pop up instead of black
If you want a black layer mask, Alt or Option-click the Layer Mask icon.
thanks for this qus=estion, you hv helped me, i was stuck@@BLTV_Photoshop
Vivid light is grayed out for me
Go to Image > Mode > RGB color, 8 bits/Channel.
Thanks, however when I select high pass with my new layer selected I get the message COULD NOT COMPLETE THE HIGH PASS COMMAND BECAUSE THE SELECTED AREA IS EMPTY.
H A Y Marty . I am from Bharat here 8:52 PM. I think u will be ok & awaking there in the morning so islamig greeting for u Asslam-o-aleykum wo rehmatulahi wo brrakatohu. Many years ago i saw u "First Time" when u are clean shaved but today ur in beared looking very smart than before really.
Thank you! I started to grow my beard a year ago and have kept it short. It's much easier than having to shave everyday.
minit 2:17 i cant understand how to do "restore back" . maybe this video totorial for expert editor only.
So sorry. I misstated the step. Alt or Option-click the layer mask icon to make a black, inverted layer mask.
yes thankyou so much. may longevity , sustenance , healthy always :)@@BLTV_Photoshop
Decent technique, but frequency separation many more options.
Yes. 7 years ago, I did a tutorial showing how to retouch skin using frequency separation. ruclips.net/video/dBqhAIoQkdU/видео.html
gud