1960 Chevy Biscayne LS Swap Ep 25 Relay box build

HTML-код
- Опубликовано: 22 июл 2019
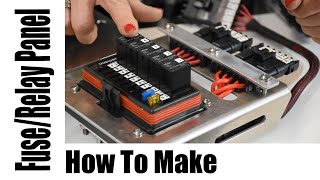
- Using this Sweet relay and fuse panel to finish up the power supply to our newly modified harness. This relay box uses 5 Bosch 5 pin relays and 1 Denso style 4 pin relay. The fuse panel also houses slots for 6 ATO fuses. I will include the drawing I made of the fuse panel wiring.
Fuse Box with relays - amzn.to/2YaiakH
ATO fuses - amzn.to/2y2seBB
Crimpers- amzn.to/2Ye9b1O
Here is the drawing - drive.google.com/file/d/1HI_8...


Really helpful info. Thanks also for the sample image that can be enlarged. Helped greatly with understanding how to set up a box panel and how the parts work together.
Thanks for the great info and links, I used each one of them!!
Excellent detailed video. Bought one of these relay boxes for another purpose, soon realized (before watching the entire video) outside of my pay scale and much more than I need. Not complaining at all, my ignorance now turned into 1% more intelligent. Returning this for something more simple. Happy I found out before pulling my last two hairs I have out of my head. KUDOS to the video!
Love the videos. I have a 1960 Biscayne my self and was debating which way I want to go. But after doing some research and seeing your videos LS is the way to go. Thanks for the videos and keep them coming.
The LS is a very affordable and reliable power source. I hope to get more done soon. Thanks for watching.
Super helpful video! Made wiring up a similar fuse block for my LS swap so much easier, thanks!
You're welcome!
@15:48-15:59 that Factory Hard Reset though Lol. Good Video
Ha!!! I normally edit those out but must have missed that one. I often get brain dead moments and have to figure out where I was heading with a subject. 🍻
I bought this box after viewing this video!
I love that box. I’ve used it on many swaps and even for accessories on out off-road vehicles.
@@ThePracticalMechanic for the price it's hard to beat
Thanks!
Awesome running same set up on my Chevy but a bit confused on main relay. relay numbers to wires would help a lot
do you have the same Fuse panel I was using? if so the main relay I used has two small terminals for the control side and two larger terminals for the battery feed and the load. If you using all Bosch 5 pin relays pin 85 and 86 will be the control wires, 30 will be you B+ fed and 87 will be the load. There is a drawing linked in the description that can be zoomed in on if that helps.
Thanks for your video on this. I'm trying to build with the exact same box. My question to you and your diagram is that you don't have labeled the wires coming from the PCM. I have a couple of hot orange PCM power leads, 2 pink switched power leads from PCM, I have 2 fan leads, fan 1 and 2, and I have a fuel pump PCM wire, I don't have a PCM B+ or an ignition crank, unless you mean one of the orange wires from the PCM, I think 75. Can you clarify this? I may hae a question on the fan controls as well, not sure what you mean by the extra drawings below, unless those are fans? Thanks
Sorry I didn’t answer this question when I answer your other question. I have links to the diagrams in the video description so you can zoom in on them. They may have been revised slightly from the video to make things easier to read but I don’t remember.
I bought this for LEDlights - Light bar, fog lights and rear lights. Probably overkill lol
I actually bought one for my toyota to do the same thing. I have yet to install it but accessory control was the idea.
@@ThePracticalMechanic It was a PITA to assemble, my crimps just suck. I wish I bought a pre-wired version hehe. but its done now and looks neat!
So you used 1 of the relay to power all the rest of the relay?
someone knows when i gan get the metal pin replaces for the blade fuses and also for the relays? my box come with the exact qty and im l damaged a couple of them
These might be the correct ones for the Bosch relays. Please compare to the ones you have. amzn.to/3fS3Rwr
Wire size ?
what size gauge wire do you use in this video?
The larger red wires are 12 gauge. Most of the other wires are 16 gauge.
First …………. Great video.
Do you know how to remove one of the fuse side terminals I had one crimp cone loose.
You should be able to use a terminal removal tool to depress the metal tab on the terminal.
@ThePracticalMechanic thanks for the reply I finally got it, it was set up as a bis bat of 3 so needed 3 de-pinning tools to get it out but finally got it to go
The other thing I meant to ask you, is your diagram relay wiring correct? I am looking at the pin out of a standard Bosch relay and you have 85 to ground, that is correct, but the others are not. 30 is for the load, you have yours going to the PCM, 87 is the direct battery feed, you have it going to the respective loads (starter, fuel pump, fans) and 86 is the lower voltage signal feed from PCM and or key switch, you have yours this way for the fuel pump and starter, but not the fans. Maybe your relays are not the same as mine. This is really confusing when I compare the LT1 Swap fuse box set up others are using. Can you clarify my confusion? Thanks again.
Pins 85 and 86 are for the relay control and can be connected either direction. The only time they cannot be be connected that way is if the relay has a built in zener diode that reduced the kickback voltage when turning the relay off. For 99% of Bosch 5 pin setups the 85 and 86 are interchangeable.
@@ThePracticalMechanic Well that makes sense, I was losing my mind on this!! Thanks so much
Hello sorry im kinda slow lol but when doing this you arnt using your cars fuse box?
The original engine require very little wiring to run and also used old style fuses that often have connection issues. This new fuel injection and ignition system require much more wiring and power. The original fuse box on the vehicle is inadequate for the job. Some people use the fuse box that came with the LS engine but it is too big and bulky to mount cleanly in the engine bay.
I prefer this small organized fuse/relay block that can power and protect the engine control system and cooling fans.
@@ThePracticalMechanic oh okay! Thanks
When is the next video 👍👍👍
It might be a couple more weeks. 🤞🏼 Thanks for checking out what I have done so far.
Best channel I’ve come across super helpful I’m doing the same swap same kits so following your lead is amazing! My swap is going into a 66 GTO though but pretty much the same I think. Keep it up helping me tons