Vectric 2D Wrapped Vectors and Profile Bits

HTML-код
- Опубликовано: 9 фев 2025
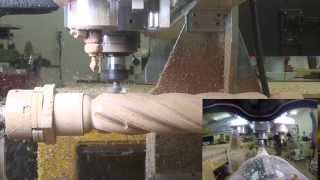
- Here we create some 2D tool paths in Vectric, and utilize profile router bits to get the desired result. The first part is the creation of the tool path, and the second part I show you the actual machining process on the CAMaster CNC rotary axis. I just used a cheap 4x4, so don't pay any attention to the quality of the wood, but rather what can be done utilizing 2D tool paths and profile bits. Thanks for watching.
WAG www.workagainst...
Vectric www.vectric.com
Magnate www.magnate.net
Amana www.amanatool.c...


![Noob To Max With DRAGON REWORK In Blox Fruits [FULL MOVIE]](http://i.ytimg.com/vi/LnBMOinoOvA/mqdefault.jpg)


Nice one Jeff, good thought provoking presentation
Thank you John. Appreciate the comment.
GREAT job Jeff, I see you are having fun with the rotary
Cool, good use of speciality bits.
Thanks for the tutorial. Why is the rotary spinning 2x (720 degrees) around on each pass? Is this something you've programmed or just the output from Vectric?
So the depth of cut determines how many passes it needs to make to get to desired depth. I had it return the A axis back to the starting point of the vector before it did the next pass. So what you see is the axis returning to A0 before it cuts again. Same happens on flat stock when cutting ON a single line. It cuts, retracts, returns to beginning of line and cuts again. Hope that makes sense and thanks for watching.
I just ordered 4 axis CNC ....and I am playing with Aspire to learn something before I recieve my machine. I have drawn a table leg on other software and saved it as STL file. Importing is not a problem but setting it to machine gives me huge headache.....it takes forever to calculate path and it tells me it would take over 7000 hours to carve it.....can you tell me simple solution to this...thanx
Why does the z raises on every depth pass? Can it remain down and plunge per pass?
Talley Boatwright It does that cause I wrote the code that way because i'm scared to damage my machine, so I always make sure Z will clear EVERYTHING everytime. you don't have to do it that way, it's just a precaution.
Work Against The Grain I glad you did this video. I am interested in seeing a tapered leg done like Legacy CNC emphasizes so much with their Conversational CAM. could it be done the same as a profile instead of 3D carving to save time?
Legacy's conversational cam IS GREAT and helps save time for sure, but yes, you can write a G Code manually that will create a tapered leg using a 3/4 ball nose and avoid the 3D carving method. Would probably take 2 passes and about 5 minutes to machine it. 2 passes because by the time you get to the end of the leg you are removing quite a bit of material. So I would say 2 possibly 3 passes with the ball nose machining down the length of the leg while the Z axis plunges deeper as it goes and the rotary spinning as I have shown here. When you understand G Code almost anything is possible and faster than 3D carving method EXCEPT when you actually need to carve something in 3D.
Work Against The Grain I am looking to buy a Camaster SR44 with Indexer. Which jawchuck are you using or recommend?
Talley Boatwright I use both Nova and Vicmarc 4 jaw. Both are great and have interchangeable jaws. The Vicmarc is best, but a bit pricy.
Where did 3 for the y axis come from?
3 represents the inches in Y from the Y ZERO position. Meaning If you can picture X zero and Y zero being the lower left corner of the work piece I wanted to start the vector 3 inches up from the end of the work piece. SO in this case for my first vector at 1:47 seconds into the video I created a vector STARTING point at X0 Y3. All of the XY coordinates at least for me start in the lower left corner of the workpiece and all of the vector staring points are in relationship to this. For example X2Y6 would be 2 inches to the right and 6 inches towards the other end. I hope I haven't confused the issue more. If you have any other questions you can sure send me an email at jefonitoo@gmail.com Thanks for watching.
:)