never thought I'd be watching a soldering video with such high production. I'm a surgeon, and I am impressed with the meticulous attention to detail here. Excellent job!
Thank you! I stopped using my skills after college in a job that was a mistake and am trying to get a job in automation and need to retrain my soldering skills. The calm, concise nature of this video and tips were incredible for me and I really appreciate it. Some of the things you did here I didn't learn in college or at my job. I'm going to buy some good equipment and start practicing! going to look into more of your videos. I have some old electronics I can use to get better at desoldiering. I need to look into cheap supplies for SMT practice. Thanks again.
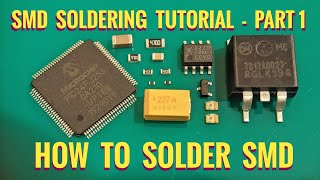
Thanks for the video. I just got my first surface-mount assembly job. I was trained 30+ years ago to do through-hole soldering. BOY! The component size difference is insane. My eyeballs are already freaking out.
As a tech from the late 80's to now, this video is a good value for the novice and production quality is on par ( I am a videographer as well ). Well done.
This video is a metaphor for life. Clean up before you start. Use the appropriate materials for the job, so you don't mess things up. Do one thing at a time. Put things away when you are done with them. Be careful not to touch things that are extremely hot. Sometimes high-end parts are used to record noise. It doesn't have to be perfect.
Watched this video for 3 min, then I'm well on the way to set for epic repair journey on my Minolta X-700 with Zero prior soldering skills :-D This video is great
Your work is really well done and you have a really steady hand, your planned approach is very smart and i am definitely getting one of those books. I have being soldering in the larger form for my whole career and part of my training included a little trick you might find useful. When you handle the solder it has a similar problem as finger grease on the PCB. I get a piece of cloth, linen is perfect, wet it with isopropyl alcohol and run the solder gently through the folded cloth. You keep doing that till the black disappears. It make a difference, especially in surface mounted soldering. Perfect is for robots. Thanks for listening
A good tip after a long time of soldering: For small SMD components, I find it best to use solder paste with a stencil (you can get a stencil very cheap and quickly produced at many locations). Then place the components in place, and use either a hot air gun (more difficult) or a heating plate (easiest option) My soldering life and PCB assembly really changed after getting a heating plate. cut down the assembly time considerably.
10:35 most of us are likely looking at the legs, but he's referring to the plastic top corner of chip is beveled [where the yellow line passes]. Its blurry there, but can see clearly when sets it down. I barely caught it myself. Can see it clear at 11:49
@@LeoMakes I just subscribed. Can I pay you to do a small job on my PCB ? I have a bios chip that needs to be removed and transferred to the other board. The PCB is from a hard drive. Please let me know I'm willing to pay somebody if you want to know more info I can explain further thanks. Keith Kuhn
Leo I found your channel from this video was looking for videos to help me with soldering, I wasn’t really paying attention to what you were actually making until you were done when you turned it on I almost screamed, I am a sound designer and music producer doing all sorts of genres from pop to ambient but what ties it all together in my style is a very high influence from idm glitch experimental music, that thing sounds amazing!, oh and btw the project I am doing right now is a portable modded out turntable for playing ,using djimg and scratching, so seems like your right up my alley… cheers!
I just soldered smd voltage regulators for the first time as a test and decided I like them. Next pcb I'll add resistors and caps. I will make sure to clean the board first with alcohol. Great video, thanks for posting.
Very interesting video. I have done through hole soldering but never surface mount. Looks like you need great vision and a very steady hand, but not difficult.
Thanks, I will receive a fume extractor in few days and I can't wait to start to solder. I got a first problem to solve, instead of releasing the fume in my house, I would prefer to evacuate the fume outside. So I need to find a way to achieve to make it more safety. Thanks for your video
Really great video with a ton of extra information baked in. I would've never thought about the beveled chip with the double lines; and wasn't expecting to learn that in this video. Good stuff!
Very nice demonstration. I do production, mostly through hole but always a few sm op-amps. For those opamps I'll put a little noclean flux on the pads, a drop of solder on the iron tip, use tweezers to place the part then just touch the solder to the pad/leg interface and it just sucks it up. Don't use rosin flux as you can't get it clean under the chip. thanks.
Funny, came here for advice on smd quad flat pack soldering. I own the Original Electroslüch from LOM. Great guy, great device!!! I use it for locating RF Interference but also so much more both creative and useful.
Funny, I built it for sound design purposes but ended up using it for RF troubleshooting since a lab spectrum analyser was hopefully out of reach for me. It totally did the job! Anyway, thanks for watching!
Right tool for the job.. my iron tip and solder diameter was great for automotive work, but getting the thinner solder and the fine tip for the iron, that will help as I solder to micro switches and learn to work on smaller scale electrical. Thank you!
Put clear masking tape over the labels in that sample book when they are new. I have two and with both, the stickers deteriorated and tried to fall off within a matter of months. I live in Thailand which is very humid but expect this would happen anywhere. Great video
Great video. I once made a very low frequency radio that had an antenna a bit over a meter in diameter of 300 turns of wire. I was able to listen to my TV, the outdoor utility pole and a lightning storm coming in, Frank Reiser M.S.
Fascinating! It never occurred to me that you can use this device (when properly tuned) to listen to a lightning storm. I associate this device with sounds from man made electronics but it’s interesting that nature can generate interesting sounds for it as well. Thanks for sharing this.
@@LeoMakes I am fascinated by the electromagnetic spectrum and radiation. I liked my VLF receiver because it was so far down the electromagnetic spectrum. Incidently, I have a Geiger counter and radioactive rocks. I have collected the Americium 241 from smoke detectors. They release an alpha particle and then a gamma ray.
Thanks for the great tutorial on SMT. After many years working on Heathkits (sure you're too young for that) looking to solder my first SMT kit and it seemed a bit daunting. You made it seem possible. Thanks!
Elektrosluch is very impressive! It opens a new sound's world to discovery!!! It's like dive into other dimensions!!! Thank you for the SMD soldering lesson!
Thank You for the video. I have a 3D printer that my micro USB port came off of it's board and I need to solder it back on. The printer doesn't have a display like most do today and the only way to monitor it is through a computer plugged into the micro USB. This gave me the know-how on how to properly do it, instead of winging it. Thank You, Frank M.
Wonderful video, Leo. Thanks. I'm wondering about flux--thoughts? The tip about beveled pads to indicate pin 1 was terrific! This video will make all of us software guys finally holding a soldering iron much less dangerous 🙂
I get this question about flux a lot. I should probably make a video but the short version is that extra flux is not necessary when soldering a fresh PCB with a new part. That’s because virtually all electronics solders have a bit of flux in them. That tiny amount is enough to make a good connection. More flux doesn’t hurt but it’s not really necessary. If you were doing re-work on a board, that’s a whole other story. Then I’d put down a good bit of flux while removing the part or cleaning up a pad so that I can put down a fresh part. Hope this clarifies.
On a range from a dull cold joint, to the very best high shine, highly wetted solder joint, these look like they’re somewhere around the middle. Some rosin core solder sizes/brands have too little rosin, thus just a touch more can help. You are concerned about a sticky mess left behind, valid, but this is very easy to avoid. A chisel tip might transfer heat better. It doesn’t matter that all parts are new. All parts need deoxidizing/cleaning, but more to the point **adequate**... deoxidizing; and as several other commenters also observed, these joints would benefit from a bit more. It’s true, since the joints are conductive, it can be argued it’s good enough. But It’s not hard to get that shine, and make it ..even better. Go for it! (Much more satisfying.) 😉
Thank you for the excellent video. Great production quality. Great getting started content. I guess not many people are into SMT or this would have way more likes and comments.
Thanks, Leo, this is a great and cool tutorial and practice about the SMT Soldering and applications devices to detecting the Noise of the electronics active component, but away the background music is cool
Nice video. Thanks! I love the eyes on the extraction hose o.o. Great advice too about getting one thing out at a time. There's nothing worse than *stuff* all over the place when working. It takes the fun out of it.
that was such a useful macro view thanks. I was just wondering if there was a specific temperature of the iron I should be using when doing surface mount parts.
Can that device you built be used to search for hidden mics and cameras? Like, "sweeping for bugs"? I came for the soldering, but got interested in that device. Excellent video!!!! Thank you!
I think this is exactly the kind of tool they used back in the day, but I think there are much newer/better tools for that kind of thing now. Thanks for watching!
Nice Video! This is exactly what I have been searching for. What type of Solder Guns do you recommend for someone getting started for this kind of work?
Yeah, we used to do it this way back in my day (20 years ago). I don't like your choice of a soldering iron tip though, the ones like a cone section hold the solder drop / puddle better. I mean, not a pointy tip, but an elliptical one. By the way, pin 1 for IC has usually square edges while the rest of the pins' pads are rounded (to mark pin one), haven't seen that bevel thing ever. Also make sure you solder two diagonal pins before you start soldering the rest. Never solder one by one, add some rosin (perhaps dissolved in alcohol or just rub a crystal between the IC's pins, to powder it in there, then use a tip with a conic section and just drag it over... all done in one swipe. For the smaller raster you have to check the result with a lens or microscope even, but it usually just flows perfectly. After you are done, brush your board with alcohol and a brush (with short bristles, perhaps a tooth brush??! or a shortened painting brush of the proper size), never leave any rosin sitting there.
I do a similar process, but I add solder to one pad on all SMT parts before I begin to place anything. I find it speeds up the process a bit. Always add the solder to the pad opposite the hand you hold the tweezer so the tweezer does not get in the way when placing the part and reflowing the solder.
Amazing work! I tried doing this precision soldering to jump a wire on my mouse PCB. I didn't have any thin solder wire though - went ahead and ordered some 0.3mm. Will try again. Thank you for this video - very helpful!
@@LeoMakes Thank you! Quick update, I sucessfully repaired two mouse PCBs. I went ahead and tried to use 0.02 mm jumping wire but had to use something thicker since it was way to thin for me to comfortably work with
Thanks for the tips, wish me luck! Attempting to remove, reprogram and resolder a soic8 chip on a $3000 ecu because Lexus had a brain fart when designing their immobilizer systems!
@@LeoMakes I did it last night! All is well, reprogrammed fine and managed to get the car to accept new keys! 16 months it's been sitting and I can drive it again!
i’m new to this and really getting into soldering in general, so this might be a stupid question but - if his solder was rosin core solder, would he still need extra flux?
@@san_dingus Late reply, but the general thought is that as long as you are heating the pad with the iron and adding the solder to the pad, then you should be okay. If you put the solder on the tip of the iron and use the iron to transfer the solder to the pad then the flux may cook off before it can do its job. So, you could argue that the method used here is okay, however the far more common approach is to use flux with reckless abandon. Cleaning the board with alcohol is a good thing, but lay of flux before tinning the pads, then flux the tinned pads again before attaching the component. You need to clean the board again whether you use extra flux or not, so use the extra flux. It's cheap insurance. A flux pen is nice, but a syringe of paste flux is fine. I use a little bottle with a needle tip to apply liquid flux.
That looks very much like the Hakko T39-B02 Conical Tip that I use for SMD and some THT soldering. Many members on the EEVBlog forum have some mental issue with conical tips.
Eh. People get wound up on forums and have strong opinions. I’ve worked with all kinds of tips and-over time-you get used to them. Maybe something is better than something else but certainly not anything to have mental issues!
Beautiful soldering. I loved the way the solder flowed on the pad while the iron was at the other end of the pad and not in contact. What soldering iron were you using? I would like to buy one. Thank you
Hey old friend! The sounds remind me of what we hear through our studio monitors when someone receives a text or call on their iPhone. Is this what we are hearing?
Hey buddy! That's exactly right. Phones and other wireless devices are generating this stuff all the time and the amps, cables, etc in your studio. can pick it up. Shielding helps, but it's not perfect--some of it will always get through.
Awesome job! I've heard it suggested to solder sockets for the IC instead of mounting them straight to the PCB. This way you can easily switch out fried components. I'm not sure if this would have much of an effect on the circuit itself as I haven't tried it yet.


![Eminem - Fuel (feat. JID) [Official Lyric Video]](http://i.ytimg.com/vi/t5H_CewqpKA/mqdefault.jpg)

never thought I'd be watching a soldering video with such high production. I'm a surgeon, and I am impressed with the meticulous attention to detail here. Excellent job!
Thank you! I stopped using my skills after college in a job that was a mistake and am trying to get a job in automation and need to retrain my soldering skills.
The calm, concise nature of this video and tips were incredible for me and I really appreciate it. Some of the things you did here I didn't learn in college or at my job. I'm going to buy some good equipment and start practicing! going to look into more of your videos. I have some old electronics I can use to get better at desoldiering. I need to look into cheap supplies for SMT practice.
Thanks again.
Thanks for the video. I just got my first surface-mount assembly job. I was trained 30+ years ago to do through-hole soldering. BOY! The component size difference is insane. My eyeballs are already freaking out.
As a tech from the late 80's to now, this video is a good value for the novice and production quality is on par ( I am a videographer as well ). Well done.
This video is a metaphor for life.
Clean up before you start.
Use the appropriate materials for the job, so you don't mess things up.
Do one thing at a time.
Put things away when you are done with them.
Be careful not to touch things that are extremely hot.
Sometimes high-end parts are used to record noise.
It doesn't have to be perfect.
Amen! My next video will be on how to write a philosophy book (just kidding).
I have been trying to touch things that are extremely hot since puberty
Geez, someone who actually knows how to teach. Thank you sir.
I love the presentation and the soft background music. It's like I'm watching surface-mount soldering with Bob Ross. :-D
Lots of happy caps, Hell let's be brave an stick a 20 watt resistor over the top for no reason .....
@Anson Lyric bad bot
At first i thought it was the GTA San Andreas theme really quiet in the background 😂
That is a cool little product.
Thanks for the info on hand soldering surface mount I'll have to go pick up a few smaller things for the fine soldering
Always been intimidated by SMD, I thought you needed ovens and paste and masks and stuff. Thanks, my life is changed!
I've been avoiding it, but this video has given me courage to try my first IC surface mount. Very nice and clear instructions!
I'm a budding engineer and love electronics. This was very interesting for a beginner
Watched this video for 3 min, then I'm well on the way to set for epic repair journey on my Minolta X-700 with Zero prior soldering skills :-D This video is great
Good luck with your repair-hope it goes great!
The fact that the Elektrosluch is stereo really makes it. So cool.
Totally! I did not expect the noises to be so directional but you can really hear it on headphones when you sweep the device around the room.
Your work is really well done and you have a really steady hand, your planned approach is very smart and i am definitely getting one of those books. I have being soldering in the larger form for my whole career and part of my training included a little trick you might find useful. When you handle the solder it has a similar problem as finger grease on the PCB.
I get a piece of cloth, linen is perfect, wet it with isopropyl alcohol and run the solder gently through the folded cloth. You keep doing that till the black disappears. It make a difference, especially in surface mounted soldering. Perfect is for robots. Thanks for listening
Great tip-I’ll give that a go next time I have to solder something.
Thanks for watching!
Great video! Very helpful. The nicest thing was hearing solder pronounced correctly!
Yep, soldering only a single SMD component value at a given time is a REALLY good tip! Thanks for the video, I think it helped me a lot!
Glad it helped!
A good tip after a long time of soldering:
For small SMD components, I find it best to use solder paste with a stencil (you can get a stencil very cheap and quickly produced at many locations). Then place the components in place, and use either a hot air gun (more difficult) or a heating plate (easiest option)
My soldering life and PCB assembly really changed after getting a heating plate. cut down the assembly time considerably.
10:35 most of us are likely looking at the legs, but he's referring to the plastic top corner of chip is beveled [where the yellow line passes]. Its blurry there, but can see clearly when sets it down. I barely caught it myself. Can see it clear at 11:49
I knew I could trust you by the googly eyes
They make everything sound and work better!
Yeah
Hi
@@LeoMakes
I just subscribed.
Can I pay you to do a
small job on my PCB ?
I have a bios chip that needs to be removed and transferred to the other board.
The PCB is from a hard drive. Please let me know I'm willing to pay somebody if you want to know more info I can explain further thanks.
Keith Kuhn
Actually gives me some confidence I might be able to fix the rather fragile output jack on my NTS-1! Thanks for making this video! 😃
Leo I found your channel from this video was looking for videos to help me with soldering, I wasn’t really paying attention to what you were actually making until you were done when you turned it on I almost screamed, I am a sound designer and music producer doing all sorts of genres from pop to ambient but what ties it all together in my style is a very high influence from idm glitch experimental music, that thing sounds amazing!, oh and btw the project I am doing right now is a portable modded out turntable for playing ,using djimg and scratching, so seems like your right up my alley… cheers!
Portable modded turntable sounds very cool! I hope you'll post it somewhere (like RUclips) and let me know so I can see it!
I just soldered smd voltage regulators for the first time as a test and decided I like them. Next pcb I'll add resistors and caps. I will make sure to clean the board first with alcohol. Great video, thanks for posting.
Hey wait, I am Norwegian and i don't like to watch knitting, I really enjoyed this. Great tutorial.
Very interesting video. I have done through hole soldering but never surface mount. Looks like you need great vision and a very steady hand, but not difficult.
Great video! I was wondering what temp the iron was on ?
Thanks, I will receive a fume extractor in few days and I can't wait to start to solder.
I got a first problem to solve, instead of releasing the fume in my house, I would prefer to evacuate the fume outside. So I need to find a way to achieve to make it more safety.
Thanks for your video
Really great video with a ton of extra information baked in. I would've never thought about the beveled chip with the double lines; and wasn't expecting to learn that in this video. Good stuff!
wow the demonstration - that is actually so cool to hear
thanks much for this. Going to have to wait for .3mm solder to be delivered, but at least I'm no longer freaked out by surface mount soldering...
Just his tone of voice and the way he speaks is like anti stress in itself
This was perfect, great for beginners! Can’t thank you enough!
Very nice demonstration. I do production, mostly through hole but always a few sm op-amps. For those opamps I'll put a little noclean flux on the pads, a drop of solder on the iron tip, use tweezers to place the part then just touch the solder to the pad/leg interface and it just sucks it up. Don't use rosin flux as you can't get it clean under the chip. thanks.
Dude you have rock steady hands. You should be a surgeon.
Funny, came here for advice on smd quad flat pack soldering. I own the Original Electroslüch from LOM. Great guy, great device!!! I use it for locating RF Interference but also so much more both creative and useful.
Funny, I built it for sound design purposes but ended up using it for RF troubleshooting since a lab spectrum analyser was hopefully out of reach for me. It totally did the job!
Anyway, thanks for watching!
Right tool for the job.. my iron tip and solder diameter was great for automotive work, but getting the thinner solder and the fine tip for the iron, that will help as I solder to micro switches and learn to work on smaller scale electrical. Thank you!
Thanks for the tips. Just ordered a sample resistor/capacitor book.
Put clear masking tape over the labels in that sample book when they are new. I have two and with both, the stickers deteriorated and tried to fall off within a matter of months. I live in Thailand which is very humid but expect this would happen anywhere. Great video
Great gadget! That is the first time I saw soldering of SMD's that made it look very doable. Thanks for the demo.
Great video! Clear speaking really helps us with bad hearing, Thank You!
you make it look so simple, ill give it a shot one day
Excellent presentation! Good tip about the thin solder
Great video. I once made a very low frequency radio that had an antenna a bit over a meter in diameter of 300 turns of wire. I was able to listen to my TV, the outdoor utility pole and a lightning storm coming in,
Frank Reiser M.S.
Fascinating! It never occurred to me that you can use this device (when properly tuned) to listen to a lightning storm. I associate this device with sounds from man made electronics but it’s interesting that nature can generate interesting sounds for it as well. Thanks for sharing this.
@@LeoMakes I am fascinated by the electromagnetic spectrum and radiation. I liked my VLF receiver because it was so far down the electromagnetic spectrum. Incidently, I have a Geiger counter and radioactive rocks. I have collected the Americium 241 from smoke detectors. They release an alpha particle and then a gamma ray.
Thanks for the great tutorial on SMT. After many years working on Heathkits (sure you're too young for that) looking to solder my first SMT kit and it seemed a bit daunting. You made it seem possible. Thanks!
I have definitely heard of Heathkits but I never had the pleasure of working on one myself. Best of luck with your SMT kit!
Hey there just wanted to say, fantastic channel. Keep up the good work.
This was helpful, and your calming voice has soothed my worries about frying my first SMT board! Thanks.
You make it seems too easy! Thanks so much for the tutorial!
Elektrosluch is very impressive! It opens a new sound's world to discovery!!! It's like dive into other dimensions!!! Thank you for the SMD soldering lesson!
Thank You for the video. I have a 3D printer that my micro USB port came off of it's board and I need to solder it back on. The printer doesn't have a display like most do today and the only way to monitor it is through a computer plugged into the micro USB. This gave me the know-how on how to properly do it, instead of winging it.
Thank You,
Frank M.
Thanks. I managed to solder my very tiny component after straggling so much.
WOW!
VERY impressive, clear and well done tutorial!
Probably the best tutorial video that that I’ve ever watched.
So nicely done!
Thank You!!!
Great tutorial. I was worried surface soldering would be really hard but this looks very approachable!
After some practice its very easy
Thank you very much for posting this video, you've exposed the mystery of SMD components for me! 🙏
This is a nice and clean and good job, well done !
It's amazing, it helped me a lot, thank you for sharing.
Thanks for a nice guide. The thing you made might be great for foley (movie sound effects)
I would use some flux, and a little less solder. Excellent Video BTW!
I'm gonna start using alcohol to clean the pads.
Hey Man, thanks for this video. I now feel confident enough to order parts for a mutable instruments ripples:) Great work!
Wonderful video, Leo. Thanks. I'm wondering about flux--thoughts? The tip about beveled pads to indicate pin 1 was terrific! This video will make all of us software guys finally holding a soldering iron much less dangerous 🙂
I get this question about flux a lot. I should probably make a video but the short version is that extra flux is not necessary when soldering a fresh PCB with a new part. That’s because virtually all electronics solders have a bit of flux in them. That tiny amount is enough to make a good connection. More flux doesn’t hurt but it’s not really necessary.
If you were doing re-work on a board, that’s a whole other story. Then I’d put down a good bit of flux while removing the part or cleaning up a pad so that I can put down a fresh part.
Hope this clarifies.
Thanks! With your help I've finished my Pulses expansion for turing machine module (eurorack). I thought it's impossible for me.
Thanks for this video - right now i'm planning to go SMD with my projects and this was really helpful. Btw you got a new sub!
On a range from a dull cold joint, to the very best high shine, highly wetted solder joint, these look like they’re somewhere around the middle.
Some rosin core solder sizes/brands have too little rosin, thus just a touch more can help. You are concerned about a sticky mess left behind, valid, but this is very easy to avoid. A chisel tip might transfer heat better. It doesn’t matter that all parts are new. All parts need deoxidizing/cleaning, but more to the point **adequate**... deoxidizing; and as several other commenters also observed, these joints would benefit from a bit more. It’s true, since the joints are conductive, it can be argued it’s good enough. But It’s not hard to get that shine, and make it ..even better. Go for it! (Much more satisfying.) 😉
educational and devilishly satisfying
Dude, thanks for this, much better than a lot of the guides I have seen. Very well done sir!
Best video I’ve seen. What temp do you have the iron. I also see you don’t use flux. Any reason? Thanks
extremely good tutorial, thank you
Thank you for the excellent video. Great production quality. Great getting started content. I guess not many people are into SMT or this would have way more likes and comments.
Thanks for the kind words! I'm hoping the video has been helpful to whoever has seen it. Plus it was fun to make.
Thanks, Leo, this is a great and cool tutorial and practice about the SMT Soldering and applications devices to detecting the Noise of the electronics active component, but away the background music is cool
Nice video. Thanks! I love the eyes on the extraction hose o.o. Great advice too about getting one thing out at a time. There's nothing worse than *stuff* all over the place when working. It takes the fun out of it.
First time viewer… insta-subscribe. Thanks for sharing! You have given me the confidence to attempt surface mounting, something I had been avoiding.
Glad it helped! Thanks for watching!
All those sounds!!❤
that was such a useful macro view thanks. I was just wondering if there was a specific temperature of the iron I should be using when doing surface mount parts.
This was a great demo!
Can that device you built be used to search for hidden mics and cameras? Like, "sweeping for bugs"? I came for the soldering, but got interested in that device. Excellent video!!!! Thank you!
I think this is exactly the kind of tool they used back in the day, but I think there are much newer/better tools for that kind of thing now.
Thanks for watching!
For being organized , thumbs up 👍🏻
Nice Video! This is exactly what I have been searching for. What type of Solder Guns do you recommend for someone getting started for this kind of work?
I've never done surface mount work, so this was really useful, thank-you!
Excellent job
Yeah, we used to do it this way back in my day (20 years ago). I don't like your choice of a soldering iron tip though, the ones like a cone section hold the solder drop / puddle better. I mean, not a pointy tip, but an elliptical one.
By the way, pin 1 for IC has usually square edges while the rest of the pins' pads are rounded (to mark pin one), haven't seen that bevel thing ever. Also make sure you solder two diagonal pins before you start soldering the rest. Never solder one by one, add some rosin (perhaps dissolved in alcohol or just rub a crystal between the IC's pins, to powder it in there, then use a tip with a conic section and just drag it over... all done in one swipe. For the smaller raster you have to check the result with a lens or microscope even, but it usually just flows perfectly. After you are done, brush your board with alcohol and a brush (with short bristles, perhaps a tooth brush??! or a shortened painting brush of the proper size), never leave any rosin sitting there.
When unsoldering use 2 soldering irons! Absolutely the best way.
Great tutorial 👽
Just destroyed a pcb with my suprt bad surface mount soldering skills. Now I'm here :DD
The art is not in the soldering, the true art of smd soldering is in finding the part should you accidentally drop it
This is awesome. Just jumping into audio and soldering and the two together as well. Love this.
I do a similar process, but I add solder to one pad on all SMT parts before I begin to place anything. I find it speeds up the process a bit. Always add the solder to the pad opposite the hand you hold the tweezer so the tweezer does not get in the way when placing the part and reflowing the solder.
Amazing work! I tried doing this precision soldering to jump a wire on my mouse PCB. I didn't have any thin solder wire though - went ahead and ordered some 0.3mm. Will try again.
Thank you for this video - very helpful!
Thanks for watching and best of luck with your repair!
@@LeoMakes Thank you! Quick update, I sucessfully repaired two mouse PCBs. I went ahead and tried to use 0.02 mm jumping wire but had to use something thicker since it was way to thin for me to comfortably work with
Dear Leo , Thank you for nice presentation ...
Thanks bro, I’m 400th comment. Congratulations 🍾🎊🎉🎈
Thank you so much for the video! I've gained enough confidence now to try SMD soldering. Too bad the product is sold out :( I just need one of these.
Thanks! You made this kind of soldering accessible to me!
Great video! Thought it would be more complex, will definitely give it a try. Thanks!
Thanks for the tips, wish me luck! Attempting to remove, reprogram and resolder a soic8 chip on a $3000 ecu because Lexus had a brain fart when designing their immobilizer systems!
Yikes! Hope you’re successful at your repair. Good luck!
@@LeoMakes I did it last night! All is well, reprogrammed fine and managed to get the car to accept new keys! 16 months it's been sitting and I can drive it again!
Nice one! Congrats!
This looks so cool! How do you prevent excess solder from going onto the board and connecting two pads that you don't want connected?
I just wish you touch-up those resistors with flux...
Yes flux then solder
i’m new to this and really getting into soldering in general, so this might be a stupid question but - if his solder was rosin core solder, would he still need extra flux?
@@san_dingus well, extra flux won't hurt, don't they?
@@san_dingus flux burns off as you solder. Generally by the time you've got the pad set, the flux is gone.
@@san_dingus Late reply, but the general thought is that as long as you are heating the pad with the iron and adding the solder to the pad, then you should be okay. If you put the solder on the tip of the iron and use the iron to transfer the solder to the pad then the flux may cook off before it can do its job.
So, you could argue that the method used here is okay, however the far more common approach is to use flux with reckless abandon. Cleaning the board with alcohol is a good thing, but lay of flux before tinning the pads, then flux the tinned pads again before attaching the component. You need to clean the board again whether you use extra flux or not, so use the extra flux. It's cheap insurance. A flux pen is nice, but a syringe of paste flux is fine. I use a little bottle with a needle tip to apply liquid flux.
That looks very much like the Hakko T39-B02 Conical Tip that I use for SMD and some THT soldering.
Many members on the EEVBlog forum have some mental issue with conical tips.
Eh. People get wound up on forums and have strong opinions. I’ve worked with all kinds of tips and-over time-you get used to them. Maybe something is better than something else but certainly not anything to have mental issues!
Beautiful soldering. I loved the way the solder flowed on the pad while the iron was at the other end of the pad and not in contact. What soldering iron were you using? I would like to buy one. Thank you
Hey old friend! The sounds remind me of what we hear through our studio monitors when someone receives a text or call on their iPhone. Is this what we are hearing?
Hey buddy! That's exactly right. Phones and other wireless devices are generating this stuff all the time and the amps, cables, etc in your studio. can pick it up. Shielding helps, but it's not perfect--some of it will always get through.
Great Video! How come no Liquid Flux?
Very great vlog
Awesome job! I've heard it suggested to solder sockets for the IC instead of mounting them straight to the PCB. This way you can easily switch out fried components. I'm not sure if this would have much of an effect on the circuit itself as I haven't tried it yet.
Are there smd ic sockets as well?
Beautiful video. Thanks, I got a lot from this.