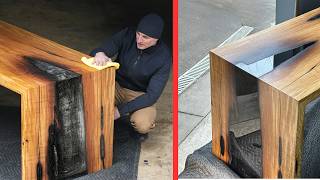
Making a Burning LAVA GAMING DESK

HTML-код
- Опубликовано: 17 июн 2023
- In this video I build a flowing lava desk/lava table with some programmable Govee LED strip lights, some burled elm slabs and a bunch of epoxy and tempered fire glass. This unique waterfall lava table resembles real burning lava inside of the river table between the wood slabs. This is a full diy video that shows every step of the build from preparing the lumber, making epoxy forms, installed the led lights, pouring the epoxy, finishing the desk, building the legs, setting up the final lava desk.
BUY MY MERCH (New "Hub" design out now): www.bunkerbranding.com/pages/...
My Instagram: / drewbuildsstuff
Free Plans for my Builds: www.drewbuildsstuff.ca/plans
Material List:
Govee AI Sync Box Lights Kit: geni.us/hFrmv2g
Govee Outdoor strip lights (inside the epoxy): geni.us/VHhQBi
Fire glass RED (used about 60 lbs): geni.us/DmM9
Fire glass Black (used under 10 lbs): geni.us/I9ryo
Fire glass Amber (used under 10lbs): geni.us/nRYEd
Casting Epoxy (used about 8 gallons): geni.us/hhzcg8
Rubio Monocoat Pure: amzn.to/3RgvDV7
Kreg Track Saw Jig: geni.us/9UVnSxr
Kreg Pocket Hole Jig: geni.us/AzcPmPL
Drill & Impact: geni.us/gEVKgX
Circular Saw: geni.us/s0gRT0
Large Router: geni.us/Em5m8c
Trim Router: geni.us/IJ8zR
Miter Saw: geni.us/m62u
Contest Rules (Winnders drawn on June 26/23, proof in my Instagram story archive):
1. Prizes:
Win one of two "Drew Builds" T-Shirts in your size.
Win the Govee AI Gaming Sync Kit that I used in the filming of this video. Condition is used, but overall like new.
2. How to Enter:
Follow on my instagram / drewbuildsstuff . All instagram followers that I receive from June 18 2023 until and including June 24 2023 will be eligible to win.
3. Winners:
Winners will be selected by me on (or shortly after) June 25 2023 by a scroll and pick by me. This may be random or selected by me. Winners will be contacted via direct message and must reply within 1 month to receive the prize. I will cover the shipping cost as long as it's to a reasonable location.
4. Proof:
Proof of winners will be posted on my instagram story or youtube story on or around June 25 2023.  Хобби
Хобби


![Shoreline Mafia - HEAT STICK (OHGEESY & FENIX FLEXIN) [Official Music Video]](http://i.ytimg.com/vi/xKEY6THtwuA/mqdefault.jpg)

Thank you 🙏🤓 Amazing work 👍🏻
Very cool
Thanks for the inspiration, love your channel!
How did the epoxy not stick to the melamine??!!
🍞
@@jeffmackintosh8611 The mold release that he put on..
Routing the LED strip out and then RECASTING them in epoxy is such a power move
Too much surface reflection if i didnt
@@DrewBuildsStuff couldnt you have created a custom backing plate for the LED's? That way when some of the lights invariably fail in the future ... its easy to replace them?
Yo wtf are you doing here???
@@moored1979I was wondering how the hell your replace those LEDs.
@@DrewBuildsStuffFor a recommendation use a jst connector for the strip so you can unplug it while transporting or working finishes
I love the fact that you left the “mess up” in the video, and how you worked through it. So many videos I watch like this are overwhelming to me because I start thinking, “yeah right, I’ll jack that up.” The brutal honesty, humility, and perseverance in this video was refreshing to see. Absolutely beautiful desk as well. Great job!
Fr, it felt so relatable and comforting to know you're not the only one who does stuff like that lol
WHERE CAN I BUY THIS?! OMG!!!!
Failure recovery often takes more ingenuity than the original project. Although in this case the project itself was pretty genius.
Bro you kicked ass on this!!! Great job!
I’m so happy you didn’t give up after the LED incident. It looks amazing, you should be proud of yourself!
I was devastated when you had to cut the led strip out! I can only imagine how you felt. Great work dude!!
as a woodworker myself I can comfortably say that this is absolutely insane dedication and hard work. I wish I can be as good as you one day. Amazing work, brother, you've earned yourself a new loyal subscriber :)
Shut up
How is this hard bro? Are you kidding me?
Is it alright to use just screws for the table legs? Isn't this causing problems when temperature and moisture changes?
well you're obviously not hard to impress lol. this table was designed wrong from the beginning, and when it failed for obvious reasons, the fool removed ALL of the led's instead of just cutting a few inches in to get to a good solder point on the led strip. and none of it matters because these led's will overheat and fail within a year anyways. youtube creators and the idiots who praise them lolol
@@bob88099 npc
Routing out the LED strip really highlights how much this is a labor of love 😻👍
No doubt, this is the most beautiful table we've ever seen. all that hard work Worth it
My thought is on the actual lifespan of the led. I definitely will attempt a build like this, but having an actual recovery option if the led strip fails would be a consideration. Beautiful build man.
Maybe clear plastic tubing you can buy from HD will work. Put the strip inside and glue the tube down. Tube ends exit piece underneath and the strip can be pulled out and another fished in at any time.
@@beowoulf355 Make that a "fished in at the same time" ;-) Should you get that option to work, connect the old and new strip and while pulling out the old one the new one gets pulled in automatically. Be careful with any tight corners though. I almost ran into problems just fishing in some audio cable in plastic tubing I had laid in the living room walls because of that.
@@beowoulf355 Plastic tubing will become yellow in some time. I think it will be better to have something in glass which won't change color.
My same thoughts exactly. Great looking table.
I don't know what you would be able to use that would last a lifetime. Photoluminescent pigment apparently only lasts 10 years. You are probably looking at something radioactive like Tritium which has a half life of 12 years. In reality the oldest light bulbs are the ones that last the longest, but wouldn't have the desired effect.
This is the first episode of your channel I've seen and it's fantastic. Your workshop, your skill, what you're doing here is everything I wish I was doing for a living. Keep it up, it's amazing.
Thanks for watching!!!
@@DrewBuildsStuff You are most welcome
And the choice of music !
Been wanting to make an LED infused epoxy desk top for my gaming PC for a while now. Epoxy is so expensive...using an Idea like this with filler is very creative! Thanks! You killed it!
Amazing video and thank you for leaving in the mess up and recovery I’m trying to get into woodworking so that was greatly appreciated and you have earned my subscription
WAIT WAIT WAIT!!!!! You routed out the LED!!!! That is wild! You get a standing ovation man!!!
Bro, you have such a great attitude and your honest, self-deprecating and sincere delivery of your narration is such a breath of fresh air. It shows that you don't take yourself too seriously, but you still have such pride and dedication in your work. This was a real treat to watch. Well done.
Loved how he was using less expensive tools, that "normal" people can afford, unlike these other RUclips channels use. Like the Woodpeckers and the Festools. I would need to win a lottery to buy those tools, and even then not sure if I would buy them.
Right, all matercraft and ryobi, looks like my shop lol
blacktail studios usually has the same kind of narration
Table looks amazing 👏 ! Thank you for showcasing your amazing skill.❤
great video. I've been there with breaking LED connectors by tripping over the cord. What I do now is use a twist lock connector so I can connect/disconnect as needed.
With the side piece included. You could make a really cool waterfall desk with a similar effect. Imagine having a blue effect going down the one side into a small diorama
After seeing it all put together that's exactly what came to my mind.
yes! make it and i will buy it.
that is honestly one of the best I've ever seen, the wood was gorgeous to begin with, so it was a great start for a composition, way to pull through as well, very impressive work!!
This is probably one of my top 3 favorites of your videos. Amazing job, Drew. Plus your really easy on the eyes.
I could of cried FOR you when you tripped on the cable, my jaw dropped & I felt like I was in the room 🙊😭 I’m so happy you kept going & found another way to make things work. It turned out amazing! I wish I lived in Canada so you could help me build my dream office 🥺
I thought he hit his leg on the desk until I realized he had broken the cable
@@uteopia same!!!
i knew it was a disaster in coming seeing how he didnt secure it, i thought he would make the end of the cord a priority to make sure nothing could ruin it during the process. i felt his pain tho
Haha lesson learned
@@reixie How much money would it take to get you to admit that you in fact did not know it was a disaster incoming?
One way to do this;
You add clean white crystals instead, and add the led lights from the bottom, is how you can replace them eventually.
yeah. I thought about that too,.. even because the led lights might stop working in the future again... I wouldn't cover them with epoxy. Just a layer of glass would suffice.
@@designjorge Make it under the edges like a train railway or a curtain is hanged commonly.
@@designjorge Or one more idea, is make the table like a lego block, cut in 3x pieces for easy acces.
Super impressed by the perseverance through the led issues
Hands down one of the coolest setups ever. Well done
I love wood/epoxy desks like this... To have LED lights inside is amazing, and now I see why I haven't seen that before! Incredible work.
It turned out brilliant. I can certainly appreciate you doing it the way you wanted with the finish and the hardware. If you love it then it doesn't really matter what anybody else has to say, right? Good stuff.
Sweet. Great work. The metal table leg gives it character. Awesome.
I love The Positive Couple. I am excited to see your version!
This is insanely well built and a magnificent idea to do this. You have a lot of persistence not stopping after tripping over that wire. This desk is so cool I wish I could have something like this. Keep up the amazing and hardworking videos, I know you take a long time to make videos!
To say this turned out great would be an understatement. This is AMAZING! The fact that you took the time and patience on this says a lot about the work you put into it. You informed the audience STEP by STEP on your process and products, not to mention the mishaps. I like that it didn't have the epoxy shine because this looks much better. KUDOS on this project. New subscriber after this!!
Calling this amazing is an understatement, it is AWESOME.
Wow!!! Great build!!! Excellent job!
I massively respect and appreciate when builders put in the mistakes
I don't watch every video you produce, but the ones i do watch always surprise me with your creations and workmanship...Nice one Drew 🙂
I appreciate that you give a good DIY perspective on these projects. I know you call out the RUclips woodworking community but most of those folks are approaching their videos from a professional/artisan perspective. This feels more like a project anyone with some basic woodworking tools could build.
Great build, thanks for the content!
Also he included his mistakes, unlike a lot of other Creators, his "entire" build is on view...BTW how many repair/how to vids skip a step or mistake?? Good stuff Drew.
Thanks for the comments! Appreciate it!!!
That is the most beautiful lava gaming desk I ever have seen. Wow. awesome.
Love the standard hardware bracing, cheap, strong, and practical
I'd love to see this replicated with a slightly tinted orange/red Epoxy to give it more of a lava feel. But I think the clear Epoxy gives you the ability to create some astral style scenes as you showed at the end! Great work
What an amazing build, it looks beautiful! The moment you ripped out the cord for the led lights, I could feel the pain. I felt so bad but I'm so glad you were able to save it in the end!
Beautiful. Was thinking of lifting my video monitors by about 3 inches with a custom platform. My original plan is going updated now. Thanks!
Awesome Thank you for the information and seeing the full project
when you snapped the cable, went back to re-route it out and added a new one earned you a new subscriber! thats hard work and dedication. i feel like most people would've given up knowing the glass was going to eat through router bits, so much extra work and effort. amazing job drew!
Thanks for watching!!
That is sick man, I love the whole setup!
Holy shit I'm going to use this video as an example. The fact that you didn't just cancel the whole project and break down for months but just redid the lights is damn impressive.
Amazing piece. I felt your pain when you tripped on the LED cord but you overcame and conquered. Great job!
The table looks great! As someone who also had a mishap at the end of a resin pour project it was nice seeing you leave that bit in the video. Nice knowing it happens to the best of us. You get a sub for that lol. Excited to check out more of your builds!
This is absolutely amazing. I will attempt to do this. Thank you so much.
What an incredible piece! I really enjoyed watching this, you explain in such a simple way that it makes me feel I could someday try it. I felt for you when you broke the light connection and thought it was wonderful you had the imagination and ability to fix it…well done 👍🏻
Dude the idea to route the cable back out was clutch, I honestly thought it was over or you were just going to have to mount a new strip under the desk itself, your tenacity prevailed my friend.
I built my own desk a while ago and was going to build another one. Was looking around for ideas and this absolutely blew my mind. Nice work man.
This is a beautiful desk! Wow!
Wow, that is absolutely stunning! Great work
What a joy to watch. Thank you for sharing your process
This was the first video of yours that I've seen and it was amazing to watch. The desk looks awesome, you make it look so easy. Awesome awesome work
Beautiful, no bad comments on wood working from me. Love it. Just a small hint on welding miters that I have used with aluminum, you can cut one outside corner of the miter just a bit, if it's 1/8" I usually cut an 1/8" off, then weld the full length of the outside of the miter to fill it in. A little grinding and it's invisible and much stronger. Keep building!
Man, I have this new interest in woodworking/carpentry but I must say this you made this a very exciting video with ripping the lights out on accident lol. Then being able to re-route them and complete the project, has made me really want to get as skilled as possible to create pieces. Really amazing looking desk.
dude!~ This desk looks very awesome! I have to say the time you have spent doing the desk was well worth the trouble. Making creative things really does make you feel accomplished.
Absolutely stunning...great work Drew!!
Absolutely stunning
Thoroughly enjoyed this video thanks . Table looks amazing
This desk is amazing. I actually really enjoy the asymmetrical legs. It makes it super unique. I really enjoyed watching you make this :D
Its beautiful! glad you pushed through and rewires the LED. I might 've left access to the LED in case I had to replace it again. Awesome one of a kind table. Wish I had one.
Wow!!!!!! This is amazing!!!! Fire!!!
Oh my gosh this looks so amazing!
I would have filled the LED channel with clear (soft) silicone after having routed out the bottom after the accident. Would allow for easier replacement of the strip when it inevitably fails.
Ya some room for improvement on the next one for sure
@@DrewBuildsStuff unfortunately, if one of those Leds go out, you'll be doing it again.
@@DrewBuildsStuff awesome! Maybe some kind of magnetic connection (ala Magsafe) for the LED power cord?
That was my thought too. What a beautiful thing and allot of work. The LED s fail and its over.
@@DrewBuildsStuff Why not increase your initial epoxy pour depth (to be clear from the glass with the router cutter) and then rout out a led channel after, hindsight is great ! could also put some of the glass in the first pour near any open edges so it looks like the glass is full depth
This is fantastic. I am really glad you showed your mistake. I can not wait until your supply list for this is posted!!! Great job.
Video editing is on point, and the sound is fire
💯%Beautiful stuff brother!!!
I'm so addicted to these videos and would love to try a few.
Your work ethic is inspiring! I cupped my head in my hands when you messed up the LED connection entry-point. 😀
That’s a great job. I really like how you made it look like the “lava” was lower than the wood to give it that 3D look. Love it.
I admire your perseverance! After that ripped wire I would surely have given up on that piece. And wow it turned out great in the end!
Wow that looks absolutely amazing!!!
*Insane work! Well done! I'm out of words!*
This was my first introduction to your channel and I was very impressed with the quality of your work. I felt your pain at ripping the wire out!
Great recovery though and you've got a new subscriber 😊👍
Thanks for the sub! Appreciate it!!
@@DrewBuildsStuff This was also my first introduction to your channel love the work and you've got yourself another sub, good work bro
Same
Simply Amazing!!!
Awesome. I can appreciate the mistakes as well as making it with everyday handyman tools. Great job.
the amount of talent and knowledge here is insane well done such an amazing work !
Your whole set-up is on fire, but not in a literal sense. You've done a pretty great job with all this.
Thanks for watching!
He's done an excellent job from filming, editing, and creating. 👍💯🙏
@Repent and believe in Jesus Christaight look i see your intentions are not bad but it's irrelevant to the video and enforcing and pressuring is not the way
@repentandbelieveinJesusChrist8 Thank you, but keep it on topic, bot.
@repentandbelieveinJesusChrist8 …….Rotting Christ Grandis, Spiritus, Diabolus…🤘🤘🤘
Drew, I think its only fit that YOU build your own home and take us along on the journey... I think a lot of us would LOVE this and you could turn it into a whole series...
Beautiful work!
Just watched for the first time. This is absolutely stunning young man. My heart just sank when that cable broke!! I did sub and like. Can't wait for what is next!!!!
Thanks for watching!
Really impressed with your work. I’m seriously thinking of trying some resin and wood mix. I would love to do a worktop for my campervan, this has got my creative juices flowing. Thank you so much. ❤
Well done Drew!
great job!! i imagine that next time would be much easier having learned much from this build! keep it up!
Dunno how I missed this video when it first came out, but glad I caught up. What a gorgeous desk man! And I felt ur pain when you ripped the cord for the LED lights -- same reaction I would have had. To your credit, you made it work, I don't think anyone could tell, and it looks beautiful. I think it would be hard for me to leave a desk that beautiful behind -- I'd just sit there admiring it :).
Bl😊pk o 😊ijn
Amazing walkthrough and thanks for sharing!
It did occure to me that you can also staine the wood very dark, like ebony, with vinegar and steelwool for that extra realistic slightly cooled dark lava look.
Absolutely gorgeous! And the desk is pretty amazing too 🥰
Agreed
Thank you for showing us something marvelous
Love this concept! You probably had problems repairing the led strip because the copper tabs have a protective coating that needs to be scraped away. You will know the connection will be good if you are able to tin the pads prior to soldering the wires to them.
Dude, impressive recovery on the electrical repair. It IS VERY COOL. Keep the fun projects coming. Always good to know that I’m not the only one that bad luck happens too.
Gorgeous
Too cool you showed the entire journey. You fixed that to the best of your ability, and from the top it looks GREAT!
Glad you liked it!
Wow... that looks amazing. Love it. Awesome work!! ❤❤
thats sick man, i would love to see more of such things. Keep up the good work :)
I soooo resonated when you tripped on that cable
You bounced back well
I really like your style and the laid back proactive to the voice over. I think the table came out great. Well done.
Thanks for watching!!
Blacktail studio headass
Amazing work Drew! I wish I had a desk like that 😊
It's nice to see someone take so much pride in their work. Great finish!
Okay, I know what I want to do for a project now. This is amazing.
Sick Build🤙
Random RUclips Algo brought this to me and my god I'm so happy it did! This is amazing work! That desk looks incredible. I'm now going to work through your other videos!
Amazing work!
I would make the LEDs removable. For easier long term maintenance!