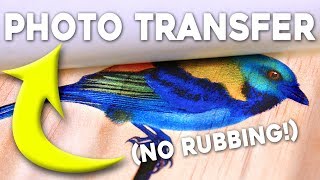
How to transfer an image onto wood

HTML-код
- Опубликовано: 21 янв 2018
- Sometimes it's nice to just be able to transfer a printed image right onto a piece of wood. Whether it's for a base for some airbrush work, or it's going to be the finished product.
Get the polycrilic medium here:
Polycrylic Gloss: amzn.to/2DY6toX
Polycrylic Satin: amzn.to/2EZd5CH
Hey guys! I’m Brad, and I make how-to videos, project vlogs, and more. I do custom painting projects, guitar painting, airbrushing, spray can painting, wood working, and a variety of other finishing work. Please subscribe and check out my channel for more!
Don't forget to ask your questions in the comment section.
Thanks for watching.
To get in touch with me with your questions, photos, etc. use the links below!
kit.com/bradangove
/ bradangovepainting
/ brad_angove
/ brad.angove  Хобби
Хобби


I've seen every one of your videos, thanks for all of the tips and tricks, looking forward to more.
Thanks Brian. And thank you for suffering through the poor quality of some of my earlier ones haha.
Thank you! For making such a great and honest videos!
Thanks for the info. I'm fixing to do a tribute guitar of my pop. I have a picture of him and I playing guitar in his living room. Now just got to find a LaserJet printer. I have learned a lot from you in a couple of days. Thank agin and keep up the good work.
Glad I could help. I hope your project goes well.
Dude I’m going to try this today on a painted guitar I haven’t clear coated yet. I’ve been scratching my head on what to do on the back of this guitar. Keep killing it.
I hope it goes well for you.
I would like to tell us if this worked mate. I want to do the same thing in my guitar.
This is something I can really use! Thanks Brad!
Cheers!
@@BradAngove Dude! I LOVE your vids! I'm learning SO much!
I used to be a vocalist in a band, but now I wanna actually PLAY & BUILD guitars!
I'm goin' for it!
Thanks man!
Awesome - have fun!
Awesome idea Brad
Thank you.
Great technique !!! Thanks
Very simply you explained!
Thank you
I already subscribed
Now you think this would work on a nitrocellulose painted surface? Also I like the way you don't edit out mistakes in your videos. I think it encourages others to try new techniques and not fear their own mistakes.
Kenneth Hildebrand I too want to know if this would work on a painted surface. if so, what paint types.
As I understand it, it’s the polycrylic that takes on the ink. So, any surface that you can properly paint with the polycrylic should allow for this technique. A properly dried and scuffed nitro finish should be no different, but you can’t replace the acrylic medium with nitro if that’s what you mean.
Related question: I’d be interested in applying the image between a nitro-based color coat and then a nitro clear coat on top. Does nitro lacquer adhere to polycrylic?
Not while it’s still soft like in these circumstances.
I like it I love the way you did your vid you took your time and broke it down, I love the crack too gives it more character good job dude thanks
Thanks Roger.
Your channel rocks! I’m learning a lot
I’m glad to hear you’re finding it helpful.
No excuse needed. Thumbs up! Great video. I've seen this done with Modgepodge before but not poly acrylic. Also, a rubber roller works well in applying the paper. Let's you roll it out very smooth. I'm interested in the guitar building application for this technique. Thanks for doing this!
Thanks Greg, and thanks for watching.
Very cool idea! Thank you for the video.
Thanks for watching.
Hey Brad,
I finally got a chance to use this technique rather than Modge Podge and I gotta say. .... 👍 Much quicker and as good or better. Thanks again from one builder to another!
Glad it worked out for you. Thanks man.
Brilliant. What a great tip for guys like me that need something to guide me with an airbrush or dremel. Thanks man!
I didn't even think of using it for the dremel! That's a cool idea, but before you do a coat of medium that you're going to carve through, I might have a better option for you. I'll need to test it first, so if you're up for reminding me next week I'll happily share it if it works.
Brad Angove sounds good, I will try to remember
Me too haha.
Very nice. Thanks for the idea.
Thanks for watching.
Love your videos! You have great artistic content! I know how much effort goes into prep, recording, creating and then editing my videos, I can tell you put a lot of effort into yours. I look forward to seeing more! :)
Thank you.
I’m glad you left the wrinkle marks. It gives a visual of why it’s important to keep the paper flat. Great vid !
Thanks Tyler.
I’ve now done about 8 transfers using Polycrylic. I’ve found best results with sanding to 400 with a random orbital and I only rub the paper off when it’s newly wet. Then I let it dry, haze white, then wet and rub again. Repeat. If I keep rubbing, I take off the pic. I think if the ink get saturated with water, it lifts easier so I do it in steps. But I’m still learning
Thank you again Brad that is a great trick I've been subscribed to you and been watching you for over a year now and I'll tell you it has been a real pleasure to watch what you do and I've learned almost as much from you as I have ole' Ben Crowe at Crimson
Thanks; that is a true compliment.
@@BradAngove well Ben has taught me how to build and you have taught me just as much about the mysteries and I mean mysteries of getting a beautiful finish I still have a couple mysteries I may ask you about down the way here cuz I got into contest for kit guitar I don't have the tools to build one from scratch that's why I wish they would turn the prize package around and give all the tools and stuff to someone building a kit because they're the ones that would need the tools so they could build them from scratch but that's okay it's just fun to be a part of it. Take care be cool brother.
So cool brother thank you for all the great videos
Thanks for watching.
nice ! cool technique , thanks for sharing it !
Thanks for watching Sam.
I have been using mog Pog to do the same process and this looked to work as well and takes less time so many thanks...I'm going to give it a shot. Also for a few bucks at a craft store you can pick up a small roller and that has been worth every penny for getting all the bubbles and creases out. Great video 🤘
Do you use a J roller for that? I was thinking I probably should have done so.
I think this stuff probably lays down a bit flatter than mod podge, but I’m not sure.
Brad Angove yeah I did and it has to lay down nicer than Modge Podge because Modge Podge is really thick. I'm on my way out right now to get some and try it. I don't know if you remember the picture of the witch guitar I posted but that was done with Modge Podge
That rings a bell. I seem to recall it going quite well. Hopefully this option works for you.
One of the small 1/2" to 1 " diameter paint rollers works well for this type of thing since the nap of the roller can push into creases etc. It also helps that the roller tube is disposable so cleanup isn't required haha
Net Rngr I like no clean up! Good idea
Cool stuff thanks
Honestly you have one of the best RUclips channel on RUclips 🤘🤘🤘🤘🤘
Thank you. That’s very kind of you to say.
Brad Angove no problem brother
Not to mention how often you respond to questions, some of mine included. I've never seen that before. And the measured way you respond to critics/loudmouths is outstanding.
By the way, I am going to try this method on a guitar headstock.
Thank you. I hope the headstock goes well. Send me a photo.
But that lamest music
Reminds me of the putty we used to put on a picture in a news paper or magazine and rubbed it to transfer the image to the putty, i like this idea, guna give this one a go i recon 👍👍
I hope it goes well for you.
Da best yet!!
Hey Brad, nice video. Was watching a video by Crafsman where he uses printing labels (take the labels off and print on the shiny side of the backing paper) No rubbing required. Results look great.
That’s a cool idea. Did he just press it into the medium as well?
Great video top job 👍
Nice! I just discovered you channel a few days ago through Darrell Braun. Love your content and your tips. I'll be trying this method with the classic pic of Johnny Cash flipping the bird on some scraps, and when I'm comfortable enough with my results... On a Tele body.
Awesome. That sounds like a really cool project.
Yes, love the wrinkle on him. I make halloween props and I find your videos very insightful!
I’m glad they’re helping. Thanks for watching.
Cool stuff
That was kewl I always wondered how that was done.
Glad I could remove some of the mystery haha.
I wish I saw this sooner. I used mod podge on my guitar body project and had to wait over 24 hours and it took forever to take out the already thin paper I was using.
Does it look good? That’s the important part haha.
@@BradAngove Some darker discoloration around Ace Frehley's head probably due to clear spray and some paper fiber that I could not get off Gene Simmon's armpit and tummy area. It was a Destroyer pic btw. But I am planning to do your method on my les paul jr proj :-)
That's pretty cool, I'll use this.
Have fun.
My mother and sister do this and it is one of my favorite things, by the way, love ur video!😊
Awesome! Thank you!
Brad Angove welcome brother! ❤️
Brad Angove brother sorry if u don't like this comment I wanna ask u in which states u live I live in middle east and it around 6:45 am of Friday
I live in Canada.
Brad Angove O cool our cousins live there too ☺️🥰
Hiya Brad....well I had some success with a different way of doing this and I think it worked the best so far. This is what I did...fwiw
1. I just used a piece of NZ pine sanded to 400 for this test.
2. I used the Mod Podge acrylic because it's what I had to hand.
To apply the ModPodge I used a sponge roller rather than a brush this time. It isn't a heavy sponge sleeve on the roller, in fact it was quite a thin roller sleeve such as you would use for (say) applying polyurethane to a piece of furniture. The coating was even and smooth.
The image was printed onto photocopy paper which gave an alright image. Not as good as (say) photopaper, but much easier to work with in this application.
Instead of placing the image face down and they trying to get rid of the bubbles, I started by placing one edge of the paper on the pine board, and gradually laying the the image down on the paper by using a lino roller ( like this one: www.trademe.co.nz/art/art-supplies-equipment/other/auction-1533483654.htm?rsqid=426bf66c66a14492b659faf7b8ccddcd ) to get rid of the bubbles as I went. It's kind of like laying steak down in a very hot pan when you don't want the hot oil to splash everywhere....I hope you get what I mean?
Doing it this way I was able to lay the image down gently with the roller and without any bubbles by the time I had the image completely flat on the board. I left this overnight to dry and the next day I used warm water and a soft sponge, as you did, to remove the paper with only a little residue left, which I cleaned up with the sponge later.
The image didn't tear out at all, although this may be luck because I haven't tried it again yet!! I'll do this 2 or 3 more times and if it works well, then I'll see about making the clock that I want to make for my extended family who live in your city!!
Now it's beer o'clock..... later.....
Sounds like you’ve got a good process in place. I find that the mod podge and acrylic mediums are a bit thick and hard to get smooth.
Yep...that's been a major issue for me too. I would much rather use something else that isn't so thick, and I probably need to hunt down something and make some further tests as I really want this clock project to be as near perfect as can be.....
That is a cool trick. I've seen others do a very similar technique using color laser printers as well. It's a very cool method to put a custom design on a wood surface. Just don't forget to print it backwards especially if there's text involved. And from what I understand, yes it must be laser printer. If you don't have a laser printer, I believe most Staples, Office Depot/Office Max, office supplies stores likely offer color laser printing.
Yes, flipping the orientation of it is an important thing to remember haha.
@@BradAngove will a monochrome Lazer printer work?
@musicmania3945 yes
I came across your channel looking for DIY guitar kit ideas. Had to subscribe! I've been looking for this technique for a graphic for my guitar. Awesome. When is the next episode of Spalted Maple DIY.
Thanks. The next episode of that goes live in about 53 minutes.
Great job wish I had seen that a month ago. I did it differently took three tries but I ended up with an acceptable picture
I’m glad it worked out for you.
Thank you!
Nice! Looks very simple to do, just remember those wrinkles. Thank you!
Thanks for watching.
Thanks for the tip!
Thanks for watching.
Wow, thats pretty crazy...I would love to do this to one of my guitars with a picture of my favorite artist.
You just gave me a great idea....thank you.
Glad to hear it. Whatever it is, I’d love to hear how it goes.
I've been wanting to do a snakeskin pattern for years and I've never been able to find a suitable way to do it. Now I have an idea how to do it. I just need to find the donor body....
Nice! I'm going to try it on one of my Guitar builds!
Excellent. I'd love to hear how it goes.
Brad have you tried doing a head stock that way? Instead of using a water slide or Vinyl transfer.
I haven’t, but there’s no reason why it shouldn’t work the same way.
Alright then I'll keep checking see if anyone else has tried it. Thanks Brad!
Uuuuh angus on an sg!
wow!!! awesome ty bud
Cheers bud.
Brad, the variety of your skills never ceases to delight me. Was that plain ol' paper, like you'd use in a basic Canon printer?
Yessir. Just normal paper.
I did a transfer to acrylic about 8 years ago using a colour laser print and a electric clothes iron. It came out decent but care has to be taken not to overheat the acrylic. Its a useful technique.
I’ve seen the clothes iron version, but have never tried it.
You could get away with a lot on wood. On acrylic its a little challenging. The plastic deforms easily if its too hot or left too long. Any slight imperfections show up as light passes through.
Try it on scrap and see how it goes. Laser printers can produce really vibrant prints so it can make for a brilliant guitar project.
Hi Brad,
thanks for such clear demonstration.
I did the same process but now after all steps the photo looks matt, so what should I use as a protection layer?
Clear coat
A Nother Great And Informative Video Brad Thank You For Sharing With Us All, Wish This Would Work With Ink Jet Printers, That Would Be Awesome, Thanks Again, Cheers
Thanks for watching. I’ll let you know if I hear of a method that works with inkjet.
Thanks Brad Much Appreciated cheers
I was thinking of doing this with enquirer pics...kool vids...jus subbed...
Welcome aboard.
I forgot this was a thing... my mom used to do this and other weird art stuff that seemed like magic when I was a little kid.
Another awesome video! Do you know of a way to age the way-too-white binding on a guitar that has a poly finish? I can't think of anything. Thanks.
If your binding has clear over it: Scuff the finish, mix some amber dye with clear and paint it over the binding (either by hand or by reverse masking and spraying), and then throw a coat of clear over the whole thing to bury the new paint and bring the shine back.
MrYankeesfan - tanning lamp or put it in a sunny window
awesome stuff Brad! I'd like to see you try this on a guitar body.....mainly cause i'd like to try it on a guitar body, but i'd like to see how it would come out before i decide if i wanna try it or not lol =)
It should come out very similarly on a guitar body. I'll see if the opportunity arises to give it a shot.
Hey Brad, thanks for the informative tutorial. I needed your advice on something. I have a completely stripped down stratocaster (bare wood) that I wanted to transfer multiple images onto, mainly printed photos. But in addition to the photos, I wanted to stain the wood to the color of my liking so that the negative spaces would show the stained wood through the transferred images. What order of events would you suggest as far as achieving this final look? Would I have to stain first, then apply this transferring technique? If so, would I have to paint the polycrylic over the entire surface of the already stained wood to keep the same color consistency? Or would it make more sense to transfer the image first into bare wood, and then stain it afterward? But then how would the stain reach the wood if there's a layer of polycrylic underneath? Please help if you can, I'd really appreciate it!!!
You won’t be able to stain through a layer of polycrylic. Stain first, then do your polycrylic coating and then your transfers.
Great video. So if I want the design on a stained colour do I colour the wood first?
Yes
Hey I have found your videos just this week and they have been blowing me away ,but I just got done watching you done the transfer from paper to wood and that was something I think I have seen before but it brought up a question, I'm a leather guy and can you think of away to do this with leather. Keep up the good work and God bless.
I would think there has to be a way to do it to leather, but I have never tried it. Perhaps you can just use iron on transfer paper like they do for t-shirts?
@@BradAngove thanks for the reply, I just wanted to pick your brain. I'll keep watching thanks again.
Hey great video!
Quick question
I’m from the UK and over here I can’t seem to find Polycrylic, any ideas what would be equivalent to this for us over here?
Thanks in advance
A water born acrylic clear coat.
I believe any water based polyurethane works Bec
Great and helpful video!. I tried this using a gel version and getting the paper off after was a nightmare. 1 question though can I stain the wood before or after using this method to transfer the image? I have a light colored wood and plan to stain it only slightly darker and the images are black and grey.
You can stain the wood before.
@@BradAngove okay cool. Thanks for getting back to me.
Hi, good video, what is the spray you use at the end to finish it off,
👍
That’s just watco lacquer.
I want to do this with my guitar!
Sounds like fun.
Thank you for your videos man. Can this be done over a paint coat?
Yes
Thank you for responding to such an old post! I’m totally digging you channel. Now I gotta stop watching and start doing.
Amazed again dude!
Can that polyacrilic go over a existing finish? Like a white guitar?
It can if you sand with 600 grit first.
Im building my own guitar and repurposing an old neck. But I wanna do this on a fret board. Do you think it'll effect playing if I'm really careful about applying the acrylic medium only where the ink is and then finished the fret board like normal?
I think it might wear off over time, but I doubt that you would notice any difference in playability.
Man I hope this works. Just designed a headstock logo if it dosent I've got a lot of sanding to do lol.
I’m testing out a new method soon, so if it doesn’t work that one might.
Brad Angove Ok my friend we will be looking for it
Can you do this in color and on paint ( like an olympic white finish on a guitar ) ?
Thanks a lot and nice vid !
Yes. The acrylic absorbs the ink; not the wood.
Brad Angove thanks !
Great video!!! Can you use polyacrylic over rustoleum paint spray cans, and if so, can it be polished?
I’ve never tried using it over rustoleum. It could theoretically work, but rustoleums painters touch clear is also acrylic.
@@BradAngove thank you for the reply. I'm a big fan of your channel brother. Keep up the good work.
Brad, do you think your technique would work using Tru-Oil as the base? ( I’m working on a guitar).
I doubt it, but I’ve never tried it so I’m not sure.
Great post @brad. Question - I want to apply an image over stain and polycrilic coats and was hoping to continue finishing with an oil to get a thicker shiner look. Will oils still work ok on top of the poly ?
Oil doesn’t generally accomplish much over poly. I would suggest just using more poly.
@@BradAngove Thanks. Great channel and content.
Love your offline comment! People are constantly telling me they bought something offline, and I say oh so you bought it at the store? They look at me funny and say no I bought it offline! I just shake my head lol
Haha yeah, good point. It’s funny because I would never say that in person, but in communication that is online it feels natural to refer to something else as offline.
Hey so I had an idea of doing this on my guitar neck instead of creating an inlay. Do you think it would stay or rub off from my fingers? Thanks!
If you seal it properly after it should stay reasonably well. There are lots of lacquered fretboards out there.
off subject question.Do you have a template for the headstock of a LP and TL type guitars you could share.Or do you know where they could be downloaded? Thanks for your videos
I don’t have any templates unfortunately. If you look up guitar plan PDFs I would imagine there are some available.
Thank you,I figured it was worth a try
Would this technique work on a guitar body after staining and before poly? Love the videos ! Cheers
Yes, it would work but you still need that acrylic medium to take the ink in between.
@@BradAngove So once you've transferred the image, could you finish your clear coat with poly or are you committed to acrylic?
Poly is fine.
are you able to stain the wood around the image? thinking of Che Guevera on a red stained tele!
You would have to stain before applying the polycrylic, but yes you can do that.
Does this work with color images too?
Can I use Polycrylic to transfer an image on top of the FINISHED electric guitar body? Will it damage the coating/finish? Also, I've seen that acetone is a reasonably decent method as well to transfer image onto wood, but if I do that on a finished body, will it severely damage the finish (Almost removing the finish I heard)? I'm planning on something not too big (Like 8cm x 5cm)
The acetone method will almost certainly damage the finish. If you sand properly and prep like you normally would to add a polycrylic finish on top of your finished body it should work. It shouldn’t do any damage to the paint underneath. At most an adhesion issue may be possible. I haven’t tried that though, so I can’t really say with 100% certainty.
Well that's just excellent. So if it's transferred to the water-based polycrillic, would you be able to remove it with a solvent before clear coating if you weren't happy with the results?
Yes. You could do that, or just sand it off.
Love your RUclips channel. I am learning a lot. You're a creative thinker and have great ideas. It would help me if I had access to all the tools and space you have in that warehouse though. Damn!!
**** My question is this. Can apply the same process with the same chemicals to the back of a guitar, a black guitar (ugh) with a polyurethane finish on it, and whatever they do at the Fender factory. I have a monochrome ( black on white paper) picture I drew, but unfortunately, I THINK maybe likely YES, DEFINITELY I would need to invert the picture before printing it out.
Any thoughts? Am I making sense?
I’m not sure how you would do it over black. Printers don’t print white. They just leave white areas blank.
Brad, is this doable on Guitar kits? any steps to add or particularly take note of?
Yes, it’s doable. No additional steps for the transfer.
great vid, but have a question, will this work with color ink pictures
If it’s the right type of printer.
Great video! Do you think this would work with a color image?
As long as it’s a laser printer I suppose it might.
Can you go over the image transfer with polyurethane for a high gloss finish?
Yes. You need to give the water-based stuff lots of time to dry first, then you can clear coat it.
would this polycrylic be an adequate finish for a guitar? and would you do another coat over the top of this?
It could be, but I would generally put something over top of it to seal in the image etc.
@@BradAngove awesome thanks man, id love to put an image of hendrix on a guitar im building. Think ill try it out and make a indian motorcycle sign for my fathers birthday first. He cant find any indian stuff its all harley xD Love your videos!
Will this method work on a guitar that I have just painted. Fantastic videos on guitar painting. I'm doing my first one now on a tele I got from Solo.
What did you paint it with?
@@BradAngove Thanks for the reply. I used a Rust-oleum painters touch ultra cover - satin oasis blue from Canadian Tire
If you give it a week or two to dry and then scuff lightly you should be able to do this.
@@BradAngove I will give it a try and let you know how it comes out. Thanks for your help.
That is a pretty cool technique. I wonder how it works with inkjet printer images compared to the demographic printed image you just showed.
I’ve never seen it used on inkjet, but I’ve heard it doesn’t work as well.
Thanks I guess I'll stick with color xerography. Have you tried with color prints?
It works with colour prints as well.
What would the maximum amount of coats would you use for a really thick professional finish?
What kind of paint are we talking about?
Neat. Anyone know if you can do this with an inkjet based image?
Je l'ai essayé et ca fonctionne, mais le résultat est plus pâle. J'ai utilisé du Varathane Polyuréthane à base d'eau.
I try it and it work, but the result are more light. I use a Varathane Polyurethane Waterbased.
Hey Brad, are you able to painter tape off the image after transfer to spray paint a color on the rest of the area?
You’ll want to seal it in with clear coat first. Then let that dry, sand lightly with 600 grit, then you can tape and spray.
I'm thinking about doing this with a Guitar build I'm doing, with Mog Pog, Just saw a video on it , but wondering what clear to use. I'm guessing a 2K is out of the question. SO I'm asking what you think the best Spray Clear one could use on this type of art work. Thanks
What makes you think 2k is out of the question?
IDK, seams like all the looking into I do on 2k isn't compatible with much. I'm just curious because I have a new can of it at home just trying to save a buck you might say. sense I have it Use it. Left over from when I painted my motorcycle a few years ago at never used it. Was going to use it for some touch up but never did.
If you give your stuff a week to dry, I see no reason why you wouldn’t be able to use the 2k.
any particular paper and ink that works best? Or does it matter? How about color images?
Laser printer ink/toner works well. Colour should be fine.
Very cool trick Brad thanks for making the tutorial for us. I’m thinking I would like to try this as a headstock logo. Would you say that this is as good an option as making a water slide decal?
Laser printer with standard toner correct?
Yes, it should be a reasonable option. I don’t really like using water slide decals personally.
@@BradAngove Two more questions for you Brad. How soon do you have to make the transfer once you have printed is there a time
frame and how about to wipe away the backing paper does that have to be dealt with right away when the underlying finish has dried
throughly?
@MrBritrider there’s no specific timeframe after printing that I’m aware of. It’s been years since I’ve done this, so I’d say whatever is in the video is the best I can tell you for timeframe before removing the backing paper.
Thanks Brad for another great video! Does the image have to be from a laser printer or will inkjet image also work?
I’m think the laser printer is the preferred option because it’s the toner that transfers, but I don’t know for sure. I’ve never tried it with inkjet.
I think the inkjet version would spear when removing the paper backing for sure. The laser output is basically a decal at that point since it's just a film of plastic. This is pretty cool though - have never seen it done before.
That seems like a reasonable conjecture.
Just tried it from inkjet ... nope not working ... went off instantly... :)
Damn.
Can you use tracing paper with the polycrylic to transfer an image onto wood?
Tracing paper would probably fall apart too easily.
Anyone know the song in this video ? It just a good sounding song to me
Hi there. I'm thinking about adding a picture to a guitar like you did on this video. In terms of your "how to paint your guitar by hand" videos, at what stage would yo recomend doing it?..
After the stain, but before the top coat.
Brad Angove great!!! Thanks so much.
You’re welcome.
Hello Brad, nice video. Say, if I want to print a logo on a headstock by this video, should I cover the whole headstock in glue, or should I only do the place where the logo goes? Will the colour differ if I don't cover it all?
I would do the whole thing, just for the sake of keeping it even. There may be a bit of residue. What glue are you using?
Brad Angove I don't have glue yet, I am just considering for next time. Up until now I've used see through decal stickers, did some layers of clear coat, sanded, clear coat,... been looking for a different methode since it takes kind of long, and in the end I always still see a plastic like shine on the decal
one quick question, i have only watched a few of your vids so u may have had this covered, what i would like to do is put an image as u did on trhe piece of wood, would it work the same for an electric guitar and acoustic, if u have any vids on it can u point me there, again huge thanks!!!
Yes, it would work the same. I will just caution you that you need to be careful what you apply as far as coatings on an acoustic due to the effect on the sound of the instrument.
Thanks :)
Your videos are worth watching for the music alone....;)
Would it have to be a laser printed image, or would you be able to do it with an ink printed image aswell? Sick videos by the way man, all very helpful, learnt alot from you now and Im very grateful for them!!
I have heard that inkjet doesn’t work correctly, but I haven’t tested it.