Maytag Fridge - Main Power Control Board Replacement and Reprogramming

HTML-код
- Опубликовано: 8 сен 2024
- This video shows how to replace and reprogram the Main Power Control Board for a typical Maytag Fridge.
The fridge in the video is a Maytag Model MFI2269VEM5
The Power Control Board Part No. is W10312695
Cost of replacement board $152.72 + 19.85 HST (Total Cost $172.57).
Replacing this board fixed my fridge which was no longer providing any cooling for the freezer or refrigerator compartments.


This worked for our 10 year old Maytag refrigerator model #MFI2569YEMO. We found a replacement main control board (Part #WPW10312695) on Amazon with overnight delivery for a compatible (not OEM) model. So far, so good. Everything seems to be working as normal. Video was excellent and made the replacement process so easy- completed in less than 30 minutes. Thank you so much for your step-by-step, clear instructions!
Hi I have the same fridge and model number and had a question before I order. Was your fridge not turning on either because mine doesn’t turn on so I just wanted to make sure it wasn’t just the board that went bad?
I was desperately seeking a solution of this same thing happening to my refrigerator. After spending hours calling for service or searching for a new refrigerator, I came across your video. You saved my day! I had a part here the next day from Amazon and it's now up and running. Thank you!!
Hi Scott, Thank you for your comment and the positive feedback. I'm so glad to hear the video helped you diagnose and solve your issue. Nice to know you were able to save some money and prevent another appliance (all that metal and plastic) from ending up in a landfill. Vito Casola - FIX IT Yourself!!
Thank you so much. I have never fixed anything like this in my whole life, but my husband was busy and I tried it myself. Your instructions were top notch. I could never have done this without you. Thank you so much for taking the time to provide this service. Take care!
Hello Marianne, Thank you for your comment and positive feedback. I'm so glad you were able to use my video to help you resolve your problem. Anything I repair now I contemplate whether I should make a video of it to help others with the same issue. That fridge video was actually my first video and from the good response I got I decided to start my channel and I'm glad I did, as I really get satisfaction knowing that I am helping others. Vito Casola - FIX IT Yourself!!
This video helped me to fix my fridge today, thanks!!
The price was a little pricey for our part but cheaper than having the repair man fix it! Video was very easy to follow and helped a lot, thank you!!
Hello and sorry for the very late response. I didn't see your response right away and it must have gotten buried under all the others. Anyway thank you for our comment and I'm glad the video helped you. I hope your fridge is still going strong like our and you now have it plugged into a surge protection device or power bar with built-in surge protector. Vito Casola - FIX IT Yourself!!
Hello. I just wanted to take a moment to thank you for your insightful video. I quite literally performed the same operation earlier today, thanks in large part to the guidance you provided in your video. The only slight tweak was when it came to programming mine. To activate the appearance of the decimal, I needed to press down on the temp/alarm button for like 2 second, then while still holding it down, press the far left side down arrow button for around 4 seconds, then remove my finger form the temp/alarm button, and then finally remove my finger from the down arrow button. That got the refrigerator into programming mode, wherein I could enter my code which also happend to be 1720. My display entered into a flashing sequence and then I just pressed the down button one more time and the system went into default 0 / 38 mode. (I just added these details in case someone else stumbles upon this and derives a clue or two from my experience.) Thank you again for the excellent video.
Hi Stephen, Thank you for posting your comment and positive feedback, it's really appreciated. I'm sure other viewers will appreciate the additional information and insight that could prove helpful if they encounter similar issue with reprogramming the Main Control Board. Thanks again. Vito Casola, FIX IT Yourself.!!
Thank you, this video saved us about $2300 dollars I ordered the whole circuit board $285. It now works again.
Thank you for your comment. So glad to hear that you were able to save a bundle of money and prevent an otherwise perfectly good appliance from ending up in the landfill. Now that you have repaired your fridge I would highly recommend connecting your fridge power cord into a surge protection device or at least a power bar that has surge protection. This will help minimize the chances of the same issue happening again in future. Most of these issues are likely caused by power spikes from electrical storms or utility grids with poor power quality. All the best. Vito Casola - FIX IT Yourself.!!
WE DID IT!!!!! Programing took quite some time because we could not get to the PEOOOO to show the decimal point, but reading some of your comments helped us not give up. Just continue trying because the orde3r of the buttons and the timing has to very very precise. It works great. Thanks a lot for the video.
Hello Jose, Thanks for your comment and your additional notes on your specific experience as it is helpful for others who may encounter similar issues with the programming. Glad you found the video and it helped you and I hope your fridge continues for many years to come. Now that you fixed your fridge I would recommend plugging it into a power surge protection device or a power bar with built-in surge protection to make sure a power surge won't damage your new board. Vito Casola - FIX IT Yourself!!
Just replaced my main circuit board which fixed my problem. Very easy and cost $175 total. Thanks for the video.
Hi James, Thanks for the feedback. Glad to hear you found this helpful and were able to save money fixing this yourself. Vito Casola - FIX IT Yourself.
So, the only way I was able to enter my code was to go into program mode via the door alarm button and the down arrow button (upper left) for 3 seconds, then release the door alarm and the display reset with the dot now visible. At that point I was able to move the dot to the different digits and enter the code numbers as demonstrated in the video. Thanks a bunch!
My neighbor repairs fridges and other appliances for a living .. so we asked him to check out or fridge when it stopped cooling . He said it was the main control board .. and told us it would be $400 just for the part.. so with labor I can’t imagine how much he is planning on charging us.
I can’t wait to do this myself because after watching this I feel really capable of doing so. Thank you for this , specially in these times we are living money is tight. You’ve saved us so much!
lol he’s gonna be baffled when I tell him I fixed it myself 😁
Lol I hope it all works out , I don’t see how it wouldn’t..
Hi Diana, Glad to hear this video has given you the confidence to go ahead and try FIXING IT Yourself!!. Let me know how that all works out for you. Be sure to shop around for that part, maybe Amazon or Ebay carries the part at a discounted price.
@@FIX-IT-Yourself We were quoted $600 by our neighbor and I got the part and installed it myself :) needless to say my neighbor wasn’t happy I did the job, but I’m really proud of this fix!
We watched your informative video, ordered a control board, rewatched your video, followed the steps, and the frig is working! Many thanks!
Hi Jeanette, Thanks for your comment. So glad to hear you were able to use my video to help you resolve your problem. Vito Casola - FIX IT Yourself!!
My refrigerator, (identical to the one shown in the video) would not go into program mode as described. However, I went to the "Service Instructions" that came with the refrigerator when we bought it. Note, these are not the "User Instructions". The Service Instructions provide a 9 step set of instructions on how to program that worked for me. 1) Press & hold the Door Alarm Keypad 2) Press & hold Freezer Temp Down Keypad for 3 seconds. 3) Release the Door Alarm Keypad & wait 3 seconds 4) The control will display "PE" to indicate your in programming mode. 5) Entry is confirmed by pressing the Freezer Temp down keypad once more. 6) The control will display the current Program Code. The value should be validated with the program code printed on the unit serial plate (mine was 1720). 7) Press the Refrigerator Temp Up Keypad or Refrigerator Down Keypad to change the digit value with each key press. (Having fun yet :) 8) The decimal point indicates the selected digit. Press the Freezer Temp Up Keypad to select the next digit. 9)Once the desired Program code is entered, press and hold the Freezer Down keypad until the Program Codes begins flassing indicating it has been saved. These Service Specs Note: If you attempt to enter an invalid Program Code the Control will not save the New code. Exit the programing process by pressing any key OR press the Door Alarm key for 3 second. If you entered the wrong code I recommend you unplug the unit and start over. I bought my new control board from Sears Parts for $289. They stated it was an upgrade to the original circuit board. Good luck...
Good Evening, and many thanks for taking the time to right these instructions. I will be sure to relay these to anyone else who has difficulty with entering the Programming Mode, entering their specific code and Exiting Programming Mode. I purchased my board from an authorized Maytag parts supplier (Maytag gave me their contact information) and my board was much cheaper ($172.57 including the Sales Tax). Again many thanks and I hope this video was somewhat helpful for you, and sorry to hear that your board cost you ~$100 more. Vito Casola
OMG you saved my sanity! After following the replacement board my fridge program did not work. These 9 steps worked and now our fridge is working. Couple of hundred instead of thousand! Thank you 😊
As per your other replies, I too could not program the fridge after following the excellent video. The extra steps outlined by you, E. Smith, saved the day. Thanks so much.
This was fantastic information. THANK YOU.
Ours is identical but happens to be one where both doors have to be open to enter program mode. Once code entered, the internal fans came on, had to wait a few minutes for compressor to restart.
Because of a lightning strike nearby during a storm, our fridge, which is exactly like the one in the video, stopped working. After googling fixes for it, I happened upon this video.
I want to thank you for posting this. My wife was ready to run out and buy a new refrigerator but I talked her into letting me try and fix it first. I followed all your directions and was able to install the new board and get it programmed.
The fridge is working great.
Thank you for saving me a lot of money.
Liked and subscribed. Thanks again, so much.
Hello St. Augustine Native,
Thank you for liking the video and subscribing. Boy what a small world.... we own a vacation home in St. Augustine since 2013 (at Ocean Village Club on 4250 A1A South - 2 bed/bath condo, right on the beach). We love coming down to St. Augustine whenever we can but most of the year we rent our unit out through a rental management company (VTrips). So glad to hear that you were able to fix your fridge and divert yet another bunch of metal and plastic from ending up in the landfill unnecessarily. Also glad that you were able to save a lot of money too. My fridge is also still running strong since this repair. You are correct in assuming that a thunderstorm and the associated possibility of power surges could have been responsible for the failure of the main control board of your fridge. I'm betting that is what caused mine to fail as well. Funny because we recently had our 2 year old Samsung Ultra High Definition TV in St. Augustine go bad (sometime around May 2020) and luckily the extended warranty I bought with the fridge was still good because my LED panel was shot and they had to replace the TV with a brand new unit. Highly recommend plugging your fridge into a Power Bar with surge protection and any other appliance (like TV's, stereos, etc.) to protect them against damaging effects of power spikes. Maybe we will run into you next time we're in St. Augustine. Take Care and Stay Safe down there. Vito Casola - FIXIT Yourself.
@@FIX-IT-Yourself Yep, St Augustine is a great place.I'm a retired Deputy who worked a lot of beach patrol off duty. I know right where Ocean Village is. We do plan on getting a surge protector for the fridge. Again, thanks for everything and take care.
John
@@StAugustineNative You're welcome John, Glad it all worked out in the end. See you on the beautiful beaches of St. Augustine someday !! :-).
Thank you for a great video. I had to replace my control board. Video made it easy and gave me confidence to make the repair myself.
Great video! I installed a new similar control panel and had PE0 or O - 000 or OOO show on display. Since there were instructions in the parts box (which some have) nor a service booklet with the fridge, I didn't know what to do next. Your video helped tremendously. Thank you.
Hello John and thank you for your comment. Glad the video helped you finish your repair and hope your fridge will give you many years more of service. Vito Casola - FIX IT Yourself!!
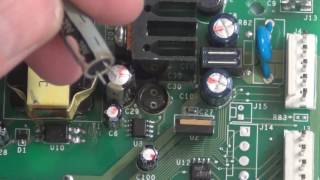
Mine is a Whirpool Gold fridge but same Main control pcb. My
display had gone off and if I pressed one button all leds would light. I
hastily replaced the front panel W101625... pcb and same problem, I removed that rear Main
pcb and visually ALL capacitors looked FINE but then I tested the
capacitors with an in-circuit cap tester, and I found that all its four
10uf 35V caps were open; C31, C32, C45, and C?. I replaced the four with
10uf 50V caps, placed the pcb back on the fridge and sure enough!! The
fridge turned on fine, Freezer at 6 and Refri at 45, Water led, and I
reset the filter. I did not even had to program it! The larger
capacitors were fine. I hope this helps others. God Bless you all !
Hi Wil, Thanks for this valuable input, it is greatly appreciated and hopefully will help those that feel confident enough to use a soldering iron to replace capacitors. I certainly would have had I known those capacitors could solve the problem. Years ago I repaired my dad's Samsung TV that wouldn't turn on by replacing a couple of capacitors and still works great to this day. Pretty easy to do if you know which components to replace. Next time I come across fixing an appliance that has a board I will definitely look at how many capacitors they have and simply replace them all if there are not many (as you did). Thanks again for the input. Vito
Thank you. This video saved people hundreds if not millions collectively. Just ordered my part and will arrive tomorrow
Hi Macholb, Thanks for your comment and sorry for the late response. Yes I sure hope my videos help people and save them money, that's why I make them and hope to add more. Vito Casola - FIX IT Yourself!!
Thanks for this extremely clear instructional video. Did exactly as you showed and things worked perfectly.
Thank you so much and for taking the time to help others with your video. Got our fridge fixed this afternoon after it decided to stop working this morning. Found the part in town and just installed it in under 30 min. You are the best, Happy New Year.
Hi Judy, Thank you for your comment and positive feedback. Very glad to hear that my video helped you diagnose and resolve your issue and repair your fridge. That's another appliance that didn't end up in a landfill earlier than required. Thanks for supporting my channel. Vito Casola - FIX IT Yourself.!!
Just switched mine today . Part was $160 shipped … thanks for the video
Hi there, where did you buy the part?
Thanks for the video! We needed to have the door open in order to get to program mode. Fridge is working.
THANK-YOU! I was almost crying here.....
Thank you for your video, I have fixed my fridge thanks to you. It seems to be a very common problem on maytags.
Thank you so much for this video,you helped me diagnose and fix my refrigerator so I didn’t have to buy a new one. You saved me at least $2000,thank you
Hi Daniel, Sorry for the late reply. Thanks for your comment and positive news. I'm so glad the video helped you fix your fridge and that it saved you money and we saved the environment by not having this end up in a landfill only to be replaced by a new fridge, with all the energy required to manufacture one. Vito Casola - FIX IT Yourself.!!
Just fixed my frig thanks to your wonderful video. 30 minutes. 150 bucks 👍
Hello, Thank you for your comment and positive feedback. Glad to hear this video helped you solve your issue and you save yourself having to buy a new fridge. Ours is still going strong since Dec.2018, so touch wood we have gotten another 5 years out of our fridge and hopefully many more years. Vito Casola - FIX IT Yourself!!
Simple clear instructions. Can't believe I fixed it myself(neither can my wife)
Good Job Mike, Glad to see this video continues to empower people with the confidence to make this simple repair that save them a lot of money and avoids an otherwise perfectly good appliance (and all that metal / plastic) from ending up on a curb and in some landfill. Hope you clicked the LIKE button as it helps improve the overall recognition of this video so others can find it more easily when they do online searches. Also hope you subscribed to my channel as I have many other "around the home" little projects and fixes that I have uploaded and should be uploading another 3 to 5 more videos in the next couple of months as soon as get some free time. Keep on FIXING IT Yourself!! Vito Casola - FIX IT Yourself!!
lol
Thanks for taking the time to explain, it was a big help to diagnose as well as to fix the problem. Took me 10 minutes to fix with your help.
Hello Kevine, Sorry for not responding sooner. You're welcome of course and thanks for your comment and feedback. Very glad to hear my video helped you resolve your issue. Vito Casola - FIX IT Yourself!!
My millennial son said I should throw the fridge out and get a new one. Took two hours to fix including going out to get the board. Very helpful video.
Glad to hear this helped you get your fridge up and running again. How much did it cost you compared to buying a new fridge? Hopefully your millennial son learned a lesson. So another dead appliance revived and avoided ending up in a landfill. If you found that helpful enough to subscribe to my channel I have uploaded several more useful fixes around the house and I plan to upload several more in the weeks/months ahead. Vito
@@FIX-IT-Yourself The board is now CAD$353 from Reliable Parts. I shudder to think what a service call would cost.
@@zaphodarrowdriver Wow that was a bit pricey but your right a service call would add to that significantly and would then make your son's idea to replace the fridge seem more like the right thing to do. My fridge is still running strong, but I should consider plugging it into a surge protection power bar rather than just the wall outlet as power surges from electrical storms could be what causes so many appliances to fail because of the delicate electronic components on these modern power boards. Hope your fridge will live long and prosper!!
@@FIX-IT-Yourself Consider a whole house surge protector that you easily add to the electrical panel. It protects everything. Available at Home Depot. Another video opportunity. www.homedepot.ca/product/square-d-whole-house-surge-home-electronics-protective-device/1001002165
Thank you so much. Followed the video. Works. Programming was the worst part. Read comments from others and got it done
Thank you !!!!
Thank you! I just replaced mine this morning, start to finish it took me around 30 mins. Honestly this was one of easiest and cost effective fixes I’ve done. The programming was a little fussy, but I finally got it. (My display was blinking) Thank you again, I was scared to try this, but so glad I did :)
Glad to hear this video helped you save some money and at the same time divert so much metal and plastic from ending up in a landfill. If you liked the video I'd appreciate if you would click the "LIKE" button as it helps with overall recognition of my channel and if you subscribe to my channel you will get notifications of any new videos of general fixes I make around the home. I'm planning to add several more videos as soon as I find time to make them and upload them, including replacing a pull cord on a lawnmower, repairing a cartridge in a bathroom lavatory faucet, and replacing a snowblower starter drive pinion gear. Vito Casola - FIX IT Yourself!!
How did you get it stop blinking? Mine is doing that.
@@jamesnogames mine too 🥺
Please mine is also blinking now . How did you get it to work
@@roxannelapierre3014 when I received the part, it came with a set of reprogramming instructions on how to stop the blinking.
Great info. To get program mode press door alarm first, then arrow key , hold 3s then release arrow key last . My fridge if you release both keys the same . It will not go program mode. Good luck.
Thanks for sharing. Hopefully this could help others that experience the same problem. Vito Casola - FIX IT Yourself!!
Thanks so much but mine is still flashing 😢
Mine went dark after a power outage and it was fixed thru this video...thanks again
Glad to hear this video helped you solve your issue and save some money. Yes, it appears that most new appliances are very susceptible to power spikes (from thunderstorms, or other utility issues) so it is definitely a good idea to plug such appliances with sensitive electronics (fridges, TV's, stereos, etc.) into surge protection device or power bar with built-in surge protection. I plugged my fridge into a surge protector that is then plugged into power bar with built-in surge protection (so double protection). Vito Casola - FIX IT Yourself!!
Thank you for your video. You’re awesome man. Who knows how much money you saved me. Thank you!
Hi, Thank you for your comment and positive feedback. I'm so glad you were able to use my video to help you resolve your problem and that it saved you money not to mention a lot of metal and plastic ending up in a landfill prematurely. It is very satisfying to know that I am helping others so thank you for commenting and for supporting my channel. Vito Casola - FIX IT Yourself!!
Thanks for the second time! My programming was a bit different (helpful comment from Stephen below) but your video was very helpful and worked.
I have the exact fridge and the exact problem. Thx. I will order this new board.
Hi Francis, Thank you for your comment. This should get your fridge working again. Vito Casola - FIX IT Yourself.!!
Thanks so much for posting video...Two days to order and get part...fridge is working. You the MAN !
You're welcome Jim. I'm glad to hear another big chunk of perfectly good metal and plastic has been diverted from a landfill and you were able to save yourself a bunch of money to buy a new fridge.Just curious how much did the board cost you? I paid CDN$152.72 + 19.85 HST (Total Cost CDN$172.57).If you liked my video I'd appreciate if you like it and subscribe to my channel. I've done a bunch more little fixes around my house, including repairing my front load Kenmore/Samsung washing machine, Installing a CMOS battery for a IBM Thinkpad T42 laptop, installing a flexible aluminum vent liner for my hot water tank, and I also repaired my aunt's KitchenAid Fridge which had a similar problem. I plan to post videos of those repairs soon, just need put all the video clips together and turn them into nice final videos and then upload them. Stay tuned... Vito
@@vitocasola8358 That's great that you plan to continue posting and at your request, I have subscribed. We paid more on Amazon to get it within two days, $220.20 with tax. Had we been willing to wait a few days, could have got for around $174.00 . Worth the difference because we managed not to lose any food. Take care and thanks again
Yeah I guess that does make sense, .... definitely worth the extra 50 bucks to save your food. We had another fridge in the basement which we were able to squeeze everything into and I went to the local parts supplier (20 minute drive) and got the board quicker than a couple of days, once I figured out what to do and decided to take a chance and buy the board. Thanks for subscribing and stay tuned for more videos. Vito.
We were able to fix our Maytag with your video! Thanks for sharing and such easy instructions! You rock!
Thank you for the entering program mode, very helpful.
You're welcome Robert,Glad that it helped you. So did you replace your board too and fix your fridge?Vito
Thanks! This saved me a lot of money on a service call. I did have to go in Program Mode, but then it was easy to get programmed. Part cost $189.99 on Amazon.
Hi David, So glad to hear that this helped you save a lot of money and/or divert all that metal and plastic from ending up in a landfill. If you liked the video I'd appreciate if you would like it and subscribe to my channel. I'm planning to add several more videos as soon as I find time to make them and upload them. Vito
Can you tell me what site you ordered part from and how long it took to receive?
Thank you guys! This combined with another video allowed me to help fix the issue pronto! 60 min or less
I was able to replace the board but now the Control Panel will not rest in the front!
Thank You for the Video b/c the Technician wanted to charge Me $185 for Labor & $385 for the part!
I purchased it on Amazon for $152 plus S/H! I know People have an up charge but this is just plain out being a rip off!
Thank you for your comment and positive feedback. I'm so glad you were able to use my video to help you resolve your problem. I know what you mean about calling anyone to help service anything, they will charge what we believe is a lot of money, but they have to make a living and this is how they do it, helping people that don't have the confidence to fix something themselves, which was the motivation behind my channel. This Maytag fridge video was actually my first video and from the positive response I got I decided to start my channel and I'm glad I did, as I really get satisfaction knowing that I am helping others, like you, to gain the confidence needed to tackle troubleshooting and fixing things that are quite simple to do really, but just plain scary when you haven't got the first clue where to start. I'm glad you enjoyed the experience of saving a bit of money and hopefully it will make you thing about trying to fix other things yourselves before calling in someone else. Good luck in the future. Vito Casola - FIX IT Yourself!!
THANK YOU SO MUCH! I replaced my control board ($250) then my lights stayed flashing. I finally figured out how long to hold the buttons etc and I have it working!
Hi Mark,Glad it was helpful... another huge hunk of metal and plastic avoided from ending up in the landfill and money saved. I was happy mine fixed the problem that I made the video so others could have the courage to tackle this relatively easy fix themselves. I now have a front load washing machine which has failed and I need to replace the two bearings and seal. This is a pretty big job and if I find I can manage it I may make another video for that repair.All the best.Vito
I can't get the lights to stop flashing so I can program. HELP!
@@brendabutts6536 me too ! Need help.
The PE000 keep flashing help please
Me three 😢
You just saved me a couple thousand bucks. Cheers to you my friend
This is a great video; you’re a good man for taking time to do this! I’m having a bit of an unusual problem with my frig and I’m wondering if you or anyone has any suggestions. I have a Maytag frig very similar to the one you show in the video. Last Sunday our electricity was off for several hours, there were no thunderstorms so I don’t know why it was off. When it came back on my refrigerator wasn’t working. When I pressed any button on the front panel all the LED’s would come on and then go off when I released the button. I decided to cycle the power so I unplugged it, waited a while then plugged it back in hoping that would reset it. But it still did the same thing. That’s when I started surfing the Internet for help and found your video. It looked like replacing the control card was the thing to do. But when I started to pull the frig out to get to the back panel, I found it working like normal. Thinking that it must have finally reset itself I decided to leave well enough alone and it worked fine for several days. I decided it would be a good idea to put it on a surge protector thinking that the power surge when the electricity came back on may have caused the problem. This meant unplugging the frig to install the surge protector. When I plugged it back in though, I had the same problem. I tried cycling the power again, but this time it didn’t work. I have some electronics background and I know that sometimes intermittence in connectors can cause problems, so I removed both the front and back panels and reseated all the connectors. When I put it back together and plugged it in, I got the same problem again, but then, after a couple hours it started working normal again, just like the first time, and has been for over a day. My concern now is that there is still actually a problem, it’s just not showing up right now and if the power goes off again (and it will go off again) it will rear its ugly head. If reseating the connectors had fixed it, it should have worked normally as soon as I plugged it back in. This seems to be an intermittence problem, but I’m not sure where it is. It seems to me that if there is a problem with the control card, it wouldn’t work at all. Right now, I’m looking for a second opinion, any comments or suggestions would be appreciated.
Hi Winston,
Thank you for the kind words and support. I'm glad you found the video helpful and I hope you "Liked the video" and subscribed to my channel. I believe you are most likely correct in assuming that thunderstorms and the associated possibility of power surges could be responsible for the failure of the main control board of these fridges as well as other household appliances that have delicate circuit boards. Installing a Power Bar with surge protection is a great idea for this fridge and any appliance (like TV's, stereos, etc.) to protect them against damaging effects of power spikes. Sometimes the issues are with capacitors and by unplugging the fridge or disconnecting the main power board you probably allowed any bad capacitor(s), which could have been the cause or your problem, to slowly drain and then work again for a short time until they get recharged to the point where they are once again overloaded. One way to diagnose a bad capacitor is to do a visual inspection. Usually bad capacitors are visible by spotting bulging tops or having what appears to be some material leaking out of the tops (you should be able to google how to spot or test for bad capacitors. It is easy when they are obvious to see, otherwise you would need to use other means to detect bad capacitors with special electrical metering equipment, which is a little more complex and requires some expertise. In my case I just went to a local part supply store and replaced the entire board. For another fridge that I repaired for my aunt (A KitchenAid model - see video ruclips.net/video/9GCv2WIkoQY/видео.html) the circuit board was discontinued and it wasn't possible for me to buy a new board so I needed to actually replace bad components on the board to repair the fridge. I believe for these Maytag fridges you can still purchase the main power control board so that may be the easiest but unfortunately somewhat more expensive, although cheaper than repairing the entire fridge. Anyway I hope you are able to solve your problem and do post whether or not you are able to find a solution as others may find that useful. Take Care and best of luck with your repair.
Vito Casola - FIXIT Yourself
Hi W.A. try replacing all its four
10uf 35V caps; C31, C32, C45, and C?. These are on the Main Board in back of the fridge. I replaced the four with
10uf 50V caps, ( but 35V are fine too, they just have less lifetime ). Leaky caps at times work or fail randomly, which seems what you are experiencing. These caps may look perfectly fine, not bulging etc, but the inside dielectric may be going bad.
@@rfsignalsolution6421 Thank you for your reply. I think you and Vito are both right, it is most likely a capacitor problem and I do intent to replace the four capacitors you suggested. However my frig is working fine right now and has been since I first posted. It's even survived a few power blinks. Apparently, the power has to be off for a while for the problem to show up, which definitely suggests a bad capacitor. Right now, i'm taking the "if it ain't broke, don't fix it" approach. However I'm also thinking it may be a good idea to go ahead and replace the capacitors before they lead to a bigger problem. Your thoughts on this would be appreciated. I'll keep you posted.
My frig finally quit working, again. Same problems as before. This time I removed the control card on the back and replaced the four capacitors you suggested. I also checked each one as I removed them. C31,C32 & C45 check out good, but C16 was bad. I replaced all four capacitors anyway. When I put the card back in and plugged it in, it immediately came on and worked fine. Apparently C16 was the culprit. Total cost of repair, $1.16 plus shipping. Sure beats paying $200.00 for a new card or hundreds for a repairman. Thanks again for your help!
@@winstonadkins2629 Great to hear that this can be fixed by simply replacing the capacitor or all capacitors for far less than replacing the entire board. If mine goes again I will be sure to try that. Anyone else that follows these posts should also consider this method first as it is a far cheaper way to accomplish the same thing. Thanks for your responses/comments, it sure helps when everyone contributes their experiences. Vito Casola - FIX IT Yourself!!
Had the two larger of the three caps at the top of the mfi2568aeb (2006) board blow Sunday evening with the ice door cycling open/closed. When unplugging for a few minutes, the fault reappeared soon after plugging it back in. Now the front display was going wacky and the compressor had ceased to operate. Sourced the caps locally and replaced, no magic smoke when plugged in. Everything back to normal. The 680uF caps are a common fault on my model and maybe others. I must have gotten good ones to last 15 years.
Hi Mark, Thank you so much for leaving this detailed comment. I'm sure it may help others who may wish to try a component level repair. Too bad RUclips doesn't allow people to upload photos so we could share with others a photo of your board that you just repaired circling the 3 capacitors you changed. If you want to send me a photo you could email it to vmcasola@gmail.com and this way if anyone asks I could simply tell them to email me a request for me to forward it to them. Thanks again for taking the time to comment. Vito Casola - FIX IT Yourself.!!
Thank you, you helped me save a lot of money. God bless you and your family.
Hi, Sorry for the late reply. I'm glad to hear that this video helped you save money and prevent a lot of plastic and metal from ending up in the landfill. I hope you subscribed to my channel and like the video. I uploaded 2 more videos recently and plan to add a few more. Cheers. Vito
Thanks you for this video! I thought my fridge was down for the count!
Have you already repaired it, or are you going to try to repair it then? Vito
Sam Dillman Lol Lol me too..
Excellent tutorial , new panel is in and fridge is working !!
Glad it helped
omg!!!! you saved me!!!!! thank you!!!! I was able reset my fridge with your help/ So appreciated. TY
I just fixed mine. Did exactly as you showed on the video. Had some problems with the reset, it was a bit different than on yours.
Great! Glad to hear this helped you save money and divert all that metal and plastic from the landfill.Please subscribe to my channel as I plan to upload other videos as soon as I have time to make them. Vito
Excellent instruction. Question: My Fridge stopped working after a power outage. I purchased the Motherboard, but now, it seems like the fridge "reset" and is now working. Do you think I should hang on to the Motherboard?
Thanks for the video! I just saved $2,300 on a new fridge or a couple hundred on a technician.
You're welcome mkielbas. I'm glad the video was helpful and saved you some money and also feel good about not having all that metal and plastic ending up in a landfill. I hope you clicked the "LIKE" button and/or subscribed to my channel as it helps with improving overall recognition of my channel. Vito Casola - FIX IT Yourself!!
Amazing and simple once I got the program worked out! Thanks so much 😊
Hello Loretto, Sorry for the late response. You're welcome and thank you for your comment. Glad my video was helpful in resolving your problem. Vito Casola - FIX IT Yourself!!
What if there is no decimal?
Thank you for the video i was able to fix my fridge and did not need to pay a repair man
Hi Steven, So glad to hear at this video helped you save a lot of money and divert all that metal/plastic from ending up in a landfill. If you liked the video I'd appreciate if you would like it and subscribe to my channel. I'm planning to add several more videos as soon as I find time to make them and upload them. Vito
Thank you! Replaced mine with your help.
Many thanks for this video, helped me figure out the problem with mine and gave great detailed instructions on how replace and program the new board!
Hi Nathan, Thank you for your comments. Glad it helped you solve your problem. Vito Casola - FIX IT Yourself!!
Thank you so much for this tutorial! You have saved me so much $$$$!!!!!!!
How do I fix the light in the door and replace water/ ice actuator switch behind the thing you push for water/ice help would be appreciated 🙏
I owe you a case of beer, thanks.
Great video! Much appreciated! My refrigerator is working again.
Thanks for the positive comments David. Glad to hear you were able to diagnose and FIX your fridge Yourself and divert yet more metal and plastic from a landfill grave!! Hope you clicked the "LIKE" button, as it really helps improve overall recognition of this video so others can find it easier in online searches.
Thank you so much. I was able to fix it. very helpful!
You're welcome. I'm very glad it was helpful for you and I hope that because of that you clicked the LIKE button when watching the video and Subscribed to my channel as I have uploaded many other videos recently. I appreciate that you took the time to comment.
Thank you for excellent guidance. Worked like charm and I was able to save lot of money and time.
Glad to hear it was super helpful and everything worked out. It's why I keep making videos... Feels good to help others save money. Keep on FIXING IT YOURSELF!! Vito Casola.
If just one button isn't working... what might you do?... of course kiddos could easily access the control panel so now the settings are far off from what they should be
Thank you for your video! Helped me diagnose the issue with my fridge. It's fixed now!
Great!! Did you end up replacing the board?
@@vitocasola8358 Yea. Luckily I found a place that had one in stock. Works perfectly now!
Awesome!! If you found this video helpful I'd sure appreciate if you would subscribe to my channel and like the video. I like to tackle and do almost any job around the house myself that needs fixing. It gets done right the first time and saves a lot of money. I'm hoping to be able to find some time soon to upload some new videos, just need to put them together first. I recently repaired a front load washing machine where the bracket which holds the drum completely disintegrated. I also repaired my aunt's KitchenAid Fridge by replacing a $2.50 relay and a $0.87 capacitor (because her board was discontinued). Aso installed a new aluminum vent liner for my Hot Water Tank (to meet a new code here in Ontario). Stay tuned. Vito Casola
Hello. Thank you very much for this video. My refrigerator is Maytag MCB2256HEB and it doesn't have the front panels with the button. A technician said I should get W10503278 Refrigerator Control JAZZ Board. How do I do the resetting after changing the board? Thank you
Thank you! This was very helpful.
You just saved us thousands! thank you!!!
Hi Melissa, Sorry for the late reply. Thanks for your comments. So glad to hear you were able to use my video to help you save money and keep a lot of metal and plastic from ending up in a landfill. Vito Casola - FIX IT Yourself.
Are there any noises associated with this? We had clicking noises first, so unsure if compressor or capacitor or something else
Awesome. Thankyou.
Thank you very much for this. It helped me out.
You're welcome, Glad to hear it was helpful.
Great job
Thank you so much helping me
Thank you for your comment. I'm glad you found the video helpful and I hope your fridge has a new lease on life. Vito Casola - FIX IT Yourself.!!
Thank you so much for the video.
I have replaced my control board and fridge is running, however I’m trying to type in the code and the keypad is not working 🤔
Hello Alberto, Thanks for your comment. I'm not sure why your keypad is not working. Do you have any indication on the front control board that it is functioning (any lights on at all)? Maybe you need to ensure that all the connectors on the control board you replaced are properly installed and secured. If you have power and cannot enter the programming mode then please refer back to the video (at the 7:20 mark) and carefully review how to enter the programming mode. If you experience any problems please refer to some of the comments left by others who experienced a number of issues related to programming as your issue may have already been encountered and resolved. I hope this helps. Vito Casola, FIX IT Yourself.!!
Thanks for this great direction! I had to keep trying several times, but eventually the PE 0000 stopped flashing and allowed me to put in the code!
Great!!! Glad to hear you were successful. Hope you were able to fix your fridge and divert all that steel and plastic from the landfill and keep more of your hard earned money in your pocket. Hope this video helped you a lot. If it did please subscribe to my channel. I will posting a few more videos in the next little while. I recently fixed my front load washing machine and I just fixed my aunt's KitchenAid Fridge this evening for $6 of parts, including a capacitor and a relay. Thanks for visiting my channel. Take Care. Vito Casola.
PE 0000 keeps flashing.
Hello Clementino, Recently someone else who viewed my video (a Mr. E. Smith) wrote back to me (Sep.2019) the following which may be helpful for you: ----- E. Smith wrote: ----- My refrigerator, (identical to the one shown in the video) would not go into program mode as described. However, I went to the "Service Instructions" that came with the refrigerator when we bought it. Note, these are not the "User Instructions". The Service Instructions provide a "9 STEP" set of instructions on how to program which worked for me. These steps are as follows: 1) Press & hold the Door Alarm Keypad. 2) Press & hold "Freezer Temp Down" button on the keypad for 3 seconds. 3) Release the "Door Alarm" button on the keypad & wait 3 seconds. 4) The control will display "PE" to indicate your in programming mode. 5) Entry is confirmed by pressing the "Freezer Temp Down" button once more. 6) The control will display the current Program Code. The value should be validated with the program code printed on the unit serial plate, located inside the fridge (mine was 1720). 7) Press the "Refrigerator Temp Up" button on the keypad -or- "Refrigerator Temp Down" button on the keypad to change the digit value with each key press. 8) The decimal point indicates the selected digit. Press the "Freezer Temp Up" button on the keypad to select the next digit. 9) Once the desired Program Code is entered, press and hold the "Freezer Temp Down" button on the keypad until the Program Codes begins flashing, indicating it has been saved. These Service Specs also say: "NOTE: If you attempt to enter an invalid Program Code the Control will not save the New code. Exit the programing process by pressing any key OR press the "Door Alarm" button on the keypad for 3 seconds". If you entered the wrong code I recommend you unplug the unit and start over.------ end of text from E. Smith. So I suggest you read the above carefully and try following step by step and hopefully this gets your fridge code entered and you are hopefully back in business ---- Good luck... Vito Casola. If you found this helpful I'd appreciate if you would like the video and subscribe to my channel. I plan to upload a few more videos soon. Vito
Thank you!!! Saved a ton of money.
Hi Angel, You're most welcome. Very glad it helped you. Hope you liked the video and subscribed to my channel. Vito Casola - FIX IT Yourself.
Thank you so much, you saved me a lot of money
Your welcome Marliese, Glad that you were able to fix this yourself and save a lot of money and divert all that metal and plastic from ending up in a landfill. If you subscribe to my channel I plan to upload more videos as soon as I have time to make them. Vito
Thank you.
It worked for a couple days but now just works randomly at time and sometimes it doesn’t although I have switched the motherboard to a brand new one and reprogrammed it.
Hi Moe, Thank you for your comment. I'm sorry to hear that changing your board didn't solve your problem. If you figure out what your issue was you may wish to share your experience here so others that experience your problem might be able to have some idea how to solve their issue. Vito Casola - FIX IT Yourself.!!
I went through the process of replacing the board. I was stuck for about a day and a half not being able to programme it. It would not show the decimal or allow me to enter the code. You will need to be persistent. Even if it looks like it is in the programming mode. Even though it says PE 0000 keep trying follow the process as if is not already in programme mode. It is VERY finicky about the timing. I tried dozens of times and had given up. Then I was board in the kitchen and it randomly worked. That said, thanks for the helpful video
Hi Adrian, Sorry I didn't respond sooner, but I'm glad to hear this video helped you in some way. Thanks for your comments and positive feedback. Hopefully others will benefit from your experience and be persistent to keep trying the reprogramming. You are right that it is quite finicky and you need to press the buttons in the correct sequence in order to get into the program mode. Anyway glad you solved your issue in the end and your fridge is back up and running. Hope it will serve you well for many more years to come. Vito Casola - FIX IT Yourself!!
thank you !!!
I don't know if I should look at the control panel first before changing out the main power board in the rear? My refrigerator was in "on and off" mode, then shut down for a few weeks and now it's trying to start again (off and on). Has anyone had this problem and was it the main board in the back? I've been using the refrigerator in the garage, and enough of that!
Excellent video. Thanks.
Your welcome ....Bob, I hope it was helpful for you.I myself had difficulties when I repaired my fridge and the one or two videos I was able to find were a little too confusing so that's why I decided I should make a nice, clear video to help out others and give them a little confidence that this really is an easy repair and could save you a lot of money and divert and appliance from ending up in the landfill that really could and should be fixed.Vito
Very Helpful Video, thanks!
Hi Chris,Glad to hear it was helpful for you. Did you have the same problem and did you go out and buy and replace the main power board?
@@vitocasola8358 relay began to chatter with power dropping in and out...gave up the ghost shortly after so I replaced the board
Hi, I"m not having the same luck as everyone else. I put in the board and the display comes up but I am unable to enter the code. The dot will not appear nor will trying the door alarm button and temp button combo. Both yielded no response in the display? Please help. My board cost me $257 locally here in Orlando.
Hi Ken,So for my fridge I was able to enter the Program Mode by first pressing the Door Alarm button and then pressing the Freezer Temperature Down button (that's the one on the left side - it's for the freezer) then wait about 3 seconds and let go of the Door Alarm button and then let go of the Freezer Temperature Down and then you should see "PE" lit up and if you press the Freezer Temperature Down button once more you should see PE and a 4 digit Code Number or PE 0 000.This procedure I well demonstrated in the video. Start watching from 7:17 of the video it shows how to enter the program mode and get to the PE 0 000. Hope this helps. Let me know if you have anymore questions.Vito
If that price of $257 was in US dollars, which I assume it is in Florida then I'd say it's expensive compared to what I paid. Wicked Liz ... see below said they paid $130 for the part and I assume that too was US$...which seems closer to what I paid. I would see if you could find it somewhere else cheaper..... save yourself a few more bucks..... just my 2 cents worth.. Good Luck.Vito
I have the same problem and tried pressing door alarm and freezer down key and still doesn't work. Any suggestions?
Sharon Mowry I’m having the same issue.
Thanks. My control panel is exactly like yours. It’s not locked but all lights in the refrigerator are out. I checked both switches with a meter and they tested good. Wondering if my problem is the board.
Hi Rick, Thank you for your comment. When I was looking to repair my fridge I had the option to go to a company which you send out your main power control board and they diagnose, repair and return the board. In my discussions with them I told them what if it turned out my problem was not the main board but the other board for the front control pane and they told me that almost always it is the main board, so when I checked the cost of the new board versus sending out my board for repair (including shipping to them and back) I decided it was probably best to just buy a brand new board. I thought it was a bit of a gamble too but was happy when it worked like a charm. I'm willing to bet your issue is with the main board. Most times it is something as simple as replacing a capacitor or relay on the board and such fixes can be quite cheap (less than $10), but you would need to have some knowledge and experience with testing and with soldering. If you search down in some of the other comments you will find someone who did repair their board themselves and you may find those comments helpful. Good Luck whichever route you decide to go. Vito Casola - FIX IT Yourself.!!
@@FIX-IT-Yourself you’ll never believe it but on a hunch I took a bulb I had with the same base and tried it in one of the sockets under the ice maker and it lit up. I thought no way would the 2 lights in the ceiling both be bad too. My test bulb was too big around at the top to fit in the sockets so I just went to Lowe’s and bought 3 bulbs. Put them in and three came on! Couldn’t believe they all burnt out together. Must have been a power surge that did them in. Because I thought there’s no way all went bad at the same time, I went to the trouble to pull and test both door switched (good) and then thought maybe the refrigerator needed reset. Went through the steps you mentioned to reset the code.(thank you for the great video by the way). All in all it ended up being the bulbs! Whoda ever thunk?
@@MountainrunnerTn Hi Rick, What are the odds? Maybe one was already burned out and you never noticed before. Anyway you're right about power surges. You should definitely consider investing in a surge protection device or even a cheap power bar with builtin surge protector and plug the fridge, (any any other appliance and TV's into such devices) cause nowadays most appliances, TV's etc. have sensitive electronic equipment that is highly susceptible to power spikes from lighting storms. I plugged my fridge into a surge protector that is then plugged into a power bar with surge protection (so hopefully double protections). Glad to hear it all worked out in the end, and thanks for the positive feedback on my videos, much appreciated. I have like 20 videos on my channel now. Every time I have something else that breaks down or requires my attention to repair I contemplate whether it could be worth making a little video and if I think it could help others then I take the raw footage and when I get time I edit the video and publish on my channel. Getting about 3,000 views on average every 48 hours.... not bad... it is growing since I started with this first Maytag Fridge video about 2.5 years ago now. All the best. Vito Casola - FIX IT Yourself.!!
Hi! Your instructions were great but our PE0000 mode did not show any decimal dot. We cannot insert the programing code. Can you please share any advice? Thanks
I have the same situation and am hoping someone here can help
thanks for the information the only thing I had to work out differently how to access the programme mode door button did not work must use the temp button for my fridge so hopefully this will help others that encounter this issue
Glad to hear the video helped you repair your fridge. Thanks for the feedback. It is appreciated. Vito
Thanks for sharing James. Vito Casola - FIX IT Yourself!!
Hello, thank you so much for this video! I was able to get the board changed no problem. But the PE0 000 doesn't have a decimal point so I'm not able to add my code in, can u help?
Also my programming code is flashing, it's not holding still at PE0 000 and I'm missing the decimal
Thanks much Works perfect you da man........
I got the same fridge in a black can you please advise how to put it on defrost mode it is a very beneficial video that you posted thank you.
Sorry for the late response. You're welcome. Glad the video was helpful. Vito Casola - FIX IT Yourself.!!
Well done bro . I have a question I also have same fridge , since few days temperature button is biping . What is that mean
I would have checked the area around the large diode. Looks like your problem would be a solder joint.
Very helpful !!! Thanks 😊
Great!! Did you fix your fridge? Were you able to basically change the board out and rescue your fridge from ending up in a landfill? I sure hope it did and hopefully saved you a lot of money in the process.If you enjoyed this video please like it and subscribe to my channel as I am planning to put out another 3 or 4 more videos on other repairs I have recently completed, including changing a CMOS battery on an IBM Thinkpad T42 laptop, fixing my front load washing machine and my aunt's KitchenAid Fridge, with $6 in electronic components, including a capacitor and a relay, instead of replacing the entire board, like I did for my fridge, this video). Anyway stay tuned for more to come. Vito
Hi my refrigerator is having a problem of power outage sign on and beeps.. then turn off and after ten seconds turn on again with beep.. what would you suggest.. thank you if you anwer back
Hello how long it's take your ice machine start to work
Replaced mother board but light is flashing. I can get it to pe but when I hit anything it starts blinking again. Any suggestions?
In your video, at the 5:49 mark, you show the light as solid. You never show it BLINKING...... so how do i eneter the code if i cant get it to stop blinking. I have tried the two buttons you reference (when your light is solid). Are these the same buttons to use when the light is BLINKING?
Hi Ernest, Not sure but try watching the video from the 7:20 mark, "How to Enter Program Mode" and keep watching cause I think it should give you some idea that you should be able to press any key to get it stop blinking. I hope this helps... but let me know in case you have any more questions. Good Luck. Vito
Ernest did figure out how to stop the blinking so you could code it ?
No because it never really started blinking for me. Maybe try unplugging the fridge then try pulling out the four connectors on the board, maybe wait a while and then plug them all back in again and plug in the fridge again. Don't know why some people experience the blinking lights. Let me know if and how that works. Good luck.
I think the main power control board is on the way out too. The control panel lights and display flicker and it sounds like the power gets cut to the compressor and blower. I still get cooling but something definitely is not right. You said that your research has led you to the control board being the cause of my problem too? Also, where did you purchase the part? Thanks in advance.
Hi Aaron, Thanks for your comment. I purchased my board at Reliable Part Ltd. at 1287 Calendonia Road, Toronto, M6A 2X7 (shown in video at 3:25 mark). Their phone no is 416-787-4212. I paid $152.72 plus HST for total price of $172.57.
I've had others tell me that they were able to successfully repair their old board simply by replacing a capacitor for a fraction of a fraction of that cost (mere pennies). So if you are feeling resourceful enough to attempt a similar repair go through all the comments below and you will find the one where someone mentioned the repair. They also emailed me photos of the repaired capacitors so if you want I could email you what they sent me. Simply email me at vmcasola@gmail.com and I'd be happy to send you whatever I got from them. Vito Casola - FIX IT Yourself.!!
@@FIX-IT-Yourself Is that an Order of the Engineer ring you have on?
@@aaronk3788 Hi Aaron, Yes it is, that's very observant of you. It's a stainless steel though. I used to have an iron ring which used to rust my pinky finger but I then got a stainless steel ring and put the iron ring aside and eventually lost the iron ring. Vito Casola - FIX IT Yourself.!!
Thank you! Thank you! Thank you!!!!!
You're welcome. Hope everything went well and you saved your fridge from ending up in the landfill. Vito Casola - FIX IT Yourself!!
Very helpful!!
Hi Don, Thank you for your comment. I'm glad you found the video helpful. Vito Casola - FIX IT Yourself.!!
Hi, so i just replaced my control panel and the front display keeps flashing. how do i get it to stop flashing so i can program it? Also great instruction video
Hi Christa. I never had the blinking problem so I never included a solution to stop blinking in my video. It seems to be a common problem for others however and no one has ever responded with their eventual solution so maybe you can try unplugging the fridge then try pulling out the four connectors on the board, maybe wait a while and then plug them all back in again and plug in the fridge again. Don't know why some people experience the blinking lights. Let me know if and how that works. Good luck. Vito
Hi Christa, Also someone else recently wrote back to me (a Mr. E. Smith, back in Sep.2019). His instructions may be helpful for you so try to follow them carefully and hopefully it helps: ----- E. Smith wrote: ----- My refrigerator, (identical to the one shown in the video) would not go into program mode as described. However, I went to the "Service Instructions" that came with the refrigerator when we bought it. Note, these are not the "User Instructions". The Service Instructions provide a "9 STEP" set of instructions on how to program which worked for me. These steps are as follows: 1) Press & hold the Door Alarm Keypad. 2) Press & hold "Freezer Temp Down" button on the keypad for 3 seconds. 3) Release the "Door Alarm" button on the keypad & wait 3 seconds. 4) The control will display "PE" to indicate your in programming mode. 5) Entry is confirmed by pressing the "Freezer Temp Down" button once more. 6) The control will display the current Program Code. The value should be validated with the program code printed on the unit serial plate, located inside the fridge (mine was 1720). 7) Press the "Refrigerator Temp Up" button on the keypad or "Refrigerator Temp Down" button on the keypad to change the digit value with each key press. 8) The decimal point indicates the selected digit. Press the "Freezer Temp Up" button on the keypad to select the next digit. 9) Once the desired Program Code is entered, press and hold the "Freezer Temp Down" button on the keypad until the Program Codes begins flashing, indicating it has been saved. These Service Specs also say: "NOTE: If you attempt to enter an invalid Program Code the Control will not save the New code. Exit the programing process by pressing any key OR press the "Door Alarm" button on the keypad for 3 seconds". If you entered the wrong code I recommend you unplug the unit and start over.------ end of text from E.Smith. So Christa, if you read the above very carefully and try following step by step, hopefully it will get your fridge to stop blinking and allow you to enter the code and get you back in business ---- Good luck... Vito Casola
@@vitocasola8358 Hi, this worked. I actually goggled it after I asked how to fix it and I got the same answer. I followed the steps and it worked!!! So THANK YOU for your time and all your help. Much appreciated. Have a Good evening :)
You're welcome: If it was helpful please subscribe to my channel as I will be uploading some additional videos as soon as I find the time to make them. Glad that it worked and helped you to get your fridge working again. Cheers.
YES! This is exactly what happened when I installed the new control board. I followed these 9 steps and the fridge reset and I am in fact back in business. Thanks 🙏🏼