Althoff Woodshop - Making a Butcher Block Cutting Board - 4K

HTML-код
- Опубликовано: 29 июн 2016
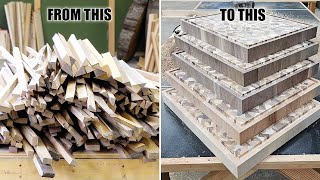
- A look into how I make my butcher blocks. I condensed about 9 hours of work into less than 9 minutes for the video.
It is made of maple and cherry and is 2 inches thick and weighs in at over 8 lbs. ▼▼▼ READ MORE ▼▼▼
See more of this butcher block at: althoffwoodshop.com/shop/butc...
See how to do the branding technique at:
althoffwoodshop.com/simple-pr...
*Shot with an iPhone 6S
--------------------------------------------------------------
LINKS FOR SUPPLIES USED:
Cutting Board Designer (Freeware) --
lumberjocks.com/projects/136098
www.lastalias.com/cbdesigner/
Finish: Howards Butcher Block Conditioner --
amzn.to/2ic75dX
Marking Guage (at 5:46) --
amzn.to/2ieLmVR
Woodburner Kit for Branding (at 7:46) --
amzn.to/2j3HW9M
Planer Used --
amzn.to/2iepzxy
Router Edge Guide --
amzn.to/2j3JWyZ
Router --
amzn.to/2j0Gzs7
Glue --
amzn.to/2jvbVEj
Bowl and Tray Router Bit --
bit.ly/2rZo9sl
--------------------------------------------------------------
WEBSITE:
althoffwoodshop.com/
FOLLOW:
/ althoffwoodshop
/ althoffwoodshop
/ althoffwoodshop  Хобби
Хобби


Tip for burn marks: Leave your router in the exact same config as when you burned the wood. Wet the burnt area and let it dry. As we all know, wetting the wood will cause it to expand a bit. When it dries it will be slightly proud of where it last was. Run the router over the area again. It should take off just the top layer or so, exposing the unspoiled wood beneath.
That sounds like a great idea. I will have to try that. Thanks +Brian Hackett
Brian Hackett I have been wondering how to do this! Maple and Cherry seem to burn easy. I will be trying this out. I already wipe my boards down in between sanding with a wet rag to raise the grain. Helps to keep it smooth after I apply the conditioner.
Or just use sharper router bits 😼
@@Althoffwoodshop Slower router speed, go slower, make shallow cuts, and do multiple passes.
@@Althoffwoodshop Also, a little sandpaper 120 grit on a dowel (thats what I do for random small router burns) can clean the burn marks up or minimize them pretty quick. Nice board there.
Lol my OCD was screaming when I saw you glue the two light brown blocks together in the beginning and I had to force myself to watch the rest. When I saw the method to your madness on the second cut/glue I finally understood... You got me, you got me good. 😂😂 looks fabulous by the way
+Bailey B 😂
I was exactly the same!! But knew from seeing finished product at start it looked right so had to see why it ended up right lol
+1
That was bothering me too
Lmao, me too. I almost commented on it at the time but waited it out. :D
This is so addicting too watch, best part of any cutting board video is always the finish oil. Thanks for the upload!
Wonderful! I love wooden cutting boards and objects in general.
Thank you! this is the first video i've watched i didnt get anxiety watching people reach across a table saw.
I like the style of the handholds, more practical than the usual ones.
Beautiful work! I loved watching the process.
That is a beautiful piece of work sir. Thanks for the inspiration.
Otustanding! Exactly what I need to help me build my first one. Thank you.
Wow what an art this is,I have a new respect for wood carvers
Nice board! Checker patterns, juice grooves, and end grain are all a challenge. I have found that a variable speed router helps with maple and cherry so you can slow down your router bit. Keep up the good work!
High quality work! Nice job
Really nice job. The music is making look forward to my vacation in Portugal.
Looks great! I can't wait to save enough to get a planer. I know it is not required for this but it does make it easier. I liked the vid, keep them coming.
Wow that was a great video from beginning to end.. nice easy going bachground music.. I could watch your creations all day lol thanks for making the video
Thank you!
Nice work! Cool transfer technique. Thx
Beautiful work!
Awesome work and great video! Thanks so much!!
Gracias por mostrar.... genial.
un saludo desde España
hi, great vid!
pitty about the router burns😬 tip: removing less material by doing more passes with a new or sharp router bit will eliminate this👍🏼
+darren green thanks!
I thought the same. I'd sand those out.
i think its the bit rather than the amount of material, didnt seem like much was being taking off
You just take a 1/32 or so of material off on a final pass and most all burned wood will be eliminated.
I was gonna ask why this was happening. I like the 1/32 final pass, same concept we used in my machining class.
Great job thanks for making the video.
Nicely done! And Utah represent! I'm also from Utah.
I'm new to the craft, and am wanting to build a cutting board butcher block for my fiance, so thanks for the tutorial.
Keep up the good work. You got a sub!
+HOTIA Thank you!! sorry, I'm not from Utah, it's just an Under Armor shirt I got for $5 at one of the local distributors in KC.
Great vid! I actually thought the surface pattern was quite interesting and aesthetically pleasing (for me) on the side you applied the glue! Nonetheless, I'll try this out!
great video Sir! you inspired me to make an end grain cutting board from maple and just finished it!
+baddocs2121 that's awesome!! You should post it to Instagram so I can see it!
Esplêndido, magnífico, configurações de cores excepcional!
Thanks for sharing! I like your techniques and details. One issue I suggest to improve your quality is to remove all router burn marks. Maple is notorious for getting burned when routing. Cut it, scrape it, sand it off. Whatever it takes. Once you apply finish you really can't go back. Especially with your cool logo on there. Thanks again.
+rob MCNEIL thanks Rob!
beautiful work sir. Thanks for posting
+Vocha Alloy thank you!!
You know you're getting old when you start enjoying woodworking videos.
I'm new to woodworking... and I am getting excited to buy a vacuum with a tornado. #oldlivesmatter
Just discovered your channel through this video, been trying to find a butcher block video I liked for a long time. Top video, great production value and lovely finish, thankyou for giving up your time! Good luck in future videos, I’ll be watching
Thank you!!!
I have made many end grain cutting boards over the years for clients, family, and my own home. A hand electric belt sander will sand the surfaces properly in about 10x the speed on end grain. I only spend about 5 minutes total on a 2 sided board right off the planer to make it perfect with my makita belt sander.
Also, i used to use cauls to clamp all my boards as well, just like Marc Spagnuolo from the wood whisperer showed us all. I found out from Pop's Cabinet Shop that you dont need to do this. Just very slowly increase the pressure on the clamp. Andre from MTMWood does the same. No cauls, just clamp slowly. It is faster in the long run. I havent done a juice catch in a long time because its so hard to get them perfect with no burns without a CNC router. Great job.
One more thing, that exact RO sander you got is the one i use for sanding rounded edges on those boards. You just quickly roll it 90 degrees on the rounded edges with a high grit like 180 to 240. It sands the edges super quick and looks even better than by hand
+Michael McDonald lots of good info, thank you
Nice work, the cutting board looks great!
Thank you!
Enjoyed This Well Made Video...Great Job
Thank you!!!
7
@@Althoffwoodshop u niw
Nice project. Wonderful !!!
Beautiful!
Thats a hell of a lot more work than i would have imagined. Instead of trying to make one I think I'll just buy one. Looks great btw.
Thanks! That's why I originally made the video, people kept wondering why I charged so much for them before that.
How much do you charge for them?
beautiful thanks for the help I am wanting g to get Into wood working and I'm trying to do butcher block counter tops for my tiny home this will help me alot
Beautifull! Congrats!
Sawdust is a carpenter’s glitter!
Belissima peça.....parabéns!!!
I like the fact that you made it with the grain out, and not end grain, looks and will be better than end grain. Done really well
What?
Wait….you realize he made an end grain cutting board? Your comment is unclear….at best
Great craftmanship!
I use same router guide and technique when I do my juice grooves. I get the router burn. There are ways around it but I like the character it brings to the board. Makes it look more handmade. Although most people don't like it
Belo trabalho!👍👍👍
E a musica e ótima!
Man, that is one sexy end product. Nice work!
Thank you!!!!
I couldn't see where you were going with the pattern arranged with the blocks. It looked really good. I really like the thing used for branding. I've never seen branding done like that before.
WOW That was awesome!!!! I'm looking for a design and I think I found it!!!! We are investing in a CNC and I challenged all four of us (ME, Wife, Son and Daughter) to come up with something they want to fabricate. In addition to telling you how awesome you and your work is (LOL) Just want to say thanks for posting all the specifics for the build. AND WTF were the 465 Haters smoking when they gave you a thumbs down????
They dont like the music and cant find their mute button 😁
An engaging video, albeit condensed, about a woodworker making a practical kitchen butcher block cutting board.
Excellent work!
Just beautiful
I thought it would be cool to make a butcher block until I saw this video. Holy cow that’s a lot of work, I think I’ll just buy one
Nice video mate, loved it
+JordsWoodShop thank you!
Very great work
Great work. Nice.
Nice video. Subscribed!
awesome work
Thank you!
Seriously good!!!!! Nice one
+Joel Drury thank you!!
Magnific
Genial!
Muy prolijo!
Muito bom ! Parabéns !
Amazing job! 👏🏻
Thank you!
Dang.... Now I know why those things are pricier than you might expect. Great craftsmanship.
+Zachary Palmer thank you!
Awesome job!!!
+aldrins Duarte thank you!
Maravilloso
Very nice job
+mahdi fadek thank you!
Beautifully done. Nothing looks nicer then smearing around the oil for the finish
Beautiful
Belo tábua gostei muito , belíssimo trabalho show.
compliments!!
Beautiful boards, I think I'd take one of those over a Boos Block any day. As for the router burns, I think it adds character and makes each board unique; a real chef is also an artist and a skilled craftsman who should appreciate the fact that the board he/she has is truly their own. Very nice, indeed.
+Bumbl3 B33 I love that thought on the burn marks!
Excellent!!!!
Nice work man... Great video edit too
+Fish Rod thank you!!
Great work!
Also, the editing, titling, and transitions were very clean and definitely added easy viewing and value to your build. Well done. Keep at it!
+Dan Deschenes thank you!
great job, Im a carpenter also, plunge routing always makes me nervous, LOL
Great work!! Fantastic shop too. I never really liked the drip edges on cutting boards... extra spot to clean out, takes away from the aesthetic. But people buying fancy cutting boards like this probably think of it as an extra feature?? Anyway... great work.
Thanks
Gorgeous ❤️
Thank you! Cheers!
very nice!!
makasih om udah bagi bagi ilmu ke kita. saya tunggu video yang lain.salam
Por favor. Como você confecciona suas etiquetas?
Achei perfeito seu trabalho. Parabéns.
That is absolutely a lovely chopping board 👏🏻👏🏻👏🏻👍🏻
Nice job
Great vid. What's the best brand/product to use to seal the wood after you're done? How often to you need to treat it after using?
Congratulations, one of the most well done I have ever seen and with great affection. How does the adhesive print on the wood? thank you
Thanks! To get the logo on the wood, check this out: althoffwoodshop.com/simple-print-transfer/
It's a neat trick that requires just a laser printer and a cheap woodburning kit.
Amazing
Thank you
For those out there thinking about doing this, just be warned that running an end grain board through a planer is rolling the dice. It can go horribly wrong, destroy the board, and harm your knives. So, milage may vary. Just be warned that it is something that is a real possibility. Use a router sled if you want to avoid the planer, or just use a hand plane.
Life is a roll of the dice.... take light cuts: 1/64 to 1/32. Use cawls on the ends and cut off later to prevent chip out on the ends. Make sure your blades are sharp. Check out mtmwood, broinwood, and other pros that make end grain boards for a living - they use planers.
very nice board! I hope in the meantime you have new milling cutters for the router, because the burned areas look ugly
Gran idea amigo gracias por compartir tu experiencia voy hacerme una igual saludos desde Colombia!!!
Genial tu trabajo, felicitaciones!
Como haces la marca de la tabla al final del vídeo?
that was very nice to see this vid. could you please tell me why did the router bit burnt the wood? i am so new to wood work. thanks
Such a nice block! Please tell me that you didn't leave the burned spots on the inside corners...
I did for the comments to boost engagement... /s
Hi. Great video!!! Could you tell me the different types of finishing oil I could use please? I'm in New Zealand so don't seem to have too many choose from. Thanks!
+Brent Lambert Thanks! The conditioner I used in the video is essentially beeswax and mineral oil. I did a write-up and video of how I made my own here: althoffwoodshop.com/wood-butter/
You can change the ratio of beeswax and mineral oil to change the consistency. Hope this helps!
-Reece
good job bro ...................
Very nice board. Might i add that juice wells ruin the look for me and also reduce the usable area. I think clean surface helps to show the beauty of the wood and your work better. Keep it up!
wow just wow
What's the chisel you use for scraping the dry glue? Thanks, great video btw.
It's the "Bent Paring Chisel" from woodcraft. Item number 157919 on www.woodcraft.com
ファンタスティック!チャンネル登録しました!!
ありがとう! --Google Translate : )
Beautiful..... ^^
Love that shirt, GO UTES!
Nice work. Love your video production too. Curious how you apply your logo to the board. Do you show how you do that online somewhere?
Thanks Matt! If you have the time, check out my newest cutting board video, I upped my production game a bit 😁. Link in description to a quick tutorial on my site for the branding. Super easy.
Beautiful work. But, I usually avoid working with cherry because it always seems to burn.
Dan Stephens those burn marks looked kinda cool in the router plunges... then again I do like the burnt wood effect