Arduino - Turn LED On and Off With Push Button

HTML-код
- Опубликовано: 17 авг 2024
- Learn how to work with an LED and a Push Button using Arduino. Control the LED with the push button - 2 step by step examples.
👉 Complete Arduino Course for Beginners: 🔥 rbcknd.com/ard... 🔥
✅ Click Here for the corresponding Written Tutorial: Turn LED ON and OFF With Button roboticsbacken...
0:00 Intro
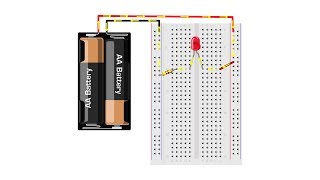
0:30 Build Arduino circuit with LED and push button
6:09 Turn on the LED when Button is pressed, turn it off otherwise
11:01 Toggle LED with Button
17:06 Improvement: Debounce the Push Button
👉 Get all my courses here 👉 rbcknd.com/all...
Twitter: / roboticsbackend
More Free Tutorials: roboticsbacken...


Thank you so much. I needed to program something for the school where I had to set up the button as you explained. In no video I have found a programming that detects when you press the button to turn on a light and then another press to turn it off. Thanks again. Keep explaining this kind of stuff, it's worth it.
Hey, fyi to make it even simpler instead of your if -> then -> else you could do ledState = !ledState
i logged in to hit like and thank you .. not one of best but the far best of all
Would delay(50); at the end of the if-condition not have done the job instead of the extra variables?
More helpful than the paid course
This video is very useful. Thank you.
I enjoyed the video and was finally sucessful in running the code on my Arduino Uno. I think it was unnecessarly difficult to extract the code from the video considering the many "back and forth" journeys in the coding. One set-back was caused by the use of different coding styles, e.g. (#define led #define button) & (#define LED_PIN #define BUTTON_PIN)
Here is the code I ended up with Thanks
Turn on the LED when the button is pressed & keep the LED on unless the button is pressed again.
If the button is pressed again the LED will remain off unless the button is pressed again.
The on & off state of the LED will toggle each time the button is pressed.
#define LED_PIN 8
#define BUTTON_PIN 7
byte lastButtonState;
byte ledState = LOW;
unsigned long lastTimeButtonStateChanged = millis ();
unsigned long debounceDuration = 50; //millis
void setup () {
pinMode(LED_PIN, OUTPUT);
pinMode (BUTTON_PIN, INPUT);
lastButtonState = digitalRead(BUTTON_PIN);
}
void loop () {
if (millis () - lastTimeButtonStateChanged >= debounceDuration) {
byte buttonState = digitalRead (BUTTON_PIN);
if (buttonState != lastButtonState) {
lastTimeButtonStateChanged = millis();
lastButtonState = buttonState;
if (buttonState == LOW) { //released
if (ledState == HIGH) {
ledState = LOW;
}
else {
ledState = HIGH;
}
digitalWrite(LED_PIN, ledState);
}
}
}
}
Hi, thank you so much for your detailed instruction! But I don't know why it even lights up without me pressing the button. When I press it, it gets lighter. How can I solve this issue tho? Thank you so much!
THANK YOU SO MUCH!
Instead of an LED, I used this on an 8 part Relay to power my LED Strips. I do have a problem where if I accidentally jiggle the wires it thinks a button is pressed, but that's likely the cheap breadboard/crappy duponts.
If you're doing the same I had to put my delay to 1000 milis otherwise it was going crazy. (It's interesting at first, but a great way to damage them.)
I did the same thing, but they take way longer to actuate now, lol.
@@FlockofSmeagles Yeah the next day mine just turned on and off without pressing the button... I love coding... I'll see if I can figure out why, but I have very little faith in my coding capabilities (or lack thereof lol)
Also I actually put mine on 1250 milliseconds, which is 1.25 Seconds... I actually like the delay for some reason, but I can see that being incredibly annoying.
@@FlockofSmeagles I figured it out... I'm wildly dumb, I also didn't touch it since my last comment.
I skipped the circuitry section because I was eager to get this to work that day. My coding wasn't the problem, it was the wiring.
I forgot to add the 5v to the button lol, curiously it worked the first time for 5 minutes, but never again after that. Now it is fixed and I have it set to 500 milliseconds, however I'll edit this to get the lowest one without any bouncing.
The reason it first but then wasn't working is because I'm in a small room surrounded by electronics, the interference caused by them made the button go crazy. I'm very new to this so I had no clue. I was dealing with a "floating pin" problem
I'm using an Elegoo 8 Part relay so I'm not sure if this will help with yours but I'll link what I found and hopefully RUclips doesn't get mad at me.
Like the guy in the GIF, I was able to actuate the button without pressing it. This stuff is so interesting.
makeabilitylab.github.io/physcomp/arduino/buttons.html#the-floating-pin-problem
ruclips.net/video/wxjerCHCEMg/видео.html&ab_channel=AddOhms
Hope you got yours to work better otherwise. Hopefully this helps if you haven't!
Edit: I got it down to 10 Milliseconds with it only bouncing once from 10 presses. I can give you my code if you want. Idk if that'll work on here but I can try
You may also have grounding or power supply problems. Try running on batteries for a clean DC supply.
yo man if you still can, can you send me a code?@@navb0tactual
Very nice, could you make one where you have 2 leds and 2 buttons where button 1 changes led1 state and button 2 changes changes button 1 to change state for led 2 ?
that would be nice for me also
why the green led light is at d3 and d4 in the diagram at 4:11 and at 5:39, the actual green led light is at different place?. I'm a beginner and super confused....
Very well explained. Thank you.
What a brain power ! Great stuff
how would we change the code to where the led would only flash five times?
Thanks bro i have issue and you solved it on minutes🧡
Can we use IR sensor instead of push button?
This helped me out, thanks.
If I wanted to wire this up without the bread board how can I do it in regards to the ground? Would I split the ground on the switch? Or how can I do that?
in this case you need to find a way to connect all grounds (maybe by soldering?)
I've done this. Except with 5 buttons and LEDS. The debounce doesn't seem to work consistently a crossed all of them.
is this because of how they are being called in the code? Is there a way to call each button and led block within an array?
If you see this. I would appreciate your help, thank you.
Well, i use another debounce system that i think would work better for your case than the on in the video. Instead of using millis(), i use a bool system, let me give you an example:
if (debounce == false) { // Checks if debounce is on or off
debounce = true; // If its off, sets it true
digitalWrite(13, ledState); // Turns led on or off
delay(1000); // This is the debounce duration, i put 1000 miliseconds
debounce = false; // Sets the debounce off after the designated time has passed
}
I am not sure if you can or not but i believe that you can implement this to multiple LEDs, probably you'd have to create 5 different bools
Why not use state machine and task implementation?
TYSM!
It should light up when the user presses the button once, and then go out when he presses it again. However, if the user presses the button again within 5 seconds, the LED should turn on and turn off after 5 seconds. how can I do that
You have store the time of the first button press in a variable. You also have to store the number of presses in another variable. Then you test with (psuedo code) "If (ButtonPressCount >= 2 AND ButtonTimer
what do i do when there's two buttons and two LEDs?
copy the code and add two more ports. Change the copied code to reference the two new ports.
Great, hey thank you.
what libraries do I need? it does not work... byte remains white
Thank you Great video Very good explained.
I have a question about the button pin? why the button Pin is 7? How to define which number of pin is for the button?
the button pin is 7 just because I decided to plug the wire from the button to the pin 7 on the circuit :)
you could use any other valid pin, then make sure you use the same number in your code.
//My code version:
#include
#define LED_PIN 8
#define BUTTON_PIN 3
bool LedState = false; //bool - the state can only be ON or OFF.
void setup() {
pinMode(LED_PIN, OUTPUT);
pinMode(BUTTON_PIN, INPUT);
}
void loop() {
if(digitalRead(BUTTON_PIN) == HIGH){ //if the button is pressed enter if#
delay(250); //small delay for button bounce.
LedState = !LedState; //set LedState to be not what it is.
}
digitalWrite(LED_PIN, LedState);
}
I replaced the push button with an electric wire, but when I short-circuited the electric wire, it turns on, and when I don't, the led turns off, but once I short-circuited, the led keeps turning on, so can't I replace it with an electric wire?
The button is to act as a "momentary" contact, that is to say you push it down for a fraction of a second and let it go again. This code is not designed for the buttong to be held down continuously. To use a wire for continuous contact try this code in the Loop:
if(digitalRead(BUTTON_PIN) == HIGH){
digitalWrite(LED_PIN, HIGH);
}
else
{
digitalWrite(LED_PIN, LOW);
}
Nice video, good explenation but a bit slow. KEEP GOING!!! JUST DO IT ;)
Thanks very very much sir 🙏
I still don't understand why do we need that 10k resistor, while the pushbutton simply breaks the circuit when it's not pressed.
Pull down resistor
Why is not working?
int buttonPin=13;
int buzzer=2;
byte LastButtonState;
byte BuzzerState=LOW;
unsigned long lasttimebuttonstatechanged = millis();
unsigned long debounceduration = 50;
void setup()
{
pinMode(buttonPin,INPUT);
pinMode(buzzer,OUTPUT);
LastButtonState= digitalRead(buttonPin);
}
void loop()
{
if (millis() - lasttimebuttonstatechanged >= debounceduration)
{
byte buttonstate =digitalRead(buttonPin);
if (buttonstate != LastButtonState)
{
lasttimebuttonstatechanged = millis();
LastButtonState = buttonstate;
if(buttonstate == LOW)
{
if (BuzzerState == HIGH)
{
BuzzerState = LOW ;
}
else
{
BuzzerState == HIGH;
}
digitalWrite(buzzer,BuzzerState);
}
}
}
}
I have known what is wrong the fking = after else just remove one
Thanks Man👌
on your diagram resistor, it's seems 10k right ? not 100k on your video. its brown,black, yellow, gold
Yes it's 10k Ohm (4 band resistor)
Note that for the real circuit I use a 5 band resistor, so the colors are a bit different (but still 10k)
thanks pro
what are the 2 resistors used there which ohm ?
Read their color codes
thank youu
Compilation error: expected '}' at end of input - Line 17 😩
That's a syntax error, triple check your code to find the error :)
lol your board is totally different from your cad
Just different colors, but the pin layout is the same.
I am finding error collect2.exe
ty brother
First project followed to the 't,' but get "Compilation error: 'digitalRead' was not declared in this scope"
Pretty dissapointing.