my son just turned 8 years old, we started building this when he turned 7. He doesn't know yet how amazing the whole think is, He will, one day. We recorder everything and adding videos about the process on our channel. Just yesterday we finished everything, we are very proud of ourselves. it took us 1 years to finish it 👦😊
OMG! I am a programmer for 30 (or more) years. I understood the registers, the address bus, data bus, and a lot of things. But I haven't understood this microcode stuff, how the program is ACTUALLY executed. I can't beleive that after so many years now I understand it. Thank you very much. It is a fantastic work. You built it up from transistors. You have worked huge amount of hours. Thanks a lot again. It was amazing.
I remember going through all that in the computer architecture class that was required for my CS degree (which I think used the same book Ben mentions at the beginning of the series!). But Ben explains it a *lot* better, and seeing the pieces come together bit by bit really drives home how it works much better.
@@RedwoodRhiadra Same for me, twice (one for undergrad and basically the same course for grad) learning that useless knowledge that I have not applied a single time in my career that I knew when I was a freshman in HIGH SCHOOL by teaching myself (30 years ago before the internet even existed... yes, I had to go to that place called a library and borrow physical books).
Ben, I think you have created, in 44 vids, a series of courses yielding an undergrad in computer architecture engineering, that one pays $150K+ at a top-notch college to obtain. Truly amazing work. I watched them all, learned a ton, and am inspired now to experiment on my own.
New 43 minute Ben Eater video? Sign me up! Also, thank you Ben! I commented on a video of yours about a year ago about a science fair that I won thanks to your videos. I'm going to school for computer engineering now, and your videos are still just as relevant, interesting and entertaining, and also useful in my classes. Thanks!
@@BenEater i am an electrical engineering student. I am fully satisfied upto this video. Can you pls even simplify how assembly language and multilevel language works at very base level for who doesn't learn programming
@@kannanrkarthikr9541 even though I’m replying to an old comment, if you or anyone wants to learn the software layer on top of the hardware check out “nand to Tetris” (there’s an online course and/or a book and website) and the first half is similar to this project except it’s simulated, the second half of the course does software. It starts with logic gates and builds up from there.
@@drivers99 Imo the computer design for that course is a bit too full of weird choices. I think that it may not be the easiest to understand for a beginner. Maybe looking for 6502 assembly tutorials would be better, it was used in some Commodore machines and is quite popular. There is also BASIC, a language fairly easy to understand that was used on 6502 based computers.
Something I'm noticing as I'm thinking about ways the computer could be made more efficient and looking at suggestions others have made: pretty near every change people have suggested - even putting the counter-enable on the same microinstruction as ram-out + instruction-register-in! - would make the computer harder to understand. Maybe only a little bit, like with the RO+II+CE thing, but harder to understand, because it is doing more things at once or doing things in more complicated ways. As someone who didn't know a lot of electrical engineering before watching your videos: thank you for being so careful to build this to be immediately comprehensible. It's appreciated.
If you still think the reset microcode sequence counter is a nice optimization, you can do that by simply resetting the microcode step counter whenever all bits of the microcode are 0. Also there's the concept of wide vs narrow microcode. Your processor uses wide microcode in that each control line is controlled via a single microcode bit. This is a very simple method of managing microcode, but as evidenced by you not using the reset optimization (because you were planning on using that unused bit to manage the flag register) because of limited number of bits available. With narrow microcode, what you do is group control lines that are never going to be active at the same time, and use a demultiplexer driven by the microcode to control those lines. A good example of some control lines that are never active at the same time would be the signals you enable to drive the bus. For your processor you have RO, IO, AO, EO, and CO for those lines. So you could instead use 3 bits of microcode to drive a 3-to-8 demultiplexer and in the process, free up 2 bits for other purposes, such as a microcode step reset to allow simple opcodes to run in fewer clock cycles. And in the process you'll still have the possibility of adding up to 2 more registers to drive the bus (with a 3-to-8 demultiplexer, you have 8 outputs, but you have to allow for the situation where you don't want to drive any of them active, so you have to limit yourself to 7, or you use an extra bit to enable any output at all). If you want to get a bit more compact, then you can also group control lines MI, RI, II, AI, BI, OI, and J together as well (technically, you could drive 2 of them together without causing damage, but practically, you only drive 1 of those lines at a time. So grouping them makes sense). By grouping those 7 lines together and selecting one of them using 3 bits of microcode, saves you 4 more bits. So by creating those 2 groups, you now require a microcode width of 10 bits instead of the 16 bits you use, therefore freeing up 6 bits for other purposes. Now 10 is a lot smaller than the original 16, but let's see if there's any more lines (I'm looking at the potential 2 unused outputs from the 1st group and the possibility of reducing the microcode width to 8 bits so you only need 1 EEPROM). Are there any ungrouped control lines that will never be driven at the same time as any of the other 5 control lines that drive the bus? And HLT jumps out at me. If the HLT line is active, then you're not driving anything else, so you can add HLT to the "RO, IO, AO, EO, CO" group, thereby saving another bit and reducing your microcode width to 9 bits. We're still left with the SU, CE, and FI control lines. Can we add one of them to the first group? As it turns out, you can actually eliminate the FI control line. Looking closely at the defined opcodes, the FI line is active every time the EO line is active, so those lines are effectively the same. Now does merging EO and FI together potentially harm us? And I say no. For instance, assume you desire to create a CMP command that does a subtraction, and then throws away the result except for the flag register, it's perfectly acceptable to place the ALU's value onto the data bus and simply not have anything else read that value. So you could create a CMP command and not have a problem with the FI line being identical to the EO line. So we can get rid of FI and have the microcode only 8 bits wide. So your microcode becomes 8 bits wide and the microcode would have 4 fields. They are: Field 1 - 1 bit wide - SU control line Field 2 - 1 bit wide - CE control line Field 3 - 3 bits wide - Select one of HLT, RO, IO, AO, EO, and CO control lines. Field 4 - 3 bits wide - Select one of MI, RI, II, AI, BI, OI, and J control lines. And if you're really sneaky, you might be able to move the CE line into the "HLT, RO, IO, AO, EO, CO" group by wiring it such that every time the CE line is active, driving the RO line active as well, reducing the microcode width to 7 bits. So in conclusion, you eliminate one EEPROM at the cost of adding 2 3-to-8 demultiplexers. And unsurprisingly, if you code things such that a 0 value for the 2 selection groups means "no signal selected", then an all 0 value for the microcode could still be used as a reset value for the microstep counter. And if you do use an all zero value to reset your microstep counter, you can at the same time eliminate your ring counter since it becomes superfluous.
Having reduced the microcode width to 7 bits you could use the 8th bit as the reset flag for the microstep counter. It would keep the circuitry a little simpler as it avoids needing to add another pair of chips to detect a microcode value of all zeros.
Beautiful optimization that actually simplifies and removes expensive hardware and programming steps. I hate the voice you use while writing, but love your points.
Please don't tell me this is the last video from the best series on RUclips by the best guy who's ever touched a breadboard :( Ok I wasted too much time typing this comment .. time for watching some conditional jumps !
OMG.. I can't believe this I've just completed watching your playlist... I've started just 2 days before I felt so bad when you said that you're near to end this series Your videos are ULTIMATE..... I'm going to prepare this 8-bit computer within few days.... :D :D
This series is to be seen and taught in schools. This is the hands-on type of stuff we all miss in many skills like mecanics or gardening. We don't know how to do stuff anymore and when I see videos from you or from guys like Primitive Technology, I see the same content, pure skill from self-teaching and curiosity. Building stuff from the ground up to understand its inner stucture, it's perfect !
Ben, what you should do is write a book. After searching and searching for books to describe this topic, I haven't found one that explains all of this from transistors all the way up to assembly code as good as you do. You already have the schematics and your drawings on paper to use, and then you could just reference your videos.
As Ben has recommended, please take a look at Digital Computer Electronics by Paul Malvino: it's an old but very nice book starting from transistors to assembly code, even describing 6502, 8080, 6809etc.
@@carlosnavarro3725 I'll give a shoutout to "Code" by Charles Petzold. It's less... "hard" and maybe a bit less detailed (especially on the transistor side of things; it describes logic gates as if they were made from relays, for example, because of how it built up to that point), but that informality can be nice depending on what you're looking for. I don't know where Malvino's book starts, but Code starts assuming very little knowledge -- like Ben in this series approaches things as if you already know binary and hex encoding, you've probably seen truth tables, etc.; Code covers all of that as well, really starting with a couple examples of just encoding data in another form before it even gets into real logic. The way I'd frame it in terms of university courses is that I'd guess Malvino's book would probably fit into like a probably-sophomore level computer organization class; "Code" would be more like a freshman seminar. But it'd be a *really good* freshman seminar, and pretty detailed for that label. :-) So maybe decide which of those sounds more like what you want.
Ben! This entire series has been absolutely wonderful to watch. Thank you. In undergrad, I took digital logic and a few classes about this level of computer engineering where hardware and software meet (or are actually somewhat equivalent). I put it all into practice with some basic logic chips, FPGA boards, and the like. At this level, I knew how a computer could and would be built. However, seeing you build this fully functional Turing machine from scratch, all portrayed in a clear and fun manner, was fascinating! I haven't ever enjoyed a series on RUclips videos as much as this. So again, thank you.
This is the first time that I watched a complete serie of RUclips videos about a specific topic. It also brought back some memories when I started with Electronics in my teenage years, playing with the 7400 series (LS did not exist at that time). Thanks Ben for the great work!
Ben your work here is absolutely amazing, i really can't thank you enough! I'm a student in electrical engineering and built the pc myself because i just couldn't understand why the hell a 001100 would add or subtract some numbers... After watching the whole series and a lot of troubleshooting i finally get it. And with that knowledge i am soo far ahead of my friends at the university, so that should give you an idea of how good your videos are. And not only do you give instructions on how to build this thing, but you also teach why it's working and the backgrounds behind it. So again, thank you very much, inspiring people like you are the reason why i am gratefull for the Internet!!
This has been the best project and tutorial that I've ever watched on youtube so far! - 10 / 10 (IGN) I've already learned all of this before in separate chunks while studying at my Uni, though, but this project is excellent for reviewing and combining all that knowledge into a nice, compact and memorable package! Thank you so much for making this! P.S. My inner programmer can finally have a rest after seeing you complete a conditional loop program that doesn't end up in an "infinite loop" :)
A left and right shift instruction would be handy for faster multiplies and divides which are powers of 2. So to multiply by 4, you left shift 3 times. To divide by 2, you right shift once. We used to do this in C back in the DOS days, use the left > instructions for faster multiplies and divides, this was before modern compilers figured this all out for you. As you know you can speed things up a great deal by using a single left shift (LSR) or right shift (RSR) instruction if all you needed was to divide by 2... you could have C = C >> 1; (or C>>=1) and that would compile to a single right shift and avoid more complex divide code. Great videos anyhow. I love how you combined my first love of electronics when I was young, in the '70s, with my later love of computer programming.
Hey Ben. I started viewing your "8-bit computer build on breadboard" video-set just a few days ago to get me over some of the lockdown boredom of Covid-19 and initially I was a bit disappointed. This was because the term "8-bit computer" always meant to me that the data into and out-of the computer was defined as being an 8-bit quantity, whereas your breadboard computer handles only a 4-bit data quantities. However, while watching the the series I realised that the whole build was a teaching process of computer design and production and this taught me much more about digital computers that I ever knew. Even though I was a professional computer programmer for systems production who used assembler languages in the late 80's and early 90'2. However, I was soon out of that job, and working on computer systems maintenance. Sort of away from the intense concentration of software and back into the stress of keeping services running and fixing issues under extremely short time constraints. What I would like to say is, your explanation of the components and the operation of the breadboard computer was very thought provoking. My understanding of what goes on under the bonnet of the plastic chip CPU has been expanded dramatically - thank you for that. I also realise that to produce an 8-bit data bus within computer would require a great deal more hardware to connect together and the increased power consumption would require to be bigger too, unless you were to use CMOS digital gates and flip-flops of course. Prior to watching your series, I discovered that another small group of people had build an emulation of the 6502 microprocessor using only transistors, and yet another chap built a monster 6502 in 6 or 7 6 foot by 3 foot racks, also using transistors in Cambridge in England. I believe that took him just over 2 years to complete, and he had it play a game of tetras to demonstrate what actually goes on in the computer. Both of these devices exhibited lots of L.E.D.s to indicate the activity, but neither of them provided the detail of the electronics that actually describes the intricate operation of the central processing unit. All I can say is thanks for sharing your knowledge of the computer. I have viewed with interest the whole process of your build with interest. My best wishes, Harry
Usually when I can't follow the series along I don't watch it, however this project is a UNIQUE EXCEPTION! Around a week ago I just wanted to learn about how clock syncs the CPU with other parts of a computer... After watching this whole series apart from the above I've learnt: 1. How to make a CPU clock 2. How to store 1-bit of data (and expand it to 8 bits) 3. WHAT is the BUS, WHY do we need it and HOW it works 4. How to isolate data from the BUS and Load/Enable it using control signals 5. How ALU works 6. We don't need a keyboard to set a value to RAM, long live DIP switches! 7. The matter of interpreting machine language instructions is simply the automated way to control the I/O signals for various parts of the computer 12+ hrs of videos of this series has saved me 5 years of life I needed to spend otherwise to learn at college, so now I can kick start with my own electronics project without a need to born as another man living another life with a completely different fate but just keep being myself and do new cool things. And one last but not least thing - as programmer I thought that I will never ever touch a real breadboard. Well, this series made me change my mind and I'm gonna buy a couple soon. ALL THANKS TO BEN! Thanks you Ben from the bottom of my heart! P.S. This series is like when you have some tech questions and can barely even ask them because of the lack of knowledge but still getting the answers that not only meet the initial requests but provides you with solid conceptual bases serving as a fantastic background for the further studying. It's made much better than I could've ever imagined possible.
You are so complete in your training, master. I am so intrigued by the way that you’re actually going from the smaller modules, then including EEPROMS, and actually designating assembly instructions to what is really just a few bytes in registers. Actually building the memory locations and designating those memory locations their corresponding addresses, all that from gates. This is a golden eureka moment for me because I’m able to finally wrap my brain around some concepts that were incomprehensible before today. I can understand why they call it ‘assembly’ language now... thank you for helping me with this stuff this is great, please know that you’ve shared something that I value to the utmost.
I've finally implemented your 8-bit CPU in Logisim, and the counting up and down with the conditional jumps works! I tried that program that one of your viewers suggested that you didn't need conditional jumps to execute multiplication and yes it does work. Nifty little program due to the limitations of the machine, however, there is one caveat. Once you run the program to its end and you get your result, you would have to enter the value for "X" into memory location 7 as it will have the previous value stored in it. Pretty cool, but on to conditional jumping on a Turing Complete machine!
Ben, thank you so much for your videos. I am an engineering student at Purdue University. I recently got sent home from a semester-long study abroad due to the virus. I got home, and I was pretty bummed about the whole situation, but I did not want to sit around and do nothing with all the free time I had during the quarantine. I started watching your videos for about and hour a day and finished the whole series in two weeks. So many times I was amazed by the individual parts of the computer, how the computer works as a whole, and the little tricks you would do to get the computer functional and optimize its performance. Thank you again for making these videos, as I learned so much and enjoyed watching. I'm looking forward to building the computer and watching more of your videos in the coming weeks!
Thank you for this wonderful series Ben. I've really enjoyed following it and have built it on breadboards and documented the whole thing in CAD for inspiration. A feature I added was in the RAM, using the 74LS157 and 74HC195 ICs, I implemented an Arduino to set the addresses and bits rather than manually using the switches. Unfortunately I have had some issues but have not been able to look into it just yet as I need an oscilloscope.
GREAT SERIES, It helped me a lot. My computer that is not complete should in theory have 16 bit architecture, 65536(64k) words sram, 64k words program space, 64k words program sram, shifting, simple bit wise, and a comparator (== only...). somewhat based off your computer but changed quite a lot in everything else. still working out theory :(
As many other people here have done, I want to thank you so much for making this video series! I understand a lot about software but this series has allowed me to make the connection all the way down to the individual transistor. I feel like I understand how computers work on a very fundamental level now and I'm not sure I would have ever made it to this point if it weren't for your videos! Thank you, Ben!
this series is everything I wish my university courses focused on, I know a lot of how each of these smaller parts operates but I have rarely seen it applied. Can't wait to start designing my own computer, thank you so much for this series.
If anyone wants to have a go at writing these sorts of programs themselves, the game Human Resource Machine is a puzzle game based around this idea. It gives you a series of simple instructions, like the ones for this computer (add, jump, output, etc.) and tasks you with solving various problems with them. It starts off with simple ones like multiplying, and works its way up to more complicated ones like sorting algorithms or breaking a number down into its prime factors. If you're already good at writing this sort of code, the levels also have optional challenges to complete them in under a certain number of steps or symbols, which can be quite difficult.
Here's an idea for a program that will display all of the 8-bit prime numbers, which should be a little more sophisticated than the Fibonacci program. Here's the pseudo-code: 0: ldi 2 # initialize test divisor 1: sta divisor 2: lda curNum # determine if division remainder is 0 3: sub divisor 4: jz 11 // divides evenly, so not prime 5: jc 3 // not done 6: ldi 1 # increment test divisor 7: add divisor 8: cmp curNum // divisor goes from 2 to (curNum - 1) 9: jlt 1 10: outm curNum # update display 11: ldi 1 # increment current number 12: addm curNum 13: jmp 0 14: = divisor 15: = curNum # doesn't really need to be initialized To fit everything into the extremely limited memory, some new general-purpose instructions are needed, which can easily be added to the gaps in the microcode ROM. I think "ldi" (load immediate) already exists or at least existed in an earlier encarnation of this computer. "cmp" (compare) was discussed in a previous episode and is a subtraction that discards the result. "jlt" (jump if less than) jumps if the Carry flag is false. "outm" (out memory) is like "out" except it takes the display value from memory instead of the accumulator. "addm" is like "add" except the result is written to memory instead of the accumulator. The crux of the method is to divide the current number by the current test divisor using repeated subtraction to determine the remainder. We don't even need to know the remainder, just whether it's zero or not. The "jz" is triggered if the remainder is 0, meaning the current number isn't prime. The "jc" is triggered if the result is positive, meaning that more subtractions are needed, and otherwise, the remainder is determined to be not zero, meaning that the test divisor does not prove the number to be non-prime. The "curNum" doesn't really need to be initialized, since the program will just run from the value that's present and start over on wrap-around. It will go through values 0 and 1 which the divisor loop isn't really set up to handle, but those values don't cause problems. Mind you, I don't have the hardware to actually test this program. This O(n²) algorithm will slow down substantially between the higher primes; you might want to crank up the clock rate! In principle, the divisor test loop only needs to run up to the square root of the current number, but there's no plausible way to implement "compare to square root" in the microcode.
for anyone who reads this and like that game i suggest you to take a look at "Baba is you", another game which play arround with basics of logic, pretty good and kinda hard puzzle game
Any computer science teacher worth their salt should include this series of videos in the curriculum. So clear and concise, and fascinating too. Now a challenge would be to create a 6502 compatible set of instructions.....
Just one request ... Plz don't stop . keep pushing it Ben ... I've been doing my own processor.. You're one is a lot better.. Great great great job .. Just keep making it better and better .. Like making dual core or something or whatever...but keep making it upgraded ... Best wishes Ben
Finally got around to watching this video series, the one on 2s compliment was especially good, it helped me re-remember and re-understand stuff I have lost years ago. Built a similar machine as a class many years ago and it was really, really enjoyable going through and seeing what I remembered and what I forgot. Thank you for making this series.
Wow! I've just binge-watched the whole of building 8-bit breadboard computer over the last week and I'm blown away! Immeasurably better than when I did sys arch at college a long time ago. I'd love this series to be a kick-off point to consider other common inclusions that aren't necessarily sensible for a computer with 16 bytes of memory and 16 op-codes, and different possible architectures. My particular interest is in Forth and Stack Machines in general, so my specific request would be implementing a return stack in hardware to allow JSR and perhaps discussion of making the A Register into a stack too, as an efficient means of passing values to and from subroutines.
I've been working on this project evenings since January and just today finally got it working perfectly! So much troubleshooting even with the official kit, but I quickly came to learn that's part of the learning! Between all the troubleshooting and testing and searches in /r/beneater I've come to understand so much more about electronic logic than just the fundamentals. I wouldn't change a thing. Thank you so much for doing these...I'm moving on to the 8502 computer next and can't wait!!
I really liked your 8bit computer tutorials, it's really inspiring and helpful for the student as well as many professors. I am able to learn many more things apart from your topics. A great thanks to you, it will be great if keep posting such inspiring and knowledgeable videos.
Thank you for the series. Your DIY video card video was recommended to me by YT (good recommendation for once!!). Now I have watched all of these. THANK YOU.
hey, been watching your videos for a while. i think i finished a Turing complete computer built in no man sky. following many examples you have shared. it just blows my mind how that no many times i watch this video i always learn something new. i just set my conditional jump to the overflow flag and didn't even realize the power of subtraction and negative binary numbers. still so much to learn and test out.
I’ve learned more about computers than ever before and I feel so fortunate I’m as relatively young as I am (20) and able to watch this series. Absolutely incredible to know how this all really works. Hoping to be able to save up enough to afford this kit and put it together myself!
"I think it's pretty cool that a few of you proved me wrong so thanks for teaching me something!" - Ben Eater Teaching millions of people such fundamental information about the technology that's become embedded in almost every aspect of life, helping to close a huge knowledge gap on a global scale, and thanking others for teaching him - this is pure inspiration!
Excellent work! I love your series. As a youngster i developed an ALU on a program called LogiSim on the MAC. learned a lot, but i failed to develop a Control Logic to process Nmemonics. Your work filled that in. Thank you.
I LEARNT SO MANY THINGS FROM THIS VIDEO SERIES.......THANK YOU SO MUCH......THIS IS THE BEST CHANNEL EVER ON RUclips.........THANKS A LOT......KEEP UP THE GOOD WORK....
Ben, this series of videos has been great. At the end of the final one you asked for suggestions. I wondered about your ALU. At first I couldn't understand why you limited it to add and subtract and didn't include multiply and divide. I see now why multiply wasn't added - you can do it totally in hardware with shifts and adds, so there's nothing educational there. Having researched divide however, I think there is a lot to be shown from that. If you select the shift and subtract algorithm you could introduce the shift registers and comparison chips which you haven't used so far and explore whether to extend the microcode to be variable length to drive the hardware directly, or figure out a way to interface to the divide unit to hand control over to do the division and then return control when its done. I built a divider on a logic simulator and it turned out to be a lot more complex to implement in hardware than the simple algorithm suggested!
This whole series is just nuts! I loved programming in Python, and was thinking about going to Uni to learn more, but this series got me covered on that front :D I can now live for my biggest love, maths! Thanks Ben! Ohh, and I never ever had the feeling to program in assembly, but watching this video series I realized, doing everything in hardware level is not for me, but assembly can actually be fun. (I never took the time to understand how it works, and wasn't intuitive at all. But now!) P.S.: Matthew's solution is really elegant. I mean that is some programming magic right there. Some solutions even in math are said to be in "The Book". This is that kind of solution. Hats off!
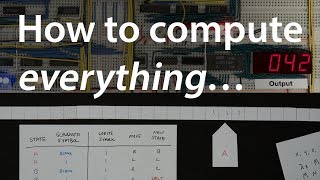
I think 27:08 is showing an excellent way of doing it. The thought crossed my mind of copying the whole JMP instruction into that row of JC and JZ for those cases where C and/or Z are set. Then if you modify JMP, conditional jump just works, without explicitly updating conditional jumps too. One might take the same concept and extend it to conditional move, copying the MOV row in those cases. You could do the inverse for the reverse case, for CMOVNC (not carry) you copy the NOP row to the CMOV row in the cases where C is set, letting it be MOV when not carry. You could extend it so there is another array for the replacement rules I mentioned. Your table driven design is the basis for a good maintainable system. Amazing video.
Well, it took 6 months but I finally completed this project. I learned more doing this project than I have on any other electronics project. Thanks for taking the time to produce these videos and put together the kit!
Great videos. Happy to see the conditional branch instructions and working fine! If one considers adding new instructions I think immediate mode for LDA, ADD and SUB would be useful to free up some memory for longer programs. :)
Fantastic series! Very addictive and informative. Read about computer architecture in a few books and went through half the nand2tetris course, but this is so much more accessible. Thanks and keep up the good work!
Just wanted to say, finished binge-watching this and the network playlists. It's amazing!! I have some coding experience but I am very new to physical computing (always has been a bit of a mystery to me) - I feel like after watching this, it all makes so much sense now! You really explain this so clearly with such a relevant examples. I would love to try to build one now myself too now! Thank you so much!
I've watched all the videos in this series in just 2 days. Ive always wanted to know how computers work on a bit level. So all I can say is thank you Ben!!
Dear Ben, just finished the series and it was life changing. Thank you so much for the ride! It was fascinating! All the best and greetings from Brazil!
Hello Ben Eater, i am really thankful to you for taking the time to create this practical and intriguing series. I am happy to say that i was excited watching them. I completed the series today along side the programmable computer setup. I have been staring at it the whole day with great excitement. Now i have the basic foundation to develop RTOS applications for Microcontrollers. Thank you once again and thumbs up to you
That would be funny to show 'good ol' self-modifying code for procedures: we don't have a stack. Instead, before jumping to procedure, we use STA to put return address exactly to last JMP instruction in that procedure we're calling. So when it is done, it jumps to the right place, 'returns'. It allows nested procedure calls, but not recursive ones. But in very many cases it is more than enough :)
Even expanding RAM to an 8-bit address would be an interesting series. (And it would be an entire series - the changes are fairly straightforward but extensive.)
Took me a week to catch up from the first episode. Superb stuff! Learned so much! Especially liked that the whole build from start to finish is recorded. I'd love to try it myself at some point. Some ideas; more memory and an easier way to enter code, perhaps a display using an led matrix, and some io. Pong game like the MegaComputer at the computer museum!
My compliments for your excellent Videos and clear explanation. I try to understand how a computer works. You are an awesome teacher. Kind regards from Germany, Dick
Thank you Ben, this series has been amazing. I know I'll be watching most of it again because I want to build one of these things now. I've ordered the book you recommended and I am starting to build up my supplies just for experimenting with various chips, we'll see how far I take this. For now, something like this is on the dream todo list, let's see what 2020 brings.
See ya in the debugging process, Clags hahaha. 9:17 Love the videos by the way, man, there's very few people that go over these things on youtube and it's easier to learn than in a book.
Excellent presentation. I have always loved digital electronics, but in the days I studied electronics they didn't have Arduinos or someone that explained digital electronics like you. Absolutely brilliant. I can see you really are quite passionate as well. Keep the great work..thanks
I can see an advantage to your four-nearly-identical-copies approach to the microcode: Make it easy to extend the ADD instruction to add-with-carry-in, allowing you to implement multiple-precision arithmetic.
EXCELLENT series on what really goes on inside that hunk of silicon and epoxy setting under that big heat sink.. :) Well done.. Takes me back to the days before the intel 4004 .
i had to add conditional jumps to a project i designed using logisim, and i used logic gates wired to the opcode. i have 8bit opcode, and all my conditional have the 4 higher bits set to 0, and the 4lowest compared to flags. it then activate the eeprom if condition is met, or else redirect to a "pass" eeprom. that way i didn'have to duplicate every instruction according to flags. Anyway, thanks a LOT for your videos, I feel like i learned a lot and i can't wait to start building my design when the kit i ordered gets delivered.
A few days ago I started this video series, I've watched through the lot, and gosh darn it just spent too much money ordering the majority of the chips for the first couple of boards. Some of them seem very hard to find these days! But I'm excited to get started.
Awesome videos, Ben. I have been binge-watching for 2 days straight :) question: Why some instructions that affect the ALU don't set the C & Z flags? That includes LDI, LDA, and maybe even STA. For example, "LDI 0" could set the Z flag. Is it just so that you can squeeze such non-arithmetic instructions in between the arithmetic instructions (which are setting the flags) and the conditional instructions? (so just more instruction order flexibility)
This was so epic. I hated this part of computer science classes, because it always seemed so abstract and impractical. But this made it so real, so tangible, and so incredibly interesting. I have never been much of a hardware person but this makes me want to try it out again
I stumbled across this series of videos partway through due to a YT recommendation. It is a very interesting project and series of videos. I will have to take some time and watch the series from the start. An optimization that could be done here is to modify the computer to set the Z flag when the LDA instruction is executed and not just on ADD and SUB. A lot of (most?) computer chips do this. To do that would only require setting the FI bit for step two of the LDA instruction. The program would then be: 0: LDA 14 1: JZ 8 2: SUB 12 3: STA 14 4: LDA 13 5: ADD 15 6: STA 13 7: JMP 0 8: LDA 13 9: OUT 10: HLT Another optimization to the program would be to change JZ 8 to JZ9 and add an extra instruction between 4 and 5 which would be JZ 10. The first JZ jumps to showing the result if X is 0. The second JZ jumps to the OUT line to show the result when Y is 0. That saves going through the loop multiple times when Y is 0 at the expense of one extra instruction per loop when X and Y are both non-zero values.
Setting the flags when the A register is loaded would be very bad for a lot of programs. There are a lot of cases where you want to do a calculation, then save the contents of the A register and load the A register with a new value before acting on the result of the calculation. This is why most CPU implementations I've seen will not update the flags on a simple load, but only on an actual arithmetic or logical operation.
@@melkiorwiseman5234 Take a look at the instruction sets for microprocessors. It is common to clear the overflow flag and set the N and Z flags as appropriate when loading an accumulator register. The other flags remain unchanged.
@@kevincozens6837 I would presume that is only done when the particular instruction set and CPU architecture together make it unfeasible for a programmer to do what I suggested.
@@melkiorwiseman5234 I would be interested to know which micros you've seen that don't modify any flags on load. I've done assembly programming for many micros over several decades. One typical use is load accumulator and branch if zero. Your suggesting you would have to do load, compare, then branch. For calculations, you would load an accumulator, then use some combination of add, subtract, add with carry, or subtract with carry using immediate values or some value from a memory location to do a calculation until you need to save an intermediate or final result.
@@kevincozens6837 Intel CPUs generally don't touch the flags on loading a register. It's done that way because quite often you'll want to test a value to find out whether or not you need to call a subroutine, then load a value for the subroutine to use just in case you need to call it, then do a conditional call to the subroutine.
Thank you for this serie of videos and all the work you have done and share. Now I can understand how a computer works and this from scratch ! So simple so clever so logical. Thank you for all your explanations and also for your english which helps me to understand you despite it's not my first language ! Best regards
Thank you Ben. This playlist was excellent - well presented and I've learn so much about the way computers work. I think I need to learn more about the programming language of the Arduino now, as those were the only bits that I got a little lost.
I'm loving this series. Found it about a week or two ago and it's filled my head with all kinds of ideas. Last year I built a Z80-based machine, maybe this year I'll build something based on this.
Three nice additional instructions you can add to this computer to make even more interesting programs is a Jump on Carry Clear (JCC), perhaps renaming JC to JCS (Jump on Carry Set). The other is an immediate add and subtract (ADI, SUI) which would e.g. make your program at the end 1 byte shorter. :)
Ben, I have thoroughly enjoyed this series of videos detailing how to build an 8-bit breadboard computer! Your style of teaching a very complex subject are very easily understood at least by me. Your have more than just simply sparked my interest in how microprocessors work. I'd like to continue learning more about how more complex CPUs work like my favorite CPU, the Motorola 6809. I understand that when Motorola designed the 6809, the engineers originally built the 6809 out of discreet TTL chips. This has captivated my imagination so much so that I have ordered a copy of the 3rd edition of "Digital Computer Electronics" on the way even as I am writing this. I became interested in the Motorola 6800 microprocessor way back in college in 1979 - 1981. Later on when I found out about the 6809, my interest was peaked again. Now because of these videos you created with great attention to detail, I completely understand everything you have taught me. Are you planning on continuing this series by building on this 8-bit computer? Would you take this cpu explanation series further by explaining ever more complex CPU architectures?
Same rush of enthusiasm over here when I noticed that Ben has uploaded a new video! But.... ...your comment immediately made me think of "turn volume DOWN to 10% and close room door"... ;)
Ben, you have handed us the Gold Mine. This is the a great collection of video to have. I can teach my son how the computer works with micro details using these videos.
This is the most priceless video of all when it comes to basic fundamentals, now days people are busy with fame and ignorance were they have no idea how even stuff works.
Just came across your videos and might have binged a little today. I'm a Software Engineer by trade, but I'm pretty far removed from hardware, generally speaking; I code mostly in Golang, and mostly serverless as of late (Lambda and the like). Seeing that computer counting and understanding exactly how all of it works was immensely satisfying. Cheers!
I find it quite amazing that the program that you used to test out the jump condition and prove the computer is Turing complete is basically a one dimensional version of the program that opened the doors to graphical interactions with computers, you basically created 1D PONG. That also brings me to my suggestion to you, which is to add active input to the computer. You still have space for one more eeprom and you can use that very same bouncing program and modify it so that it either halts or turns on a light if it reaches 255 or 0 if a button is not pressed.
If we lived in a Soviet Union, you would worthy the "title Hero of the Soviet Union" for your excellent educational work in digital electronics field. Really, thank you, you've all my respect.
There is a good puzzle game called Turing Complete. Had absolutely no idea about processors and how it works, also no idea about the connection between bits and bytes. You start with logic gates, then build more complex components like counters, memory and decoders from them, finally you build the architecture with registers, Alu, condition, immediate values and then you can create your own assembler language to solve software puzzles. Even if the questions in the game are sometimes funny and you don't get it straight away, if you're interested you can still do it. It is all the more astonishing that people created the basic principles 70/80 years ago. And it's even more amazing what cpu's can do today, I can't imagine. Hope google translator is halfway right.


![OhGeesy x Lefty Gunplay - What It Iz [Official Music Video]](http://i.ytimg.com/vi/L0yzW9t2ixk/mqdefault.jpg)


imagine being a kid watching this. I would have KILLED for such a video when I was younger. This whole series is amazing.
bruh im 12 lol and i watched the whole series and get it. I am kind of a nerd tho😂
I remember starting the series when I was like, 12. I've been redesigning it myself in Scrap mechanic since then lol
I needed this while Dad was teaching me c over like 8 years
my son just turned 8 years old, we started building this when he turned 7. He doesn't know yet how amazing the whole think is, He will, one day. We recorder everything and adding videos about the process on our channel. Just yesterday we finished everything, we are very proud of ourselves. it took us 1 years to finish it 👦😊
@@antonanton3136 Same
OMG! I am a programmer for 30 (or more) years. I understood the registers, the address bus, data bus, and a lot of things. But I haven't understood this microcode stuff, how the program is ACTUALLY executed. I can't beleive that after so many years now I understand it. Thank you very much. It is a fantastic work. You built it up from transistors. You have worked huge amount of hours. Thanks a lot again. It was amazing.
I remember going through all that in the computer architecture class that was required for my CS degree (which I think used the same book Ben mentions at the beginning of the series!). But Ben explains it a *lot* better, and seeing the pieces come together bit by bit really drives home how it works much better.
@@RedwoodRhiadra Same for me, twice (one for undergrad and basically the same course for grad) learning that useless knowledge that I have not applied a single time in my career that I knew when I was a freshman in HIGH SCHOOL by teaching myself (30 years ago before the internet even existed... yes, I had to go to that place called a library and borrow physical books).
People 70 years ago would consider this small computer a miracle.
People 70 years ago would consider a single TTL logic chip a miracle.
people 700 years ago would burn him for sorcery.....
@@NeverSnows even the one that's using the led lamp lol
people 7000 would
idk, what would they actually?
But people 50 years ago would be pretty comfortable with this.
This series is pure bliss. It's like watching a thriller unfold.
It's weird but I totally get you.
Ben, I think you have created, in 44 vids, a series of courses yielding an undergrad in computer architecture engineering, that one pays $150K+ at a top-notch college to obtain. Truly amazing work. I watched them all, learned a ton, and am inspired now to experiment on my own.
New 43 minute Ben Eater video? Sign me up!
Also, thank you Ben! I commented on a video of yours about a year ago about a science fair that I won thanks to your videos. I'm going to school for computer engineering now, and your videos are still just as relevant, interesting and entertaining, and also useful in my classes. Thanks!
Sweet! I remember that comment! It's awesome to hear you're doing well and continuing to learn.
Nice work, Nate. (I assume that is your nickname.)
@@BenEater i am an electrical engineering student. I am fully satisfied upto this video. Can you pls even simplify how assembly language and multilevel language works at very base level for who doesn't learn programming
@@kannanrkarthikr9541 even though I’m replying to an old comment, if you or anyone wants to learn the software layer on top of the hardware check out “nand to Tetris” (there’s an online course and/or a book and website) and the first half is similar to this project except it’s simulated, the second half of the course does software. It starts with logic gates and builds up from there.
@@drivers99 Imo the computer design for that course is a bit too full of weird choices. I think that it may not be the easiest to understand for a beginner.
Maybe looking for 6502 assembly tutorials would be better, it was used in some Commodore machines and is quite popular. There is also BASIC, a language fairly easy to understand that was used on 6502 based computers.
Something I'm noticing as I'm thinking about ways the computer could be made more efficient and looking at suggestions others have made: pretty near every change people have suggested - even putting the counter-enable on the same microinstruction as ram-out + instruction-register-in! - would make the computer harder to understand. Maybe only a little bit, like with the RO+II+CE thing, but harder to understand, because it is doing more things at once or doing things in more complicated ways.
As someone who didn't know a lot of electrical engineering before watching your videos: thank you for being so careful to build this to be immediately comprehensible. It's appreciated.
I like that he doesn't do those things, because it essentially gives us homework XD
@@barmetler and the fact someone might think those things while watching is testament to their teaching power!
If you still think the reset microcode sequence counter is a nice optimization, you can do that by simply resetting the microcode step counter whenever all bits of the microcode are 0.
Also there's the concept of wide vs narrow microcode. Your processor uses wide microcode in that each control line is controlled via a single microcode bit. This is a very simple method of managing microcode, but as evidenced by you not using the reset optimization (because you were planning on using that unused bit to manage the flag register) because of limited number of bits available. With narrow microcode, what you do is group control lines that are never going to be active at the same time, and use a demultiplexer driven by the microcode to control those lines. A good example of some control lines that are never active at the same time would be the signals you enable to drive the bus. For your processor you have RO, IO, AO, EO, and CO for those lines. So you could instead use 3 bits of microcode to drive a 3-to-8 demultiplexer and in the process, free up 2 bits for other purposes, such as a microcode step reset to allow simple opcodes to run in fewer clock cycles. And in the process you'll still have the possibility of adding up to 2 more registers to drive the bus (with a 3-to-8 demultiplexer, you have 8 outputs, but you have to allow for the situation where you don't want to drive any of them active, so you have to limit yourself to 7, or you use an extra bit to enable any output at all).
If you want to get a bit more compact, then you can also group control lines MI, RI, II, AI, BI, OI, and J together as well (technically, you could drive 2 of them together without causing damage, but practically, you only drive 1 of those lines at a time. So grouping them makes sense). By grouping those 7 lines together and selecting one of them using 3 bits of microcode, saves you 4 more bits. So by creating those 2 groups, you now require a microcode width of 10 bits instead of the 16 bits you use, therefore freeing up 6 bits for other purposes.
Now 10 is a lot smaller than the original 16, but let's see if there's any more lines (I'm looking at the potential 2 unused outputs from the 1st group and the possibility of reducing the microcode width to 8 bits so you only need 1 EEPROM). Are there any ungrouped control lines that will never be driven at the same time as any of the other 5 control lines that drive the bus? And HLT jumps out at me. If the HLT line is active, then you're not driving anything else, so you can add HLT to the "RO, IO, AO, EO, CO" group, thereby saving another bit and reducing your microcode width to 9 bits. We're still left with the SU, CE, and FI control lines. Can we add one of them to the first group? As it turns out, you can actually eliminate the FI control line. Looking closely at the defined opcodes, the FI line is active every time the EO line is active, so those lines are effectively the same. Now does merging EO and FI together potentially harm us? And I say no. For instance, assume you desire to create a CMP command that does a subtraction, and then throws away the result except for the flag register, it's perfectly acceptable to place the ALU's value onto the data bus and simply not have anything else read that value. So you could create a CMP command and not have a problem with the FI line being identical to the EO line. So we can get rid of FI and have the microcode only 8 bits wide. So your microcode becomes 8 bits wide and the microcode would have 4 fields. They are:
Field 1 - 1 bit wide - SU control line
Field 2 - 1 bit wide - CE control line
Field 3 - 3 bits wide - Select one of HLT, RO, IO, AO, EO, and CO control lines.
Field 4 - 3 bits wide - Select one of MI, RI, II, AI, BI, OI, and J control lines.
And if you're really sneaky, you might be able to move the CE line into the "HLT, RO, IO, AO, EO, CO" group by wiring it such that every time the CE line is active, driving the RO line active as well, reducing the microcode width to 7 bits.
So in conclusion, you eliminate one EEPROM at the cost of adding 2 3-to-8 demultiplexers. And unsurprisingly, if you code things such that a 0 value for the 2 selection groups means "no signal selected", then an all 0 value for the microcode could still be used as a reset value for the microstep counter. And if you do use an all zero value to reset your microstep counter, you can at the same time eliminate your ring counter since it becomes superfluous.
John Cochran wahhhhhhhhh dude!
Initial reading makes sense, I think would love to see that in practice though
One more breadboard can't hurt
Having reduced the microcode width to 7 bits you could use the 8th bit as the reset flag for the microstep counter. It would keep the circuitry a little simpler as it avoids needing to add another pair of chips to detect a microcode value of all zeros.
Beautiful optimization that actually simplifies and removes expensive hardware and programming steps. I hate the voice you use while writing, but love your points.
Please don't tell me this is the last video from the best series on RUclips by the best guy who's ever touched a breadboard :( Ok I wasted too much time typing this comment .. time for watching some conditional jumps !
OMG..
I can't believe this
I've just completed watching your playlist...
I've started just 2 days before
I felt so bad when you said that you're near to end this series
Your videos are ULTIMATE.....
I'm going to prepare this 8-bit computer within few days....
:D :D
Ajay Dyavathi that playlist is 12h long...
nobody5050 it's called "not everyone has even 8 hours a day of free time"
@@maybeja Hey! hey! we do now!
AnimaRookie hah, that’s pretty good
I agree - Best didactic series I have ever watched!
This series is to be seen and taught in schools. This is the hands-on type of stuff we all miss in many skills like mecanics or gardening. We don't know how to do stuff anymore and when I see videos from you or from guys like Primitive Technology, I see the same content, pure skill from self-teaching and curiosity. Building stuff from the ground up to understand its inner stucture, it's perfect !
Ben, what you should do is write a book. After searching and searching for books to describe this topic, I haven't found one that explains all of this from transistors all the way up to assembly code as good as you do. You already have the schematics and your drawings on paper to use, and then you could just reference your videos.
As Ben has recommended, please take a look at Digital Computer Electronics by Paul Malvino: it's an old but very nice book starting from transistors to assembly code, even describing 6502, 8080, 6809etc.
@@carlosnavarro3725 I'll give a shoutout to "Code" by Charles Petzold.
It's less... "hard" and maybe a bit less detailed (especially on the transistor side of things; it describes logic gates as if they were made from relays, for example, because of how it built up to that point), but that informality can be nice depending on what you're looking for. I don't know where Malvino's book starts, but Code starts assuming very little knowledge -- like Ben in this series approaches things as if you already know binary and hex encoding, you've probably seen truth tables, etc.; Code covers all of that as well, really starting with a couple examples of just encoding data in another form before it even gets into real logic.
The way I'd frame it in terms of university courses is that I'd guess Malvino's book would probably fit into like a probably-sophomore level computer organization class; "Code" would be more like a freshman seminar. But it'd be a *really good* freshman seminar, and pretty detailed for that label. :-) So maybe decide which of those sounds more like what you want.
Yeah, he really needs to codify this series, it's too good to just remain on RUclips. He's got a gift for explaining and demonstrating concepts.
"And now I've got to fix up all the spacing. I'm sure it's not gonna work right if everything doesn't line up perfectly."
This isn't python, Ben.
@@skyc3560 it's called perfectionism. sometime it hurts if you don't see everything lined up correctly
@@marcobonera838 I so very much 100% agree ×infinite
A pretty airplane flies better 😉
Hey Ben please keep this series going! Don't let this be the last video.
Ben! This entire series has been absolutely wonderful to watch. Thank you.
In undergrad, I took digital logic and a few classes about this level of computer engineering where hardware and software meet (or are actually somewhat equivalent). I put it all into practice with some basic logic chips, FPGA boards, and the like. At this level, I knew how a computer could and would be built. However, seeing you build this fully functional Turing machine from scratch, all portrayed in a clear and fun manner, was fascinating! I haven't ever enjoyed a series on RUclips videos as much as this.
So again, thank you.
This is the first time that I watched a complete serie of RUclips videos about a specific topic. It also brought back some memories when I started with Electronics in my teenage years, playing with the 7400 series (LS did not exist at that time). Thanks Ben for the great work!
After watching all 44 videos of pure knowledge I just wanna say "Thank you ! Ben" 💐
A new Ben Eater CPU video! Woo :D I'm really finding these fascinating, thanks!
Ben your work here is absolutely amazing, i really can't thank you enough! I'm a student in electrical engineering and built the pc myself because i just couldn't understand why the hell a 001100 would add or subtract some numbers... After watching the whole series and a lot of troubleshooting i finally get it. And with that knowledge i am soo far ahead of my friends at the university, so that should give you an idea of how good your videos are. And not only do you give instructions on how to build this thing, but you also teach why it's working and the backgrounds behind it. So again, thank you very much, inspiring people like you are the reason why i am gratefull for the Internet!!
This has been the best project and tutorial that I've ever watched on youtube so far!
- 10 / 10 (IGN)
I've already learned all of this before in separate chunks while studying at my Uni, though, but this project is excellent for reviewing and combining all that knowledge into a nice, compact and memorable package!
Thank you so much for making this!
P.S. My inner programmer can finally have a rest after seeing you complete a conditional loop program that doesn't end up in an "infinite loop" :)
A left and right shift instruction would be handy for faster multiplies and divides which are powers of 2. So to multiply by 4, you left shift 3 times. To divide by 2, you right shift once. We used to do this in C back in the DOS days, use the left > instructions for faster multiplies and divides, this was before modern compilers figured this all out for you. As you know you can speed things up a great deal by using a single left shift (LSR) or right shift (RSR) instruction if all you needed was to divide by 2... you could have C = C >> 1; (or C>>=1) and that would compile to a single right shift and avoid more complex divide code.
Great videos anyhow. I love how you combined my first love of electronics when I was young, in the '70s, with my later love of computer programming.
Hey Ben.
I started viewing your "8-bit computer build on breadboard" video-set just a few days ago to get me over some of the lockdown boredom of Covid-19 and initially I was a bit disappointed. This was because the term "8-bit computer" always meant to me that the data into and out-of the computer was defined as being an 8-bit quantity, whereas your breadboard computer handles only a 4-bit data quantities.
However, while watching the the series I realised that the whole build was a teaching process of computer design and production and this taught me much more about digital computers that I ever knew. Even though I was a professional computer programmer for systems production who used assembler languages in the late 80's and early 90'2. However, I was soon out of that job, and working on computer systems maintenance. Sort of away from the intense concentration of software and back into the stress of keeping services running and fixing issues under extremely short time constraints.
What I would like to say is, your explanation of the components and the operation of the breadboard computer was very thought provoking. My understanding of what goes on under the bonnet of the plastic chip CPU has been expanded dramatically - thank you for that. I also realise that to produce an 8-bit data bus within computer would require a great deal more hardware to connect together and the increased power consumption would require to be bigger too, unless you were to use CMOS digital gates and flip-flops of course.
Prior to watching your series, I discovered that another small group of people had build an emulation of the 6502 microprocessor using only transistors, and yet another chap built a monster 6502 in 6 or 7 6 foot by 3 foot racks, also using transistors in Cambridge in England. I believe that took him just over 2 years to complete, and he had it play a game of tetras to demonstrate what actually goes on in the computer. Both of these devices exhibited lots of L.E.D.s to indicate the activity, but neither of them provided the detail of the electronics that actually describes the intricate operation of the central processing unit.
All I can say is thanks for sharing your knowledge of the computer. I have viewed with interest the whole process of your build with interest.
My best wishes,
Harry
Usually when I can't follow the series along I don't watch it, however this project is a UNIQUE EXCEPTION!
Around a week ago I just wanted to learn about how clock syncs the CPU with other parts of a computer...
After watching this whole series apart from the above I've learnt:
1. How to make a CPU clock
2. How to store 1-bit of data (and expand it to 8 bits)
3. WHAT is the BUS, WHY do we need it and HOW it works
4. How to isolate data from the BUS and Load/Enable it using control signals
5. How ALU works
6. We don't need a keyboard to set a value to RAM, long live DIP switches!
7. The matter of interpreting machine language instructions is simply the automated way to control the I/O signals for various parts of the computer
12+ hrs of videos of this series has saved me 5 years of life I needed to spend otherwise to learn at college,
so now I can kick start with my own electronics project without a need to born as another man
living another life with a completely different fate but just keep being myself and do new cool things.
And one last but not least thing - as programmer I thought that I will never ever touch a real breadboard.
Well, this series made me change my mind and I'm gonna buy a couple soon.
ALL THANKS TO BEN!
Thanks you Ben from the bottom of my heart!
P.S. This series is like when you have some tech questions and can barely even ask them because of the lack of knowledge but still getting the answers that not only meet the initial requests but provides you with solid conceptual bases serving as a fantastic background for the further studying. It's made much better than I could've ever imagined possible.
You are so complete in your training, master. I am so intrigued by the way that you’re actually going from the smaller modules, then including EEPROMS, and actually designating assembly instructions to what is really just a few bytes in registers. Actually building the memory locations and designating those memory locations their corresponding addresses, all that from gates. This is a golden eureka moment for me because I’m able to finally wrap my brain around some concepts that were incomprehensible before today. I can understand why they call it ‘assembly’ language now... thank you for helping me with this stuff this is great, please know that you’ve shared something that I value to the utmost.
I've finally implemented your 8-bit CPU in Logisim, and the counting up and down with the conditional jumps works! I tried that program that one of your viewers suggested that you didn't need conditional jumps to execute multiplication and yes it does work. Nifty little program due to the limitations of the machine, however, there is one caveat. Once you run the program to its end and you get your result, you would have to enter the value for "X" into memory location 7 as it will have the previous value stored in it. Pretty cool, but on to conditional jumping on a Turing Complete machine!
Ben, thank you so much for your videos. I am an engineering student at Purdue University. I recently got sent home from a semester-long study abroad due to the virus. I got home, and I was pretty bummed about the whole situation, but I did not want to sit around and do nothing with all the free time I had during the quarantine. I started watching your videos for about and hour a day and finished the whole series in two weeks. So many times I was amazed by the individual parts of the computer, how the computer works as a whole, and the little tricks you would do to get the computer functional and optimize its performance. Thank you again for making these videos, as I learned so much and enjoyed watching. I'm looking forward to building the computer and watching more of your videos in the coming weeks!
Total Time of the whole series by now: 12h 19m 12s
Totally worth every millisecond
Woah!
Did not even notice that
More like worth every microsecond
Still too short ._.
Yoctosecond...
Thank you for this wonderful series Ben. I've really enjoyed following it and have built it on breadboards and documented the whole thing in CAD for inspiration.
A feature I added was in the RAM, using the 74LS157 and 74HC195 ICs, I implemented an Arduino to set the addresses and bits rather than manually using the switches.
Unfortunately I have had some issues but have not been able to look into it just yet as I need an oscilloscope.
GREAT SERIES, It helped me a lot.
My computer that is not complete should in theory have 16 bit architecture, 65536(64k) words sram, 64k words program space, 64k words program sram, shifting, simple bit wise, and a comparator (== only...). somewhat based off your computer but changed quite a lot in everything else. still working out theory :(
As many other people here have done, I want to thank you so much for making this video series!
I understand a lot about software but this series has allowed me to make the connection all the way down to the individual transistor. I feel like I understand how computers work on a very fundamental level now and I'm not sure I would have ever made it to this point if it weren't for your videos!
Thank you, Ben!
this series is everything I wish my university courses focused on, I know a lot of how each of these smaller parts operates but I have rarely seen it applied. Can't wait to start designing my own computer, thank you so much for this series.
If anyone wants to have a go at writing these sorts of programs themselves, the game Human Resource Machine is a puzzle game based around this idea. It gives you a series of simple instructions, like the ones for this computer (add, jump, output, etc.) and tasks you with solving various problems with them. It starts off with simple ones like multiplying, and works its way up to more complicated ones like sorting algorithms or breaking a number down into its prime factors.
If you're already good at writing this sort of code, the levels also have optional challenges to complete them in under a certain number of steps or symbols, which can be quite difficult.
That game is genious! I highly recommend it to anyone interested in this kind of thing.
I also really recommend tis 100 as it actually has a similar instruction set to bens pc there is also Shenzhen io
Here's an idea for a program that will display all of the 8-bit prime numbers, which should be a little more sophisticated than the Fibonacci program. Here's the pseudo-code:
0: ldi 2 # initialize test divisor
1: sta divisor
2: lda curNum # determine if division remainder is 0
3: sub divisor
4: jz 11 // divides evenly, so not prime
5: jc 3 // not done
6: ldi 1 # increment test divisor
7: add divisor
8: cmp curNum // divisor goes from 2 to (curNum - 1)
9: jlt 1
10: outm curNum # update display
11: ldi 1 # increment current number
12: addm curNum
13: jmp 0
14: = divisor
15: = curNum # doesn't really need to be initialized
To fit everything into the extremely limited memory, some new general-purpose instructions are needed, which can easily be added to the gaps in the microcode ROM. I think "ldi" (load immediate) already exists or at least existed in an earlier encarnation of this computer. "cmp" (compare) was discussed in a previous episode and is a subtraction that discards the result. "jlt" (jump if less than) jumps if the Carry flag is false. "outm" (out memory) is like "out" except it takes the display value from memory instead of the accumulator. "addm" is like "add" except the result is written to memory instead of the accumulator.
The crux of the method is to divide the current number by the current test divisor using repeated subtraction to determine the remainder. We don't even need to know the remainder, just whether it's zero or not. The "jz" is triggered if the remainder is 0, meaning the current number isn't prime. The "jc" is triggered if the result is positive, meaning that more subtractions are needed, and otherwise, the remainder is determined to be not zero, meaning that the test divisor does not prove the number to be non-prime.
The "curNum" doesn't really need to be initialized, since the program will just run from the value that's present and start over on wrap-around. It will go through values 0 and 1 which the divisor loop isn't really set up to handle, but those values don't cause problems. Mind you, I don't have the hardware to actually test this program. This O(n²) algorithm will slow down substantially between the higher primes; you might want to crank up the clock rate! In principle, the divisor test loop only needs to run up to the square root of the current number, but there's no plausible way to implement "compare to square root" in the microcode.
I should probably play this before building the CPU (that's really what this is). I program for a living but not at this low level.
for anyone who reads this and like that game i suggest you to take a look at "Baba is you", another game which play arround with basics of logic, pretty good and kinda hard puzzle game
Any computer science teacher worth their salt should include this series of videos in the curriculum. So clear and concise, and fascinating too.
Now a challenge would be to create a 6502 compatible set of instructions.....
Just one request ... Plz don't stop . keep pushing it Ben ... I've been doing my own processor.. You're one is a lot better.. Great great great job .. Just keep making it better and better .. Like making dual core or something or whatever...but keep making it upgraded ... Best wishes Ben
Finally got around to watching this video series, the one on 2s compliment was especially good, it helped me re-remember and re-understand stuff I have lost years ago.
Built a similar machine as a class many years ago and it was really, really enjoyable going through and seeing what I remembered and what I forgot.
Thank you for making this series.
Wow! I've just binge-watched the whole of building 8-bit breadboard computer over the last week and I'm blown away! Immeasurably better than when I did sys arch at college a long time ago.
I'd love this series to be a kick-off point to consider other common inclusions that aren't necessarily sensible for a computer with 16 bytes of memory and 16 op-codes, and different possible architectures.
My particular interest is in Forth and Stack Machines in general, so my specific request would be implementing a return stack in hardware to allow JSR and perhaps discussion of making the A Register into a stack too, as an efficient means of passing values to and from subroutines.
I've been working on this project evenings since January and just today finally got it working perfectly! So much troubleshooting even with the official kit, but I quickly came to learn that's part of the learning! Between all the troubleshooting and testing and searches in /r/beneater I've come to understand so much more about electronic logic than just the fundamentals. I wouldn't change a thing. Thank you so much for doing these...I'm moving on to the 8502 computer next and can't wait!!
I really liked your 8bit computer tutorials, it's really inspiring and helpful for the student as well as many professors. I am able to learn many more things apart from your topics.
A great thanks to you,
it will be great if keep posting such inspiring and knowledgeable videos.
Thank you for the series. Your DIY video card video was recommended to me by YT (good recommendation for once!!). Now I have watched all of these. THANK YOU.
Same here, thanks RUclips I guess
hey, been watching your videos for a while. i think i finished a Turing complete computer built in no man sky. following many examples you have shared. it just blows my mind how that no many times i watch this video i always learn something new. i just set my conditional jump to the overflow flag and didn't even realize the power of subtraction and negative binary numbers. still so much to learn and test out.
I like the tags font on breadboard which is so clearly to make learner easy to read.
I’ve learned more about computers than ever before and I feel so fortunate I’m as relatively young as I am (20) and able to watch this series. Absolutely incredible to know how this all really works. Hoping to be able to save up enough to afford this kit and put it together myself!
"I think it's pretty cool that a few of you proved me wrong so thanks for teaching me something!" - Ben Eater
Teaching millions of people such fundamental information about the technology that's become embedded in almost every aspect of life, helping to close a huge knowledge gap on a global scale, and thanking others for teaching him - this is pure inspiration!
Excellent work! I love your series. As a youngster i developed an ALU on a program called LogiSim on the MAC. learned a lot, but i failed to develop a Control Logic to process Nmemonics. Your work filled that in. Thank you.
I LEARNT SO MANY THINGS FROM THIS VIDEO SERIES.......THANK YOU SO MUCH......THIS IS THE BEST CHANNEL EVER ON RUclips.........THANKS A LOT......KEEP UP THE GOOD WORK....
Ben, this series of videos has been great. At the end of the final one you asked for suggestions. I wondered about your ALU. At first I couldn't understand why you limited it to add and subtract and didn't include multiply and divide. I see now why multiply wasn't added - you can do it totally in hardware with shifts and adds, so there's nothing educational there. Having researched divide however, I think there is a lot to be shown from that. If you select the shift and subtract algorithm you could introduce the shift registers and comparison chips which you haven't used so far and explore whether to extend the microcode to be variable length to drive the hardware directly, or figure out a way to interface to the divide unit to hand control over to do the division and then return control when its done. I built a divider on a logic simulator and it turned out to be a lot more complex to implement in hardware than the simple algorithm suggested!
Funny that ;-)
This whole series is just nuts! I loved programming in Python, and was thinking about going to Uni to learn more, but this series got me covered on that front :D I can now live for my biggest love, maths! Thanks Ben!
Ohh, and I never ever had the feeling to program in assembly, but watching this video series I realized, doing everything in hardware level is not for me, but assembly can actually be fun. (I never took the time to understand how it works, and wasn't intuitive at all. But now!)
P.S.: Matthew's solution is really elegant. I mean that is some programming magic right there. Some solutions even in math are said to be in "The Book". This is that kind of solution. Hats off!
44 videos into this playlist and it's the first time he asks for a subscription. This man is a RUclips King
Love your video. Reminds me of how I read Allan Turing hated adding unnecessary hardware, so he just programmed in everything he needed.
I think 27:08 is showing an excellent way of doing it. The thought crossed my mind of copying the whole JMP instruction into that row of JC and JZ for those cases where C and/or Z are set. Then if you modify JMP, conditional jump just works, without explicitly updating conditional jumps too. One might take the same concept and extend it to conditional move, copying the MOV row in those cases. You could do the inverse for the reverse case, for CMOVNC (not carry) you copy the NOP row to the CMOV row in the cases where C is set, letting it be MOV when not carry. You could extend it so there is another array for the replacement rules I mentioned. Your table driven design is the basis for a good maintainable system. Amazing video.
Well, it took 6 months but I finally completed this project. I learned more doing this project than I have on any other electronics project. Thanks for taking the time to produce these videos and put together the kit!
My most favourite thing on the internet for the last year or so.
Great videos. Happy to see the conditional branch instructions and working fine! If one considers adding new instructions I think immediate mode for LDA, ADD and SUB would be useful to free up some memory for longer programs. :)
Fantastic series! Very addictive and informative. Read about computer architecture in a few books and went through half the nand2tetris course, but this is so much more accessible. Thanks and keep up the good work!
Why did you stop the nand2tetris course?
Just wanted to say, finished binge-watching this and the network playlists. It's amazing!! I have some coding experience but I am very new to physical computing (always has been a bit of a mystery to me) - I feel like after watching this, it all makes so much sense now! You really explain this so clearly with such a relevant examples. I would love to try to build one now myself too now! Thank you so much!
Thank you for this series, I've learned a ton building out this 8-bit breadboard computer!
I've watched all the videos in this series in just 2 days. Ive always wanted to know how computers work on a bit level. So all I can say is thank you Ben!!
Dear Ben, just finished the series and it was life changing. Thank you so much for the ride! It was fascinating! All the best and greetings from Brazil!
Hello Ben Eater, i am really thankful to you for taking the time to create this practical and intriguing series. I am happy to say that i was excited watching them. I completed the series today along side the programmable computer setup. I have been staring at it the whole day with great excitement. Now i have the basic foundation to develop RTOS applications for Microcontrollers. Thank you once again and thumbs up to you
I like your way of handling the microcode given it's an educational video. Optimizing it would end up in a convoluted mess with a bunch of shortcuts.
Thank you Ben for this great series.
I wish I could see this 30 years ago when I was 10. :)
Ben, you are such a good teacher. I love watching every episode you make.
Now implement a Stack and expand the RAM to 16bit adresses
That would be funny to show 'good ol' self-modifying code for procedures: we don't have a stack. Instead, before jumping to procedure, we use STA to put return address exactly to last JMP instruction in that procedure we're calling. So when it is done, it jumps to the right place, 'returns'.
It allows nested procedure calls, but not recursive ones. But in very many cases it is more than enough :)
Even expanding RAM to an 8-bit address would be an interesting series. (And it would be an entire series - the changes are fairly straightforward but extensive.)
I which you were my teacher back in the days. Thanks.
you are a master teacher, and have rekindled my love of electronics and computers. Thank you, sir
Took me a week to catch up from the first episode. Superb stuff! Learned so much!
Especially liked that the whole build from start to finish is recorded. I'd love to try it myself at some point.
Some ideas; more memory and an easier way to enter code, perhaps a display using an led matrix, and some io. Pong game like the MegaComputer at the computer museum!
My compliments for your excellent Videos and clear explanation. I try to understand how a computer works. You are an awesome teacher. Kind regards from Germany, Dick
Thank you Ben, this series has been amazing. I know I'll be watching most of it again because I want to build one of these things now. I've ordered the book you recommended and I am starting to build up my supplies just for experimenting with various chips, we'll see how far I take this. For now, something like this is on the dream todo list, let's see what 2020 brings.
See ya in the debugging process, Clags hahaha. 9:17
Love the videos by the way, man, there's very few people that go over these things on youtube and it's easier to learn than in a book.
Excellent presentation. I have always loved digital electronics, but in the days I studied electronics they didn't have Arduinos or someone that explained digital electronics like you. Absolutely brilliant. I can see you really are quite passionate as well. Keep the great work..thanks
I can see an advantage to your four-nearly-identical-copies approach to the microcode: Make it easy to extend the ADD instruction to add-with-carry-in, allowing you to implement multiple-precision arithmetic.
EXCELLENT series on what really goes on inside that hunk of silicon and epoxy setting under that big heat sink.. :) Well done.. Takes me back to the days before the intel 4004 .
Finished watching the whole play list. All I can say is thank you! Amazing job and explained in the detail that even I get it.
i had to add conditional jumps to a project i designed using logisim, and i used logic gates wired to the opcode.
i have 8bit opcode, and all my conditional have the 4 higher bits set to 0, and the 4lowest compared to flags.
it then activate the eeprom if condition is met, or else redirect to a "pass" eeprom.
that way i didn'have to duplicate every instruction according to flags.
Anyway, thanks a LOT for your videos, I feel like i learned a lot and i can't wait to start building my design when the kit i ordered gets delivered.
A few days ago I started this video series, I've watched through the lot, and gosh darn it just spent too much money ordering the majority of the chips for the first couple of boards. Some of them seem very hard to find these days! But I'm excited to get started.
Be sure to join us on Reddit /BenEater when you need help :)
@@Shyssiryxius I certainly will. I'm sure it will happened sooner rather than later. Now I just need to wait six weeks while it all arrives.
It is going to take some time for me to absorb it all but this is fantastic Ben
Awesome videos, Ben. I have been binge-watching for 2 days straight :)
question: Why some instructions that affect the ALU don't set the C & Z flags? That includes LDI, LDA, and maybe even STA. For example, "LDI 0" could set the Z flag.
Is it just so that you can squeeze such non-arithmetic instructions in between the arithmetic instructions (which are setting the flags) and the conditional instructions? (so just more instruction order flexibility)
This was so epic. I hated this part of computer science classes, because it always seemed so abstract and impractical. But this made it so real, so tangible, and so incredibly interesting. I have never been much of a hardware person but this makes me want to try it out again
I stumbled across this series of videos partway through due to a YT recommendation. It is a very interesting project and series of videos. I will have to take some time and watch the series from the start. An optimization that could be done here is to modify the computer to set the Z flag when the LDA instruction is executed and not just on ADD and SUB. A lot of (most?) computer chips do this. To do that would only require setting the FI bit for step two of the LDA instruction. The program would then be:
0: LDA 14
1: JZ 8
2: SUB 12
3: STA 14
4: LDA 13
5: ADD 15
6: STA 13
7: JMP 0
8: LDA 13
9: OUT
10: HLT
Another optimization to the program would be to change JZ 8 to JZ9 and add an extra instruction between 4 and 5 which would be JZ 10. The first JZ jumps to showing the result if X is 0. The second JZ jumps to the OUT line to show the result when Y is 0. That saves going through the loop multiple times when Y is 0 at the expense of one extra instruction per loop when X and Y are both non-zero values.
Setting the flags when the A register is loaded would be very bad for a lot of programs. There are a lot of cases where you want to do a calculation, then save the contents of the A register and load the A register with a new value before acting on the result of the calculation. This is why most CPU implementations I've seen will not update the flags on a simple load, but only on an actual arithmetic or logical operation.
@@melkiorwiseman5234 Take a look at the instruction sets for microprocessors. It is common to clear the overflow flag and set the N and Z flags as appropriate when loading an accumulator register. The other flags remain unchanged.
@@kevincozens6837 I would presume that is only done when the particular instruction set and CPU architecture together make it unfeasible for a programmer to do what I suggested.
@@melkiorwiseman5234 I would be interested to know which micros you've seen that don't modify any flags on load. I've done assembly programming for many micros over several decades. One typical use is load accumulator and branch if zero. Your suggesting you would have to do load, compare, then branch. For calculations, you would load an accumulator, then use some combination of add, subtract, add with carry, or subtract with carry using immediate values or some value from a memory location to do a calculation until you need to save an intermediate or final result.
@@kevincozens6837 Intel CPUs generally don't touch the flags on loading a register.
It's done that way because quite often you'll want to test a value to find out whether or not you need to call a subroutine, then load a value for the subroutine to use just in case you need to call it, then do a conditional call to the subroutine.
He motivated me to start studying system programming basics and look at computer science with renewed interest.
Thank you for this serie of videos and all the work you have done and share. Now I can understand how a computer works and this from scratch ! So simple so clever so logical. Thank you for all your explanations and also for your english which helps me to understand you despite it's not my first language !
Best regards
Thank you Ben. This playlist was excellent - well presented and I've learn so much about the way computers work. I think I need to learn more about the programming language of the Arduino now, as those were the only bits that I got a little lost.
Ben eater's notification make my week..... It shoots my adrenaline, thank you so much SIR!!!
I'm loving this series. Found it about a week or two ago and it's filled my head with all kinds of ideas. Last year I built a Z80-based machine, maybe this year I'll build something based on this.
Three nice additional instructions you can add to this computer to make even more interesting programs is a Jump on Carry Clear (JCC), perhaps renaming JC to JCS (Jump on Carry Set). The other is an immediate add and subtract (ADI, SUI) which would e.g. make your program at the end 1 byte shorter. :)
Ben, I have thoroughly enjoyed this series of videos detailing how to build an 8-bit breadboard computer! Your style of teaching a very complex subject are very easily understood at least by me. Your have more than just simply sparked my interest in how microprocessors work. I'd like to continue learning more about how more complex CPUs work like my favorite CPU, the Motorola 6809. I understand that when Motorola designed the 6809, the engineers originally built the 6809 out of discreet TTL chips. This has captivated my imagination so much so that I have ordered a copy of the 3rd edition of "Digital Computer Electronics" on the way even as I am writing this.
I became interested in the Motorola 6800 microprocessor way back in college in 1979 - 1981. Later on when I found out about the 6809, my interest was peaked again. Now because of these videos you created with great attention to detail, I completely understand everything you have taught me.
Are you planning on continuing this series by building on this 8-bit computer?
Would you take this cpu explanation series further by explaining ever more complex CPU architectures?
Wait'll you see the 68000 :-)
When I saw your video i set the volume to 100 and closed my room door.
And by mistake from the excitement i threw my mouse to the floor.
Same rush of enthusiasm over here when I noticed that Ben has uploaded a new video!
But....
...your comment immediately made me think of "turn volume DOWN to 10% and close room door"... ;)
Agreed I will do anything to watch his videos
rumour has it that it's now 1 year later and you still haven't taken a shower because you're still in your room watching the video's hehe
@@martinkuliza yes
❤thank you for the series Ben!!!
I would love to see you port this to an FPGA and teach us all about those.
This self made computer is getting better and better, so interesting
Ben, you have handed us the Gold Mine. This is the a great collection of video to have. I can teach my son how the computer works with micro details using these videos.
This is the most priceless video of all when it comes to basic fundamentals, now days people are busy with fame and ignorance were they have no idea how even stuff works.
Just came across your videos and might have binged a little today. I'm a Software Engineer by trade, but I'm pretty far removed from hardware, generally speaking; I code mostly in Golang, and mostly serverless as of late (Lambda and the like). Seeing that computer counting and understanding exactly how all of it works was immensely satisfying. Cheers!
This is the best. I just finished the series last night!
You were very clever on the way used the array for the microcode table
Your video series was so well done. I found it very interesting and I cannot wait for what you have to show next.
I find it quite amazing that the program that you used to test out the jump condition and prove the computer is Turing complete is basically a one dimensional version of the program that opened the doors to graphical interactions with computers, you basically created 1D PONG. That also brings me to my suggestion to you, which is to add active input to the computer. You still have space for one more eeprom and you can use that very same bouncing program and modify it so that it either halts or turns on a light if it reaches 255 or 0 if a button is not pressed.
Congratulations! This are the best series of videos i had ever seen.
If we lived in a Soviet Union, you would worthy the "title Hero of the Soviet Union" for your excellent educational work in digital electronics field. Really, thank you, you've all my respect.
Thanks for all the series. It was very interesting to watch and explore all of that.
There is a good puzzle game called Turing Complete. Had absolutely no idea about processors and how it works, also no idea about the connection between bits and bytes. You start with logic gates, then build more complex components like counters, memory and decoders from them, finally you build the architecture with registers, Alu, condition, immediate values and then you can create your own assembler language to solve software puzzles. Even if the questions in the game are sometimes funny and you don't get it straight away, if you're interested you can still do it. It is all the more astonishing that people created the basic principles 70/80 years ago. And it's even more amazing what cpu's can do today, I can't imagine.
Hope google translator is halfway right.