@@BELSERVICEMAN I've also used it to determine water depth in a bucket for an irrigation system. I placed a small hole in the top of the bucket and pointed it down.
@@Dorff_Meister oh no! I have to stop watching RUclips! It is costing me $$! I am thinking about rain water recovery as we are having a drought and I don’t have a well so local water is tied to sewer so if I use city water I pay for sewerage on my lawn and garden. This is detrimental to my Home Assistant gadget spending. I anticipate I will discover more use cases! Thanks again for helping ResinChem on this!
I love this! I have recreated your STAND-ALONE motion sensor version and have 2 hallways in my house that light up at night when you walk by so you can see and it would be great to replace the PIR sensors to those TOF sensors. But I read your comment to Paul Bryson when he mentioned it also. Well if you decide to see if it can be done in the future, I'd watch the video!
Thanks. Let me give it a little more thought on the best way to approach an upgrade for the standalone system. Then I'll consider putting together a video as to how to replace the sensors for those folks that have built that version. Stay tuned... and thanks for watching!
thanks for the guide, I've been on a mission to replace all the Sonoff PIR sensors in my home as they are crap with mm wave sensors but was stuck when it came to bathrooms due to no power points. I have now installed ESPhome, created the sensor and it's working great on the doorway. I created the automation in node red so implemented a 100ms trigger delay + used the delay node to prevent repeat triggers for 2 seconds to stop the light going on then straight back off again as your legs pass the sensor.
Yeah... I like the ToF sensors better than PIR... for certain use cases. They can be a little bit noisy, but as long as you debounce them a bit, they can be both great distance tools... or with some coding, turned into a simply binary sensor for detecting something that breaks a "beam" for triggering other actions. Thanks for watching and taking time to leave a comment!
Excellent video as usual. Just getting into the automated LED scene and have a few ideas for around the house. Just a suggestion with fitting the sensor. Modify the lid with a couple of "L" shaped overhangs (brackets) to slide the sensor underneath to hold it in place, no screws needed. Keep up the good work.
Thanks! Yeah... my 3D design skills are still a work in progress! This one was actually an improvement over the original that used hot glue to hold the sensor in place. So baby steps I guess. I've been (very) slowly trying to move my design work over from Tinkercad to Fusion 360. I still have a long way to go. Thanks for the recommendation... and thanks for taking a few moments to post a comment. I appreciate it.
Cheers, I'm using FreeCAD for design work. Always learning with this program. Made a few parts for my little motion Racing Simulator setup. I like the staircase setup you have with the improved sensor. Still getting my head around how all this works together before I start buying parts for a project. Really like you videos and thanks for the reply.@@ResinChemTech
If you haven't already, be sure to check out the original stair video that shows more about how the system is put together, as this video is just an update to that one. using new sensors. And of course this version requires Home Assistant or another compatible home automation platform. But I do have another system (and video) for a standalone version of the stair system. This other system does not have all the features and effects of the original, but it does work without any external systems or automation platforms if you are not currently a Home Assistant user. And of course, let me know if you have any questions if you do decide to build one my stair projects.
Me too! For many of my projects, I learn things later... or like in this case, get great ideas from my viewers... that leads me to either go back and improve on the original or to create better versions the next time around. Thanks for watching... and thanks so much for taking time to add a comment. I greatly appreciate it!
Thanks! While it means my videos are a bit longer than many others, I do try to provide both the what and why of a project, hopefully so other can easily take what I show and adapt them to their own project needs. Thanks for watching and taking time to leave a comment.
Looks good, but if it was me I would put one pressure sensor on the first step, then as soon as anyone puts their foot on that steep you would get a logic high or low to tell the processor to start, so no false triggers, no detection area, just the first step, and very cheap you can get a pressure pad in a local store that sells alarm stuff, just slide it under the carpet and wire in. All the best Bob in the UK
Yep... you are absolutely correct. Of course, when I first started creating a lot of these, the button entity wasn't available. And I tend to be lazy and copy/paste from one project to another. But you are right, and moving forward I should start using button. Thanks for the tip!
Fantastic I'm in the process of installing exactly the same set up from your original vid but with the tof sensor knowing the pir would be activated as a high traffic area. I have the led in place but no sensors as of yet. My only stump is understanding the automation of it hopefully I can understand it off your updated blog. Can't wait to get the project going. Thanks for great video
Thanks! I'm pretty happy with the system, especially with the upgraded sensors. As far as the automation, you might take a look at the Github repo ( github.com/Resinchem/LED-Stair-Lights ) where I have the latest code and some better explanations than in the blog article. And if you aren't a YAML guy, you can recreate the automations using the Home Assistant UI editor. Or enable packages and just copy/paste the package version right into Home Assistant. If you run into any issues with the automation/code, please don't hesitate to reach back out. The automation/code is where most people tend to get stuck, but I've helped quite a few folks through that step... and am always happy to do so! Thanks for watching!
All I did to narrow the field of view was tape over the area on the left side of the PIR lens so it cant see anything until a foot goes onto the first step, easy and cheap.
Wow, thanks! I don't think anyone has ever mentioned my production values! I'm slowly getting better (and getting better equipment along the way). This was the first video using new editing software, so it's a bit of a learning curve as well. But thanks so much for your kind words. I greatly appreciate it!
Thank you for the update!!! I will be using this for under bed lighting.... one for each side of the bed.... I have a ranch so I don't have stairs BUT this is an excellent update for my bed!!! Thank you so much!! Great job!
You are welcome! I know a number of others that have reached out to say that they installed this system along the baseboard of a long hallway, but I haven't heard of anyone that has tried to use it for under-bed lighting. That's an interesting use case! Let me know how it works out. And of course, if you run into any questions along the way, don't hesitate to reach back out. Thanks for watching!
@ResinChem Tech Always learning new things from your videos.. keep up the good work. When I get all my parts if I have a question nice to know you're there. Thank you again!
@@ResinChemTech Not really sure what I"m doing wrong here but I can only ever get one sensor to work. I've built 4 but only one works.... for some reason the other 3 aren't scanning... I'm at a loss.
Really lost here.... says to create a WLED controller...check... then I go to ESPHome and write the code to the di mini and it says "Erasing" which pretty much wipes out WLED.... what am I not seeing here? LOL Does there exist a start to finish blog that carries it from start to finish? Thank you
Ok... let's verify here. You should be using 3 separate D1 Minis or ESP8266 boards. One is for WLED and one each for the sensors. You cannot have ESPHome and WLED on the same controller. Nor, in this particular case, can you have both sensors connected to the same controller. Each sensor needs its own D1 Mini (there are ways around this, but you have to use code to change the I2C address on one of them)... and WLED needs its own D1 Mini or ESP8266 board. It sounds like you are trying to use the same controller for more than one thing... which won't work. Let me know if I am misinterpreting what you are saying... but as I built the system here, each sensor and the LED controller are completely separate. The 'communication' between the devices is handled via Home Assistant automations.
I use simple pressure mats on the bottom and top steps. So it really only comes on when someone is standing on the stairs. And it doesn't react to the cats either.
What I would personally do for this one is grab one of those lawn solar lights, rip off the solar panel on top. Then put that solar panel on one side of your stairs, and put a weak laser light (one that you cannot visibly see) pointing at the solar panel. And wire the solar panel to output a digital trigger when the beam is broken. It will be like a laser trip wire, and when that small amount of power stops being generated at the solar panel is triggers. Just an idea i had for my own.
I see Resin Tech and I can’t help wonder if we had contact when you were in the industry. Perhaps you are familiar with Brookfield Viscometers, my old company before they sold. I see the Indianapolis sign and after 5 years out. I bet Henkel has bought all the small specialty resin companies and only leaving room for giants like AOC and Dow to name a few. I guess it doesn’t matter that I used to support/help people in Resins and coatings and now ResinTech just educated me! It seems like a nice turn on things.
Ha! I worked for a company called Lilly Industries (formerly Lilly Industrial Coatings)... and nope, not the same Eli Lilly (pharmaceutical) company most folks associate with Indy. I developed polymers and resins for various coatings... primarily polyesters and alkyds. Prior to that, I worked for Union Carbine (now Praxair) that developed metal ceramic coatings. But that was many, many years ago. Lilly was purchased by Valspar and operations moved to Minneapolis. That's when I made the career switch to IT. Nice to virtually meet you... if we didn't cross paths somewhere in our pasts!
@@ResinChemTech I forget how diversified the “resins “ industry is and I think epoxy all to often and not paint. Valspar was a customer and I tend to buy their paints but all paint companies were customers pretty much. DuPont and it variations and I had lots of contact in automotive coatings. Being the service manager I did get to experience many different applications!
Could consider a slot on the inside of the box with slightly bendable arms that have round pegs to fit into the holes of the new sensor so you won’t need screws
Very interesting! I've been trying to find a way to have HA no if my car is going out or coming in. It seems like I could put two of these next to each other a couple inches apart just inside the garage door. If the one closest to the door goes from false to true first then the car is entering the garage. Because the tire had to have passed the first one and then as I drove further into the garage, the second one would activate. Intriguing indeed!
That's an interesting use. If you haven't seen it, I also have a parking assistant video that uses a LIDAR sensor and MQTT to integrate into home assistant to let you know when a car is present or not. It could work in a similar manner.. when the detection goes from "car present" to "no car present", then you know the car is leaving the garage... and vice versa. It's just another option if you are interested. You can find that video here: ruclips.net/video/HqqlY4_3kQ8/видео.html But let me know if you go the route of trying the ToF sensors for detecting a car entering or leaving the garage. And thanks for watching!
I've been really happy with the new sensors. They are much more reliable, have a tighter focus and result in very, very few false triggers as compared to the PIR version. They do make a nice 'break beam' with only wiring on one side, just as long as the distance needed for that break beam is relatively short (< 4 ft or so), but it is ideal for something like a staircase.
You could also use multiple sensors or maybe a camera to track people on the stairs. This way the light would stop or adjust to a change is speed. Would look and feel so futuristic I guess!
Yes it's WLED. This, along with the controller build, install and Home Assistant automations are all covered in the original video. This video was just an update to the original that shows the improved detection by replacing the original PIR sensors with ToF sensors. Everything else about the system is covered in the original video: ruclips.net/video/Y29Y0iTLggg/видео.html
@@ResinChemTech thanks! I apologize if you covered this already, but how did you get the gradual cascading up/down effect for the leds? When I configure mine in the WLED settings, it’ll either just turn the entire strip light on, or if I configure segments like it shows in the Animated Staircase usermod docs, it’s just a choppy effect. Are you using something besides the animated staircase for that?
I am not using any mods at all in WLED. It is just standard WLED. When the automation fires in Home Assistant from one of the triggers, it calls the WLED entity and passes the speed and effect, in this case it is the "Wipe" effect. For the reverse direction, the automation also either turns the WLED reverse switch on or off. This is all standard WLED, the Home Assistant WLED integration and Home Assistant automations. If you look in the video description of the original video I linked to above, you will also find a blog article and Github repo that provides more info and provides samples of the code that I used to make this all work.
You are most welcome! I've been running the new sensors for a week or so now, and they are much more responsive with less false triggers at the bottom than the PIR sensors... so I agree that it would be a good upgrade if building the system from scratch today. Thanks for watching and taking time to comment!
Well, the true credit goes to one of my viewers who recommended it. But I have been extremely pleased with the upgrade and no longer have "false triggers" when just walking by the steps. It was really an easy upgrade but it has made a huge difference in the reliability and reactivity of the lights. Thanks for watching and taking time to leave a comment!
Glad I found these videos. It's exactly what I'd like to do with my steps. Now trying to actually do it. Lol One question though. Looks like once you trip the sensor you can turn it off with the same sensor. So if 2 people are using the steps right after one another, will it turn the light off and not work?
Yeah... sort of. It isn't perfect when it comes to multiple people on the steps at the same time. When a sensor is tripped (either one), it toggles the state of the LEDs. So if one person starts on the stairs, the LEDs will come on if they were off. If a second person then trips a sensor before the first person exits, it will turn the LEDs off. Similarly, when the first person exits the stairs, the LEDs will turn back on and then finally turn back off again when the second person exits. You could probably implement some sort of 'counter' to try to keep track if multiple people have entered the stairs... but that could be fooled if someone starts down the stairs, opts to turn around and exits the stairs at the same end they entered. There would be no way to tell if it was a second person entering or the original person turning around and existing at the same sensor. So, it isn't 100% foolproof for every scenario. But honestly, at least for us, it is not often that multiple people are using the stairs at the same time. And regardless of how the sensors are tripped, the LEDs default to turning off 15 seconds after all detection has ended. And of course there is no 'cool down' period with the ToF sensors like there is with PIR. So, you can simply tap your foot again on the stair where the sensor is located to toggle the lights on or off at any time. Again, not perfect.. but it does allow you to turn the LEDs off in a multi-person scenario if you are the last to exit and it results in the lights toggling on. Or as mentioned, they will turn off after 15 seconds anyway. Good luck with your build. Do note that this was a follow up video to the original that covers the actual build and install. This one was simply to cover the upgrade of the sensors from PIR to ToF (a huge improvement in reliability/elimination of false triggers in my case). So if you haven't watched the original video, it might be worth a peek ( ruclips.net/video/Y29Y0iTLggg/видео.html ). Just let me know if you have any additional questions.
Could used any IR sensor. In my case i have a tube around the PIR sensor directing it very strictly. Have had mine in the stairs for 6+ years and have every step with leds that can change color :) Both down up and up down of course and if someone goes after the time extends. Perfect for the night.
I've seen your stair video. It is nice. However, in my case as I stated in the original video, my goal was to do an installation without any modification to the stairs... so no drilling of any holes, removal of carpet or drywall, etc. So I could not recess any sensors into the stringers as you did. In addition, since the bottom of my stairs are open, even a tube still meant that the lights could be triggered when walking by the opening in the stairs directly opposite the sensor... a tube would be of no help in this case. But by switching to distance instead of motion, it resolved the issue... and I didn't need any tubes, fins or other measures to block portions of the sensors. I do like how you have the light under each step as opposed to along the sides/stringers like I do. Unfortunately, with carpeted stairs, that really wasn't an option for me. I tried to build a system that was not only easy to install, but could easily be removed without leaving behind any holes or other repairs that would have to be made. Thanks for taking time to share your thoughts.
Great improvement and another well explained video, thank you! I had similar sensor at work, but it had a reflector at the desired distance, did you address the range code-wise ? and by the way, which language you're coding with? do you have any tutorial? I'm really looking forward to get into this world and was wondering
You are welcome! I cover the code that is used for the sensor in the section on ESPHome code (at the 6:10 mark), and this is where I set the distance to indicate the 'broken' beam. ESPHome modules are basically written using YAML, but compile to Arduino/C++ code under the hood. The VL53L0X sensor is more-or-less a tiny LIDAR sensor and uses pulses of non-visible laser/IR light to measure distance, so a reflector isn't really needed... just a solid surface. I use various languages in my projects, depending upon needs. Home Assistant relies heavily on YAML for its automations and manual configuration (although Home Assistant itself is written in Python). So, besides YAML and Python, I also write my own firmware (primarily for the ESP family) using Arduino/C++. If you are looking at getting started with Home Assistant, I'd focus on an understanding of YAML first... although as Home Assistant matures, the need to use YAML continues to decrease. If you want to develop/design your own devices using ESP8266/ESP32, then Arduino/C++ is probably the best, although not the only choice. If you want to use Raspberry Pi for custom applications, Python is probably the best choice. Thanks for watching... and thanks for the kind words!
I finally got this working !!!! Thank you very much for your videos and your recommendations. But (and there is always a but) my wife does not like the case sticking out at the top of the stairs. Can you tell me what software you are using to create the stl files to do the 3 printing. She wants to have the box in the drywall so that there is a minimum exposure of the sensor. again thanks for your help and guidance.
First... congrats on getting the system up and running! And yes... got to keep that WAF high! In my case, it was sort of the opposite... I wasn't supposed to make any changes to the stairs or drywall. But most all of my 3D designs, including this one, were just done with Tinkercad. For the most part, I just need simple geometric shapes for things like enclosure boxes. I'm in the process of learning Fusion 360 for more complex designs. If it helps, I just added the .stl file for the sensor lid when using the ToF sensor to the Github repo for this project: github.com/Resinchem/LED-Stair-Lights/ If you have a way to share photos (unfortunately you can't do that here in the RUclips comments), I'd love to see what your finished project looks like with the sensors recessed into the wall. Let me know if you have any additional questions.
I love this! Too bad I can't find this on Amazon as a plug and play. Device. I would definitely buy it. This is way too involved for me. I don't have that kind of skills
just use motion sensors, this extra customization isn't 100% needed, as you walk by the stairs it gives you extra light anyways, I don't see why you wouldn't want this other than for OCD reasons
Awesome tutorial... I've been messing with wled and xlights for Christmas decorations but this is a great idea especially now that my stairs are getting remodeled which gives me more options, my question is.... Can I connect two Tof sensors to one esp32? One to the bottom of the stairs and one at the top. I've seen your videos and read your tutorial. I have all the parts just wanted to make sure I was good to go before I dive in. Thanks
You can connect both to a single ESP32... but it does prevent a couple of challenges. First of course is that it requires you to run two extra wires the length of the stairs (data and clock) in addition to the USB power (or +5V/gnd wires). Next, if connecting both to the same controller, you will need to follow the manufacturer's information to change the I2C address for one of the two devices. Each I2C device connected to a given controller must have a unique address. The default address for the ones I purchased were 0x29. But this will be the same for every one purchased. Changing the address usually involves connecting the device and using Arduino code to send an I2C command to the sensor to set its address. You can Google "VL53L0X change I2C address" for more info. Some sensors might offer another way to change the address through its hardware, but again, you'd have to check the manufacturer's info. Once the address has been changed on one of the sensors, you could then connect both to the same controller and modify the ESPHome code, specifying the particular address for each sensor and making the other necessary changes for having two sensors in the same ESPHome node. So, yes I believe it is possible. But it would probably involve a little more work and some code writing on your end to figure out the I2C address issue. Again, the address is not an issue when using individual ESP controllers. It might actually be a lot less work just to use a cheap Wemos D1 Mini ESP8266 independently for each sensor. Then you only need the power connections and could use the same ESPHome code for both, only needing to give each sensor a unique name.
@@ResinChemTech thank you so much for your detailed response. I will be hitting the coffee button for sure, it's fun when you have other people into the same hobby, even though I'm not a professional but I still like tinkering and learning new stuff. I have the mini on my Amazon basket just in case and if that will make it easier then I would go that route, I have like 3 spare esp32 so I wanted to use them with the Tof I have but if the minis make it less work then I will go that route, when it comes to wires I'm not too concerned because I have the capability of hiding them under the stairs so the only thing that will be showing is the channel like you have it. This is what happens when you get in the rabbit hole of tinkering hahaha
You are most welcome... and I agree that it's fun to chat and exchange information with others that have the same interest. Oh... and I did want to add that if you have extra ESP32's and don't want to order the D1 minis, you can use separate ESP32's for each sensor and everything would pretty much be the same... you'd just select an ESP32 when creating the ESPHome nodes. But as long as they are separate controllers, you wouldn't have to mess with the I2C address issue. Although to be honest, an ESP32 is kind of overkill for just running a single ToF sensor... but it would work if you have them to spare. And don't hesitate to let me know if you run into any other questions or issue with the stair lights as you move forward.
@@ResinChemTech I really appreciate your help, I will be getting the minis tommorow so I'll be going over your tutorial again and if I have any questions I will let you know. Thank you once again. I'm sure other people are taking advantage of your step by step example because I looked for a while and they were all complicated or skipped steps, so I was left lost half way. Awesome work 👍🏼👌🏻
We got it at a local place here in Indy called Jay Orner & Son Billiard Co. It is a man-cave heaven... pool tables, bars, home theater seating, arcade machines, etc. Just about anything you'd ever want for a basement or rec room. Thanks for watching!
Great video I built and use the standalone stair light system, can this upgrade be done to that system too as i have the same issue when anyone passes by the stairs...Thanks
It's possible... but not as straightforward or easy. In the full version that uses Home Assistant, each motion detector has it's own control board (D1 Mini). In the standalone system, the motion detectors share the same controller (and power source) as the lights. This means that the Arduino/C++ code would have to be modified to work with the TOF/distance sensor... OR ... you'd have to build the TOF sensor shown here, run 5V to it to power the D1 Mini and use ESPHome to return a high signal when "motion" (or minimum distance) happens and return a low signal when cleared. So, in short, yes it is possible. But it isn't a simple swap out for the existing motion sensors like shown in the video. Let me know if you would like me to provide more info if you opt to try a replacement. I'd be happy to try to help out.
Thats a Great Idea! i made something like this and had the same problem fixed it by buying an esp and hooking up an cheap ultrasonic sensor whats specially coded to detect motion. Reply if you want the code :)
Really, about any type of distance sensor can be turned into a binary (motion-type) sensor using this same technique. It really depends upon your range and FOV needs. In my case, the VL53L0X had a shorter range and a narrow field of view, which was perfect for my stairs. Plus its small size made it easier to place on the stairs without being as noticeable as the much larger ultrasonic sensor. The ultrasonic sensor might be just a little cheaper, but the ESPHome code that I used can really be used for whatever distance sensor you prefer to use that meets your project needs.
I have a crazy idea, add vibration sensors to the steps (or a few of them) and light the led firstly when both the motion sensor and vibration sensor has been triggered. Probably requires some fine tuning, but it would be totally awesome.
I am all new to this, so maybe a dumb question. But I also saw video’s on mmWave sensors. Could such a sensor be a solution for a staircase? Maybe in combination with pir/distance sensor? (On + motion on stairs= continue sequence, otherwise it is only a moodlight of first few steps?) Also to avoid the multiple people triggering on/off wrong? Or is this easier said than done?
Part of the issue with mmWave sensors is that they generally detect in 360°, including through walls. So mmWave sensors alone would present an even bigger issue than the PIR sensors in terms of triggering the LEDs. However, you might be able to find a way to supplement the trigger sensors with mmWave in some manner. This might be able to solve the one issue that I have with my setup... and that is if multiple people enter or on the stairs at the same time. A mmWave sensor, in combination with ToF or PIR for the triggers, might be able to overcome this particular issue. It would require some pretty substantial changes to the code to either substitute or add additional mmWave sensor(s) to how the system operates. So from that perspective, it probably is much easier said than done!
Im curious if you've experienced any random false positives with the TOF sensor. When I had one hooked up the distance would occasionally change causing a false trigger. Do you ever notice this problem?
Yeah... I occasionally had that issue as well. I fixed it by adding a 100 millisecond 'for' clause in the automation... so when the state changes (say from off to on), it has to maintain that state for 100 milliseconds before the automation fires. This means that the signal can 'bounce' on and back to off without firing the automation and turning on the lights... basically 'debouncing' the signal. 100 milliseconds may longer than it really needs to be, but it is short enough that it still triggers the automation when someone actually walks in front of the sensor (they'd have to be pretty dang quick to clear the path in less than 100 milliseconds - especially on stairs!). You could probably add that delay on the ESPHome side instead... I just opted to put in the delay as a 'for' clause on my trigger in the automation. Hope that might help you out... it at least worked for me. Haven't had any false triggers (that I know of) since I added it.
I love this project and had so much fun learning about it. I have everything working great, but I have an issue I can't figure out. I have the TOF sensor at waist height so the dogs won't trip it. When I pass the TOF it detects my body, but sometimes when the body passes then it goes back to clear, but then an arm comes through behind it and trips it again. So the lights come on and then go right back off. Doesn't happen often but often enough. The Second issue is almost the same, when I pass through the TOF the lights turn on, but if someone is right behind me they will trip it turning the lights back off. Is there a way to have TOF 1 open once and not run again until TOF 2 has been crossed or the timer expired? Hope I explained that well enough. Thanks for all the time you put into helping us with this project!
Yeah... the system still isn't "perfect" and I've experienced both of the things you are talking about. While the ToF sensors are better, they do reset very fast! It wasn't as much of an issue with the PIR sensors that had a 5 second cool-down/reset period. But there are some things you can do to tweak the system. First, as far as your arm retriggering the system: I opted to add a "for" time to the automations, saying that the sensor must be in the "on" state for a certain time: from: 'off' to: 'on' for: milliseconds: 250 #adjust this value as needed This has fixed the issue for me in most situations. But another user has recommended adding a debounce routine to the ESPHome Lambda function. That's too long to detail in these comments, but you can see the code he is recommending here: github.com/Resinchem/LED-Stair-Lights/pull/1/commits/5cbe81f7e1be55f89e18d44ada23e83c5a07f8e0 His recommendation is probably the better option, but I feel like it is a little more difficult for newer users to try to add to the ESPHome code... as opposed to just modifying the automation. And he has the 'fixed' time at 1 second, so you have to understand the code to change this value. For this reason, I haven't merged his PR into my version. But if you are comfortable with editing the ESPHome Lamdba section, this is probably the best option. As far as a second person tripping the sensor, my original version used two input_booleans (one for top sensor, one for bottom). When the first sensor triggers, its input_boolean is set to TRUE and remains TRUE until the opposite sensor is triggered or the lights time out (then the input_boolean is reset to FALSE) . This input_boolean is then checked as part of the automation condition... if true, then the automation does not fire. I removed this logic in later iterations because it also prevents the lights from turning back off if someone starts down the stairs and turns around... it's a trade-off on how you want the lights to react. With just two of us in the house, it was rare that we both head down the stairs at the same time... and more likely that we'd start down a step or two and then turn around. Let me know if you have any other questions... or if my explanations above are unclear. Unfortunately, it's kind of difficult to share large code blocks here in the comments!
@@ResinChemTech Thanks for the feedback. I messed around with the Lamdba part of the code, I could get it to validate but it would always error out when updating it. So I went with the top and bottom booleans, and that works perfectly. I have two other questions. First is the "Wipe" effect on the WLED, I really like this motion but I can't get it to only run once. It flows from one end to the other, it waits a second or so and then goes back to the start and does it again. Is there a way to make it only run once? Second question is about "Packages". First I'd like to thank you for recommending them, I hadn't worked with them before, so much cleaner. One thing I couldn't figure out is when you start an Automation there seems to be a random ID number, how do you figure out this number when you create a new action? This is what I'm talking about: # -------------------------------- # Stair Lights On with Top Motion # -------------------------------- automation: - alias: Top Motion Lights On id: 9f65f629-507c-4cab-86d0-c79e780e1142 Where does this ID # come from? Thanks again for your help, my build turned out awesome thanks to your help!
Most of the WLED effects are 'repeating' effects, meaning they run in a loop or continuously. So there isn't a way to have them only run "once"... short of trying to time how long it takes for one cycle then using a timer and shutting the lights off via code when the timer expires. But do note that you can change the speed of how fast any effect runs. That's also in the automation... I believe I use number.stair_speed = 220 (I think valid values are 0-255). So you can adjust the speed or try different effects other than 'wipe' to see if you find one you like better. As far as that ID, each automation must have a unique ID if you want to be able to use some of the UI tools like traces for troubleshooting. So, I just add a random string each time I create a new automation. I use an online UUID generator ( www.uuidgenerator.net/ ) to generate this number for me and just copy/paste it into the automation when I create it. It has no real "meaning" other than to make each automation unique for some of the troubleshooting tools. Let me know if you have additional questions. Glad the project worked out well for you!
That might have worked too. Although it wouldn't have addressed the PIR sensor 'cool down' time. The original PIR sensors I used have a cool down time of 5 seconds, which is about as short as any (some are 30 seconds or longer). The TOF sensors are instantaneous on/off/on, and do not have the cool down period... which for me is another bonus of this particular type of sensor. But thanks for watching and providing an alternative solution! I love getting feedback and other potential ideas from my viewers.
Ok so I first saw you when I was learning addressable LEDs. The lesson on the data signal and how it works was really helpful. I might need to go back and watch it again but my first question is Logic Level Shifter. Do you always use it 100% of the time as a fail safe? I am asking as the size is small but fitting an extra component in a box that now needs to be bigger and we are trying to hide these solutions from our less gadget type friends and family. Also it means more short lead soldering in a small space. To me it is laziness not the expense of adding the shifter so I was wondering if you have a rule of thumb for when you use a shifter. All projects with 8266D1? Just when strips have a certain length? Just specific strip types?
Hi again! I do tend to use a logic level shifter for all my LED projects... just to avoid any potential signal problems and so I don't have to worry about how far away the controller is from the start of the LED strip. But in cases where the distance is very short, you can probably get away without it. If you haven't seen it, I do have a video that shows what can potentially happen to your signal if the voltage drops too low ( ruclips.net/video/Q9mLitVxF3c/видео.html ). As far as size, if you use a Wemos D1 Mini and the mini (1/4) size ElectroCookie board, both the D1 Mini and shifter will barely fit on the smaller board and the resulting size is about the size of a small box of matches... about 1/4 of the size as compared to using a full size ElectroCookie board. This is now my "go to" controller, unless I have a large number of LEDs or want sound-reactivity, which means I move up to an ESP32 board. I think I have a wiring diagram for this smaller version in one of my blog articles somewhere. Let me know if you're interested and I'll shoot you over a link to it. So, long story short is that a logic level shifter "might" be optional. But it can vary from install to install, just based on various tolerance within both the ESP8266 and the LED strip. One install might not have a signal problem... and the next one with the same lead length might experience signal issues. That's why I just opt to use a logic level shifter regardless... it pretty much just eliminates that issue for all but extremely long signal wire runs.
@@ResinChemTech thanks for this honest answer. This is what I expected, you do it to avoid headaches and I am trying to establish my own rule of thumb. Like if I have to inject power I need to level shift as well.
@@ResinChemTech I promise I will stop bothering you. So it has been a few years so it is ok if you tell me to go study Kirchhoff law and ohms law but what about temperature (climate ) with respect to ESP866 D1 and level shifting. I am probably going to do my garage door and to do it right I will need about 22’ of strip so I will probably inject power and now I will probably level shift too My question is Boston isn’t so different a winter climate from you so do you anticipate cold or even heat (as I am too lazy to look) can degrade the performance on the data line as you did show in the video I watched. I don’t recall the video reference temperature. That explanation was awesome! I love understanding at that level. Ha ha, can you help me find a video that explains how MQTT works? If someone could explain how the underlying stuff works with brokers etc then maybe I might use HA even more intelligently.
First off... no bother! Helping out others is why I do these videos and blog articles. Many folks helped me out when first starting, so I like to "give back"! I really haven't done any sort of study or test regarding temperature and the data signal. I do have LED strips installed in my garage (attached, but not heated or cooled). I haven't noticed any issues with low temperatures (down to mid 30's in the garage during the dead of winter). I'd be a little more concerned about the high end... especially when it comes to the power supply and controller (more so than the data signal - if you boost to 5V with a shifter, you have a pretty wide range until the voltage drops to ~3.3 volts... using higher gauge wire can help as well). But with higher temperatures, I always assure I use a power supply with overtemp protection, assure it and the controller have ventilation. I have lost one ESP32 controller that I suspect was due to high temperature, but it was enclosed in an air tight box. As far as MQTT.... I love it! It did take me a while to get my head wrapped around it, but I use MQTT in all my custom developed or Arduino/C++ projects to communicate with Home Assistant and add those devices to automation routines. I'd be glad to help out, but it's probably a little much to try to do here in the RUclips comment section! If you like, as a subscriber, feel free to reach out to me via email. You can get my email address from the "About" page of my RUclips channel (I don't publish it here so that the spam bots can't pick up on it). in addition, if you are on Discord, we can jump over there if necessary too and I can give you that info via email. Just let me know how I can help out!
@@ResinChemTech I must be really stupid as your About here on RUclips doesn’t show an email. I am new to discord but have it and now you have me afraid to post my email here. I don’t want you to hold my hand on MQTT or anything but when I understand the underlying operation in a block diagram and not just code language. Electrical Engineering drop out that needed up successful as a service manager but very little programming experience. I guess my question is where did you go to learn about MQTT? Point me there instead of bothering you when all I did was buy coffee in thanks for such a great explanation of LEDs! I am not sure now but my contact information is in my about section. My goal is to have fun but also find a few practical use cases for family and friends. I think coming off SmartThings and having HA since May I am doing well. I enjoy using Yaml over the UI in some cases and I never thought I would say that! I have done basic assembly on a old 650X series micro back oh so many years ago in night school. Oh I am Rich or Richard, thanks again for the video and the replies.
The most reliable solution for this type of detection is an infrared photoelectric sensor of the Retro-reflective type. This involves a small sensor which has an IR transmitter and receiver mounted facing the same direction. A small retroreflector is then placed on the opposite side of the detection area. These can be found on Ebay or other sources. Just be aware of the distance specified for the sensor. Another complication is that most of these sensors require 12VDC or more for operation, but some that work with 5V can be found.
Howdy! Your videos are great! Do you ever do private tutoring? I'm working on a project for my Burning Man camp and have extensive software eng experience, it this hardware stuff is all new to me, though very fun!
Thanks! I appreciate the kind words. I don't really do any sort of 'official' tutoring, but I'm always glad to try to help out others with their projects. I'm happy to answer basic questions here in the comments. But if things go beyond that, I will generally move the conversation over to email and/or Discord, where it's easier to share photos, diagrams, code blocks, etc. Just FYI.. my background is in software and app development as well. But, like you, I am really finding the hardware side fun and fascinating. So, feel free to shoot me any questions that might have a quick answer here in the comments. Otherwise, if you feel it is a bit too complicated for the RUclips comments, you can get my email address from the 'About' page of my RUclips channel. I don't publish it here in the comments to avoid the spam bots picking it up! Whether you opt to reach out or not, good luck on your Burning Man project and your future hardware adventures!
I'm not sure why putting the sensors on the ceiling with fins would make any major difference than where I initially had them on the sides (with fins), but if for no other reason, putting the sensors on the ceiling is impractical because there is no good way to run the power for the D1 Mini/sensor. But I appreciate the thought and recommendation. I just don't think that is a viable option that would have made a real difference in my situation. The new ToF sensors have been working great and much better than the original PIR motion sensors.
When I try to flash the YAML trough the ESP home flasher tool [windows], I get the following issue "Unexpected error: The firmware binary is invalid (magic byte=23, should be E9) How do I resolve this.
Are you trying to flash the YAML? That won't work. If you are uploading via an external tool like ESP Home flasher, you need to use ESPHome to compile it and download as a .bin file. In ESPHome, select 'Install' then manual download. This will create the necessary compiled .bin file that can be flashed. If you are still having issues, you might try searching for the exact error message you are receiving for additional assistance.
Could you please create a video on how can I use WLED with esp8266 and PIR Motion Sensor? Wiring and settings, I need colors effects with led turn on with sensor. Please
That's basically exactly what I do in my original stair lighting video: ruclips.net/video/Y29Y0iTLggg/видео.html You can see a step-by-step process for building the WLED controller in this video: ruclips.net/video/ifv6wV3Rm6A/видео.html The stairs use two PIR sensors, but the concept is the same. You could just use 1 PIR sensor instead of two. All the wiring diagrams and parts for the stair project can be found in my related blog article: resinchemtech.blogspot.com/2021/07/simple-motion-activated-led-stair.html. The directions and wiring diagrams for the WLED controller can be found here: resinchemtech.blogspot.com/2021/01/building-your-own-led-light-strip.html Hope that helps!
That's a good suggestion for some situations. However, because my stairs are open on the sides, no amount of blocking would prevent motion from being detected when crossing in front of the open area on the sides. Anything that would block this open area would also block the area directly in front of the sensor... where you step on the stair and want the motion to be detected. That's why a distance-based sensor solved the issue for my particular installation. The 'beam' between the two sides of the stair stringers has to be broken by stepping on the actual stair itself. I can then move freely all around the stairs without trigging the LEDs until I actually step up onto the stairs. But I do appreciate the suggestion. It might help others if there situation is different from mine or where longer range detection is required.
I tried the paint trick too , and it didn't work very well for me , there is another way to narow the field of view ( of the sensor ) by attaching a pipe in front of it , didn't try that because of the finish look . The solution was to replace the PIR sensor for the LED controler , with a laser one : XKC-KL200-NPN ( about $20 ) . Don't buy the other versions KD200 or KE200 because they are " color sensitive " ( even the newest one XKC-KL800 )
Hi! @resin I am curious as to what type of coding language would you suggest a beginner jump into to learn how to connect and automate things!? I’d like to be a sales engineer for an iot company named samsara. Love this video and going to look at all of them ! Thank you!
Well, it's hard for me to specify a single language (or even two) that would be the best. Part of that depends upon your own goals. From a technical perspective, Home Assistant is written in Python... which is popular for a lot of different things. In addition to Python, I use Arduino/C++ in a lot of my own projects. This is also used by things like ESPHome, WLED and other firmware that is often installed on ESP and Arduino microcontrollers and it is used in many DIY IoT devices. While technically not a "language" and more of a communication protocol, knowing and understanding MQTT would also be beneficial (I have a beginner's video on MQTT). This is a common communication protocol used between IoT devices. Then if you flip over to looking at things like mobile app development, you could consider languages like Java/Javascript... among many others. But if you've not done any programming before and if I had to pick a single language to start with, I would probably recommend Python. It has a broad range of platforms and uses, it is relatively easy to understand and you don't need any sort of high end hardware or compilers to use it. Once you have the concepts in Python, then jumping over to another language like C++ will generally be easier. I'm sure others would have other opinions, but hopefully that provides you at least a little useful information.
Can you in theory use multiple tof sensors and pixel LEDs with WLED to light up the previous, current and next stair as you walk up? Reaction based not time based
In theory (although I haven't tried or tested), I would think that you could setup segments in WLED and then have each sensor's automation turn on a particular segment while turning off all other segments. The automations and timing might get tricky and you'd need the sensors spaced so that no two sensors would be tripped at the same time... but placing a sensor on every other step might work. There might be some wiring challenges as well, but since the ToF sensors are I2C, they can share the CLK and DAT GPIO pins on the controller, so every ToF sensor might not need its own controller, but each would need four wires... SCL, SDA, V+ and GND. But in theory, I'm guessing something like this could probably be designed and automated.
Hello I loved the solution you have found. I am trying to use that with the same ToF Sensor with a ESP32 board. There is this issue of getting an unknown message in the HA ESPHome. The Log says it found a I2C device but there is no update on the log for the distance. What might be the problem? I have copied everything after the captive_portal. Could you please help me? I have tried 2 ESP32 boards and the results are the same.
I have not tried or tested my ESPHome code with an ESP32, so I cannot verify what I'm about to say. But a couple of potential issues jump to mind. First, what GPIO pins are you using on the ESP32? The default pins for I2C on the ESP32 are GPIO21 for SDA and GPIO22 for SCL. If you are using different pins, then those need to be configured in the code. Next, assure that your VL53L0X has the same I2C address as mine (0x29). It is possible that you could have received ones with a different address. Check the specs for the devices. Finally, verify you have the right board selected for your ESP32 at the top of the file and that you have specified a valid distance for the filter under the sensor. You might try a higher and lower value just to assure you haven't exceeded some range of the sensor. That's about all I can think of. As I mentioned, I have not tested or tried the VL53L0X with an ESP32 and ESPHome.
@ResinChemTech Thanks for your help. Firstly, yes I have connected them to GPIO21 and GPIO22 as you wrote. Also, I have tried other pins with a code to specify them. I guess the address (0x29) is correct because ESPHome Logs says it found a i2c device at that address. The board was in use before, so it is not the problem I have tested it. I have tried simple distance codes to test the sensor but still the same results. I guess the sensor itself is the problem. I will get another one and as last chance, I will try with D1 Mini.
Maybe... and I had to go look this up... but the fresnel lens focuses the light onto the sensor (see learn.adafruit.com/pir-passive-infrared-proximity-motion-sensor/how-pirs-work ). So, I suppose it might be possible to narrow the FOV by removing the lens. But in my particular case, I think there still would have been a possibility of motion being detected at the end and through that opening in my staircase. I've replaced both of the original PIR sensors with the ToF sensors now.. and they are working perfectly... at least for me in my use case. But I appreciate the idea that you might also just remove the lens and possibly be able to narrow the FOV for the PIR sensor. Something I might have to test down the road. Thanks for watching... and sharing an alternate idea.
Wow! Thank you so much... I greatly appreciate it! Don't hesitate to let me know if you have any questions or issues if you end up using these sensors.
Hey I think that the way that you have done this whole project is awesome, but I was wondering if it is possible to do this with only white leds which have just a 12v and gnd pin?
You can certainly use 12V and only white LEDs. But if the LED strip does not use a data signal line from a controller (which I believe is what you are referring to), then how would the sensors turn the lights off and on based on motion or distance? I suppose you could use a smart switch or something to turn the power off/on to the LEDs. The controller in my case is used to also send the signal to the LED strip to turn off/on (in addition to the effect... but I could also just make my LEDs solid white, with no 'wipe effect'). But without a controller, again, there is no way to turn the LEDs on when on sensor is triggered and back off again with the other sensor... unless you do use some other way to do so with another connected device like a smart plug or switch. But yes, you can use 12V LEDs. However, if using my controller, you must just a step-down converter to step that down to 5V... or use two separate power supplies and create a common ground between the two.
@@ResinChemTech yeah the control was my main issue, my reason for using a 2 pin led strip is I want it as thin as possible and they are also quite cheap. The smart plug idea might work. Will have to look in to what smart plugs would integrate properly and how the coding would work. Thanks
How are the sensors synchronized with the led installation if they are not wired in the same circuit? Just with the wifi automation and the led controller? I'm very bad at welding since my hands are shaking quite a lot; might probably use a bigger controller like NodeMCU ESP8266 Development Board; would it work?
It is all done through automations in Home Assistant (this is covered in the original video... this is just an update of that video with new sensors). The sensors communicate with Home Assistant and Home Assistant then controls the LEDs. I have a standalone version without as many features or lighting effects, but it works without Home Assistant or any external automation system... and in that case, the sensors are wired to the controller that controls the LEDs. You can find that video here: ruclips.net/video/b4s_VEtVWY4/видео.html But yes, either of these systems can be built with the full size NodeMCU as opposed to using the D1 Mini. Just as long as the NodeMCU has a minimum of 4MB of flash.
Thank you for the quick reply!!! Let's say I want to install this on the stairs but I don't want it to light on when there is enough light conditions; would it by possible to have a light sensor controlling everything then, if the light sensor circuit is "closed", to have the laser sensors as a second trigger so, when both are closed (not enough light and movement detected) then the lights turn on? Sorry, I have my laser sensors on the way and trying to figure out everything in advance 😂
You can easily use a light level sensor as a condition for your automations. In other words, only run the automation (to turn the lights on) if the light level measurement is below a certain value. If the light level is above that, the condition would fail and the automation would not turn on the lights. Just like the ToF sensors, the light level sensor can be completely standalone and does not need to be wired to the controller (or other sensors), since Home Assistant is the middle piece that 'glues' everything together via the automation.
@@ResinChemTech Thank you! But I guess I need to power this light sensor to something... Same 5V Power supply? Also, which mounting screws did you use to attach the ToF to the lid?
Yes... you can use the same 5V power supply (assuming you are using something like a D1 mini or other 5V powered control board).. or you can power it separately via any USB adapter (like a phone charger). Now, while you can't attached this to the same D1 mini controlling the LEDs (since this is running WLED firmware), you *could* theoretically connect it to one of the D1 Minis running the ToF or PIR sensors. Since these are running ESPHome, you'd just have to add the code to the ESPHome node for the light sensor. The light sensor would then be exposed to Home Assistant and could be used as described above. This depends upon your use case. The advantage of a standalone light sensor (with its own D1 Mini/controller) is that it could be placed anywhere in the room to better detect light level of the room as opposed to right next to a sensor that may be darker due to the stairwell and/or would be impacted by the LEDs themselves when they turn on. But either method would work. You just need to get that light sensor integrated to Home Assistant (via ESPHome or other method... you could even use a completely separate, battery operated light sensor like a Zigbee one that isn't physically wired to 'anything' and could be placed anywhere) so that you can use the light level measurement in the automations that controls the stair lights.
So... if I understand you correctly, you could 'enter' the stairs somewhere in the middle of the staircase and could go up or down from that location? It would be possible, I think, but quite a bit more complicated. You'd likely have to add two additional motion or Tof sensors, one right above and one right below the middle entry point. You could then setup segments in WLED to only light one half the the stairs (either up or down, depending on which mid-stair sensor fired). The Home Assistant automations would also have to be modified to take these extra sensors into account.. and to manage the lights/segments accordingly. But I do believe the system could be modified to handle the situation as I described above, even though it would be quite a bit more complicated. Other than adding the two additional sensors, most of the changes required would be within Home Assistant and the automations. If you are talking about some other type of stair configuration, let me know... and I can tell you what I think the options might be.
Thank you so much for your video. I am stuck at where my D1-mini can't seem to connect it to my pc with direct cable. My pc can detect it, but ESPHome insists that nothing is being connected. You have any idea why? Thank you.
I had this issue with a Lenovo laptop. It did not have the correct USB to serial driver installed. For the D1 Mini, this should be the CH340. You may need to search for the CH340 driver for your particular system. For my Lenovo, it took me a bit of digging to find the right one for the particular USB bus on the Lenovo. When you say your PC can 'detect' it, do you see an additional COM port appear in device manager? If you do not see a COM port appear when you connect the D1 Mini, then ESPHome will not be able to see the device for installation. It is also worth double-checking your USB cable to assure it is truly a data cable and not just a power cable. Not all USB cables are able to transfer data... some are just for power/charging. I hope this info helps.
This does appear to be related to the incorrect driver installed on your system. I've not seen that error before, but found this issue listed on the ESPHome Github and it seems very similar to yours... and the solution was to update the USB to serial driver: github.com/esphome/esphome-flasher/issues/14
@@ResinChemTech So I have a few things I can update to you: 1. My Device Manager does show USB-SERIAL CH340(COM3) 2. I'm also using the data cable (which I can confirm that it is working since I mainly use it for the data transfer on a portable drive) 3. To recap my process of approaching the connection between the board and our PC, I have my D1-Mini board directly connected to my PC with the said cable, here I chose "Plug into this computer" option, which opened up the ESPHome web and it gave me the error "Failed to execute 'open' on 'SerialPort': Failed to open serial port.". I also tried the "Plug into the computer running ESPHome Dashboard" option, which also couldn't detect the board. I also approached the ESPHome-Flasher method and that was how I got the error from my previous comment. Hopefully this provides enough info for you. Thank you so much for your help.
Thanks for the video and code. I have 2 questions if you can help. Q1, Importing the package version of the code, HA complains that the automations aren't editable in the UI and do I want to import them, is this something I should do? Q2, The automation sort of works, half of my LED string lights up and regardless of which motion sensor triggers, they light up in the exact same way and direction. Is this something you've encountered and is an obvious fix? Thanks for any advice.
As to your first question, automations are only editable via the UI if they are created using the UI and/or if they exist in the primary automations.yaml file. So, for automations that are in packages, you won't be able to use the UI editor to modify them. You'll have to use the file editor (or whatever you normally use to edit your YAML files). The second question actually has two parts. When you say "half the lights"... do you mean only the light on one side of the stairs, or that only half the lights on each side? If it is the first problem, then you have a wiring issue. The signal line from the controller is split and the same signal is sent to both sides of the stairs. If one side isn't lighting up, then it is either a power or signal issue... be sure that no wires popped loose during the install. If it is the other issue (only half the lights are lighting up on each side), launch WLED and assure you have entered the total number of LEDs (use the total from ONE side of your stairs only... if the two sides have a different number, use the larger of the two). By default, WLED is only set for a default of 30 pixels, so that's all that will light up. If the lights are 'moving' in the same direction regardless of which sensor fires, then you need to check the automation. First, make sure you have the right sensor names for the 'Top Motion Lights On' and 'Bottom Motion Lights On'. Double check that you haven't duplicated the same sensor entity ID for both and have the right sensor for the right automation. Next, in each of these same two automations, there is a "switch" under the action section that is either turned on or turned off to reverse the direction of the lights. Be sure this switch is turned ON (switch.turn_on) for one of the automations and turned OFF (switch.turn_off) for the other. If the motion is backwards, then just reverse these. Finally, are you bench testing at this point or have you installed the system? If bench testing, be sure that only one motion detector is firing at a time. You might need to use the Dev Tools/states and watch and make sure that only one motion detector at a time is triggering when you are testing. Let me know how that goes, if you get it working, or have additional issues. If you are still having issues, you might want to consider reaching out to me via email. It's difficult to help much further here in the comments, as I can't post images, code blocks, etc. If you want to contact me via email, you can find my email address on the 'About' page of my RUclips channel (it says 'for business inquiries'). I just don't post my actual email address here in the comments because it gets picked up by the spambots... I get enough of that already! Do note that it appears you will need to use a full desktop browser to see this email link. Apparently when on a device like an iPad or mobile, the email address link isn't shown. It sounds like you are really, really close and I think you just need a few tweaks to get everything working properly.
@@ResinChemTech thanks for taking the time to reply, I genuinely appreciate that. Q1, good to know. Q2, I am currently bench testing right now, with 1 length of LEDs, 62 in total. I'll go through your detailed (again, thanks), feedback and try and diagnose the issue and reach out if i'm still having issues. All the best for the New Year if I don't catch up sooner than that.
Hey, hello again. Not sure if you remember me or where I left the comment about your LED staircase project that you inspired me or I should say challenge me to do a project of my own. As I started purchasing the required components, life happens as you know so the project was delayed, but now I wanted to show you how I had progressed thus far. I still haven’t figured out the control part yet. I have some ideas tho and I know how I want it to function just not sure how to make it happen. Is there a place where to share video photos etc.
Hi again. I fully understand and appreciate how life happens and sometimes gets in the way of our projects! But I'm glad to hear that you have circled back to the project. Yeah.. unfortunately you can't share photos or videos here in the RUclips comments. There are a number of options however. Naturally, you could upload video right here in RUclips. You could just mark the video as 'unlisted' if you don't want it publicly available and only those you give the link to will be able to view it. Of course, RUclips also blocks/holds any comments with a link as well.. Do you happen to have a Discord account? That would probably be the ideal way. I do have a small, private by-invite only server. If you do have a Discord account, if you could shoot me your full Discord handle (they are currently going thru the process of changing user names, so if yours hasn't been updated yet, it will have a #nnnn with four numbers. If you don't want to publicly post your Discord here, you can contact me via email which you can find under "business inquiries" on the About page of my channel. Be sure to let me know who you are in that email as I generally don't respond to unsolicited emails in that account.
Thanks for asking about my stair LED project. Oh, and the controller is isolated from the power supply. This is my first project of this type, and I miss sized the enclosure box. OK, the controller works perfectly fine the issues I’m having are with the PIR motion sensors I’m using. The PIR motion sensors I’m using are working perfectly and detect exactly how and what I need for a proper detect at top and bottom of the stairs the issue is with the interface to the GPIO pins. The one PIR sensor I’m using at the top only has a N/C contact more like a switch so you can feed voltage into one side of the contacts and have the contact open on trigger. That’s one of the issues you really want to have a normally open contact and feed voltage on a trigger from what I’m reading PIR’s want to be pulled high or fed voltage on trigger. So I’m trying to find a way to reverse this sensors N/C contact to N/O perhaps with another relay. The other sensor at the bottom has both normally open and normally close contacts so naturally, I’m going to use the normally open set. So the next issue is getting it working with the macros, presets, etc.. seems most stair projects have custom compiled user mods which I have no clue about. My plan was to try to get it working with the built in presets macros, etc.. so trying to find a way to implement the same outcome as a custom compiled project, but with the built-in functions.
I just started another LED project and I haven’t got the stair one even working yet but I’m working on my one desk while I have it out and apart. I ordered another Dr. Z’s controller but hasn’t arrived but I’m thinking I could come off the quad. Thats mounted in the basement under the stairs is in the basement for the stair project. There’s still available channels since I’m only using 2 one for each side of the steps.
What firmware are you using on the controller connected to the PIR? If you are using ESPHome like I am, then you can apply an 'inverted' filter to the PIR sensor. This makes it work in reverse and so the normally closed sensor would work the same as the normally open one, which would not be inverted. And of course all my automations are handled via Home Assistant. While WLED does have inputs for PIR sensors, it doesn't have any sort of 'logic' language to handle the more complex situation like two sensors on a staircase. If all you wanted to do was turn on some LEDs when motion was detected, WLED alone could handle that. But it doesn't have any sort of "IF-THEN-ELSE" language to say something like if the lights are already on (because they were triggered by one motion detector), turn the lights back off... otherwise turn them on. And if no motion is detected after 15 seconds turn the lights off regardless. You need something with a true automation engine like Home Assistant to accomplish that.
It's really not a difficult project. I do have a number of LED-related videos that include a step-by-step guide on how to create these stair lights and others on the basics of using LED strips: ruclips.net/p/PLqjDNeOVHOkf079FYwRLRoOHJwLijKkP3 This project could technically be done with little-to-no soldering if desired. Most of my projects also have a related written version with step-by-step instructions, wiring diagrams, parts lists and more. And of course, I and many others are always happy to answer any questions and help you along if you decide to try this or any other LED projects. I'm sure that with just a little bit of patience, you could definitely create something similar to this or at least you own LED project of some kind.
Hi, could you tell me the name of the LED STRIP? or what is it called as so i can buy it in my country? I need 3 led strips like those on the ceiling with motion sensor So if possible can you please provide me the specific name of that led strip or is it a effect? if its an effect what is it called as? Am sorry am a little confused.
The LED strip I used is the BTF Lighting WS2812b 60 LEDs/m. You can find a link to this, and all the other parts I used in my original stair lighting blog ( resinchemtech.blogspot.com/2021/07/simple-motion-activated-led-stair.html ) As far as the effect, I am using WLED software on the controller. This is free and has over 100 different effects ( kno.wled.ge/features/effects-palettes/ ). The one I am using in this particular video is called 'Wipe'. This particular video was just an update to a previous video I did to improve the sensors. It might be helpful if you watch the original video as it goes into a bit more detail about the overall system: ruclips.net/video/Y29Y0iTLggg/видео.html
You can purchase the ToF sensor itself... but to make it useful it does have to be connected to some sort of microcontroller or device that can take the measurements and do something with them (like turn the LEDs off or on). I do not know of any sort of "pre-built" version that would also work to control the LEDs. Like most of my projects here on RUclips, it is a DIY project that you must build yourself. However, I do have step-by-step instructions, including wiring diagrams, in the related blog article: resinchemtech.blogspot.com/2021/07/simple-motion-activated-led-stair.html Hope that helps... but as I mentioned, my projects are generally meant as DIY or hobby projects. They can't be purchased 'pre-built' and unfortunately I can't build them for others. The best I can do is show you how to build your own.
@@ResinChemTech thank you so much just for your reply I’m looking for plug and play system I do understand that you built it from scratch I probably could do it but know what is need and where to find it all I half the challenge Maybe I’ll try a LED system with motion control I think they can be found a little easier Again thx for the reply Asked for help with some other thinks and people don’t reply and no guidance Thx again!!!!!
That is certainly possible. It would primarily be handled via the Home Assistant automation. The automation trigger can be designed so that a state must be held for a minimum time (like 90 seconds) before the action (turning on the fan) will execute. But the simply answer is yes.. this could be adapted to do something like you are describing.
Couldnt this be solved by giving the PIR sensor some kind of short tube to look through? In my case I am fine with the broad field of view of the PIR sensor using it for a corridor and timed. Just in theory: could you have the PIR activate the TOF sensor? :D
I did add 'fins' to the 3D printed enclosure, but it wasn't enough. I guess you could add a tube or try to restrict the field-of-view even further, but the ToF sensors have worked out great... and continue to work great, with no cool down period that all PIR sensors have, and that can't be solved by a tube.. or my any other means. The ToF sensors cost about $6 vs. around $4 for the PIR sensor and the effort to wire them is nearly identical, so I guess it depends on personal choice and your particular install needs. For me the extra $2 per sensor was well worth it... and the resulting overall sensor size is smaller (and in my opinion looks nicer and is less noticeable).
It might be worth a try, but I don't know what other effects more opaque covers might have. Since the PIR is using infrared instead of visible light, I'm unsure what might occur with a more diffused cover. It could simply scatter the signal more, leading to other issues, as the purpose of the diffuser is to focus the light onto the sensor. And while it might shorten the detection distance, but probably wouldn't really help with the field of view, which was also one of the problems I was having in my particular install. But it is an interesting idea. Thanks for sharing it.
Considering that the system can draw up to 26A at 5V when fully powered on, any sort of battery is going to have to be quite large... like a car battery or something (stepped down to 5V)... and likely would not last too long without recharging or replacing depending on how often the lights are triggered. In my case, this is for 432 LEDs (216 per side). LEDs can draw a lot of power when added up. The standby power draw, when the lights are off would be pretty small, but probably still around 500mA - 1A when the sensors are included. You could substitute lower power LEDs and reduce the number of LEDs, but you are still going to require a pretty big power draw and are unlikely to be able to run this off of any sort of normal type of power bank or LiPo-type battery system... at least for any significant length of time. Is it possible? Of course.. with a large enough battery. But even if it is made to work, the power draw will likely drain any type of battery system pretty quickly.
Why not just use 2 sensors. The one you have at the bottom with a triggered delay looking for a second trigger from another one on the first step. (narrow beam IR, laser, or something that you'd see at the entrance to a store in a mall) After you trigger the bottom one, wait x number of seconds and wait for the second one on the step. No second trigger, no go and then reset.
Thanks for the idea. I obviously already have two sensors... one at the bottom and one at the top that controls both the on/off and direction of the lights. Adding a second sensor at both ends would result in four sensors total... with more wiring required as well. To be honest, the new TOF sensor acts pretty much like a store entrance sensor and doesn't trigger when just walking by the stairs. Yeah... it costs around $6 vs. $3 for the PIR sensor, but if I needed to use 2 PIR sensors, the cost would be a wash . The TOF sensor is much more responsive without a cool down time as well. Like most DIY projects, there are a lot of ways to accomplish the same outcome. If I had been willing to tear into the stairs and modify them, I would have done things much differently.... but as my original video stated, I wanted to accomplish this with no modifications to the existing staircase. Regardless, I greatly appreciate the feedback and idea. In fact, this particular video came from a view comment on the original video. Thanks again!
You just have to delete the original entities using the Settings->Devices & Services. Once the original entities have been deleted (or the device if it exists), you can simply rename the new binary_sensors and remove the _2 from the entity_id via the Entities page. You just can't have duplicate entity names in Home Assistant. So, once you remove the original name, you can simply rename the new one and reuse the original name. That way, you don't have to update any automations, scripts or dashboards. Hope that helps!
Numerous others have asked this question. Unfortunately, each system would have to be custom designed based on a particular stair configuration (length, location of power, etc.). And the cost of shipping the aluminum channel and various components would be cost-prohibitive. And finally, my goal in these videos are to try to show others how to do it themselves. I simply don't have the time or capacity to build, ship, bill and deal with all the other related logistical issues involved in making and selling a system like this. Finally, this system requires Home Assistant to function properly. If you are not a Home Assistant user, then this system simply will not work. I have created a simpler version that doesn't require Home Assistant or any other automation system ( ruclips.net/video/b4s_VEtVWY4/видео.html ), but the physical build is about the same for both systems. But I am happy to answer any questions or assist as best as I can if you would like to attempt to build your own but I'm simply not able to build any of my projects for others.
@@ResinChemTech Thanks for your fast reply, I don't know enough about electronics to do this myself I don't think. I'm not even sure what home assistance is :D is this the raspberry PI thing? I really like the transition you create, its exactly what I want from my LED system for my stairs, but I have no clue how to go about building such a thing.
Would it be possible for a price to get all the components but not the LED strip, as i would measure and buy the LED STRIP for the length of my steps, but could I purchase the rest from yourself maybe? so like 80% complete.
Which Gist are you using? The one from kdorff? What error are you seeing? It is possible an update to ESPHome could have broke something, but this is a pretty basic file other than the lambda, so it may be something else. I'm happy to try to help, but I need a little more info than "got an error".
Try this gist, which I just created from my ESPHome node: gist.github.com/Resinchem/6026ca5eef706f605b5efcc630533405 A few notes (which are also included in the Gist comments): You should create a starting ESPHome node using the ESPHome 'New Device' option, but you can skip the initial installation if you want. This creates the top portion of the file with the specifics for your HA... e.g. wifi, a unique encryption key, etc. The only thing you may need to edit in this top portion is the board type if you are using a D1 Mini. The last line of the generated file should be 'captive portal'. Copy all the info from the Gist file following this line into your ESPHome node. Change any entity names as desired. This is just for one of the two sensors (top in this case). You'll create another one for the bottom sensor, just changing the 'top' to 'bottom' everywhere in the file. Let me know if you have questions or continue to have errors or issues.
Ha! Yeah... I could see that. But I know another person that built the system and opted to simply install the sensors around waist high. That way it would trigger for a person, but their dogs would not trigger the sensor and therefore the lights would not turn on. Just an option for those that don't want their animals to trigger the lights.
If you are referring to the LEDs, then yes you can certainly use something other than the aluminum channel. I have a project where I used 'neon rope' tubing for the LEDs ( ruclips.net/video/Y2y19Ck2vic/видео.html ), but I found this particular brand/style a bit difficult to work with. But there are many other similar options as well.
It took me a little bit of trial and error to zero in the right distance and the delay time (both important steps), but since then I have not had any false positives. This is especially true of the 'false positives' I previously had when just walking by but not actually going up the stairs. With the VL53L0X this is not an issue. I never get a trigger just walking by the stairs. I actually have to step on the first riser to cause the lights to trigger. The PIR sensors on the other hand, would often cause a false positive when just walking through the room near the stairs. They would also occasionally, but not often, cause a false positive and turn on the lights when no one was near the stairs at all... which led to all the "ghost" comments you see in the original video's comments! The VL53L0X is ideal when you need a narrow, short detection range... like a stairwell. The longer the distance being measured, the wider the detection range and the higher the likelihood of getting false positives.
Thanks.I'm using only one esp8266 in my case it could be the distance I have from the controller. the descent sensor is at around 5m and the ascent sensor at around 3m.
That's a pretty long distance for the VL53L0X. The listed max range is listed at 3m, but there is a long-range mode (with less accuracy. According to the description: "The VL53L0X supports two modes: normal and long-range. In normal mode, the maximum measurable range is 1200mm. In long-range mode, the maximum measurable range is 2100mm, but the result is more noisy." You have to, I believe, enable this long range mode by sending a command to the device. It's great for shorter ranges, but for something longer you may need to move to something like the TFMini LIDAR sensor, like the one I used in my Parking Assistant video: ruclips.net/video/HqqlY4_3kQ8/видео.html In this video, I actually do a comparison of distance sensors, including the VL53L0X vs. ultrasonic vs. the TFMini. In my testing, I found the VL53L0X often reported 'out of range' errors at a distance of only 5 feet ( ~1.5m), which would agree with the above statement when not in long range mode.
Yes, I have each VL53L0X connected to its own ESP8266. As I2C devices, you can connect more than one to a single board/set of GPIO pins, but each I2C device has to have a unique address. For the VL53L0X, you can change the device address, but it has to be done by sending a command to the device to set the address. Out of the box, all the VL53L0X sensors will have the same I2C address so unpredictable results will occur if you are trying to use two or more I2C devices with the same address and a single ESP board.... unless you have also created two separate I2C channels via the GPIO pins.
This video is just an update to the original video. Please see the original video for information on the controller, WLED, ESPHome, Home Assistant and how the system integrates and operates: ruclips.net/video/Y29Y0iTLggg/видео.html Do note that this particular version in this video requires Home Assistant for the automations. It does not work with just WLED alone. I have another video of a standalone version that doesn't require Home Assistant, but also uses custom Arduino code for the controller instead of WLED: ruclips.net/video/b4s_VEtVWY4/видео.html
Hi, thank you for another great video. I am looking for someone to make a blueprint on a job that I would like to tackle.Of course I will gladly pay for it. I would like to pour a concrete walkway 46 feet long. I would like to embed in it LED channels facing the sky. The path to be divided every 2 ft, like stairs, with a PRI or TOF sensor. When somebody steps on the walkway only that section of the path to lit up. More info if you think that you would take the job. Any help would be greatly appreciated.
Thanks for the feedback. And while I appreciate the offer, I don't feel I have either the qualifications or comfort level to provide you with any sort of blueprints or design plans for something like that. For one, everything would need to be waterproof and wiring/cabling would need to be buried (power injection would definitely be needed for that long of a run and that number of pixels).. and code for that may vary based on location. Outdoor installs are a totally different animal than indoor projects. I have no idea how something like the ToF sensor would even react to rain or snow. Next, for around 46 feet (assuming 60 LED/m strips), you would be over 800 LEDs... and that is just for one side of the walkway. If you put them on both sides, you are over 1600 LEDs... and looking at a really big power supply of 100 amps or more... this would require special fusing considerations, among others things. I just don't feel I can adequately and safely provide you with any sort of blueprints or design plans for something like this. But I do appreciate the offer.
You can certainly use an ESP32 with WLED. And WLED does have the ability to connect "buttons" or something that acts as a binary sensor (like a PIR motion detector). The issue with the ToF sensor is that it reports a distance and isn't a binary on/off sensor. In my case, I'm using ESPHome to 'convert' that distance into a true/false binary based on whether the measured distance is greater or less than a predefined distance. This is something that I don't believe WLED alone is capable of doing. However, there are different versions of WLED that you can custom compile with various options and/or user mods that might allow use of something like a distance sensor. But the standard default WLED currently does not have an option for using a distance sensor or value for control of the LEDs. Hope that info helps.
While I appreciate the interest, as I've told many others that have requested that I build versions of my projects for them, I simply don't have the time with my own projects and responsibilities to build, package, ship, track and deal with all the other logistics involved with selling a product. The goal of my channel is to show others how to build their own. To that end, I'm always happy to answer questions and assist someone with building a version of one of my projects, but I just don't have the time with my own projects to build anything for others. But I do appreciate the interest. And thanks for watching. Again, I'm happy to answer any questions to help you create your own version of this, or any of my other projects.
You could certainly do that... really anything that can detect someone stepping on the first step. In my case, the original PIR sensor detected motion near the stairs but not necessarily on the actual step. The only thing I wanted to avoid was installing something on both sides of the stairs. My garage door sensor, at least, has a wired sensor on both sides, so that wouldn't work in my case. But whatever sort of sensor works to detect a person (or pet if you like) would probably be fine. Heck, you could even use some sort of pressure plate or load cell that would turn the lights on when someone steps on it. That's the cool think about DIY... lot's of different ways to tackle a project and to find the one that works best in your situation. Thanks for watching and taking time to drop a comment! I love it when viewers recommend ideas for improvements. Even if they don't work for me, they might work for someone else.
Sorry... many others have asked the same question, but with my own projects and other responsibilities, I simply don't have time to build, package, and ship any of my projects for others. I try to provide enough information and details between my videos and related blog articles so that others can make their own versions... that's kind of the purpose of my channel. So, while I appreciate the interest, I am simply unable to build any of my projects for others.
A pressure pad would certainly work... but in my case an exposed pad on the stairs would not get a high WAF. The other option would then be to cut and pull back the carpet and install it underneath the carpet. But that violates the rule of the original project as stated in that video... to complete the project without making any modifications to the existing staircase (and that would include the carpet). There are many, many other ways to do a project such as this... and plenty of examples of fancier options here on RUclips if you are willing to cut drywall, route out stringers, etc. But as the original video was titled "...without staircase modification", and probably should have included "... and with wife acceptance", I did have some limitations on the type and installation of sensor triggers. Regardless, these ToF sensors were a major improvement over the original PIR sensors and eliminated the "ghost" triggers. As always, I appreciate the suggestion. But in this case, a pressure pad would not have been a viable option for my project goals. But everyone's goals are different and this may be a good solution for others.
Sorry. I don't have the capacity to build, package, ship and charge for building any of my projects for others. My goal is to try to teach others how to build these things themselves, and while I'm happy to try to help them do so, I simply don't have the ability or resources to build any of my items for sale to others. But thanks for your interest.
Thanks! Kind words like yours are what motivate me to keep making videos! And I'm slowly learning new techniques to try to improve those production values... which were pretty darn poor in my earlier videos. Thanks again for watching and taking time to leave an encouraging comment.

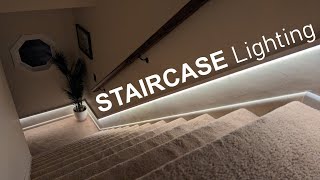


Nicely done! I'm so glad I could contribute to this fun project.
Thanks... and thanks again for sharing a great upgrade!
Really nice @DorffMeister I think this is useful for other applications so I appreciate you suggesting TOF so I got to learn about it here!
@@BELSERVICEMAN I've also used it to determine water depth in a bucket for an irrigation system. I placed a small hole in the top of the bucket and pointed it down.
@@Dorff_Meister oh no! I have to stop watching RUclips! It is costing me $$! I am thinking about rain water recovery as we are having a drought and I don’t have a well so local water is tied to sewer so if I use city water I pay for sewerage on my lawn and garden. This is detrimental to my Home Assistant gadget spending.
I anticipate I will discover more use cases!
Thanks again for helping ResinChem on this!
Future generations shall revere the name DorffMeister.
I love this! I have recreated your STAND-ALONE motion sensor version and have 2 hallways in my house that light up at night when you walk by so you can see and it would be great to replace the PIR sensors to those TOF sensors. But I read your comment to Paul Bryson when he mentioned it also. Well if you decide to see if it can be done in the future, I'd watch the video!
Thanks. Let me give it a little more thought on the best way to approach an upgrade for the standalone system. Then I'll consider putting together a video as to how to replace the sensors for those folks that have built that version.
Stay tuned... and thanks for watching!
thanks for the guide, I've been on a mission to replace all the Sonoff PIR sensors in my home as they are crap with mm wave sensors but was stuck when it came to bathrooms due to no power points. I have now installed ESPhome, created the sensor and it's working great on the doorway. I created the automation in node red so implemented a 100ms trigger delay + used the delay node to prevent repeat triggers for 2 seconds to stop the light going on then straight back off again as your legs pass the sensor.
Yeah... I like the ToF sensors better than PIR... for certain use cases. They can be a little bit noisy, but as long as you debounce them a bit, they can be both great distance tools... or with some coding, turned into a simply binary sensor for detecting something that breaks a "beam" for triggering other actions.
Thanks for watching and taking time to leave a comment!
Excellent video as usual. Just getting into the automated LED scene and have a few ideas for around the house. Just a suggestion with fitting the sensor. Modify the lid with a couple of "L" shaped overhangs (brackets) to slide the sensor underneath to hold it in place, no screws needed. Keep up the good work.
Thanks! Yeah... my 3D design skills are still a work in progress! This one was actually an improvement over the original that used hot glue to hold the sensor in place. So baby steps I guess. I've been (very) slowly trying to move my design work over from Tinkercad to Fusion 360. I still have a long way to go.
Thanks for the recommendation... and thanks for taking a few moments to post a comment. I appreciate it.
Cheers, I'm using FreeCAD for design work. Always learning with this program. Made a few parts for my little motion Racing Simulator setup. I like the staircase setup you have with the improved sensor. Still getting my head around how all this works together before I start buying parts for a project. Really like you videos and thanks for the reply.@@ResinChemTech
If you haven't already, be sure to check out the original stair video that shows more about how the system is put together, as this video is just an update to that one. using new sensors. And of course this version requires Home Assistant or another compatible home automation platform. But I do have another system (and video) for a standalone version of the stair system. This other system does not have all the features and effects of the original, but it does work without any external systems or automation platforms if you are not currently a Home Assistant user.
And of course, let me know if you have any questions if you do decide to build one my stair projects.
I love that feeling when something that worked, but not perfectly, now works like a dream! :)
Me too! For many of my projects, I learn things later... or like in this case, get great ideas from my viewers... that leads me to either go back and improve on the original or to create better versions the next time around.
Thanks for watching... and thanks so much for taking time to add a comment. I greatly appreciate it!
I am extremely glad with your modification on sensor distance.
I appreciate the level of detail, thank you. Your doing some pretty cool stuff.
Thanks! While it means my videos are a bit longer than many others, I do try to provide both the what and why of a project, hopefully so other can easily take what I show and adapt them to their own project needs.
Thanks for watching and taking time to leave a comment.
Looks good, but if it was me I would put one pressure sensor on the first step, then as soon as anyone puts their foot on that steep you would get a logic high or low to tell the processor to start, so no false triggers, no detection area, just the first step, and very cheap you can get a pressure pad in a local store that sells alarm stuff, just slide it under the carpet and wire in.
All the best Bob in the UK
Interesting project!
Tiny comment on the ESPHome code: I believe a button is preferred over a switch nowadays for the reset.
Yep... you are absolutely correct. Of course, when I first started creating a lot of these, the button entity wasn't available. And I tend to be lazy and copy/paste from one project to another. But you are right, and moving forward I should start using button.
Thanks for the tip!
Fantastic I'm in the process of installing exactly the same set up from your original vid but with the tof sensor knowing the pir would be activated as a high traffic area. I have the led in place but no sensors as of yet. My only stump is understanding the automation of it hopefully I can understand it off your updated blog. Can't wait to get the project going. Thanks for great video
Thanks! I'm pretty happy with the system, especially with the upgraded sensors. As far as the automation, you might take a look at the Github repo ( github.com/Resinchem/LED-Stair-Lights ) where I have the latest code and some better explanations than in the blog article. And if you aren't a YAML guy, you can recreate the automations using the Home Assistant UI editor. Or enable packages and just copy/paste the package version right into Home Assistant.
If you run into any issues with the automation/code, please don't hesitate to reach back out. The automation/code is where most people tend to get stuck, but I've helped quite a few folks through that step... and am always happy to do so!
Thanks for watching!
@@ResinChemTech Thanks for getting back to me ill check it all out, and will do thankyou!
All I did to narrow the field of view was tape over the area on the left side of the PIR lens so it cant see anything until a foot goes onto the first step, easy and cheap.
Hi. Thanks for your efforts. I think if you just keep the sensors in the 1st or 2nd stair step will solve the false trigger
Great solution to your problem and wonderful video production value! Nice job!!
Wow, thanks! I don't think anyone has ever mentioned my production values! I'm slowly getting better (and getting better equipment along the way). This was the first video using new editing software, so it's a bit of a learning curve as well.
But thanks so much for your kind words. I greatly appreciate it!
Thank you for the update!!! I will be using this for under bed lighting.... one for each side of the bed.... I have a ranch so I don't have stairs BUT this is an excellent update for my bed!!! Thank you so much!! Great job!
You are welcome! I know a number of others that have reached out to say that they installed this system along the baseboard of a long hallway, but I haven't heard of anyone that has tried to use it for under-bed lighting. That's an interesting use case! Let me know how it works out.
And of course, if you run into any questions along the way, don't hesitate to reach back out. Thanks for watching!
@ResinChem Tech Always learning new things from your videos.. keep up the good work. When I get all my parts if I have a question nice to know you're there. Thank you again!
@@ResinChemTech Not really sure what I"m doing wrong here but I can only ever get one sensor to work. I've built 4 but only one works.... for some reason the other 3 aren't scanning... I'm at a loss.
Really lost here.... says to create a WLED controller...check... then I go to ESPHome and write the code to the di mini and it says "Erasing" which pretty much wipes out WLED.... what am I not seeing here? LOL Does there exist a start to finish blog that carries it from start to finish?
Thank you
Ok... let's verify here. You should be using 3 separate D1 Minis or ESP8266 boards. One is for WLED and one each for the sensors. You cannot have ESPHome and WLED on the same controller. Nor, in this particular case, can you have both sensors connected to the same controller. Each sensor needs its own D1 Mini (there are ways around this, but you have to use code to change the I2C address on one of them)... and WLED needs its own D1 Mini or ESP8266 board. It sounds like you are trying to use the same controller for more than one thing... which won't work. Let me know if I am misinterpreting what you are saying... but as I built the system here, each sensor and the LED controller are completely separate. The 'communication' between the devices is handled via Home Assistant automations.
I use simple pressure mats on the bottom and top steps. So it really only comes on when someone is standing on the stairs. And it doesn't react to the cats either.
This is perfect thank you I'll give it a go soon I'm just starting to learn these things it's quite amazing what can be done
What I would personally do for this one is grab one of those lawn solar lights, rip off the solar panel on top.
Then put that solar panel on one side of your stairs, and put a weak laser light (one that you cannot visibly see) pointing at the solar panel. And wire the solar panel to output a digital trigger when the beam is broken.
It will be like a laser trip wire, and when that small amount of power stops being generated at the solar panel is triggers.
Just an idea i had for my own.
You are insane at this stuff bro
I think my wife would likely agree with you... at least the insane part!
I see Resin Tech and I can’t help wonder if we had contact when you were in the industry. Perhaps you are familiar with Brookfield Viscometers, my old company before they sold. I see the Indianapolis sign and after 5 years out. I bet Henkel has bought all the small specialty resin companies and only leaving room for giants like AOC and Dow to name a few.
I guess it doesn’t matter that I used to support/help people in Resins and coatings and now ResinTech just educated me!
It seems like a nice turn on things.
Ha! I worked for a company called Lilly Industries (formerly Lilly Industrial Coatings)... and nope, not the same Eli Lilly (pharmaceutical) company most folks associate with Indy. I developed polymers and resins for various coatings... primarily polyesters and alkyds. Prior to that, I worked for Union Carbine (now Praxair) that developed metal ceramic coatings. But that was many, many years ago. Lilly was purchased by Valspar and operations moved to Minneapolis. That's when I made the career switch to IT.
Nice to virtually meet you... if we didn't cross paths somewhere in our pasts!
@@ResinChemTech I forget how diversified the “resins “ industry is and I think epoxy all to often and not paint. Valspar was a customer and I tend to buy their paints but all paint companies were customers pretty much. DuPont and it variations and I had lots of contact in automotive coatings.
Being the service manager I did get to experience many different applications!
Could consider a slot on the inside of the box with slightly bendable arms that have round pegs to fit into the holes of the new sensor so you won’t need screws
Very interesting! I've been trying to find a way to have HA no if my car is going out or coming in.
It seems like I could put two of these next to each other a couple inches apart just inside the garage door. If the one closest to the door goes from false to true first then the car is entering the garage. Because the tire had to have passed the first one and then as I drove further into the garage, the second one would activate.
Intriguing indeed!
That's an interesting use. If you haven't seen it, I also have a parking assistant video that uses a LIDAR sensor and MQTT to integrate into home assistant to let you know when a car is present or not. It could work in a similar manner.. when the detection goes from "car present" to "no car present", then you know the car is leaving the garage... and vice versa. It's just another option if you are interested. You can find that video here: ruclips.net/video/HqqlY4_3kQ8/видео.html
But let me know if you go the route of trying the ToF sensors for detecting a car entering or leaving the garage. And thanks for watching!
I'd love to take on this project!!! Thank you
I wanted to use multiple beam break sensors to gain the same affect but it would require wiring on both sides of the stairs. I might give this a try
I've been really happy with the new sensors. They are much more reliable, have a tighter focus and result in very, very few false triggers as compared to the PIR version. They do make a nice 'break beam' with only wiring on one side, just as long as the distance needed for that break beam is relatively short (< 4 ft or so), but it is ideal for something like a staircase.
You could also use multiple sensors or maybe a camera to track people on the stairs. This way the light would stop or adjust to a change is speed. Would look and feel so futuristic I guess!
Are you using WLED for controlling the leds per chance?
Yes it's WLED. This, along with the controller build, install and Home Assistant automations are all covered in the original video. This video was just an update to the original that shows the improved detection by replacing the original PIR sensors with ToF sensors. Everything else about the system is covered in the original video: ruclips.net/video/Y29Y0iTLggg/видео.html
@@ResinChemTech thanks! I apologize if you covered this already, but how did you get the gradual cascading up/down effect for the leds? When I configure mine in the WLED settings, it’ll either just turn the entire strip light on, or if I configure segments like it shows in the Animated Staircase usermod docs, it’s just a choppy effect. Are you using something besides the animated staircase for that?
I am not using any mods at all in WLED. It is just standard WLED. When the automation fires in Home Assistant from one of the triggers, it calls the WLED entity and passes the speed and effect, in this case it is the "Wipe" effect. For the reverse direction, the automation also either turns the WLED reverse switch on or off. This is all standard WLED, the Home Assistant WLED integration and Home Assistant automations.
If you look in the video description of the original video I linked to above, you will also find a blog article and Github repo that provides more info and provides samples of the code that I used to make this all work.
This is a great update. Thanks for sharing!
You are most welcome! I've been running the new sensors for a week or so now, and they are much more responsive with less false triggers at the bottom than the PIR sensors... so I agree that it would be a good upgrade if building the system from scratch today.
Thanks for watching and taking time to comment!
Seeing the Zebra brought me back to the 90's
Good idea. I'd have added stupidly a 2nd pir sensor and use and AND logic with the 2 pir sensors to turn on the light.
Well, the true credit goes to one of my viewers who recommended it. But I have been extremely pleased with the upgrade and no longer have "false triggers" when just walking by the steps. It was really an easy upgrade but it has made a huge difference in the reliability and reactivity of the lights.
Thanks for watching and taking time to leave a comment!
Glad I found these videos. It's exactly what I'd like to do with my steps. Now trying to actually do it. Lol
One question though. Looks like once you trip the sensor you can turn it off with the same sensor. So if 2 people are using the steps right after one another, will it turn the light off and not work?
Yeah... sort of. It isn't perfect when it comes to multiple people on the steps at the same time. When a sensor is tripped (either one), it toggles the state of the LEDs. So if one person starts on the stairs, the LEDs will come on if they were off. If a second person then trips a sensor before the first person exits, it will turn the LEDs off. Similarly, when the first person exits the stairs, the LEDs will turn back on and then finally turn back off again when the second person exits.
You could probably implement some sort of 'counter' to try to keep track if multiple people have entered the stairs... but that could be fooled if someone starts down the stairs, opts to turn around and exits the stairs at the same end they entered. There would be no way to tell if it was a second person entering or the original person turning around and existing at the same sensor. So, it isn't 100% foolproof for every scenario. But honestly, at least for us, it is not often that multiple people are using the stairs at the same time. And regardless of how the sensors are tripped, the LEDs default to turning off 15 seconds after all detection has ended. And of course there is no 'cool down' period with the ToF sensors like there is with PIR. So, you can simply tap your foot again on the stair where the sensor is located to toggle the lights on or off at any time. Again, not perfect.. but it does allow you to turn the LEDs off in a multi-person scenario if you are the last to exit and it results in the lights toggling on. Or as mentioned, they will turn off after 15 seconds anyway.
Good luck with your build. Do note that this was a follow up video to the original that covers the actual build and install. This one was simply to cover the upgrade of the sensors from PIR to ToF (a huge improvement in reliability/elimination of false triggers in my case). So if you haven't watched the original video, it might be worth a peek ( ruclips.net/video/Y29Y0iTLggg/видео.html ). Just let me know if you have any additional questions.
Could used any IR sensor. In my case i have a tube around the PIR sensor directing it very strictly. Have had mine in the stairs for 6+ years and have every step with leds that can change color :) Both down up and up down of course and if someone goes after the time extends. Perfect for the night.
I've seen your stair video. It is nice. However, in my case as I stated in the original video, my goal was to do an installation without any modification to the stairs... so no drilling of any holes, removal of carpet or drywall, etc. So I could not recess any sensors into the stringers as you did. In addition, since the bottom of my stairs are open, even a tube still meant that the lights could be triggered when walking by the opening in the stairs directly opposite the sensor... a tube would be of no help in this case. But by switching to distance instead of motion, it resolved the issue... and I didn't need any tubes, fins or other measures to block portions of the sensors.
I do like how you have the light under each step as opposed to along the sides/stringers like I do. Unfortunately, with carpeted stairs, that really wasn't an option for me. I tried to build a system that was not only easy to install, but could easily be removed without leaving behind any holes or other repairs that would have to be made. Thanks for taking time to share your thoughts.
@@ResinChemTech ahh yeah my involve some drilling and such. :)
Great improvement and another well explained video, thank you!
I had similar sensor at work, but it had a reflector at the desired distance, did you address the range code-wise ?
and by the way, which language you're coding with? do you have any tutorial? I'm really looking forward to get into this world and was wondering
You are welcome! I cover the code that is used for the sensor in the section on ESPHome code (at the 6:10 mark), and this is where I set the distance to indicate the 'broken' beam. ESPHome modules are basically written using YAML, but compile to Arduino/C++ code under the hood.
The VL53L0X sensor is more-or-less a tiny LIDAR sensor and uses pulses of non-visible laser/IR light to measure distance, so a reflector isn't really needed... just a solid surface.
I use various languages in my projects, depending upon needs. Home Assistant relies heavily on YAML for its automations and manual configuration (although Home Assistant itself is written in Python). So, besides YAML and Python, I also write my own firmware (primarily for the ESP family) using Arduino/C++. If you are looking at getting started with Home Assistant, I'd focus on an understanding of YAML first... although as Home Assistant matures, the need to use YAML continues to decrease. If you want to develop/design your own devices using ESP8266/ESP32, then Arduino/C++ is probably the best, although not the only choice. If you want to use Raspberry Pi for custom applications, Python is probably the best choice.
Thanks for watching... and thanks for the kind words!
I finally got this working !!!! Thank you very much for your videos and your recommendations. But (and there is always a but) my wife does not like the case sticking out at the top of the stairs. Can you tell me what software you are using to create the stl files to do the 3 printing. She wants to have the box in the drywall so that there is a minimum exposure of the sensor.
again thanks for your help and guidance.
First... congrats on getting the system up and running! And yes... got to keep that WAF high! In my case, it was sort of the opposite... I wasn't supposed to make any changes to the stairs or drywall.
But most all of my 3D designs, including this one, were just done with Tinkercad. For the most part, I just need simple geometric shapes for things like enclosure boxes. I'm in the process of learning Fusion 360 for more complex designs. If it helps, I just added the .stl file for the sensor lid when using the ToF sensor to the Github repo for this project: github.com/Resinchem/LED-Stair-Lights/
If you have a way to share photos (unfortunately you can't do that here in the RUclips comments), I'd love to see what your finished project looks like with the sensors recessed into the wall. Let me know if you have any additional questions.
I'm still waiting for the aluminum tracks, but I will send you pictures of the the finished product. I really appreciate you guidance on this project.
I love this! Too bad I can't find this on Amazon as a plug and play. Device. I would definitely buy it. This is way too involved for me. I don't have that kind of skills
Agreed, I'd definitely buy it.
just use motion sensors, this extra customization isn't 100% needed, as you walk by the stairs it gives you extra light anyways, I don't see why you wouldn't want this other than for OCD reasons
Awesome tutorial... I've been messing with wled and xlights for Christmas decorations but this is a great idea especially now that my stairs are getting remodeled which gives me more options, my question is.... Can I connect two Tof sensors to one esp32? One to the bottom of the stairs and one at the top. I've seen your videos and read your tutorial. I have all the parts just wanted to make sure I was good to go before I dive in. Thanks
You can connect both to a single ESP32... but it does prevent a couple of challenges. First of course is that it requires you to run two extra wires the length of the stairs (data and clock) in addition to the USB power (or +5V/gnd wires).
Next, if connecting both to the same controller, you will need to follow the manufacturer's information to change the I2C address for one of the two devices. Each I2C device connected to a given controller must have a unique address. The default address for the ones I purchased were 0x29. But this will be the same for every one purchased. Changing the address usually involves connecting the device and using Arduino code to send an I2C command to the sensor to set its address. You can Google "VL53L0X change I2C address" for more info. Some sensors might offer another way to change the address through its hardware, but again, you'd have to check the manufacturer's info. Once the address has been changed on one of the sensors, you could then connect both to the same controller and modify the ESPHome code, specifying the particular address for each sensor and making the other necessary changes for having two sensors in the same ESPHome node.
So, yes I believe it is possible. But it would probably involve a little more work and some code writing on your end to figure out the I2C address issue. Again, the address is not an issue when using individual ESP controllers. It might actually be a lot less work just to use a cheap Wemos D1 Mini ESP8266 independently for each sensor. Then you only need the power connections and could use the same ESPHome code for both, only needing to give each sensor a unique name.
@@ResinChemTech thank you so much for your detailed response. I will be hitting the coffee button for sure, it's fun when you have other people into the same hobby, even though I'm not a professional but I still like tinkering and learning new stuff. I have the mini on my Amazon basket just in case and if that will make it easier then I would go that route, I have like 3 spare esp32 so I wanted to use them with the Tof I have but if the minis make it less work then I will go that route, when it comes to wires I'm not too concerned because I have the capability of hiding them under the stairs so the only thing that will be showing is the channel like you have it. This is what happens when you get in the rabbit hole of tinkering hahaha
You are most welcome... and I agree that it's fun to chat and exchange information with others that have the same interest.
Oh... and I did want to add that if you have extra ESP32's and don't want to order the D1 minis, you can use separate ESP32's for each sensor and everything would pretty much be the same... you'd just select an ESP32 when creating the ESPHome nodes. But as long as they are separate controllers, you wouldn't have to mess with the I2C address issue. Although to be honest, an ESP32 is kind of overkill for just running a single ToF sensor... but it would work if you have them to spare.
And don't hesitate to let me know if you run into any other questions or issue with the stair lights as you move forward.
@@ResinChemTech I really appreciate your help, I will be getting the minis tommorow so I'll be going over your tutorial again and if I have any questions I will let you know. Thank you once again. I'm sure other people are taking advantage of your step by step example because I looked for a while and they were all complicated or skipped steps, so I was left lost half way. Awesome work 👍🏼👌🏻
Great video, I watched the first video and got a glimpse of your poker table set. Where did you find it?
We got it at a local place here in Indy called Jay Orner & Son Billiard Co. It is a man-cave heaven... pool tables, bars, home theater seating, arcade machines, etc. Just about anything you'd ever want for a basement or rec room.
Thanks for watching!
Great video I built and use the standalone stair light system, can this upgrade be done to that system too as i have the same issue when anyone passes by the stairs...Thanks
It's possible... but not as straightforward or easy. In the full version that uses Home Assistant, each motion detector has it's own control board (D1 Mini). In the standalone system, the motion detectors share the same controller (and power source) as the lights. This means that the Arduino/C++ code would have to be modified to work with the TOF/distance sensor... OR ... you'd have to build the TOF sensor shown here, run 5V to it to power the D1 Mini and use ESPHome to return a high signal when "motion" (or minimum distance) happens and return a low signal when cleared.
So, in short, yes it is possible. But it isn't a simple swap out for the existing motion sensors like shown in the video. Let me know if you would like me to provide more info if you opt to try a replacement. I'd be happy to try to help out.
Thats a Great Idea! i made something like this and had the same problem fixed it by buying an esp and hooking up an cheap ultrasonic sensor whats specially coded to detect motion.
Reply if you want the code :)
Really, about any type of distance sensor can be turned into a binary (motion-type) sensor using this same technique. It really depends upon your range and FOV needs. In my case, the VL53L0X had a shorter range and a narrow field of view, which was perfect for my stairs. Plus its small size made it easier to place on the stairs without being as noticeable as the much larger ultrasonic sensor. The ultrasonic sensor might be just a little cheaper, but the ESPHome code that I used can really be used for whatever distance sensor you prefer to use that meets your project needs.
Use a small mirror in combination with the original PIR?
I have a crazy idea, add vibration sensors to the steps (or a few of them) and light the led firstly when both the motion sensor and vibration sensor has been triggered. Probably requires some fine tuning, but it would be totally awesome.
Another great video.
Thanks! And thanks for continuing to watch!
I am all new to this, so maybe a dumb question. But I also saw video’s on mmWave sensors. Could such a sensor be a solution for a staircase? Maybe in combination with pir/distance sensor? (On + motion on stairs= continue sequence, otherwise it is only a moodlight of first few steps?) Also to avoid the multiple people triggering on/off wrong? Or is this easier said than done?
Part of the issue with mmWave sensors is that they generally detect in 360°, including through walls. So mmWave sensors alone would present an even bigger issue than the PIR sensors in terms of triggering the LEDs. However, you might be able to find a way to supplement the trigger sensors with mmWave in some manner. This might be able to solve the one issue that I have with my setup... and that is if multiple people enter or on the stairs at the same time. A mmWave sensor, in combination with ToF or PIR for the triggers, might be able to overcome this particular issue.
It would require some pretty substantial changes to the code to either substitute or add additional mmWave sensor(s) to how the system operates. So from that perspective, it probably is much easier said than done!
Fantastic!
This is so cool.
Im curious if you've experienced any random false positives with the TOF sensor. When I had one hooked up the distance would occasionally change causing a false trigger. Do you ever notice this problem?
Yeah... I occasionally had that issue as well. I fixed it by adding a 100 millisecond 'for' clause in the automation... so when the state changes (say from off to on), it has to maintain that state for 100 milliseconds before the automation fires. This means that the signal can 'bounce' on and back to off without firing the automation and turning on the lights... basically 'debouncing' the signal. 100 milliseconds may longer than it really needs to be, but it is short enough that it still triggers the automation when someone actually walks in front of the sensor (they'd have to be pretty dang quick to clear the path in less than 100 milliseconds - especially on stairs!).
You could probably add that delay on the ESPHome side instead... I just opted to put in the delay as a 'for' clause on my trigger in the automation.
Hope that might help you out... it at least worked for me. Haven't had any false triggers (that I know of) since I added it.
@@ResinChemTech thanks for the reply! You've inspired me to give the TOF sensor another shot. I appreciate your time and effort put into these videos.
I love this project and had so much fun learning about it. I have everything working great, but I have an issue I can't figure out. I have the TOF sensor at waist height so the dogs won't trip it. When I pass the TOF it detects my body, but sometimes when the body passes then it goes back to clear, but then an arm comes through behind it and trips it again. So the lights come on and then go right back off. Doesn't happen often but often enough. The Second issue is almost the same, when I pass through the TOF the lights turn on, but if someone is right behind me they will trip it turning the lights back off. Is there a way to have TOF 1 open once and not run again until TOF 2 has been crossed or the timer expired? Hope I explained that well enough. Thanks for all the time you put into helping us with this project!
Yeah... the system still isn't "perfect" and I've experienced both of the things you are talking about. While the ToF sensors are better, they do reset very fast! It wasn't as much of an issue with the PIR sensors that had a 5 second cool-down/reset period. But there are some things you can do to tweak the system.
First, as far as your arm retriggering the system: I opted to add a "for" time to the automations, saying that the sensor must be in the "on" state for a certain time:
from: 'off'
to: 'on'
for:
milliseconds: 250 #adjust this value as needed
This has fixed the issue for me in most situations. But another user has recommended adding a debounce routine to the ESPHome Lambda function. That's too long to detail in these comments, but you can see the code he is recommending here:
github.com/Resinchem/LED-Stair-Lights/pull/1/commits/5cbe81f7e1be55f89e18d44ada23e83c5a07f8e0
His recommendation is probably the better option, but I feel like it is a little more difficult for newer users to try to add to the ESPHome code... as opposed to just modifying the automation. And he has the 'fixed' time at 1 second, so you have to understand the code to change this value. For this reason, I haven't merged his PR into my version. But if you are comfortable with editing the ESPHome Lamdba section, this is probably the best option.
As far as a second person tripping the sensor, my original version used two input_booleans (one for top sensor, one for bottom). When the first sensor triggers, its input_boolean is set to TRUE and remains TRUE until the opposite sensor is triggered or the lights time out (then the input_boolean is reset to FALSE) . This input_boolean is then checked as part of the automation condition... if true, then the automation does not fire. I removed this logic in later iterations because it also prevents the lights from turning back off if someone starts down the stairs and turns around... it's a trade-off on how you want the lights to react. With just two of us in the house, it was rare that we both head down the stairs at the same time... and more likely that we'd start down a step or two and then turn around.
Let me know if you have any other questions... or if my explanations above are unclear. Unfortunately, it's kind of difficult to share large code blocks here in the comments!
@@ResinChemTech Thanks for the feedback. I messed around with the Lamdba part of the code, I could get it to validate but it would always error out when updating it. So I went with the top and bottom booleans, and that works perfectly. I have two other questions. First is the "Wipe" effect on the WLED, I really like this motion but I can't get it to only run once. It flows from one end to the other, it waits a second or so and then goes back to the start and does it again. Is there a way to make it only run once? Second question is about "Packages". First I'd like to thank you for recommending them, I hadn't worked with them before, so much cleaner. One thing I couldn't figure out is when you start an Automation there seems to be a random ID number, how do you figure out this number when you create a new action? This is what I'm talking about: # --------------------------------
# Stair Lights On with Top Motion
# --------------------------------
automation:
- alias: Top Motion Lights On
id: 9f65f629-507c-4cab-86d0-c79e780e1142
Where does this ID # come from? Thanks again for your help, my build turned out awesome thanks to your help!
Most of the WLED effects are 'repeating' effects, meaning they run in a loop or continuously. So there isn't a way to have them only run "once"... short of trying to time how long it takes for one cycle then using a timer and shutting the lights off via code when the timer expires. But do note that you can change the speed of how fast any effect runs. That's also in the automation... I believe I use number.stair_speed = 220 (I think valid values are 0-255). So you can adjust the speed or try different effects other than 'wipe' to see if you find one you like better.
As far as that ID, each automation must have a unique ID if you want to be able to use some of the UI tools like traces for troubleshooting. So, I just add a random string each time I create a new automation. I use an online UUID generator ( www.uuidgenerator.net/ ) to generate this number for me and just copy/paste it into the automation when I create it. It has no real "meaning" other than to make each automation unique for some of the troubleshooting tools.
Let me know if you have additional questions. Glad the project worked out well for you!
a bit of white tape over half of the PIR would probably have sorted it, just keep the half on the stair side open.
That might have worked too. Although it wouldn't have addressed the PIR sensor 'cool down' time. The original PIR sensors I used have a cool down time of 5 seconds, which is about as short as any (some are 30 seconds or longer). The TOF sensors are instantaneous on/off/on, and do not have the cool down period... which for me is another bonus of this particular type of sensor.
But thanks for watching and providing an alternative solution! I love getting feedback and other potential ideas from my viewers.
now if you forget something halfway up the stairs, the lights should follow you downwards and light up downwards
Ok so I first saw you when I was learning addressable LEDs. The lesson on the data signal and how it works was really helpful.
I might need to go back and watch it again but my first question is Logic Level Shifter. Do you always use it 100% of the time as a fail safe?
I am asking as the size is small but fitting an extra component in a box that now needs to be bigger and we are trying to hide these solutions from our less gadget type friends and family.
Also it means more short lead soldering in a small space.
To me it is laziness not the expense of adding the shifter so I was wondering if you have a rule of thumb for when you use a shifter. All projects with 8266D1?
Just when strips have a certain length?
Just specific strip types?
Hi again! I do tend to use a logic level shifter for all my LED projects... just to avoid any potential signal problems and so I don't have to worry about how far away the controller is from the start of the LED strip. But in cases where the distance is very short, you can probably get away without it. If you haven't seen it, I do have a video that shows what can potentially happen to your signal if the voltage drops too low ( ruclips.net/video/Q9mLitVxF3c/видео.html ).
As far as size, if you use a Wemos D1 Mini and the mini (1/4) size ElectroCookie board, both the D1 Mini and shifter will barely fit on the smaller board and the resulting size is about the size of a small box of matches... about 1/4 of the size as compared to using a full size ElectroCookie board. This is now my "go to" controller, unless I have a large number of LEDs or want sound-reactivity, which means I move up to an ESP32 board. I think I have a wiring diagram for this smaller version in one of my blog articles somewhere. Let me know if you're interested and I'll shoot you over a link to it.
So, long story short is that a logic level shifter "might" be optional. But it can vary from install to install, just based on various tolerance within both the ESP8266 and the LED strip. One install might not have a signal problem... and the next one with the same lead length might experience signal issues. That's why I just opt to use a logic level shifter regardless... it pretty much just eliminates that issue for all but extremely long signal wire runs.
@@ResinChemTech thanks for this honest answer. This is what I expected, you do it to avoid headaches and I am trying to establish my own rule of thumb.
Like if I have to inject power I need to level shift as well.
@@ResinChemTech I promise I will stop bothering you. So it has been a few years so it is ok if you tell me to go study Kirchhoff law and ohms law but what about temperature (climate ) with respect to ESP866 D1 and level shifting.
I am probably going to do my garage door and to do it right I will need about 22’ of strip so I will probably inject power and now I will probably level shift too
My question is Boston isn’t so different a winter climate from you so do you anticipate cold or even heat (as I am too lazy to look) can degrade the performance on the data line as you did show in the video I watched.
I don’t recall the video reference temperature.
That explanation was awesome!
I love understanding at that level.
Ha ha, can you help me find a video that explains how MQTT works? If someone could explain how the underlying stuff works with brokers etc then maybe I might use HA even more intelligently.
First off... no bother! Helping out others is why I do these videos and blog articles. Many folks helped me out when first starting, so I like to "give back"!
I really haven't done any sort of study or test regarding temperature and the data signal. I do have LED strips installed in my garage (attached, but not heated or cooled). I haven't noticed any issues with low temperatures (down to mid 30's in the garage during the dead of winter). I'd be a little more concerned about the high end... especially when it comes to the power supply and controller (more so than the data signal - if you boost to 5V with a shifter, you have a pretty wide range until the voltage drops to ~3.3 volts... using higher gauge wire can help as well). But with higher temperatures, I always assure I use a power supply with overtemp protection, assure it and the controller have ventilation. I have lost one ESP32 controller that I suspect was due to high temperature, but it was enclosed in an air tight box.
As far as MQTT.... I love it! It did take me a while to get my head wrapped around it, but I use MQTT in all my custom developed or Arduino/C++ projects to communicate with Home Assistant and add those devices to automation routines. I'd be glad to help out, but it's probably a little much to try to do here in the RUclips comment section! If you like, as a subscriber, feel free to reach out to me via email. You can get my email address from the "About" page of my RUclips channel (I don't publish it here so that the spam bots can't pick up on it). in addition, if you are on Discord, we can jump over there if necessary too and I can give you that info via email. Just let me know how I can help out!
@@ResinChemTech I must be really stupid as your About here on RUclips doesn’t show an email. I am new to discord but have it and now you have me afraid to post my email here.
I don’t want you to hold my hand on MQTT or anything but when I understand the underlying operation in a block diagram and not just code language.
Electrical Engineering drop out that needed up successful as a service manager but very little programming experience.
I guess my question is where did you go to learn about MQTT? Point me there instead of bothering you when all I did was buy coffee in thanks for such a great explanation of LEDs!
I am not sure now but my contact information is in my about section.
My goal is to have fun but also find a few practical use cases for family and friends.
I think coming off SmartThings and having HA since May I am doing well. I enjoy using Yaml over the UI in some cases and I never thought I would say that!
I have done basic assembly on a old 650X series micro back oh so many years ago in night school.
Oh I am Rich or Richard, thanks again for the video and the replies.
The most reliable solution for this type of detection is an infrared photoelectric sensor of the Retro-reflective type. This involves a small sensor which has an IR transmitter and receiver mounted facing the same direction. A small retroreflector is then placed on the opposite side of the detection area. These can be found on Ebay or other sources. Just be aware of the distance specified for the sensor. Another complication is that most of these sensors require 12VDC or more for operation, but some that work with 5V can be found.
Howdy! Your videos are great! Do you ever do private tutoring? I'm working on a project for my Burning Man camp and have extensive software eng experience, it this hardware stuff is all new to me, though very fun!
Thanks! I appreciate the kind words. I don't really do any sort of 'official' tutoring, but I'm always glad to try to help out others with their projects. I'm happy to answer basic questions here in the comments.
But if things go beyond that, I will generally move the conversation over to email and/or Discord, where it's easier to share photos, diagrams, code blocks, etc. Just FYI.. my background is in software and app development as well. But, like you, I am really finding the hardware side fun and fascinating.
So, feel free to shoot me any questions that might have a quick answer here in the comments. Otherwise, if you feel it is a bit too complicated for the RUclips comments, you can get my email address from the 'About' page of my RUclips channel. I don't publish it here in the comments to avoid the spam bots picking it up!
Whether you opt to reach out or not, good luck on your Burning Man project and your future hardware adventures!
@@ResinChemTech neato!
@@ResinChemTech cool!
why not installing motion detoctors on the ceiling and add fins to modify field of view
I'm not sure why putting the sensors on the ceiling with fins would make any major difference than where I initially had them on the sides (with fins), but if for no other reason, putting the sensors on the ceiling is impractical because there is no good way to run the power for the D1 Mini/sensor.
But I appreciate the thought and recommendation. I just don't think that is a viable option that would have made a real difference in my situation. The new ToF sensors have been working great and much better than the original PIR motion sensors.
When I try to flash the YAML trough the ESP home flasher tool [windows], I get the following issue "Unexpected error: The firmware binary is invalid (magic byte=23, should be E9)
How do I resolve this.
Are you trying to flash the YAML? That won't work. If you are uploading via an external tool like ESP Home flasher, you need to use ESPHome to compile it and download as a .bin file. In ESPHome, select 'Install' then manual download. This will create the necessary compiled .bin file that can be flashed.
If you are still having issues, you might try searching for the exact error message you are receiving for additional assistance.
Could you please create a video on how can I use WLED with esp8266 and PIR Motion Sensor? Wiring and settings, I need colors effects with led turn on with sensor. Please
That's basically exactly what I do in my original stair lighting video: ruclips.net/video/Y29Y0iTLggg/видео.html
You can see a step-by-step process for building the WLED controller in this video: ruclips.net/video/ifv6wV3Rm6A/видео.html
The stairs use two PIR sensors, but the concept is the same. You could just use 1 PIR sensor instead of two. All the wiring diagrams and parts for the stair project can be found in my related blog article: resinchemtech.blogspot.com/2021/07/simple-motion-activated-led-stair.html. The directions and wiring diagrams for the WLED controller can be found here: resinchemtech.blogspot.com/2021/01/building-your-own-led-light-strip.html
Hope that helps!
I had the same problem and I used a little paint on the sensor to fine tune it
That's a good suggestion for some situations. However, because my stairs are open on the sides, no amount of blocking would prevent motion from being detected when crossing in front of the open area on the sides. Anything that would block this open area would also block the area directly in front of the sensor... where you step on the stair and want the motion to be detected.
That's why a distance-based sensor solved the issue for my particular installation. The 'beam' between the two sides of the stair stringers has to be broken by stepping on the actual stair itself. I can then move freely all around the stairs without trigging the LEDs until I actually step up onto the stairs.
But I do appreciate the suggestion. It might help others if there situation is different from mine or where longer range detection is required.
I tried the paint trick too , and it didn't work very well for me , there is another way to narow the field of view ( of the sensor ) by attaching a pipe in front of it , didn't try that because of the finish look . The solution was to replace the PIR sensor for the LED controler , with a laser one : XKC-KL200-NPN ( about $20 ) . Don't buy the other versions KD200 or KE200 because they are " color sensitive " ( even the newest one XKC-KL800 )
Hi! @resin I am curious as to what type of coding language would you suggest a beginner jump into to learn how to connect and automate things!? I’d like to be a sales engineer for an iot company named samsara. Love this video and going to look at all of them ! Thank you!
Well, it's hard for me to specify a single language (or even two) that would be the best. Part of that depends upon your own goals. From a technical perspective, Home Assistant is written in Python... which is popular for a lot of different things. In addition to Python, I use Arduino/C++ in a lot of my own projects. This is also used by things like ESPHome, WLED and other firmware that is often installed on ESP and Arduino microcontrollers and it is used in many DIY IoT devices.
While technically not a "language" and more of a communication protocol, knowing and understanding MQTT would also be beneficial (I have a beginner's video on MQTT). This is a common communication protocol used between IoT devices.
Then if you flip over to looking at things like mobile app development, you could consider languages like Java/Javascript... among many others. But if you've not done any programming before and if I had to pick a single language to start with, I would probably recommend Python. It has a broad range of platforms and uses, it is relatively easy to understand and you don't need any sort of high end hardware or compilers to use it. Once you have the concepts in Python, then jumping over to another language like C++ will generally be easier. I'm sure others would have other opinions, but hopefully that provides you at least a little useful information.
Can you in theory use multiple tof sensors and pixel LEDs with WLED to light up the previous, current and next stair as you walk up? Reaction based not time based
In theory (although I haven't tried or tested), I would think that you could setup segments in WLED and then have each sensor's automation turn on a particular segment while turning off all other segments. The automations and timing might get tricky and you'd need the sensors spaced so that no two sensors would be tripped at the same time... but placing a sensor on every other step might work.
There might be some wiring challenges as well, but since the ToF sensors are I2C, they can share the CLK and DAT GPIO pins on the controller, so every ToF sensor might not need its own controller, but each would need four wires... SCL, SDA, V+ and GND. But in theory, I'm guessing something like this could probably be designed and automated.
Hello
I loved the solution you have found. I am trying to use that with the same ToF Sensor with a ESP32 board. There is this issue of getting an unknown message in the HA ESPHome. The Log says it found a I2C device but there is no update on the log for the distance. What might be the problem? I have copied everything after the captive_portal. Could you please help me? I have tried 2 ESP32 boards and the results are the same.
I have not tried or tested my ESPHome code with an ESP32, so I cannot verify what I'm about to say. But a couple of potential issues jump to mind. First, what GPIO pins are you using on the ESP32? The default pins for I2C on the ESP32 are GPIO21 for SDA and GPIO22 for SCL. If you are using different pins, then those need to be configured in the code.
Next, assure that your VL53L0X has the same I2C address as mine (0x29). It is possible that you could have received ones with a different address. Check the specs for the devices.
Finally, verify you have the right board selected for your ESP32 at the top of the file and that you have specified a valid distance for the filter under the sensor. You might try a higher and lower value just to assure you haven't exceeded some range of the sensor.
That's about all I can think of. As I mentioned, I have not tested or tried the VL53L0X with an ESP32 and ESPHome.
@ResinChemTech Thanks for your help. Firstly, yes I have connected them to GPIO21 and GPIO22 as you wrote. Also, I have tried other pins with a code to specify them.
I guess the address (0x29) is correct because ESPHome Logs says it found a i2c device at that address. The board was in use before, so it is not the problem I have tested it.
I have tried simple distance codes to test the sensor but still the same results. I guess the sensor itself is the problem. I will get another one and as last chance, I will try with D1 Mini.
Correct me if I'm wrong, but couldn't you also remove the lens from the pir sensor essentially making it a beam?
Maybe... and I had to go look this up... but the fresnel lens focuses the light onto the sensor (see learn.adafruit.com/pir-passive-infrared-proximity-motion-sensor/how-pirs-work ). So, I suppose it might be possible to narrow the FOV by removing the lens. But in my particular case, I think there still would have been a possibility of motion being detected at the end and through that opening in my staircase.
I've replaced both of the original PIR sensors with the ToF sensors now.. and they are working perfectly... at least for me in my use case. But I appreciate the idea that you might also just remove the lens and possibly be able to narrow the FOV for the PIR sensor. Something I might have to test down the road.
Thanks for watching... and sharing an alternate idea.
Thanks!
Wow! Thank you so much... I greatly appreciate it! Don't hesitate to let me know if you have any questions or issues if you end up using these sensors.
Hey I think that the way that you have done this whole project is awesome, but I was wondering if it is possible to do this with only white leds which have just a 12v and gnd pin?
You can certainly use 12V and only white LEDs. But if the LED strip does not use a data signal line from a controller (which I believe is what you are referring to), then how would the sensors turn the lights off and on based on motion or distance? I suppose you could use a smart switch or something to turn the power off/on to the LEDs. The controller in my case is used to also send the signal to the LED strip to turn off/on (in addition to the effect... but I could also just make my LEDs solid white, with no 'wipe effect'). But without a controller, again, there is no way to turn the LEDs on when on sensor is triggered and back off again with the other sensor... unless you do use some other way to do so with another connected device like a smart plug or switch.
But yes, you can use 12V LEDs. However, if using my controller, you must just a step-down converter to step that down to 5V... or use two separate power supplies and create a common ground between the two.
@@ResinChemTech yeah the control was my main issue, my reason for using a 2 pin led strip is I want it as thin as possible and they are also quite cheap. The smart plug idea might work. Will have to look in to what smart plugs would integrate properly and how the coding would work. Thanks
How are the sensors synchronized with the led installation if they are not wired in the same circuit? Just with the wifi automation and the led controller?
I'm very bad at welding since my hands are shaking quite a lot; might probably use a bigger controller like NodeMCU ESP8266 Development Board; would it work?
It is all done through automations in Home Assistant (this is covered in the original video... this is just an update of that video with new sensors). The sensors communicate with Home Assistant and Home Assistant then controls the LEDs. I have a standalone version without as many features or lighting effects, but it works without Home Assistant or any external automation system... and in that case, the sensors are wired to the controller that controls the LEDs. You can find that video here: ruclips.net/video/b4s_VEtVWY4/видео.html
But yes, either of these systems can be built with the full size NodeMCU as opposed to using the D1 Mini. Just as long as the NodeMCU has a minimum of 4MB of flash.
Thank you for the quick reply!!!
Let's say I want to install this on the stairs but I don't want it to light on when there is enough light conditions; would it by possible to have a light sensor controlling everything then, if the light sensor circuit is "closed", to have the laser sensors as a second trigger so, when both are closed (not enough light and movement detected) then the lights turn on? Sorry, I have my laser sensors on the way and trying to figure out everything in advance 😂
You can easily use a light level sensor as a condition for your automations. In other words, only run the automation (to turn the lights on) if the light level measurement is below a certain value. If the light level is above that, the condition would fail and the automation would not turn on the lights. Just like the ToF sensors, the light level sensor can be completely standalone and does not need to be wired to the controller (or other sensors), since Home Assistant is the middle piece that 'glues' everything together via the automation.
@@ResinChemTech Thank you! But I guess I need to power this light sensor to something... Same 5V Power supply? Also, which mounting screws did you use to attach the ToF to the lid?
Yes... you can use the same 5V power supply (assuming you are using something like a D1 mini or other 5V powered control board).. or you can power it separately via any USB adapter (like a phone charger). Now, while you can't attached this to the same D1 mini controlling the LEDs (since this is running WLED firmware), you *could* theoretically connect it to one of the D1 Minis running the ToF or PIR sensors. Since these are running ESPHome, you'd just have to add the code to the ESPHome node for the light sensor. The light sensor would then be exposed to Home Assistant and could be used as described above. This depends upon your use case. The advantage of a standalone light sensor (with its own D1 Mini/controller) is that it could be placed anywhere in the room to better detect light level of the room as opposed to right next to a sensor that may be darker due to the stairwell and/or would be impacted by the LEDs themselves when they turn on. But either method would work.
You just need to get that light sensor integrated to Home Assistant (via ESPHome or other method... you could even use a completely separate, battery operated light sensor like a Zigbee one that isn't physically wired to 'anything' and could be placed anywhere) so that you can use the light level measurement in the automations that controls the stair lights.
I have a split level house how would I make that work to go up the stairs and down the stairs from entering on main level.
So... if I understand you correctly, you could 'enter' the stairs somewhere in the middle of the staircase and could go up or down from that location? It would be possible, I think, but quite a bit more complicated. You'd likely have to add two additional motion or Tof sensors, one right above and one right below the middle entry point. You could then setup segments in WLED to only light one half the the stairs (either up or down, depending on which mid-stair sensor fired). The Home Assistant automations would also have to be modified to take these extra sensors into account.. and to manage the lights/segments accordingly.
But I do believe the system could be modified to handle the situation as I described above, even though it would be quite a bit more complicated. Other than adding the two additional sensors, most of the changes required would be within Home Assistant and the automations. If you are talking about some other type of stair configuration, let me know... and I can tell you what I think the options might be.
@@ResinChemTech thats what I was thinking. Thanks
Thank you so much for your video.
I am stuck at where my D1-mini can't seem to connect it to my pc with direct cable. My pc can detect it, but ESPHome insists that nothing is being connected. You have any idea why? Thank you.
I had this issue with a Lenovo laptop. It did not have the correct USB to serial driver installed. For the D1 Mini, this should be the CH340. You may need to search for the CH340 driver for your particular system. For my Lenovo, it took me a bit of digging to find the right one for the particular USB bus on the Lenovo.
When you say your PC can 'detect' it, do you see an additional COM port appear in device manager? If you do not see a COM port appear when you connect the D1 Mini, then ESPHome will not be able to see the device for installation.
It is also worth double-checking your USB cable to assure it is truly a data cable and not just a power cable. Not all USB cables are able to transfer data... some are just for power/charging. I hope this info helps.
The error I'm getting back is PermissionError(13, 'A device attached to the system is not functioning.', None, 31) if that helps.
This does appear to be related to the incorrect driver installed on your system. I've not seen that error before, but found this issue listed on the ESPHome Github and it seems very similar to yours... and the solution was to update the USB to serial driver: github.com/esphome/esphome-flasher/issues/14
@@ResinChemTech So I have a few things I can update to you:
1. My Device Manager does show USB-SERIAL CH340(COM3)
2. I'm also using the data cable (which I can confirm that it is working since I mainly use it for the data transfer on a portable drive)
3. To recap my process of approaching the connection between the board and our PC, I have my D1-Mini board directly connected to my PC with the said cable, here I chose "Plug into this computer" option, which opened up the ESPHome web and it gave me the error "Failed to execute 'open' on 'SerialPort': Failed to open serial port.". I also tried the "Plug into the computer running ESPHome Dashboard" option, which also couldn't detect the board. I also approached the ESPHome-Flasher method and that was how I got the error from my previous comment.
Hopefully this provides enough info for you. Thank you so much for your help.
Thanks for the video and code. I have 2 questions if you can help. Q1, Importing the package version of the code, HA complains that the automations aren't editable in the UI and do I want to import them, is this something I should do? Q2, The automation sort of works, half of my LED string lights up and regardless of which motion sensor triggers, they light up in the exact same way and direction. Is this something you've encountered and is an obvious fix? Thanks for any advice.
As to your first question, automations are only editable via the UI if they are created using the UI and/or if they exist in the primary automations.yaml file. So, for automations that are in packages, you won't be able to use the UI editor to modify them. You'll have to use the file editor (or whatever you normally use to edit your YAML files).
The second question actually has two parts. When you say "half the lights"... do you mean only the light on one side of the stairs, or that only half the lights on each side? If it is the first problem, then you have a wiring issue. The signal line from the controller is split and the same signal is sent to both sides of the stairs. If one side isn't lighting up, then it is either a power or signal issue... be sure that no wires popped loose during the install. If it is the other issue (only half the lights are lighting up on each side), launch WLED and assure you have entered the total number of LEDs (use the total from ONE side of your stairs only... if the two sides have a different number, use the larger of the two). By default, WLED is only set for a default of 30 pixels, so that's all that will light up.
If the lights are 'moving' in the same direction regardless of which sensor fires, then you need to check the automation. First, make sure you have the right sensor names for the 'Top Motion Lights On' and 'Bottom Motion Lights On'. Double check that you haven't duplicated the same sensor entity ID for both and have the right sensor for the right automation. Next, in each of these same two automations, there is a "switch" under the action section that is either turned on or turned off to reverse the direction of the lights. Be sure this switch is turned ON (switch.turn_on) for one of the automations and turned OFF (switch.turn_off) for the other. If the motion is backwards, then just reverse these.
Finally, are you bench testing at this point or have you installed the system? If bench testing, be sure that only one motion detector is firing at a time. You might need to use the Dev Tools/states and watch and make sure that only one motion detector at a time is triggering when you are testing.
Let me know how that goes, if you get it working, or have additional issues. If you are still having issues, you might want to consider reaching out to me via email. It's difficult to help much further here in the comments, as I can't post images, code blocks, etc. If you want to contact me via email, you can find my email address on the 'About' page of my RUclips channel (it says 'for business inquiries'). I just don't post my actual email address here in the comments because it gets picked up by the spambots... I get enough of that already! Do note that it appears you will need to use a full desktop browser to see this email link. Apparently when on a device like an iPad or mobile, the email address link isn't shown. It sounds like you are really, really close and I think you just need a few tweaks to get everything working properly.
@@ResinChemTech thanks for taking the time to reply, I genuinely appreciate that. Q1, good to know. Q2, I am currently bench testing right now, with 1 length of LEDs, 62 in total. I'll go through your detailed (again, thanks), feedback and try and diagnose the issue and reach out if i'm still having issues. All the best for the New Year if I don't catch up sooner than that.
Hey, hello again. Not sure if you remember me or where I left the comment about your LED staircase project that you inspired me or I should say challenge me to do a project of my own. As I started purchasing the required components, life happens as you know so the project was delayed, but now I wanted to show you how I had progressed thus far. I still haven’t figured out the control part yet. I have some ideas tho and I know how I want it to function just not sure how to make it happen. Is there a place where to share video photos etc.
Hi again. I fully understand and appreciate how life happens and sometimes gets in the way of our projects! But I'm glad to hear that you have circled back to the project.
Yeah.. unfortunately you can't share photos or videos here in the RUclips comments. There are a number of options however. Naturally, you could upload video right here in RUclips. You could just mark the video as 'unlisted' if you don't want it publicly available and only those you give the link to will be able to view it. Of course, RUclips also blocks/holds any comments with a link as well..
Do you happen to have a Discord account? That would probably be the ideal way. I do have a small, private by-invite only server. If you do have a Discord account, if you could shoot me your full Discord handle (they are currently going thru the process of changing user names, so if yours hasn't been updated yet, it will have a #nnnn with four numbers. If you don't want to publicly post your Discord here, you can contact me via email which you can find under "business inquiries" on the About page of my channel. Be sure to let me know who you are in that email as I generally don't respond to unsolicited emails in that account.
Thanks for asking about my stair LED project. Oh, and the controller is isolated from the power supply. This is my first project of this type, and I miss sized the enclosure box.
OK, the controller works perfectly fine the issues I’m having are with the PIR motion sensors I’m using. The PIR motion sensors I’m using are working perfectly and detect exactly how and what I need for a proper detect at top and bottom of the stairs the issue is with the interface to the GPIO pins. The one PIR sensor I’m using at the top only has a N/C contact more like a switch so you can feed voltage into one side of the contacts and have the contact open on trigger. That’s one of the issues you really want to have a normally open contact and feed voltage on a trigger from what I’m reading PIR’s want to be pulled high or fed voltage on trigger. So I’m trying to find a way to reverse this sensors N/C contact to N/O perhaps with another relay. The other sensor at the bottom has both normally open and normally close contacts so naturally, I’m going to use the normally open set. So the next issue is getting it working with the macros, presets, etc.. seems most stair projects have custom compiled user mods which I have no clue about. My plan was to try to get it working with the built in presets macros, etc.. so trying to find a way to implement the same outcome as a custom compiled project, but with the built-in functions.
Ok no way to add photos, I forgot about that.
I just started another LED project and I haven’t got the stair one even working yet but I’m working on my one desk while I have it out and apart. I ordered another Dr. Z’s controller but hasn’t arrived but I’m thinking I could come off the quad. Thats mounted in the basement under the stairs is in the basement for the stair project. There’s still available channels since I’m only using 2 one for each side of the steps.
What firmware are you using on the controller connected to the PIR? If you are using ESPHome like I am, then you can apply an 'inverted' filter to the PIR sensor. This makes it work in reverse and so the normally closed sensor would work the same as the normally open one, which would not be inverted.
And of course all my automations are handled via Home Assistant. While WLED does have inputs for PIR sensors, it doesn't have any sort of 'logic' language to handle the more complex situation like two sensors on a staircase. If all you wanted to do was turn on some LEDs when motion was detected, WLED alone could handle that. But it doesn't have any sort of "IF-THEN-ELSE" language to say something like if the lights are already on (because they were triggered by one motion detector), turn the lights back off... otherwise turn them on. And if no motion is detected after 15 seconds turn the lights off regardless. You need something with a true automation engine like Home Assistant to accomplish that.
Wish I could do this myself
It's really not a difficult project. I do have a number of LED-related videos that include a step-by-step guide on how to create these stair lights and others on the basics of using LED strips: ruclips.net/p/PLqjDNeOVHOkf079FYwRLRoOHJwLijKkP3
This project could technically be done with little-to-no soldering if desired. Most of my projects also have a related written version with step-by-step instructions, wiring diagrams, parts lists and more. And of course, I and many others are always happy to answer any questions and help you along if you decide to try this or any other LED projects. I'm sure that with just a little bit of patience, you could definitely create something similar to this or at least you own LED project of some kind.
Hi, could you tell me the name of the LED STRIP? or what is it called as so i can buy it in my country? I need 3 led strips like those on the ceiling with motion sensor
So if possible can you please provide me the specific name of that led strip or is it a effect? if its an effect what is it called as? Am sorry am a little confused.
The LED strip I used is the BTF Lighting WS2812b 60 LEDs/m. You can find a link to this, and all the other parts I used in my original stair lighting blog ( resinchemtech.blogspot.com/2021/07/simple-motion-activated-led-stair.html )
As far as the effect, I am using WLED software on the controller. This is free and has over 100 different effects ( kno.wled.ge/features/effects-palettes/ ). The one I am using in this particular video is called 'Wipe'.
This particular video was just an update to a previous video I did to improve the sensors. It might be helpful if you watch the original video as it goes into a bit more detail about the overall system: ruclips.net/video/Y29Y0iTLggg/видео.html
i would like to install the TOF sensor /distance sensor but were does one get things like this seem you did yours from scratch
You can purchase the ToF sensor itself... but to make it useful it does have to be connected to some sort of microcontroller or device that can take the measurements and do something with them (like turn the LEDs off or on). I do not know of any sort of "pre-built" version that would also work to control the LEDs. Like most of my projects here on RUclips, it is a DIY project that you must build yourself. However, I do have step-by-step instructions, including wiring diagrams, in the related blog article: resinchemtech.blogspot.com/2021/07/simple-motion-activated-led-stair.html
Hope that helps... but as I mentioned, my projects are generally meant as DIY or hobby projects. They can't be purchased 'pre-built' and unfortunately I can't build them for others. The best I can do is show you how to build your own.
@@ResinChemTech thank you so much just for your reply
I’m looking for plug and play system I do understand that you built it from scratch
I probably could do it but know what is need and where to find it all I half the challenge
Maybe I’ll try a LED system with motion control I think they can be found a little easier
Again thx for the reply
Asked for help with some other thinks and people don’t reply and no guidance
Thx again!!!!!
Hi, Is there a way to use this for a bathroom fan so when sitting in front and cutting beam for like 90 seconds it will turn on?
That is certainly possible. It would primarily be handled via the Home Assistant automation. The automation trigger can be designed so that a state must be held for a minimum time (like 90 seconds) before the action (turning on the fan) will execute.
But the simply answer is yes.. this could be adapted to do something like you are describing.
@@ResinChemTech Thank You!
Works perfectly thank you.@@ResinChemTech
Couldnt this be solved by giving the PIR sensor some kind of short tube to look through?
In my case I am fine with the broad field of view of the PIR sensor using it for a corridor and timed.
Just in theory: could you have the PIR activate the TOF sensor? :D
I did add 'fins' to the 3D printed enclosure, but it wasn't enough. I guess you could add a tube or try to restrict the field-of-view even further, but the ToF sensors have worked out great... and continue to work great, with no cool down period that all PIR sensors have, and that can't be solved by a tube.. or my any other means.
The ToF sensors cost about $6 vs. around $4 for the PIR sensor and the effort to wire them is nearly identical, so I guess it depends on personal choice and your particular install needs. For me the extra $2 per sensor was well worth it... and the resulting overall sensor size is smaller (and in my opinion looks nicer and is less noticeable).
Couldn't you just add slightly more opaque covers on the sensors to do the same thing?
It might be worth a try, but I don't know what other effects more opaque covers might have. Since the PIR is using infrared instead of visible light, I'm unsure what might occur with a more diffused cover. It could simply scatter the signal more, leading to other issues, as the purpose of the diffuser is to focus the light onto the sensor. And while it might shorten the detection distance, but probably wouldn't really help with the field of view, which was also one of the problems I was having in my particular install.
But it is an interesting idea. Thanks for sharing it.
Is this setup possible to run of batteries and if so what is the power draw
Considering that the system can draw up to 26A at 5V when fully powered on, any sort of battery is going to have to be quite large... like a car battery or something (stepped down to 5V)... and likely would not last too long without recharging or replacing depending on how often the lights are triggered. In my case, this is for 432 LEDs (216 per side). LEDs can draw a lot of power when added up. The standby power draw, when the lights are off would be pretty small, but probably still around 500mA - 1A when the sensors are included.
You could substitute lower power LEDs and reduce the number of LEDs, but you are still going to require a pretty big power draw and are unlikely to be able to run this off of any sort of normal type of power bank or LiPo-type battery system... at least for any significant length of time.
Is it possible? Of course.. with a large enough battery. But even if it is made to work, the power draw will likely drain any type of battery system pretty quickly.
Why not just use 2 sensors.
The one you have at the bottom with a triggered delay looking for a second trigger from another one on the first step. (narrow beam IR, laser, or something that you'd see at the entrance to a store in a mall)
After you trigger the bottom one, wait x number of seconds and wait for the second one on the step.
No second trigger, no go and then reset.
Thanks for the idea. I obviously already have two sensors... one at the bottom and one at the top that controls both the on/off and direction of the lights. Adding a second sensor at both ends would result in four sensors total... with more wiring required as well. To be honest, the new TOF sensor acts pretty much like a store entrance sensor and doesn't trigger when just walking by the stairs. Yeah... it costs around $6 vs. $3 for the PIR sensor, but if I needed to use 2 PIR sensors, the cost would be a wash . The TOF sensor is much more responsive without a cool down time as well.
Like most DIY projects, there are a lot of ways to accomplish the same outcome. If I had been willing to tear into the stairs and modify them, I would have done things much differently.... but as my original video stated, I wanted to accomplish this with no modifications to the existing staircase. Regardless, I greatly appreciate the feedback and idea. In fact, this particular video came from a view comment on the original video. Thanks again!
How have you fixed the "issue" with _2 binary sensor ID?
You just have to delete the original entities using the Settings->Devices & Services. Once the original entities have been deleted (or the device if it exists), you can simply rename the new binary_sensors and remove the _2 from the entity_id via the Entities page.
You just can't have duplicate entity names in Home Assistant. So, once you remove the original name, you can simply rename the new one and reuse the original name. That way, you don't have to update any automations, scripts or dashboards.
Hope that helps!
@@ResinChemTech sure it does! Thank you for your time! :)
Hi, Do you sell this as a kit? or the majority of the components together at a cost? let me know please
Numerous others have asked this question. Unfortunately, each system would have to be custom designed based on a particular stair configuration (length, location of power, etc.). And the cost of shipping the aluminum channel and various components would be cost-prohibitive. And finally, my goal in these videos are to try to show others how to do it themselves. I simply don't have the time or capacity to build, ship, bill and deal with all the other related logistical issues involved in making and selling a system like this.
Finally, this system requires Home Assistant to function properly. If you are not a Home Assistant user, then this system simply will not work. I have created a simpler version that doesn't require Home Assistant or any other automation system ( ruclips.net/video/b4s_VEtVWY4/видео.html ), but the physical build is about the same for both systems.
But I am happy to answer any questions or assist as best as I can if you would like to attempt to build your own but I'm simply not able to build any of my projects for others.
@@ResinChemTech Thanks for your fast reply, I don't know enough about electronics to do this myself I don't think. I'm not even sure what home assistance is :D is this the raspberry PI thing? I really like the transition you create, its exactly what I want from my LED system for my stairs, but I have no clue how to go about building such a thing.
Would it be possible for a price to get all the components but not the LED strip, as i would measure and buy the LED STRIP for the length of my steps, but could I purchase the rest from yourself maybe? so like 80% complete.
Did anyone get any errors when trying to install the Gist for ESPHome Code?
Which Gist are you using? The one from kdorff? What error are you seeing? It is possible an update to ESPHome could have broke something, but this is a pretty basic file other than the lambda, so it may be something else. I'm happy to try to help, but I need a little more info than "got an error".
Try this gist, which I just created from my ESPHome node: gist.github.com/Resinchem/6026ca5eef706f605b5efcc630533405
A few notes (which are also included in the Gist comments):
You should create a starting ESPHome node using the ESPHome 'New Device' option, but you can skip the initial installation if you want. This creates the top portion of the file with the specifics for your HA... e.g. wifi, a unique encryption key, etc. The only thing you may need to edit in this top portion is the board type if you are using a D1 Mini. The last line of the generated file should be 'captive portal'. Copy all the info from the Gist file following this line into your ESPHome node. Change any entity names as desired. This is just for one of the two sensors (top in this case). You'll create another one for the bottom sensor, just changing the 'top' to 'bottom' everywhere in the file.
Let me know if you have questions or continue to have errors or issues.
Time of flight? isn't this RADAR/ microwave?
The VL53L0X used is listed as a Time of Flight Laser rangefinder: amzn.to/3YUQcK1
@@ResinChemTech I see so it's Lidar
I love this design. I would install something like this but my cats would set it off every 5 seconds just to annoy me.
Ha! Yeah... I could see that. But I know another person that built the system and opted to simply install the sensors around waist high. That way it would trigger for a person, but their dogs would not trigger the sensor and therefore the lights would not turn on. Just an option for those that don't want their animals to trigger the lights.
Is it possible to make it flexible?
If you are referring to the LEDs, then yes you can certainly use something other than the aluminum channel. I have a project where I used 'neon rope' tubing for the LEDs ( ruclips.net/video/Y2y19Ck2vic/видео.html ), but I found this particular brand/style a bit difficult to work with. But there are many other similar options as well.
Hello. hello. with the change to the vl53 there are no false positives? Thanks
It took me a little bit of trial and error to zero in the right distance and the delay time (both important steps), but since then I have not had any false positives. This is especially true of the 'false positives' I previously had when just walking by but not actually going up the stairs. With the VL53L0X this is not an issue. I never get a trigger just walking by the stairs. I actually have to step on the first riser to cause the lights to trigger.
The PIR sensors on the other hand, would often cause a false positive when just walking through the room near the stairs. They would also occasionally, but not often, cause a false positive and turn on the lights when no one was near the stairs at all... which led to all the "ghost" comments you see in the original video's comments!
The VL53L0X is ideal when you need a narrow, short detection range... like a stairwell. The longer the distance being measured, the wider the detection range and the higher the likelihood of getting false positives.
Thanks.I'm using only one esp8266 in my case it could be the distance I have from the controller. the descent sensor is at around 5m and the ascent sensor at around 3m.
could it be that you are using only one es8266? I used eshome configuration for multiple vl53.
That's a pretty long distance for the VL53L0X. The listed max range is listed at 3m, but there is a long-range mode (with less accuracy. According to the description: "The VL53L0X supports two modes: normal and long-range. In normal mode, the maximum measurable range is 1200mm. In long-range mode, the maximum measurable range is 2100mm, but the result is more noisy." You have to, I believe, enable this long range mode by sending a command to the device.
It's great for shorter ranges, but for something longer you may need to move to something like the TFMini LIDAR sensor, like the one I used in my Parking Assistant video: ruclips.net/video/HqqlY4_3kQ8/видео.html In this video, I actually do a comparison of distance sensors, including the VL53L0X vs. ultrasonic vs. the TFMini. In my testing, I found the VL53L0X often reported 'out of range' errors at a distance of only 5 feet ( ~1.5m), which would agree with the above statement when not in long range mode.
Yes, I have each VL53L0X connected to its own ESP8266. As I2C devices, you can connect more than one to a single board/set of GPIO pins, but each I2C device has to have a unique address. For the VL53L0X, you can change the device address, but it has to be done by sending a command to the device to set the address. Out of the box, all the VL53L0X sensors will have the same I2C address so unpredictable results will occur if you are trying to use two or more I2C devices with the same address and a single ESP board.... unless you have also created two separate I2C channels via the GPIO pins.
How do you integrate this into wled
This video is just an update to the original video. Please see the original video for information on the controller, WLED, ESPHome, Home Assistant and how the system integrates and operates: ruclips.net/video/Y29Y0iTLggg/видео.html
Do note that this particular version in this video requires Home Assistant for the automations. It does not work with just WLED alone. I have another video of a standalone version that doesn't require Home Assistant, but also uses custom Arduino code for the controller instead of WLED: ruclips.net/video/b4s_VEtVWY4/видео.html
Hi, thank you for another great video.
I am looking for someone to make a blueprint on a job that I would like to tackle.Of course I will gladly pay for it. I would like to pour a concrete walkway 46 feet long. I would like to embed in it LED channels facing the sky. The path to be divided every 2 ft, like stairs, with a PRI or TOF sensor. When somebody steps on the walkway only that section of the path to lit up. More info if you think that you would take the job. Any help would be greatly appreciated.
Thanks for the feedback. And while I appreciate the offer, I don't feel I have either the qualifications or comfort level to provide you with any sort of blueprints or design plans for something like that. For one, everything would need to be waterproof and wiring/cabling would need to be buried (power injection would definitely be needed for that long of a run and that number of pixels).. and code for that may vary based on location. Outdoor installs are a totally different animal than indoor projects. I have no idea how something like the ToF sensor would even react to rain or snow.
Next, for around 46 feet (assuming 60 LED/m strips), you would be over 800 LEDs... and that is just for one side of the walkway. If you put them on both sides, you are over 1600 LEDs... and looking at a really big power supply of 100 amps or more... this would require special fusing considerations, among others things. I just don't feel I can adequately and safely provide you with any sort of blueprints or design plans for something like this. But I do appreciate the offer.
@@ResinChemTech Thank you very much for your detailed answer 🙏. That still helped me in some way. Stay well and keep up the excellent job on videos.
Anyone know if you can do esp32 + wled + tof sensor?
You can certainly use an ESP32 with WLED. And WLED does have the ability to connect "buttons" or something that acts as a binary sensor (like a PIR motion detector). The issue with the ToF sensor is that it reports a distance and isn't a binary on/off sensor. In my case, I'm using ESPHome to 'convert' that distance into a true/false binary based on whether the measured distance is greater or less than a predefined distance. This is something that I don't believe WLED alone is capable of doing. However, there are different versions of WLED that you can custom compile with various options and/or user mods that might allow use of something like a distance sensor. But the standard default WLED currently does not have an option for using a distance sensor or value for control of the LEDs.
Hope that info helps.
@@ResinChemTech it does. Thank you.
How many cups of coffee must I buy to be able to get the control system from you? 🙏🙏🙏🙏🙏🙏
While I appreciate the interest, as I've told many others that have requested that I build versions of my projects for them, I simply don't have the time with my own projects and responsibilities to build, package, ship, track and deal with all the other logistics involved with selling a product. The goal of my channel is to show others how to build their own. To that end, I'm always happy to answer questions and assist someone with building a version of one of my projects, but I just don't have the time with my own projects to build anything for others.
But I do appreciate the interest. And thanks for watching. Again, I'm happy to answer any questions to help you create your own version of this, or any of my other projects.
@@ResinChemTech I can't tell you how much I appreciate your response! My new favorite channel.
what about a laser like you use in a garage door
You could certainly do that... really anything that can detect someone stepping on the first step. In my case, the original PIR sensor detected motion near the stairs but not necessarily on the actual step. The only thing I wanted to avoid was installing something on both sides of the stairs. My garage door sensor, at least, has a wired sensor on both sides, so that wouldn't work in my case.
But whatever sort of sensor works to detect a person (or pet if you like) would probably be fine. Heck, you could even use some sort of pressure plate or load cell that would turn the lights on when someone steps on it. That's the cool think about DIY... lot's of different ways to tackle a project and to find the one that works best in your situation.
Thanks for watching and taking time to drop a comment! I love it when viewers recommend ideas for improvements. Even if they don't work for me, they might work for someone else.
Can you send me the whole system
Sorry... many others have asked the same question, but with my own projects and other responsibilities, I simply don't have time to build, package, and ship any of my projects for others. I try to provide enough information and details between my videos and related blog articles so that others can make their own versions... that's kind of the purpose of my channel.
So, while I appreciate the interest, I am simply unable to build any of my projects for others.
Love to able to do this but no idea how to. Lol
if yes please send me price also
pressure pad on step 1 would solve this.
A pressure pad would certainly work... but in my case an exposed pad on the stairs would not get a high WAF. The other option would then be to cut and pull back the carpet and install it underneath the carpet. But that violates the rule of the original project as stated in that video... to complete the project without making any modifications to the existing staircase (and that would include the carpet).
There are many, many other ways to do a project such as this... and plenty of examples of fancier options here on RUclips if you are willing to cut drywall, route out stringers, etc. But as the original video was titled "...without staircase modification", and probably should have included "... and with wife acceptance", I did have some limitations on the type and installation of sensor triggers. Regardless, these ToF sensors were a major improvement over the original PIR sensors and eliminated the "ghost" triggers.
As always, I appreciate the suggestion. But in this case, a pressure pad would not have been a viable option for my project goals. But everyone's goals are different and this may be a good solution for others.
Can you make the sensor and I buy it from you
Sorry. I don't have the capacity to build, package, ship and charge for building any of my projects for others. My goal is to try to teach others how to build these things themselves, and while I'm happy to try to help them do so, I simply don't have the ability or resources to build any of my items for sale to others.
But thanks for your interest.
Cool
Great solution to your problem and wonderful video production value! Nice job!!
Thanks! Kind words like yours are what motivate me to keep making videos! And I'm slowly learning new techniques to try to improve those production values... which were pretty darn poor in my earlier videos.
Thanks again for watching and taking time to leave an encouraging comment.