Yamaha Outboard Trim Tilt Motor Replacement

HTML-код
- Опубликовано: 11 окт 2024
- Dedicated to my father who taught me early on that if I set my mind to a task, I could accomplish whatever I chose.
June 25, 2016 - Rest in peace, Dad. You are very much missed.
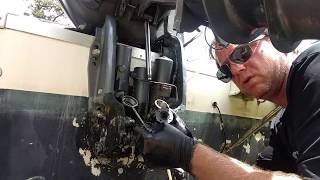
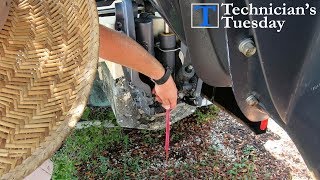
Replacement of the trim/tilt motor on a 2002 Yamaha 90 2 stroke. This recaps a leisurely paced 2 1/2 hour remove/replace job that was completed without removing the outboard from the boat.
The aftermarket motor that I installed January, 2015 was already showing corrosion. I decided to replace it so I could treat the corrosion before it was too severe and salvage the motor as a backup.
The replacement motor was purchased from DB Electrical and came with what appears to be a good paint job. For added protection (after taping the protruding motor section below the mounting flange - don't want paint contaminating the fluid), the motor was given 3 coats of Rustoleum primer and 2 top coats of Rustoleum paint before being installed. Hopefully this will retard corrosion.
Tools required: 1/4" drive ratchet, 10mm deep socket, 4" flex extension, 3/8" drive ratchet, 14mm socket, 17mm socket, 14mm box end wrench, #2 Phillips Screwdriver. For cleaning threads on the removed bolts, a wire brush and anti-sieze compound. Lastly, twine or mono for use as a pull string as mentioned in the video.
Yamaha recommends using Yamaha Outboard Power Trim and Tilt Fluid Oil. I have been using Dexron III/Mercon ATF and have not experienced any problems doing so.


7 years later still helping people with this video. Thank you and lots of love from Seychelles ❤
Seychelles, thank you very much for watching and commenting. That was the purpose of the video, and I am still helping people many years later. I suppose it should not be surprising that this video has had the most views of any video I have produced.
this is by far the most detailed video of this project on the entire internet. Thanks so much for posting it!
Scott, thank you for watching and commenting. Take your time, be patient so that you don't rush and strip out one of those three bolts attaching the motor (my biggest fear) and you should not have any problems. I would suggest that when you are ready to tighten any of those bolts, that you first turn them backwards and feel for the threads to slightly drop into place before you begin to tighten. You can practice the "feel" of that on something else before you do so on these bolts.
Just got notified that my new trim motor is here. Based on your advice, going to pickup a flexible extension now. I’ll watch the video again from my wife’s tablet as I do the job for clarity and my wife will like it, too. 👍👍
JT, the flex extension is a must. Be patient with that rear screw/bolt and be sure you don't cross thread it when you install the new motor.
Thanks Jim. After watching your video I had the confidence to tackle this job on my 70HP Yamaha. I was able to do everything in about an hour thanks to your video.
William, thanks for commenting and congratulations on a successful install. Glad the video helped!
Thanks Jim. You saved me a trip to the marine shop. The swap out was so easy since I got to watch each of your steps. I did use paracord attached to old wires then guided new wires through engine compartment which helped.
texasflusher - TX, glad the video helped you to get the job done. It is a rather easy job but requires a bit of patience. Thanks also for leaving the comment to let me know.
Replaced the tilt/trim motor on my F225 TXRC yesterday. Piece of cake after watching your video. Had considerably more movement in the tilt/trim assembly after removing 3 14mm bolts on each side and loosening the 4th. Your smaller 90 had two +1, mine had 3+1. The string on the leads before removing the wires was a great hint. Thanks. Made installing the new leads a cinch. Bought a can of YAMAHA spray paint ($18.00) to make the aftermarket motor ($130.00 vs $587+ ) match the rest of the assembly and hopefully prevent the corrosion that ate your replacement motor. Painted the motor before installation. Thanks again for the great video.
Sunny, Thanks for the compliments! Very glad it gave you some guidance and that you were able to get your T/T motor replaced. As regards the T/T motors, I just wish the aftermarket units had a way to make the main cylinder case bonded to either the top or bottom so that the engine anodes could help protect it. All the best!
I boat in the great lakes so I'm hoping that with the fresh water I will get better life out of the motor than 15 months.
A tip to hold the back bolt in your socket when reaching behind the motor - lay a paper towel across the top of the socket head. Loosely hold the paper towel in place while inserting the head of the bolt into the socket. Then gently tear away the excess paper towel from around the area where the socket meets the bolt. The bolt will hold just enough for you to place it in the back bolt hole. The socket will pull free with a small amount of exertion. This is a good technique for inserting just about any size bolt where your fingers cannot fit.
Thanks for taking the time to make the video. I initially pulled the entire assembly to install a seal kit. My motor seal leaked, so I was able to pull the tilt/trim motor (using your steps) without having to unbolt the outboard motor mounts from the transom. The motor was out and back in within minutes.
James, I'll thank you on behalf of everyone who watches for your very valuable tip. I believe I had considered gum or a dab of caulking to hold that bolt in place, but didn't try either. Your paper towel idea is perfect.
Glad the video helped.
Thanks mate. Had a 90 HP Yamaha with no tilt. Followed your instructions to bleed hydraulic fluid air lock. Worked a treat. You're a champ.👍😊
Glad it helped, Neil!!
Absolutely fantastic! Excellent video, and I successfully replaced my motor because of this. For everyone who has attempted this, I did run into one problem, which others have likely run into as well. The 3 bolts that held the motor in place were stuck so securely (prior owner kept the boat in the saltwater), that when I attempted to remove them, I broke the heads off of 2/3 for the motor, and 1/3 for the reservoir (which I decided to attempt to replace those bolts as well, since I had already broken the ones for the motor). It appeared to be a disaster, but I was ultimately able to have what remained of the bolts removed. I lifted the motor, and removed the entire trim unit. I took it to a welder, who made welds to the broken bolts, which, of course heated them, and gave him something to grip them, and remove them. When he returned the unit, I couldn't believe he got them out. When I replaced the bolts, I made sure to cover them in anti-seize, so I don't have the problem in the future. For anyone who has broken the bolts, all is not lost, and they can be removed. Good luck.
Wow! I'd say you got very lucky with those bolts. Hopefully your idea and success will help others who may have similar issues. Thanks again for watching and commenting.
@@DanaJohnson-ck7rn Hi Dana !I could fit a regular model in the back. I didn't need a flexible model.
Hi. I have recently discovered spray cans of lube freeze stuff that superchills a thread, shrinking it enough for lubricant to penetrate. Works great on rusty bolts in boats.
Jim, Thank you. I used this video to change my tilt motor on the same motor. My helpers were my 80 yr. old Dad and my 2, 13 yr. old sons.
Preston, VERY glad it helped you. And that was probably a fantastic bonding experience with grand dad and grandsons working together!
Ok Preston672.... I’m a 72 year old dad going over to my son’s (48 year old) house tomorrow to help him! :)
Jim! Thank you! I watched this 20x at least and then did the job over two weekends. Your instruction was spot on! Down to where to buy a new motor. You saved me $2000. I’d buy you a steak dinner if I ever ran into you!!!
Frank, very glad that you successfully completed the project. It's doable if one has the patience, which you obviously did. Good job!!
If you're ever in Miami, I'll take you up on the steak dinner! Just kidding!! All the best, ~Jim
Thanks Jim, great lesson. I have that outboard and my trim motor is really corroded. Thanks to you I'll fix it myself when the time comes. Thanks again from Scott on Vancouver Island.
Scott, thanks for the kind words. If you've any inclination to DIY projects and have the correct tools, you shouldn't have any problem. Patience needs to be in your tool bag though!
I'm on my 17th power boat Jim. I'm no mechanic but if I wasn't at all mechanical I'd be in the poor house. Thanks to videos like yours I can usually figure it out. Keep up the good work .
Thanks Jim. You saved me hours of frustration. Completed this on my Yamaha 90 in about 90 minutes thanks to you!
Mike, glad the video helped. It’s not a bad job for most DIYers. Thanks for the comment!
Why would anybody give this video a thumbs down?
Your video was great! Im replacing the trim and tilt motor on my 1997 60hp Yamaha and your video is going to help me.
Thanks
Thank you for the positive comment. Maybe they hit the wrong thumb, maybe some mechanic doesn't like a lucrative job being demonstrated to be a DIY capable job? It doesn't bother me, as with the many views and comments I know the video is helping others. Take your time and I'm positive you'll get the job done.
Very nicely done and straight forward. I have been doing Marine repair for over 20 years I would highly recommend that if you are going to rebuild the trim rams and do a reseal then pull the tilt ram and reseal it as well. In 6 months or a year the old 20 plus year old seals in the tilt ram will blow out and the job will come back to bite you in the ass. If you are going to reseal then reseal the complete unit . Good video excellent job thank you
Roger, Many thanks for the compliment and especially coming from someone in the business.
The new motor is in place and works great!!!!!!
Couldn't have done it without your detailed video
Thanks
Bryan, thanks for watching and for the nice compliment. Very glad the video helped you with your project!
just did mine on an OX-66 saltwater series. only real difference was a simple routing of the wiring and had 3 bolts per side to remove and loosen the bottom bolts on each side per video. Slid out easily to get to the last bolt. Thanks again for posting and sharing!!
Pillguy8, Very glad the video was confidence inspiring. Good to hear positive feedback! Many thanks.
Fantastic video !!! No show boating bs or a bunch of look at me crap ! Factual and straight to the point !
Justin, Thank you for watching the video and for a really nice complement.
I am preparing to do this replacement on my outboard as soon as all the parts arrive. This video is very informative and made me aware of a couple of things that I did not think of. BTW, a moderate amount of dielectric grease on the o-ring will a) help keep the o-ring in place during assembly and, b) keep the o-ring pliable during the life cycle of the hydraulic motor.
dr, thanks for watching and commenting with a very useful suggestion. It's a fairly easy job when undertaken with patience.
@@JimMFishing the repair went well. Really appreciate you sharing the points that gave you consternation. That helped me avoid some potential problems. Did have one minor holdup during the install of new motor. The forward bolt fell between the cylinder and the jack plate and wedged. I had to make a quick run out to the hardware store and purchase a set of mechanical fingers to retrieve the bolt. After that, all went well.
@@drbankston Those "grabbers" are a mechanic's friend!
Appreciate your video. Repair shop told me 3-6 week minimum wait on trim/tilt repair. Got frustrated and decided to tackle myself. Waiting on replacement motor to arrive. I agree, miss my Dad so much, we didn't see eye to eye at times but he was trying to show me things all along but as a teen, had my head up my a#@ most of the time. Wish me luck on my project (suzuki df115). Ned
Ned, thank you for your comment. I don't know how similar your Suzuki will be to a Yamaha. I do hope that the video gives you enough guidance to accomplish the job with both time and $$$ savings.
Jim, Mission accomplished! I received in the replacement trim motor, it took 45 minutes to install and is working like a champ. Thanks for the encouragement. Ned@@JimMFishing
@@neddufrene7281 Very glad that project was successful. Now it’s time to get back out on the water!
Thanks Jim. I am working at being more self reliant fixing the things that I think are in my capabilities. This video is worth bookmarking.
Scott, thanks for watching. I try to do as much DIY as I can, provided that I feel that I can do as good a job as a mechanic would. Being a DIYer, you will likely will save quite a few dollars and will also understand more about how systems work. If you should have a problem on the water, you can rely on what you learned and hopefully get yourself out of a jam.
Just changed mines out this morning using this vid as a tutorial. Great Teacher!!👍
Very glad the video helped! Thanks for the compliment and for commenting!
Thank you very much! You are either a great mechanic or an engineer that has excellent communication skills!
Thanks for the compliment, Steve. I'm just a DIY'er who was given a great start by my father, starting many years ago when I was a teenager. I try to do the basic maintenance work on the boat and cars, leaving the more complicated time-consuming work for the well paid local mechanics. Not complaining as there is a lot of overhead associated with repair shops that people don't think about. I just try to stay on top of the lighter work myself, knowing how the job was completed and learning in the process. And, I very much enjoy showing/teaching others - ask my children!
Thank you Jim! Great video and step by step instructions... Allowed me to do the job easily.....
Most welcome. Glad it helped!
Great video. I'm not doing this job by myself so it gave me a good sense of what the techs at the boat yard will be doing on my 225.
Rob, thanks for watching and commenting. The particulars might be a bit different on a larger outboard, but the basics would be the same.
The random spring that you were unaware of the purpose is used to hold the old style filter that has since disintegrated. Yamaha has post dated that model filter with the new "FILTER 2" model. Great tutorial. I would add, coat the trim motor with a heavy duty thick paint. I used caliper paint. Looks like you did yours.
Matt, thanks for the compliments and information. I took a look at boats.net to see what filter you were referring to. Now I know. There was no filter there when I performed this motor replacement and I don't recall seeing one when I replaced the previous motor. I have to presume that someone previously decided not to install one?
I did apply several coats of Rustoleum paint to the motor prior to installing it. So far, three plus years later, the motor is still holding up well. I now need to replace the seals around the trim and tilt pistons. When I do, I'll make another video.
So easy after watching this video! Quarter inch ratchet head is super important for the back corner screw on the trim motor!
Thank you, Jeason. Glad it was able to help you out.
Little grease on that o ring will keep it from falling off the motor stud. Nice video and well informative. Thanks
Dennis, I have no idea if using a small amount would have any effect on internal seals after it eventually mixed with the fluid. As small an amount as would be required to hold the O ring in place, it might not have any effect. Nevertheless, a great suggestion.
Thanks for watching, the compliment, and for the tip! ~Jim
Just inherented my opas old boat with this motor. Needs work so your video will help me keep it.
Dudedud, thanks for commenting. These are strong, reliable motors which is why after 20 years and more they are still sought after.
Thanks Jim, awesome video. I'll definitely be giving this ago when I get my new motor delivered.
Peter, it is definitely doable as I've shown. Patience is the key. Thanks for the comment and Happy New Years!
Thanks Jim and Happy New Year to you too
Hi mate. Great video in every respect. Thankyou. Love that advice about walking away and not turning to the bottle. 😂 i'm old enough to already know that trick, but sure learnt the hardway in my younger days. Going to do mine this weekend. Cheers mate.
Eric, thanks for the laugh and compliment! Yep, I'm long past my younger, dumber, immortal days myself. Good luck with the project!
Thank you for your video. Today replaced my trim motor following your steps.
Glad it helped and that you are now experiencing that job satisfaction that comes when you've done the job yourself! Thanks for letting me know of your success.
Thank you sir!! I have the same motor and boat.. Glad you made this video. About to tackle mine tomorrow.
This is a relatively easy job on our outboard’s. Remember to be patient. Don’t get frustrated and start forcing things, especially that back bolt. You don’t want any of those cross threaded.
Great Video Very good advice there - don't pull through the cables without attaching guide cable to allow you to pull back the new cable. It's tight in there and very hard to find a way back if you don't have a guide wire!
Colum Horgan - thanks for watching and reinforcing a small but very time saving tip.
Thank you, great help to see what I will encounter on my 90hp unit before I start on the motor screws, from Durban, South Africa.
Craig, thanks for watching and commenting. Patience is a very useful tool when replacing that motor. ~Jim
gonna attempt my 90 Johnson T/T motor this weekend-nice work and great video-awesome tribute to your father
Thank you, Sir! I'm not sure if the Johnson T/T works the same but hopefully the video gave you enough insight that you are able to adapt.
My father actually got to see the video about two weeks before he passed away. Being he was in his 90's, he was quite amazed at how well I had documented the steps and he congratulated me on a job well done. He was a great man and father. I do miss him.
Many thanks.
Jim M ,we caught hell but we got buttoned up, sad thing now don't even have time to fish time to go deer hunting here in Texas good luck thank you for that video again
Good luck with the deer hunting. Haven't been since moving to Florida 20 years ago. Get one for me!
Outstanding video. My mechanic wanted to pull the engine and mentioned 1800 for parts. I am in your debt.Peace to you and yours👷♀️👍
Stan, a few inexpensive tools and a lot of patience is really all that is required. The local Yamaha dealer also said they'd have to pull the engine. Doing so may make for an easier job once the engine is off the boat, but I've shown that the T/T motor replacement can be successfully performed without doing so. Take your time and you'll be able to get the job done at home.
What everyone else said x 100! Less than 3 hours (not including a trip to the parts store to get the 1/4” flex extension). Lots of appreciation from Seaford, Virginia.
Excellent!! You’re not far from my old fishing grounds at the CBBT.
First off, I want to say how great this video is. I've watched it multiple times to try change out our motor. I did pretty good.....except that the hydraulic lift only raises about half way. Any troubleshooting tips you might have would be greatly appreciated!
Aimee, thanks for the comment and compliment. If the motor is working the hydraulics any little bit, I doubt it is a motor problem. I would need some more information in order to recommend some suggestions.
1) What year and model Yamaha do you have?
2) Are the trim rams operating fully and only the tilt ram giving problems?
3) Does the sound made by the t/t unit change when it stops lifting, is there any gurgling?
4) Did you bleed the air out of the system?
@@JimMFishing 60 hp yamaha 1998..... only the tilt ram is having issues (only raising half way)....husband says there is a gurgling sound when the motor is lowered completely down. We got the air out the best we could.....but we did your process more than twice because it wasn't working right. My husband did initially use the wrong plug (one with a flat head screw)...because he didn't listen to me when I told him you were using the other one. He feels like there is still air in there, but we can't figure out how to get it out. Thanks so much for your help! I've been dying to get back out on the water!
@@JimMFishing he figured it out. He lowered the front end of the boat trailer to make the motor more vertical....and kept pumping the motor. He finally got all of the air out and the reservoir full. it is working perfectly! Thanks again!!
@@aimeemcmillan4134 Aimee, that's fantastic! Glad you figured it out (and your husband listened, ha ha!). The process I've always used to get the air out is to raise the outboard with the t/t motor, open and fill the reservoir and resinsert plug, then open the manual bypass screw and let the motor descend as low as it will go. It may not go down into the trim range. Close the manual bypass and use the t/t to lift the outboard. You may need to repeat the cycle several times. Some do not use the manual bypass part and just jog the outboard down in short bursts with the t/t/ motor. Lowering the trailer tongue till it touches the ground helps to pack more fluid in the reservoir.
Now, time to wrap up that project and get out on the boat. Glad it all worked out.
Great description. Going to tackle one on a 150 Yamaha this week. Thanks for the info Jim!
Jordan, thanks for commenting! Take your time, be patient and you'll get the job done.
Good video, you have a good voice for the audio as well, nice and clear. It looks like you take good care of your boat as well.
40, Thanks for the comment and compliment. I do try to take maintain the boat as best I can with the belief that it will last much longer if well cared for.
Jim...great video. I followed you step by step. Success!
Paul, comments like yours makes me feel really good about having produced the video. Thanks for letting me know. Time to go out and enjoy the boat! ~Jim
I found it easier to take out the 2 long bolts holding the top of the tilt trim motor down. Take the top off the trim tilt motor, then remove the motor with housing. Then it is easy remove the 3 mounting bolts. To mount the new motor you will need to use Jim's method to get the 3rd bolt in unless you disassemble the new motor and reassemble it once the 3 bolts are in the base. The shaft protruding from the base of the motor mates with a female nylon extension to the hydraulic pump, make sure it does!
Robert, thanks for commenting. Your disassembly method provides another alternative to having to remove the outboard from the transom.
Thankyou! I had a hell of a time trying to get that 3rd front corner bolt out…. Also if anyone is wondering you can straighten a metal coat hanger make a small hook on one side. And grab your two ring terminals for fishing the new wires under the carbs👍
Anthony, glad the video helped! That third bolt can be a pain. Patience is the key, both in removing and in reinstalling. I like your coat hanger idea. It's been a long while since I replaced that t/t motor - I may have used some single conductor wire in a similar fashion but I cannot remember. Thanks for commenting and letting us know of your success!
Thanks. I was looking for same instructions for 1982 Evinrude 140 V4 . Your video has helped me very much, especially the connecting wire. That back third screw is the son of a gun. I was thinking that maybe you had to remove the engine from the boat to get at this joker, but maybe able to do what you did. I have a few extension tools, but may have to get a small handed friend to get at it. I also am not completely sure its motor, and not wiring/relay issues. My relays click, but no movement in motor. Tried replacing relays with no luck.
Bottom line, this is great video. Thanks. Gotta get into right mindset to attempt this job. Back screw is gonna suck.
Kerry, thanks for the compliment on the video. One of the reputable Yamaha repair shops in the area told me that the engine had to be removed from the transom to replace the t/t motor, and quoted close to $800 for the job. Well, it appears that isn't necessarily the case.
If the relays are clicking, that to me would indicate that the T/T motor is bad. One way to check (at least on the Yamaha T/T motor, 2 leads on the motor) is to remove the T/T leads from the relay and apply 12v directly to the leads. If the motor is good, it will spin. If your '82 Evinrude is also a 2 lead T/T motor, I'd give it a try just to try to isolate the problem to the motor.
All the best...
Thanks!!!!
Jim very informative. I was wondering if I had to loosen the whole Assy to access back bolt. Great video.
Dean, thanks for watching and commenting. As you've seen and contrary to what the local Yamaha service center had told me, the T/T motor can be replaced without removing the T/T unit from the brackets. Patience will get the job done.
It worked just like you showed. I had removed my old motor because of rust, but the new after market motor would only work intermittently so I removed all the rust from the oem. A tedious job with a Drexel tool and sandpaper. Found a few pits. Soaked it in rust removing chemical then washed it with water, then acetone. I then used JB Weld to fill the pits (not deep), and coat all bare metal. Let that almost cure and recoated that plus the remainder of the motor (Just the ferrous portion not the base). After complete curing I painted it. Reinstalled it, filled reservoir, purged, and it works great. Now to return the non oem motor for refund.
So I did an “off old, on new, off new, repair old, on old”. I may be an expert now. Could not have become such w/o your video.
That's great to hear, Rob. I'm glad you got the job done with whatever help the video provided. Time to get back on the water and enjoy the boat!
Thanks, I`t was very easy to change motor after this video. Greetings from Norway =)
@@stigjohannessen9648 Norway! Wow! Thanks for watching and commenting. Glad the video helped. ~Jim
Thank you for this video, I just replaced my motor by following your steps!!!
I'm glad the video gave you the guidance and confidence to get the t/t motor replaced. And thank you for watching and commenting. Wishing you a very Happy New Years....
Going to do this on my 70 tomorrow, thanks for your video.
Rob, sorry for the late reply. Post up on how it turned out.
You were amazing. Thank you so much for this video
Bill, thanks for the compliment. If you've had to replace your t/t motor, I hope the video helped.
Heading over to a mechanic friend of mine this evening. He told me about the same referring to the cap. Going to try nonetheless. I'll keep you posted.
Josh, any followup that could help me and others?
Jim M unfortunately none that would apply for a DIY application. My mechanic is a good friend of mine and he advised that I not get involved in that particular job. Said if those caps have never been removed it’s a chore getting them off without damaging the piston. I spoke with the company that manufactures the spanner wrench to remove the caps and found the part is pretty expensive. I wasn’t willing to purchase it on the off chance I couldn’t get the caps and then be stuck with a tool I couldn’t use and a problem I couldn’t exactly solve lol. Long story short I took the boat in. Piston was pitted below the seals. Needs a new subassembly unit. $1000 for the whole job. It hurt , but it’s done.
Josh, thank you very much for the update. Sorry you couldn't get the job done but sometimes we do have to turn the work over to those trained in these areas. All the best.
Jim M no prob. All the best to you as well.
Hey Jim , are you a guide ?
Great job.....I miss my Dad....
Thanks for watching and the comment, smokster.
New subscriber here. Thank you for making the video. I feel more confident in doing this job. Thank you again
Thanks for watching and for subbing. It's a relatively simple job that just requires some patience.
Thank you for sharing the knowledge!
Sorry for the late response. Hope it helps! Thanks for watching and commenting.
I know it’s been three years since someone has commented on this But I hope someone can answer my question great video
First, thanks for watching the video. It was four years that I posted the video and I am still getting comments / questions, 216 comments thus far! If you use the "Sort By" icon you will see very recent comments. I do try to answer each one as the whole purpose of making this video was to be helpful to others. If I can provide help by answering a question, I try. I saw your second post and replied to it. Again, thanks for watching.
@ Rafael:
Rafael, I tried several times to respond to your comment but YT somehow was blocking it.
Do you hear the motor make any noise when you engage the trim/tilt switch? Try both switches if you have one on your throttle and on the lower cowling. If you don't hear any noise, you may have a faulty motor, bad relay, bad switch(es), or a break in the wiring. To test the t/t motor, disconnect the motor leads from the colored studs on the relay and connect them to a good battery using jumpers. (On this particular model t/t motor, the leads are both used to make the electrical circuit. The drive shaft rotation is accomplished by the relay reversing the electrical polarity running thru the leads.) If your t/t motor runs, this will confirm that your t/t motor is good, and will point you in another troubleshooting direction.
If the motor runs but the motor does not tilt... Be sure the manual bypass valve is closed. The motor cannot build up enough pressure if the bypass valve is open. Remember, open the valve to lower the motor, close the valve, fill the reservoir, close reservoir plug and use t/t motor to raise the outboard.
It may be possible that you did not engage the drive shaft on the t/t motor with the connector inside the housing. I don't know if it is even possible to reinstall the t/t motor without a proper alignment of the drive shaft and connector. But, if the connector cannot spin, the pump body cannot generate the necessary pressure to tilt the outboard.
Hope this helps.
Great job brother. Many thanks. This will help me greatly with my 50 horse Yamaha.. got a freshly painted trim motor ready to roll
Thanks, Scott. I would think that the 50 will be very similar, if not exactly the same, as my 90. If nothing else, the video will serve as a guide. Patience and you'll get it done, in plenty of time for the season!
I have no idea how to work on boats so thanks for this :D
Benjamin, thanks for watching and commenting. If you take your time and be patient, you can get it done. There is nothing complicated about the job.
Great Video Jim. Saved me a lot of time and aspirin
Scott, thanks for sharing yet another success story. Time to go enjoy the boat!
After dropping that difficult 3rd bolt behind the whole trim unit I had to remove those 2 bottom bolts to retrieve it. With the whole unit loose, it made it much easier to put that difficult bolt back in. The trim unit was easy to resecure. If I had to do it again I wouldn't hesitate to remove all 8 bolts giving me easier access to all 3 trim motor bolts.
Rob, thanks for commenting and for sharing your experience. I am hoping that future viewers will read thru the comments to gleam more useful information to apply to their particular situation.
Jim, thank you for this video. It's terrific. On my '91 200TXRP, the tilt locking pin (the one at the top of the tilt piston) is stuck into place and cannot be moved, even with the circlip removed. Would penetrating oil and an air hammer be warranted at this point, or is heating the bracket around the pin a better solution?
Ty, I really don't know. I'm a backyard DIYer, not a certified mechanic who might have more knowledge of such. I would think that if all pressure has been released from the t/t unit and the motor is resting on the service locks, there should not be anything preventing it's removal. Penetrating oil is certainly worth trying but I'd be very hesitant to use a air hammer. You'll want to use the least amount of force necessary to dislodge the pin. Maybe try using a socket of appropriate diameter with either a rubber mallet or claw hammer. Tapping will hopefully do the trick.
Thanks for the video it helped me out alot taking it off tonight but unfortunately I was sent the wrong motor. I do have fat fingers but I did it a little different I used about 18" of extensions last 3 inches was a wobble to a 10mm it worked perfectly.
Jason High, glad the video helped. Hopefully your comment will also help others. Bummer that they shipped the wrong motor. Hopefully the correct replacement will be in your hands soon.
Great video! Quick question, what is the best way to replace the manual relief valve screw on that setup? Does the bracket need to be removed? Or can it be removed in place?
Will, thank you for watching, and for the compliment. I do not know the best way to replace the manual relief valve screw. It may require a full disassembly of the T/T unit. I am not a mechanic, just a DIYer so I really cannot answer your question.
I replaced the back bolt with a hex and phillips both type of bolt so I have two chances to get it out next time. I used a 6 inch flex extension and didn't need to loosen any motor mount or piston clips to get the bolt out. Used some ductseal on a large phillips to reinstall the back bolt. A phillips bit is a lot narrower than the 8 or 9 mm hex socket.
Thanks for that insight, Richard. It may prove useful to others. Thanks for watching and commenting.
Thank you! Clear concise!
Thanks Mark. I appreciate the compliment.
Thanks for the video mate. About to tackle mine now.
I know this is a late reply, but I hope all went well.
@@JimMFishing It did mate. Brand New motor since then though lol.
I have a 99 Yamaha 150hp fuel injected 2 stroke on my boat. The Yamaha Shop manual states to use ATF Dexron II hydraulic fluid. The local West Marine sold Chevron ATF so I bought a bottle of that to use. The Tilt/Trim is not working at all. The motor is down and I was able to remove the fill plug and oil came out. The T/T motor runs sounding the same as always. So, I'm a little perplexed at the cause. I plan to do a fill procedure anyway and hope that fixes it.
Sorry for the late response. I did not see the comment come thru on my phone.
I honestly do not know what the difference would be between the two ATF fluids, although in transmissions the fluid will make a definite difference. I doubt the fluid is your issue, but not being a mechanic and being there in person, I really cannot say.
Is the manual relief valve closed? If it is not closed, the hydraulic pressure cannot build within the cylinders to operate the rams.
@@JimMFishing My tilt/trim cylinders got new seals and they work fine now! I've owned the boat/motor since 2007 and this is probably the first time the seals have been replaced.
@@williamwhite9767 William, glad to hear that all is working as they should be!
Think you very much.you help me for your instructions
put ???
have you got a video on how to do the replacement seal from middle cap trim ?
Or remove hydraulic from boat ?
Thinks
I have since published a video on replacing the cap seals. Look for it on my channel.
Haha I don't know whether to laugh or cry. About to deal with this... Brilliant video. Thank you!
Thanks for the compliment. Post up with your success story afterwards!
Nice video! LOL, Don’t drink if you become aggravated, that’s time to get a sip:)
Thanks! You're right, save the drink until that system is bled and the tools are put away.
This video saved me a ton of money! Thank you!!
Thanks for watching and commenting. I'm glad it has helped!
Very informative. Keep it up. Thanks from Goa India
Thank you! If you take on the job yourself, please post up how it turned out.
Thanks, Rick in Australia.
Roderick Barry - I sincerely hope it helps. Thanks Rick!
Excellent video
@@johnfreeman8537 Thank you John! If this project is on your horizon, I hope the video proves useful.
Brilliant explanation! Thank you
Thanks for watching and for the compliment, Nick!
great job thank you for the help, you have a good what I call radio voice very clear
Trevor Grosso Thanks, Trevor. Glad to know that the video is still helping others.
THANKS IT WAS A BIG HELP..
Thanks for letting me know!
I have a problem with my Johnson 115 hp V6 two-stroke some days the trim will work some days it won’t I scraped the wires connecting to the panel to the solenoid with sandpaper and it still won’t work now I’m thinking the motor is shotWhat should I do the same thing you did
These t/t motors do start acting erratic before they completely give out. If it were me, I'd go ahead and replace it and not have a nagging concern when you're out wanting to have an enjoyable trip on the water.
great video, will use on my 70hp. only difference relay sits horizontal, below your black cover. Did you have to buy O ring separate?
Dennis, thank you for the compliment. The motor I purchased from DB had an O ring but I felt it was a bit thin. I purchased a Yamaha O ring for the job. If you do not have a Yamaha parts dealer close by, use boats.net. They have great diagrams available for every outboard.
Thanks for the comeback. Also, I plan to use tree coat wound dressing to paint trim motor. I've used it on my trailer which goes in salt water and it seems to hold up well. I believe the asphalt in the spray might help it to hold up better. Similar to bitumastic coating, but cheaper. This is an experiment.
@@dennissnyder380 Interesting experiment. Anything that prevents salt water from reaching the T/T motor casing has to help. I think part of the issue with the motor is that the outer case is typically in three sections with a gasket between each. If an internal metal to metal connection is not had, there is no galvanic protection available from the outboard's anodes. BTW, be sure that both anodes on the outboard are in good order - trim tab and beneath mounting bracket at transom.
Wondering why you didn't drop the entire tilt unit out from between the engine mount brackets giving you free and clear access to the 3 tilt motor bolts? You had the entire unit unbolted, just had to pull it clear of the engine.
Rollie, from what I recall (its been 2 years now).... due to the design of the mounting brackets the T/T unit cannot be entirely removed while the outboard is mounted to the transom. If the transom mounting bolts were removed, it might could be done. But, you'd be further complicating the job. I'll grant you that if the engine was not mounted to the boat and the T/T unit was removed entirely, it would be an even simpler job.
Thank you. Very informative. Great narrative.
Thanks for watching and commenting. I hope it helps you out.
great vid! so there's no seal between tilt motor and hydraulic unit? just the o-ring on the motor?
Correct, only the O-ring. I didn't show it in the video, but take the O-ring and slide it onto the motor (around the slight extension of the motor housing) before you install the motor. You can pick up a new O ring from your local Yamaha parts department or online from sites such as boats.net.
Thanks for watching. I hope it helps.
Great video and you've given me the confidence to replace the motor on my 2007 115 four stroke - any ideas on where to go for an aftermarket replacement???
The one I bought was from DB Electrical. My first one purchased from this company was the one I was replacing in the video, and the replacement was also from DB Electrical. As stated in the video, I did give it a good paint job. First, several "washes" using a brush to apply ospho to the factory paint, then two coats of Rustoleum Spray Primer followed by several coats of Rustoleum Spray Paint. Thus far, no rust!
Hey Jim thanks for the quick reply and G'day from Down Under - going to try and contact DB here from Oz and see how I go - prices for these things here are ridiculous.
They have a independent website and also an eBay store. Try both to see if you can get them to ship to you. Wishing you great success, both on getting the motor and on its replacement.
Hi thanx you the best video in the RUclips its very useful , i want ask one question for you please my motor hydraulic yamaha 85 working just down put if i try up it is disconnected and no voice Permanently , what yo think that proplem? And thanx you dear
Thanks for watching and commenting. I don't fully understand what you are asking. If the motor works fine going down but not up, it might be a bad switch. You might try reversing the wires on the relay to see if the T/T would then work in the up and not down position. If so, then the motor and relay are good, switch is bad. I had this happen sometime after the video was made - bad switch on the engine that would only work in one direction. Fortunately, I had a second switch on the throttle that confirmed the motor and relay were good as it worked in both directions using the throttle switch.
Jim, great video. I just stumbled upon it as I’ve got a bad T/T motor on my 90TLRP. I was reading through the comments and saw where you purchased an aftermarket TT motor from DB Electrical. I too am looking to buy from them. An OEM motor is $650-700 and there’s no way I can justify spending that much when I can get an aftermarket one for
Walker - the DB motor that I installed in that video is still running strong. I did prep it prior to installing with primer and finish coats which I’m sure helped, even though it was painted when received. To be frank, the motor I was replacing also came from DB and lasted only 15 months. If you can get 3-4+ years from an aftermarket motor, you’re ahead of the game compared to OEM as long as you have a DIY mindset.
Jim, thanks for the reply and information. Very helpful!
Jim, or anyone else for that matter. I removed my old motor Yamaha OEM TT motor but have a quick question about the new TT motor I bought from BD Electrical. The old motor has 3 wires, green, blue and black. I know what the green and blue are for and I assum the black is a ground wire. But the new motor does NOT have a black wire. Only the green and blue. Do I not use a ground wire for the new motor? Or do I need to rig it up some way with a ground? Any suggestions. Sorry I’m a newbie when it comes to this stuff. Thanks so much for the great video and your help.
@@walker500 - I have to believe you have ordered the wrong motor and would not recommend you attempt to use it. With three wires, I doubt that your solenoid reverses polarity like occurs on a two wire motor and instead keeps the polarity the same thru the wires, using the black as a common ground.
Go onto boats.net, look up your year and model motor and take a look at the parts diagram. I'm not sure if it will show the wiring, but you can get the Yamaha part number and cross reference it. Look as similar offerings available on the internet including marine supply houses, eBay and Amazon and try to determine if the motors being sold also use three wires. If so, you definitely have the wrong motor and should exchange it for the correct one for your outboard.
Jim, thanks for the reply. I talked to DB Electrical cust service. Using my model # (90TLRP) they pulled up the TT motor I ordered (item#TRM0037). I also used the parts diagram on boats.net and got the actual part # (6H1-43800-00-00) and searched for that part on DB’s website and got the same info. (Boats.net didn’t sell the motor I needed). I also searched several other websites and those motors looked like 2 wire motors with the extra wiring harnesses to convert to a 3 wire. DB cust service tells me this aftermarket motor is a 2 wire motor and comes with two relays and necessary wiring harness to convert it to a 3 wire motor. I did receive all that but it seems and looks very confusing to convert it. They said the early 90s (my motor is a 1991) is when a lot of these motors went from a 3 wire to 2 wire. I’ll need to do more research to learn how I go about converting it as there’s two relays, the green, blue, a red and black wires. I hope RUclips has as good a video as yours to help me in that process. Wish me luck and thank you for your help. It’s very much appreciated.
Just did it with you help. Great video.
Congratulations, Travis! Glad the video helped you. If you run your motor in salt water, be sure to flood the t/t area with fresh water to remove any salt residue after every outing. Make it a part of your engine flush routine.
Hello Jim, do you think I can get away with buying a "universal" trim motor assembly rather than Yamaha...Which is what I have. It's a 90 4 stroke. There's a big price difference.
Margie, I believe you are referring to a non-Yamaha brand trim motor that is made to work with your trim/tilt unit. If so, then yes it will work. The unit I am installing in this video is made by DB Electric here in the US. It is not a Yamaha branded motor.
If you are referring to a universal trim/tilt assembly (the entire assembly including the pistons and rams), I have no clue. I would be hesitant to use install one on my outboard.
Hope this helps and best of luck with the project!
Life saver video, great tips as well
Jesse, thank you for watching and for the compliment!!
Any idea if a 60 Johnson has a power tilt button on the power head like those Yamahas do? That's a very handy feature when installing a transom saver
I have no idea, sorry. I do appreciate your watching and commenting.
I used a 6 inch flex extender for the rear bolt, with a little patience I got a grab on it. Believe it was a 10mm socket. When I reinstalled the rear bolt I used a Phillips with the same 10mm outside bolt size, dabbed a little duct seal to hold it on the socket and tightened to 32 ft lbs.
Good job, Richard. I've also had to use something sticky in the past to hold a bolt to a socket in a tight place, but was able to get that back bolt in without it, using a lot of patience and determination. Glad it worked out for you.
Yeah, Jim it worked, but the next job will be the seals on one trim cylinder - I'm a little apprehensive about ruining the pin recesses on the cap but I gotta try it.
Excellent video, thank you so much.
Thanks for commenting. I hope it helps!
great video mine is in need of being changed i have an 85hp r the motors all the same ?
@DJ Illmanik - I'm not sure if the 85 uses the same T/T unit. You can compare the part numbers for your engine year / model with the parts for a 2002 90TLRA (my model). Even if yours has different parts, the procedure may very well be the same. A good site for looking up parts is www.boats.net
Great video! Alot of knowledge comes from our Dads. I'm about to tackle my motor replacement on my 90 TLRC. Where is a good place to purchase a aftermarket motor? Once again, thanks!!
Joel, you are correct! My father taught me so much and like most, only realized it once I was a out of the house and on my own. Fortunately, he lived close by and we were always working on projects at his or my home. i come from a close family and we all miss Dad. I was fortunate enough to have him see the video and comment to me on how impressed he was, just weeks before he left us.
I bought my aftermarket motor from DB Electrical. They sell on eBay and direct from their website. I cannot say how well their motors are built as the first motor I bought is the one you see that is severely rusted and being replaced. The second I purchased is still in operation today, although I did give it several coats of Rustoleum red primer before the finish coat.
Looks challenging but the DIY savings are tremendous. I have an 05 Yamaha F90TLR 4 stroke. Can't see the tilt motor as it is trimmed down. the tilt motor has 4 bolts. Will your method work on this motor?
Ken, thanks for watching the video. I do not know if the T/T motor replacement is the same on your 4s motor, but would think that it is very similar. I would research the motor using some online parts diagrams and make the decision.
If you call your local outboard mechanic and ask the same question, you might be able to get an answer. Explain that you've done this before on an older 2s outboard and want to know if it's a similar process. It's certainly worth a try.
Thanks for getting back to me. Guess the only way to know is pull the boat and hoist up the motor. Your video was well done. Learned a lot.
Thanks. I'm going to change mine. I have already removed my motor and theres a foam ring in the reservoir. It looks like its shot. Does it need to be replaced too?
Michael, it is a filter and if yours is in bad condition I would replace it. When I had my t/t motor out, I did not notice a filter in it but I also was not looking for one. If / when I have to replace the t/t motor again, I will be checking for it and will replace it depending upon its condition.
@@JimMFishing great. Thanks. I wound up taking the motor mounts off to get to that nightmare inside bolt. That one really sucks
Hey Jim I know this post was some time ago. I was wondering if you have had any experience replacing the seals to the center T/T piston ? It's leaking on my unit and the TT motor needs to be replaced so I figured I'd try my hand at both. Having some issues getting that cap off. Thanks in advance for any insight
Josh, I have not yet attempted a seal replacement, although I do see some slight weeping on the right trim cylinder seal. I spoke with a Yamaha mechanic some time ago about the job. He told me the caps are usually so stuck that his shop considers them a replacement item for the job, using a chisel (gouging the top) to break the cap free. The cost of a new cap would probably be less than the shop labor charge for them trying to salvage an old cap. From the videos I've seen on YT, I am of the opinion that the tool used for tightening a cap will not work for removing them after they have been exposed to salt water for a while.
Please do respond back with your results if you do decide to tackle that job. Maybe make a video so others, including myself, can learn.
Well done sir.
Thanks for watching and the compliment!
What was the pump or motor doing before you changed it having problems with mine
Erik, the motor would sometimes not start up when the switch was depressed. That is generally the first sign that the motor is on its last legs.
Jim, I have 1999 90 hp. I would I get the entire trim/tilt unit out? My engine is slowly lowering all the way down and I am under the impression I need to overhaul the entire unit.
Don, I am not sure what you would have to remove to be able to remove the complete trim/tilt unit. You may have to remove one of the two motor brackets from the transom to provide enough room to remove the t/t unit.