Dear Robert! I've just created a 2 layer board in EasyEDA, thanks for this awesome tutorial! I have a question in my mind however... My board is an H-Bridge which will handle 10A current spikes, a few amp countinous current. (I upgrade my kid's electric tractor)... So I just did the layout, and I have some space on the board to route a few tracks on both side a top of each other (for example from the MOSFETs to motor connector) If I do this, should I put VIAs along the way to connect the two sides multiple time, or is just ok if the connection is made in the two ends (THT connector and FET had been used) Thanks, Peter
@@EFazy that's super cool. I am very happy this tutorial helped. PCB tracks can withstand high currents (I have some videos about burning PCB tracks) + I discuss high current PCB design with Steve Sandler. I don't know how wide are your tracks, but you can use Saturn PCB calculator (free software) to double check if you would need paralell tracks. 10A is not so much - it may not be necessary, especially if your input - output are on the same side of PCB - in that case most current will probably flow on one side anyway. However, having GND plane on the other side may help with possible EMC / EMI reduction (which may not be relevant in your case). ruclips.net/video/WdlN8bHw-w0/видео.html ruclips.net/video/sJQi9vcCW-E/видео.html
The most beautiful saying "PERFECT" I've ever heard in my life ( I will use that voice sample on my home assistant wallpanel if @robertferanec allows it 🙄). Excellent job. I am using these boards in my house automation system without knowing how they work internally. Now I have a good idea of how this kind of system works.
Thank you so much for this! Want to say, @2:52:52 (palindrome :) ), I see you using a web page from DroneBotWorkshop. I've been learning a lot from his videos! That's so cool. Am helping my nephew write video games, and I plan to introduce him to "smaller computers" this Christmas, with displays and PictoBlox which is like MIT's Scratch, which can run on esp32 etc. Thank you again!
Another awesome contribution to the community 👍 , having started doing layout on light tables using vellum and bishop tape all I can say is this generation of engineers have no excuse for producing nothing short of excellent designs . Modern tools and your guidance and generosity of sharing many years of your experience is all they need . Having purchased your Cadence course a few years back it saved me $ 1000’s of dollars of wasted time getting to know the tool chain 🙏👍👏
Totally agree. I wish I had the same possibilities when I was a teenager. PS: Thank you very much for buying our courses, you support helps with creating this free content.
Hi Robert, Thank you for the great video! Great content as always I would like to share a little tip: When you are routing a line on the top layer, and you want to pass to the bottom layer through a VIA (e.g., at 01:35:15), you can just switch the layer on the "Layers and objects" box, and it creates the VIA automatically from your current layer to the one to which you changed to (instead of (1) stopping the routing command, (2) placing the VIA, (3) switching the layer, and (4) starting the routing command again).
I knew this was possible, and you show all the steps. There must be ways to share working schematics with all required fabrication information. This is as cheap as buying off the shelf. I often see boards that have too many things and want to remove them, buy just what I need for an application. If you tied to the PCB maker then anyone could just pick what they needed and have it made. Thanks!!
@@RobertFeranec Thanks. You are doing some outstanding things. But it still relies on your memory of how to find and click so many things. If we just had some way to check boxes to select what we want. I am sure a program, somewhere, could generate the required pieces to "print" something and let us order them. Me, today, I would ask for a programmable SDR to cover from milliHertz to GHz, storage to network drive. Yes, the link is helpful. I have been spending many hours every day talking with ChatGPT3 from OpenAI. It cannot yet, but at some point could, help people design the tools they need, program them for what you want to do, and have them completely ready to go to work when you receive them. Maybe I am just old, but after more than 40 years of clicking and typing arcane sequences of things, just to get computers to stay working, I am happy to be able to talk with an AI in complete and correct English sentences, using whatever words I want to express myself. It makes lots of mistakes and is not yet allowed to learn, but it saves me a LOT of time and improves my writing at the same time.
Thanks! I have had about 6 boards manufactured using JLCPCB using KiCad. This looks easier even given the new software time hit. The integration with LCSC looks easier. I have never had more than 2 layers and have been avoiding it. Its the longest instructional video I have watched but it was great. Watching you work likely will speed me up some. Watching the USB parts and Impedance matching eases some stress. I have missed the check and had a couple of parts not assembled. I now take a copy of their check image next to mine so that I can check everything easier
Inspirational! I'm in process trying to design a PCB for a motorcycle CDI. I was really stuck today but your video has given me a bunch of new ideas and a lot of enthusiasm. Thank you so much for taking the time to do this. Perfect!
Another awesome contribution to the community , having started doing layout on light tables using vellum and bishop tape all I can say is this generation of engineers have no excuse for producing nothing short of excellent designs . Modern tools and your guidance and generosity of sharing many years of your experience is all they need . Having purchased your Cadence course a few years back it saved me $ 1000’s of dollars of wasted time getting to know the tool chain
Thanks for the great tutorial, Robert! At first I was a little discouraged by the 3 hours, but it is by far the best tutorial I have seen so far on this subject. And now I discovered others of your quality videos, 8-9 hours in total. :)
Great video! Only wish that you went a bit more into explaining why you physically placed the components where you did on the PCB. It might be that you had already designed one of these and was copying it, but it would still be good to understand the logic when you’re initially laying things out.
A great tutorial from start to the very end, you went through all the necessary steps without any skipping of content and with lots of aspects explained. I really enjoyed the whole video. Thank you Robert!
I am just getting into designing my own PCB's and this is going to be my first project as you have covered every single step. Great job. I can't think of anything more you could have done short of coming to the house and building it all with me. Thanks
Thank you. PS: You can always only buy PCB (just PCB is not expensive), buy components somewhere else and fit them by yourself. Also, as others pointed out, you can use Basic components, that would make it cheaper.
A fantastic tutorial, and what I learned here is about to get put to use. So much good information packed into a few hours. Thank you very much, I learned a lot in a short period. Subscribed!
i just like the video tutorial .... this is the classic one i was searching for no lagging and no other stuff just straight to the point ... just loved it ❣
perfect I had been looking for tutorials like this, I just passed by while I'm looking for another tutorial for work related, i came to this. This is really great
Thanks for a great tutorial. I was able to make my first pcb using this skills and its actually working. Telling the truth, I am 100 LY away from hw designer 😂
THANK YOU ROBERTS! YOU ARE A GREAT TEACHER! It was a breeze for me since I had already taken you introductory Altium training on Udemy 2yrs ago. Most of the steps, mouse movements etc (except the 3D view controls) are very similar to Altium environment!. And it is much simpler to use and get started quickly than Altium especially bcos of the component and foot print library!
I am absolutely awestruck from this video, amazing! I have watched some of your other Altium ones, and will be purchasing at least one of your Fedevel courses today. Can I ask one question? What about vias in pads? Is it something to be avoided? Guidelines? Thank you so much!
I understood very little about electronics going into the video. Your step by step instructions really helped clarify some concepts I didn't fully grasp. I am looking forward to watching more. Thank you for the great video.
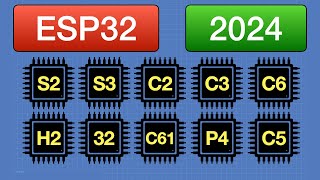
Hi Gael, I'm also doing my first custom ESP32 board. I'm making board to communicate via CAN bus as I do not wanna use wifi or any radio. I'm currently doing board with 4 connectors for PIR sensors. The esp32 supposed to send messages over the CAN Bus to ESPHome listening on CAN Bus. Then I'm gonna control my hot water solar heater again via CAN Bus. I'm planing to wire most important things over CAN Bus.
Hello Robert. I am just finishing a design using the ESP32-S2 bare IC. While using the bare IC instead of the module, you have to place a 40Mhz Oscillator, and you also have to design a transmission line for the RF input, and a Pi Network for transmission matching. Do you think you can cover that in a future video?
Excellent video, I must tell you I have learned the schematic and pcb design by watching your videos, and there was on fpga video that helped me so much in one project that i was working
Thank you very much. I am working on a product that used ESP32. I hope to find a solution for PCB challenges I faced at the BOOT and ENABLE wiring to the ESP32. Thank you for the video. Let's me sit down and enjoy ❤️☺️
Great video. Personally I've switched to the Pro Version, which is a nice step up. They've integrated a lot of feedback from the Standard version into the Pro version I think.
Great video. Wouldn’t you save space for routing by connecting ground pins where possible and sharing vias rather than creating a via for every pin? Same for 3V3.
Hi! General best practice is to place ground and power vias per connection and avoid sharing I believe. I have heard different reasoning behind this from different engineers but I am still learning myself. Overall, if you have the space, doesn't hurt to shoot for best case of better, low inductance connections to internal planes. I think for simple designs, probably doesn't matter.
Quick question: What is the purpose of the 0 ohm resistors in the serial signals section? Is it just to make it easier to cross-connect the TXD to RXD nets?
Incredible contribution!!! Thank you very much, you have really delivered very useful information in this tutorial. Also, it's really inspiring. All the best.
Perfect video! Learn a lot (together with your series #1- #7 one year ago). Have a question: "Power Input Selection" there you use a connector "J4" - to avoid a manual connector - can this be replaced with a "Dual Common Cathode Schottky Barrier Diodes (e.g. onsemi BAT54CLT1G)", the same solution that was used in your "TINY" the project?
Thank you. The 1117 regulator is not the best and if you take the lower USB voltage tolerance and decrease it by loses on the diode the voltage will be around the limits what 1117 needs. That is the reason why I rather used jumper. In the TINY project I used a better regulator, so we could use the diode.
This is a great tutorial because it shows how a professional engineer is thinking during the actual work and I would like to thank you for that. I have a question about the process. How much time you had to spent on a research phase before recording the video?
Quick question, for the user LED you have the cathode connected to the ESP GPIO and the anode connected to +3v3. Doesn't the output from the esp32 produce +3v3 making both sides of the LED receive +3v3?
Whats the reason behind not connection the gnd of decoupling caps to the ground pin of the mcu? Instead u used one via to the ground plane for each, even when they are right next to each other. These two vias will increase the impedance of the gnd path between the cap and the supply pins. Same at the input cap of the LDO? Shouldn't gnd pin connected to decoupling cap connected to two gnd vias give the best preformance?


Thank you for watching. PS: Project is here: oshwlab.com/robertferanec/esp32-tutorial
Dear Robert! I've just created a 2 layer board in EasyEDA, thanks for this awesome tutorial!
I have a question in my mind however... My board is an H-Bridge which will handle 10A current spikes, a few amp countinous current. (I upgrade my kid's electric tractor)... So I just did the layout, and I have some space on the board to route a few tracks on both side a top of each other (for example from the MOSFETs to motor connector) If I do this, should I put VIAs along the way to connect the two sides multiple time, or is just ok if the connection is made in the two ends (THT connector and FET had been used)
Thanks, Peter
@@EFazy that's super cool. I am very happy this tutorial helped. PCB tracks can withstand high currents (I have some videos about burning PCB tracks) + I discuss high current PCB design with Steve Sandler. I don't know how wide are your tracks, but you can use Saturn PCB calculator (free software) to double check if you would need paralell tracks. 10A is not so much - it may not be necessary, especially if your input - output are on the same side of PCB - in that case most current will probably flow on one side anyway. However, having GND plane on the other side may help with possible EMC / EMI reduction (which may not be relevant in your case). ruclips.net/video/WdlN8bHw-w0/видео.html ruclips.net/video/sJQi9vcCW-E/видео.html
The most beautiful saying "PERFECT" I've ever heard in my life ( I will use that voice sample on my home assistant wallpanel if @robertferanec allows it 🙄).
Excellent job. I am using these boards in my house automation system without knowing how they work internally. Now I have a good idea of how this kind of system works.
Why not using USB-C tho? :D Personally hate the boards not coming with USB-C already because the other connectors die even faster :(
Thank you so much for this! Want to say, @2:52:52 (palindrome :) ), I see you using a web page from DroneBotWorkshop. I've been learning a lot from his videos! That's so cool. Am helping my nephew write video games, and I plan to introduce him to "smaller computers" this Christmas, with displays and PictoBlox which is like MIT's Scratch, which can run on esp32 etc. Thank you again!
Another awesome contribution to the community 👍 , having started doing layout on light tables using vellum and bishop tape all I can say is this generation of engineers have no excuse for producing nothing short of excellent designs . Modern tools and your guidance and generosity of sharing many years of your experience is all they need . Having purchased your Cadence course a few years back it saved me $ 1000’s of dollars of wasted time getting to know the tool chain 🙏👍👏
Totally agree. I wish I had the same possibilities when I was a teenager. PS: Thank you very much for buying our courses, you support helps with creating this free content.
Hi Robert, Thank you for the great video! Great content as always
I would like to share a little tip: When you are routing a line on the top layer, and you want to pass to the bottom layer through a VIA (e.g., at 01:35:15), you can just switch the layer on the "Layers and objects" box, and it creates the VIA automatically from your current layer to the one to which you changed to (instead of (1) stopping the routing command, (2) placing the VIA, (3) switching the layer, and (4) starting the routing command again).
I was just thinking that. Little tricks....
I knew this was possible, and you show all the steps. There must be ways to share working schematics with all required fabrication information. This is as cheap as buying off the shelf. I often see boards that have too many things and want to remove them, buy just what I need for an application. If you tied to the PCB maker then anyone could just pick what they needed and have it made. Thanks!!
Thank you very much @richardcollins5549 PS: If it helps, a link to the finished project is in my pinned comment.
@@RobertFeranec Thanks. You are doing some outstanding things. But it still relies on your memory of how to find and click so many things. If we just had some way to check boxes to select what we want. I am sure a program, somewhere, could generate the required pieces to "print" something and let us order them. Me, today, I would ask for a programmable SDR to cover from milliHertz to GHz, storage to network drive.
Yes, the link is helpful.
I have been spending many hours every day talking with ChatGPT3 from OpenAI. It cannot yet, but at some point could, help people design the tools they need, program them for what you want to do, and have them completely ready to go to work when you receive them. Maybe I am just old, but after more than 40 years of clicking and typing arcane sequences of things, just to get computers to stay working, I am happy to be able to talk with an AI in complete and correct English sentences, using whatever words I want to express myself. It makes lots of mistakes and is not yet allowed to learn, but it saves me a LOT of time and improves my writing at the same time.
Thanks! I have had about 6 boards manufactured using JLCPCB using KiCad. This looks easier even given the new software time hit. The integration with LCSC looks easier. I have never had more than 2 layers and have been avoiding it. Its the longest instructional video I have watched but it was great. Watching you work likely will speed me up some. Watching the USB parts and Impedance matching eases some stress.
I have missed the check and had a couple of parts not assembled. I now take a copy of their check image next to mine so that I can check everything easier
Inspirational!
I'm in process trying to design a PCB for a motorcycle CDI. I was really stuck today but your video has given me a bunch of new ideas and a lot of enthusiasm. Thank you so much for taking the time to do this. Perfect!
Thanks - an incredibly useful tutorial. All my questions answered from one video. Brilliant!
Thank you very much
One of the best professional pcb designing tutorial 👌 so far. A to Z steps for pcb development... thank you for such an awesome tutorial...
Thanks! I appreciate the long form content that really shows how it all comes together
Thank you very much for your support and nice comment.
Another awesome contribution to the community , having started doing layout on light tables using vellum and bishop tape all I can say is this generation of engineers have no excuse for producing nothing short of excellent designs . Modern tools and your guidance and generosity of sharing many years of your experience is all they need . Having purchased your Cadence course a few years back it saved me $ 1000’s of dollars of wasted time getting to know the tool chain
Thanks, Robert! This is incredibly helpful!
Thank you very much for your support. I am very happy you found it helpful.
Thanks for the great tutorial, Robert! At first I was a little discouraged by the 3 hours, but it is by far the best tutorial I have seen so far on this subject. And now I discovered others of your quality videos, 8-9 hours in total. :)
Thank you for watching and leaving nice comment
Another great video in RUclips'S history.
Bedankt
Thank you very much
Thank you Robert! I am amazed at how serious you are about having fun! Gold medal!
:)
I REALLY CAN'T FIND WORDS, THIS VIDEO IS MIRACLE... ROBERT THANK YOU VERY-VERY MUCH, YOU CHANGE MY LIFE
I have just finished the tutorial and this is just awesome. It is the moment about the truth. Thank you.
These practical videos are the best, so much to learn. WOuld be great to see more of them! these are really helpful! Thanks for the hard work on this
Great video! Only wish that you went a bit more into explaining why you physically placed the components where you did on the PCB. It might be that you had already designed one of these and was copying it, but it would still be good to understand the logic when you’re initially laying things out.
Nice to see the corrected wroom-32E easyeda model in action. It took me a long time to let them correct it.
This is by far the best tutorial out there ! thanks!
Thanks!
Dakujem
Your channel has taken the community so far ahead!
Thank you very much
totally agree!
Thank you so much! This is an awesome tutorial, from the real beginning to a working pcb. No one shows so much details as you! Thank you!
Great video mate!
Even though I have already made 30+ different PCBs, still learned a few new tricks! Amazing.
Keep up the good stuff!
A great tutorial from start to the very end, you went through all the necessary steps without any skipping of content and with lots of aspects explained. I really enjoyed the whole video. Thank you Robert!
I am just getting into designing my own PCB's and this is going to be my first project as you have covered every single step. Great job. I can't think of anything more you could have done short of coming to the house and building it all with me. Thanks
hello, did it work for u ?
THE BEST VIDEO EVER! Thank you for sharing this free content to the community. I loved the video. Just felt bad that it's WAY expensive to order it
Thank you. PS: You can always only buy PCB (just PCB is not expensive), buy components somewhere else and fit them by yourself. Also, as others pointed out, you can use Basic components, that would make it cheaper.
@@RobertFeranecj😅h😅h
You are a genius, I will learn a lot from this. Thank you for the time you put into this.
Great video. Thanks for showing every step, even the repetitive "boring" stuff.
thank you for everything. I especially like when you talk to so many various experts
A fantastic tutorial, and what I learned here is about to get put to use. So much good information packed into a few hours. Thank you very much, I learned a lot in a short period. Subscribed!
this is actually so detailed, i managed to create my own wled board for inside and portable use. thanks!!
i just like the video tutorial .... this is the classic one i was searching for no lagging and no other stuff just straight to the point ... just loved it ❣
What a fantastic work, a comprehensive guide. I appreciate you sharing the entire process of creating the idea from scratch.
I just wanted to say thank you for this excellent video. Your explanation was exactly what I was looking for and I learned so much from it!
I learned alot from you, Even after watching your videos i started Study youtube channel and uploaded course on Udemy. Thanks for your teachings.
perfect I had been looking for tutorials like this, I just passed by while I'm looking for another tutorial for work related, i came to this. This is really great
Thanks for a great tutorial. I was able to make my first pcb using this skills and its actually working. Telling the truth, I am 100 LY away from hw designer 😂
Hi there, I`m a newbee with all of this and Your Video has helped me aLOOOOOT.
GREAT JOB Robert
I learned more from this video than the previous half dozen. Thanks!
Learnt lot of things on this tutorial. Brilliant man he is.
THANK YOU ROBERTS! YOU ARE A GREAT TEACHER! It was a breeze for me since I had already taken you introductory Altium training on Udemy 2yrs ago. Most of the steps, mouse movements etc (except the 3D view controls) are very similar to Altium environment!. And it is much simpler to use and get started quickly than Altium especially bcos of the component and foot print library!
I am absolutely awestruck from this video, amazing! I have watched some of your other Altium ones, and will be purchasing at least one of your Fedevel courses today. Can I ask one question? What about vias in pads? Is it something to be avoided? Guidelines? Thank you so much!
Thank you Jedi master. I am your Padawan learner. Very well done.
Super helpful for people like me dipping their toes into custom assembled boards!
I understood very little about electronics going into the video. Your step by step instructions really helped clarify some concepts I didn't fully grasp. I am looking forward to watching more. Thank you for the great video.
Amazing video , really this is the best channel, I hope more videos like this one
Fantastic video ! I want to make my own ESP32 board, customized for the personal project I am working on and this step-by-step video is incredible !
Hi Gael, I'm also doing my first custom ESP32 board. I'm making board to communicate via CAN bus as I do not wanna use wifi or any radio. I'm currently doing board with 4 connectors for PIR sensors. The esp32 supposed to send messages over the CAN Bus to ESPHome listening on CAN Bus. Then I'm gonna control my hot water solar heater again via CAN Bus. I'm planing to wire most important things over CAN Bus.
Hello Robert. I am just finishing a design using the ESP32-S2 bare IC. While using the bare IC instead of the module, you have to place a 40Mhz Oscillator, and you also have to design a transmission line for the RF input, and a Pi Network for transmission matching. Do you think you can cover that in a future video?
RF for this kind of chips is on my todo list. Just hard to find someone for my interview video.
@@RobertFeranec Yes, it most certainly is. What little I know had to learn the hard way
@@avinadadmendez4019watch Phil's lab. He covered that
Finally, This is what im looking for, thank you, Sir!
Excellent video, I must tell you I have learned the schematic and pcb design by watching your videos, and there was on fpga video that helped me so much in one project that i was working
Man !! you made me feel proud❤
A big thank you!!
Great video without hiding anything and asking for following the paid course.
You are the man Robert! Thank you!
I am a big fan of your videos. As an easyeda user this is an iconic video for me .. very useful and informative .... thank you ...
Where were you 2 months ago..I learned all by myself the hard way:) Anyway thanks for the great video!
Hello This video is very helpful to me. Thanks my guru!
Wow, long video. Lots to learn. Thank you.
감사합니다. 당신의 노고에 박수를 보내드립니다 ^^
Genius!! Thanks for the video, you are a great person!
The best electronics video ever. Thank you
Thank you very much. I am working on a product that used ESP32. I hope to find a solution for PCB challenges I faced at the BOOT and ENABLE wiring to the ESP32. Thank you for the video. Let's me sit down and enjoy ❤️☺️
Great video. Personally I've switched to the Pro Version, which is a nice step up. They've integrated a lot of feedback from the Standard version into the Pro version I think.
Great video. Wouldn’t you save space for routing by connecting ground pins where possible and sharing vias rather than creating a via for every pin? Same for 3V3.
Hi! General best practice is to place ground and power vias per connection and avoid sharing I believe. I have heard different reasoning behind this from different engineers but I am still learning myself. Overall, if you have the space, doesn't hurt to shoot for best case of better, low inductance connections to internal planes. I think for simple designs, probably doesn't matter.
this was really helpful. thanks ♥ . Good luck for future ones 👍.
Quick question: What is the purpose of the 0 ohm resistors in the serial signals section? Is it just to make it easier to cross-connect the TXD to RXD nets?
I'm wondering this too, but I'm not all the way through the video yet.
Incredible contribution!!!
Thank you very much, you have really delivered very useful information in this tutorial. Also, it's really inspiring. All the best.
Thank you Andrey
wow exactly what i wanted...thanks for uploading
Perfect video! Learn a lot (together with your series #1- #7 one year ago).
Have a question:
"Power Input Selection" there you use a connector "J4" - to avoid a manual connector - can this be replaced with a "Dual Common Cathode Schottky Barrier Diodes (e.g. onsemi BAT54CLT1G)", the same solution that was used in your "TINY" the project?
Thank you. The 1117 regulator is not the best and if you take the lower USB voltage tolerance and decrease it by loses on the diode the voltage will be around the limits what 1117 needs. That is the reason why I rather used jumper. In the TINY project I used a better regulator, so we could use the diode.
WOW ! Thaks a lot for your tutorials! I just completed it!😀
You make this look so easy. I have never seen software like this let alone used it. SMD's are so hard to work with too.
Great video! love to have this all in a single video!
Thank you for the detailed description. I was thinking if raw ESP32 modules would require bootloader for connecting via Arduino.
It is so satisfying to watch. All tips and explanations are also very usefull.
Thanks a lot for this!!
Thank you so much for posting Robert!
You are doing a great job @Robert. Your videos are loaded with information. Kudos ! Keep it up 👍
You’re the Bob Ross of board design.
Fantastic work, Robert!
Excellent video. It is a nice intro to these boards and what the circuits are doing inside. Great Job.
You can have different design rule, esp at Track With and can decide for which type like GND or Vcc
Thank you for such a comprehensive and educational video.
Hello, thank you sir for the tutorial, easy to understand, amazing!
Sorry for a newbie question, but what is the reason for two GND vias right next to each other - why not use the same via for both connections?
And/or a polygon? Isn’t ground plane essentially just a great big ”polygon” anyways?
Thank you so much man! The license worked
Wonderful tutorial. Thanks Robert.
This lesson is great Robert! Going thru Altium,Thank you!
Amazing tutorial!
Good job! I Like the way you make pcb layout ! Great Master
This is a great tutorial because it shows how a professional engineer is thinking during the actual work and I would like to thank you for that. I have a question about the process. How much time you had to spent on a research phase before recording the video?
Hi Robert, thank you for this great video. I enjoyed watching!
Dude this is on clutch!!! Thanks so much
Phenomenal resource. thanks for being so incredibly through. Super helpful
Your tutorial is very informative.
Thank you Robert.
Awesome video. Really detailed. Thank you!
I learned so many things from this. Wow.
Nice man! Very very nice! You are definitely good at your craft!
Quick question, for the user LED you have the cathode connected to the ESP GPIO and the anode connected to +3v3. Doesn't the output from the esp32 produce +3v3 making both sides of the LED receive +3v3?
GPIO output from ESP can be controlled by software and can be set to both, 3v3 or 0.
Great job.... Thanks for your immense efforts. It takes a lot of time and preparation for this. Thanks again..
Whats the reason behind not connection the gnd of decoupling caps to the ground pin of the mcu? Instead u used one via to the ground plane for each, even when they are right next to each other. These two vias will increase the impedance of the gnd path between the cap and the supply pins. Same at the input cap of the LDO? Shouldn't gnd pin connected to decoupling cap connected to two gnd vias give the best preformance?