Alright, so I didn't explain it in the video, essentially the buttons have 4 pins. Run it so a resistor. (I literally have no idea what omh I think possible 1k but I could be wrong) Is leading from the powered line to a led. Then from the other side of the LED run a wire to one corner of the button, then from the other diagonal corner run a wire to the ground. Do this with all 4. I'm really sorry I didn't explain it well (or at all) in the video. In future videos I will go a lot more in depth
Never apologise for having a go. Remember, everyone watching this wants to know what you know. The video was great, and only sociopaths care about spelling or grammar. Thanks for posting!
For common LEDs with forward voltages between 2V (red and yellow) and 3V (Blue, green, white) with a max current of 20 mA, I'd say 40 Ohms and 60 Ohms resistors. 100 Ohms work but a 10 will pop that diode with a sound. There is calculators on the web but most important is you know your diodes specs
i know its irrelevant now but i used 1k to get a brighter light but it doesn't really matter that much, it will just be dimmer the higher ohm the resistor
I posted a comment explaining the circuit more in depth, it's fairly simple, you just run one corner of a button to a LED and the other to ground. And the other side of the led to a resistor, connecting to power. Hope this helps!
Cool video but it lacks alot of information xD he dosent include any resistor values but by reading comments i gathered it dosent really matter. i used 1k resistors for all of them and it worked. it also only worked when i switched the polarity on the battery.
Didn't actually explain a darn thing... nothing about polarities, nothing about breadboard structure, nothing... just a "too bad if you actually cared about this". Very poor content!


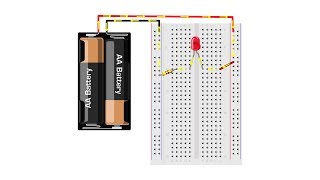


Alright, so I didn't explain it in the video, essentially the buttons have 4 pins. Run it so a resistor. (I literally have no idea what omh I think possible 1k but I could be wrong) Is leading from the powered line to a led. Then from the other side of the LED run a wire to one corner of the button, then from the other diagonal corner run a wire to the ground. Do this with all 4.
I'm really sorry I didn't explain it well (or at all) in the video. In future videos I will go a lot more in depth
Thank you for responding to me!!
Very nice! I have the same breadboard, but I'm new to electronics and don't know how to use it; thanks for the video!
Thanks mate
Amazing video, very easy to follow. Thanks so much!
You're very welcome!
Never apologise for having a go. Remember, everyone watching this wants to know what you know. The video was great, and only sociopaths care about spelling or grammar. Thanks for posting!
Thanks for that! I really appreciate it!
Great work mate! Keep on going 👍👍
Awesome vid!! You should make more like this
Super good I made it and it was working great!😉
Nice, Simple, funny, and easy to understand. Thanks!
🙏🙏🙏
For your first video you did pretty good!
Well not good. Things are good and people do well, You don't do good you do well.
Thanks!
For common LEDs with forward voltages between 2V (red and yellow) and 3V (Blue, green, white) with a max current of 20 mA, I'd say 40 Ohms and 60 Ohms resistors. 100 Ohms work but a 10 will pop that diode with a sound. There is calculators on the web but most important is you know your diodes specs
Thank you Jonathan. The video is definitely lacking some information.😢
I ran direct 5V into my red LED, and it didn’t pop but it did start burning, you could hear it sizzling and smell it.
@@jonathanblixtnordin5711 thanks for clarifying for them man, I didn't do the greatest job at doing that lol. Keep it up!
Do more please i need inspiration xd
Thanks bro! Your video helps a lot😉❤️
keep it up bro ...
thank you so much
Great first video
🥹
its will be very awesome if u talk, ik that its ur first video and u might be nervous but still i will be so much nice the just reading text
Nice! Thank you
Thanks I did it first board project!!!
Glad it worked!
Do we have to do exactly like you
Do you have to have the same colors
Which resistor
cool
your first video and latest video
What is the name of this project? Do u have schematic diagram of this?
Where did you get those colored buttons?
projects made random thank you.
Which ohm resistor bro
i know its irrelevant now but i used 1k to get a brighter light but it doesn't really matter that much, it will just be dimmer the higher ohm the resistor
Dude we care about the stuff you didn’t show
The wiring ain't that difficult to follow, so it should be fine
Mb mb, next time I'll go a little more in depth!
Bro what is name for wire
Sir it is very helpful for me. Colud I know how to plot this on a multisim? Thank you in advance sir
Hope you could help me
I posted a comment explaining the circuit more in depth, it's fairly simple, you just run one corner of a button to a LED and the other to ground. And the other side of the led to a resistor, connecting to power. Hope this helps!
Bro why the hell u stopped posting videos...ur content was awesome to make u blow and earn thousands of subs
Thanks mate!
what resistor did you use
Great video! I learned a lot!
1.Ditch The Music
2. Ditch The Music
3. Ditch the Music
4. Goto 1
Resistor value?
Please make more videos i love this video
🥹🙏🙏
what if i use fours cells instead of two? plz tell me i am a very biggner
Im not sure but i think that causes a short, putting too much power in the circuit and could damage you harware
Procedure mil skta written mein?
Cool video but it lacks alot of information xD he dosent include any resistor values but by reading comments i gathered it dosent really matter. i used 1k resistors for all of them and it worked. it also only worked when i switched the polarity on the battery.
Sorry for that, glad you got it working!
a breadBORED?!?!?!?!?
Lol typos. Mb
Experiment name
I cared about some of the stuff you didnt care about :')
Sorry man, next time I'll get more In-Depth on how the circuit works. Hope you got it working anyway though!
What happened if you don’t put resistor ? Have you tried it ?
the voltage of the battery would be too high for the LEDs which would break them.
It will.burn the led😢
@@luke5567 which resistors did he use in this video?
I think it would fry the LEDs
Practical name plzz??
The camera should be down ward to the working table
But you have done a pretty good job
Sir is ka purposal or report sand kardo
What are the color codes??
No
I Believe it's a 1K omh.
ok
The value of resistors ???
Does it matter ????
Didn't you read rip other stuff
It doesn't matter.
Well for it should be around 1k 5k 10k
It may vary for which led you use
yes it matters really much in normall but foe this experitment 10k ohms is a good resister
where new video
What would you like to see me make?
@@LeviathanEngineering something basic but more complex than this
Project pdf form mein bnany k liye
If you follow ben eater it will be a great opportunity to you
The music screws your mind 😅
I iam too biginerr
Lose the music, explain.
This does not help
1st
Childish....
Correct.
Work on your spelling.
Not a native English speaker. So at the time I was still trying to pick up spelling, granted "yellor" is just a typo, no excuse for that
Didn't actually explain a darn thing... nothing about polarities, nothing about breadboard structure, nothing... just a "too bad if you actually cared about this". Very poor content!
I'm sorry man, I'll go in depth in future videos, I've posted a comment explaining it a little more in detail how to run the circuit. Hope it helps!
Resistor value?