HOW TO: Replicate Brush Strokes on Seam Sealers

HTML-код
- Опубликовано: 7 сен 2024
- Ryan Marrinan, 3M Application Engineer, gives a few tips and tricks for spreading seam sealers and accomplishing a factory look in larger applications. Techs often tape acid brushes together to create those brush strokes. The techniques in this video use different tools to get a better brush stroke and make it continuous just like from the factory.
Step 1: Prep your seam sealer (00:38)
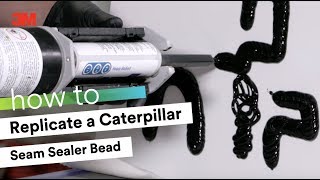
Use 3M Heavy-Bodied Seam Sealer 08308. As with all of our two-part cartridges, equalize it upward into a paper towel. Apply 3M static mixing nozzle and lock down the ring, then dispense a little bit of material out onto the mixing board or into the paper towel. Get two or three inches of material out so there’s equal mixing coming through the nozzle.
Step 2: Lay the material (01:46)
Dispense the seam sealer out onto the surface and knock it down with a spreader. Use tape to create a clean-cut dedicated bead.
Step 3: Replicate the bead (02:05)
Take a gray Scotch-Brite scuff pad and trim it down to a manageable size. Roll it in half so it’s easy to work with and has a nice smooth edge. Don’t use the sharp edge - it will create inconsistencies in the bead. Drag the scuff pad over the top of the material to add the feature and style lines and get a consistent bead. If you need a long continuous brush stroke going side to side, use a spreader again to first knock down the material and create a tight seal. Then take the rolled Scotch-Brite pad and drag it over the top from side to side to create that brushed look.
Step 4: Brush out at the ends if needed (04:06)
Use the Scotch-Brite pad to just grab the edge of the bead - just hook the edge of the surface and drag it out. You see this most commonly on rear body panels where the gasket needs to clear without any problems. This technique creates a nice tight seal so there’s no corrosion or water intrusion.
Step 5: Technique for lengthy applications (05:17)
If you’re working on a rear body panel, you may need to create that continual factory brush stroke on a long area. After you’ve caulked out all your material, take the gray Scotch-Brite pad and push the material into the surface. Because you’re not starting with the spreader here, put a little bit of pressure on the surface so that as you push the material out ahead, it’s forced to the surface. As you come by behind with the pad, you’ll add the texture.
Important note:
There are of course many factors and variables that can affect an individual repair, so the technician and repair facility need to evaluate each specific application and repair process, including relevant vehicle, part and OEM guidelines, and determine what is appropriate for that repair.
Products used in this video:
3M™ Heavy-Bodied Seam Sealer, Part Number 08308
www.3m.com/3M/...
3M™ Disposable Paper Mixing Board 20382
www.3m.com/3M/...
Scotch-Brite™ Hand Pad 7448 PRO
www.3m.com/3M/...
3M™ Performance Pneumatic Applicator, 09930, 200 mL
www.3m.com/3M/...
For more advanced tutorials, check out 3M Collision Repair Academy
www.3m.com/3M/...
You’ll find courses that will expand your knowledge, deliver practical procedures that you can use right away, and, in many cases, earn you I-CAR credits.
Website: 3MCollision.com
Instagram: 3MCollision
Facebook: 3MCollision


Ryan, These video tips and tricks are great reminders of the creativity that is sometimes needed to achieve the function, the protection and the look that matches the automaker's final product. The commitment and continued effort that 3M puts into developing and sharing these tech tips are much appreciated.
Thanks,
Rex
Good afternoon, excellent looking results. Really good tip with the scotch brite pad. I also use a sash brush to replicate brush finishes in the seam sealer. I trim them to whatever works for the project. There are lot of different sizes and brush configurations. Thanks and take care.
Thanks for sharing your own tip, Steve!
Big shout out to Ryan’s sideburns, like a magnificent bead of seam sealer.
I love those videos
Excellent!!
These videos are really well presented but the music suddenly playing at 3 times the volume of the presenter is a pain that makes it impossible if other people are in the room. Very helpful though
Awesome
Ryan, do you see anything wrong with using 3M 8308 on top of my butt welds before I apply body filler? I'm working on a 1969 Chevrolet Panel Truck. Thanks and great video! PS: I completed all of your 3M "On Demand" Courses and I enjoyed each one.
I appreciate the craftsmanship and attention to detail and the goal is to attain that level, but when insurance company allows a ridiculous amount of time, all that taping to duplicate the appearance goes out the window. Insurance only pays for the application of seam sealer, they would careless how it looks. Sad realization
He said spreader as a scotch brite lol 3:40