Это видео недоступно.
Сожалеем об этом.
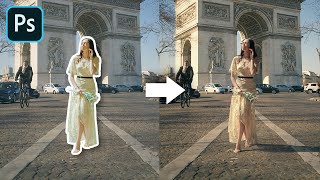
Create Automatic Long Shadows in Photoshop | Cast Shadow Text Tutorial

HTML-код
- Опубликовано: 17 авг 2024
- In this tutorial, we'll go through a few simple steps to set up an automatic cast shadow for text in Photoshop. Written instructions and free textures below... let me know if you have any thoughts or questions!
FREE TEXTURES USED IN THIS TUTORIAL AND MORE:
texturelabs.or...
FONT USED IN THIS TUTORIAL:
www.dafont.com...
CONNECT AND SUPPORT TEXTURELABS!
texturelabs.org/
Instagram - / texturelabs
STEP BY STEP INSTRUCTIONS:
1) Select the layer you’d like to create a cast shadow for.
2) Open your Actions Tab in Window→Actions.
3) Optional: Create a new folder to put your custom actions in.
4) Click the New Action button in the Actions Tab, name it “Cast Shadow”, and press the Record button.
5) Control (Mac: Command) Click on the layer icon of your selected layer to make a selection in the shape of the text.
6) Create a new layer.
7) Press D to set colors to default.
8) Press Alt Backspace (Mac: Option Delete) to Fill with Black
9) Control D (Mac: Command D) to Deselect.
10) Control [ (Mac: Command [ ) to Move the Layer Down.
11) Press V for the Move Tool.
12) Press the Down Arrow key once, then press the Left Arrow key once.
13) Control J (Mac: Command J) to Duplicate the Layer.
14) Control [ (Mac: Command [ ) to Move the Layer Down.
15) Press the Down Arrow key once, then press the Left Arrow key once.
16) Repeat steps 13-15 eight times, until you have your original text layer, plus a total of ten copies.
17) Press Alt Shift ] (Mac: Option Shift ] ) nine times to Select all of the layer copies.
18) Control E (Mac: Command E) to Merge Selected Layers.
19) Double Click on the merged layer and rename it “Shadow”.
20) Your action is ready! Select any text layer and press the Play Button in the Actions Tab.
OPTIONAL VINTAGE EFFECT:
21) Control (Mac: Control) Click on the original text layer to make a selection in the shape of the text.
22) Select the Shadow layer and press Backspace (Mac: Delete)
23) Use Control T (Mac: Command T) to Transform and move one of the layers, creating some misalignment between the Text and Shadow layers.
24) Control (Mac: Control) Click on the Text layer to make a selection in the shape of the text.
25) Click the layer’s eye icon to hide the Text layer.
26) With the selection still active, create a new Solid Color in your Fill and Adjustment Layers menu (at the bottom of the layers tab).
27) With the mask of the new Solid Color layer selected, use Filter→Filter Gallery. In the Brush Strokes section, use Spatter with Spray Radius at 10 and Smoothness at 15.
28) In the Properties Tab, press the Select and Mask button.
29) In the Global refinements section, set Smooth to 50 and Contrast to 40.
30) Repeat steps 24-29 on the Shadow layer.
31) Open the Texturelabs Paper 151, and press Control A (Mac: Command A) to select all, then Control C (Mac: Command C) to make a copy.
32) Back in your main document, use Control V (Mac: Command V) to Paste the texture above the top layer .
33) Use Filter→Other→High Pass at 200 to create an average value of 50% grey.
34) Set the Blending Mode of the texture layer to Linear Light.


let's not skip the ads, this channel deserves every last ads.
I'm a professional designer and I had lost the fun element in designing, you have reminded me how fun and versatile it can be!!!!
I second that. Love the little jokes and the overall light-hearted approach, too!
Sooooooo true!!
'old school' graphic artist here...retired long ago, just after having learned to digitize work using newly released corel draw (that ages me!)...got hooked on photoshop for fun but hadn't explored its potential for text until now...every one of your tutorials makes me wish i could start my career all over again...it's honestly energizing...thanks for the inspiration, instruction, and textures
Very cool! Ya I've been using photoshop primarily for text and graphic design for so long, I actually forget what it can do with photos. Thanks for the post!
As I'm going through your videos, I feel you have the deepest knowledge of each tiny thing in Photoshop dialog boxes.
I actually keep finding new stuff.... I can't decide whether it's a simple program or an insanely complicated one!
Great video Brady. Here are a couple of pointers that might speed this up a little.
1) If you press cmd/cntrl and click on the New Layer icon, it will automatically create a layer BELOW the text layer (no need for the Move Layer below command).
2) If you make sure you have the Marquee tool selected (unfortunately, choosing the Marquee tool isn't allowed as an Action step, so this has to be done manually), you can stay on the same Shadow layer, then nudge and fill the selection each time without having to create new layers, no need to do a final select layers and merge.
Regarding the Marquee tool step, you can set a Stop message at the top of the Action to tell the user to select the text layer as well as the Marquee tool. The Lasso tool works too. You just need one of these selected so your nudges only move the selection and not the layer's content.
I love you, you are doing god’s work helping all other designers like me out there
I'm a graphic designer. I always enjoy seeing how other people work and learning new techniques. Love your tutorials. Your approach to teaching and explanation of how and why things work is excellent. Plus, the results of your process are spectacular. Keep up the great work!
I knew the trick for creating the shadow... but I like the rest of the execution, which I hadn't seen done. Especially the offset 👏
as an independent band, the graphic design usually lands on me. Your videos have been incredible and the site is a lifesaver for creating edits. Would love to see more of your work with motion graphics! that burn video was awesome.
I can't believe how great your techniques are. So unique and original and I am thoroughly in awe. I've been using Photoshop for 21 years now and it amazes me how I discover new things to do with it. I've subscribed here on RUclips, followed you on Instagram, bookmarked your website and supported you on Patreon. You deserve all the success with the amazing content you provide. Wishing you all the best, man.
Awesome, just saw the comment and recognized your name... Really appreciate it man, huge gratitude!
I am finally getting to use Photoshop for creating graphics for my Twitch shows and IG notices. Have been mainly using Photoshop for photo retouching.
Thank-you for such great content. I am based in Ireland. Your techniques and style have helped so much in levelling up. Clients have noticed the difference and like the variation. So... thank-you. Besides that family back in Canada have asked me to help put together summer projects | posters and such. Essentially... thank-you.
i´m not a student or even a designer, i think i loss my time wen i was young..... i´m a 43 years old men and design by my self all the graphics content for my own bussines........the thing is.... i found your tutorial very usefull and funny to follow the steps...... learning and creating awesome visual effects on photoshop.....thank you so much for that ¡keep going! (sorry about my english by the way..)
Thank you from Russia! Amazing master class
Man! This is awesome! I'm a graphic designer/ illustrator, and I crave a lot of old time visuals! Your tutorials have helped me a lot in my projects and I'm super grateful 🙌🏼🙌🏼🙌🏼
Great tutorial! I’m a Belgian grafic design teacher and I surely will use this tutorial in my Photoshop class when we’re working on text types. Also the action part is very useful. Thanks a lot!
Great, I love hearing that! It does make a nice intro to Actions... thanks for the post!
This is very cool for retro designs looks very authentic, Thanks a lot
What a time saver this video is!!
I like photoshop and I take it as a hobby, but I like to learn, it's very interesting.
UX designer checking in, love the tutorials!
I work as a graphic artist in films where we often have to fake things for the sets. So I do quite a lot of masking, blending and texturing, but your approach to certain elements of this work is just ahead of me. Or at least it was until now. Thanks a lot!
My pleasure... that sounds like a fun job!
great tutorial, thank you! Took me a few attempts, but I eventually got it! I am a designer brushing up on my skills and your videos are quite helpful.
Amateur PS user here. I found your tutorial very succinct but useful. Thanks for presenting these techniques.
Hey! I'm a designer and I'm learning a lot about textures in your videos! This one wasn't technically new to me, but still a great idea to turn it into an action. I was most impressed with your metallic textures and have already tried them myself. Great channel!
Very cool.. glad to hear that about the metallic textures - the fact that you're a designer and probably have some cool ideas about how to incorporate them is key!
@@Texturelabs yes, could already use the gold look on a band logo, since it looks so high quality. Thanks and keep it up!
I am a Graphic Designer too and I get a lots of Ideas in your tutorials... thank you for making this channel... I watch all your Video.... please make more tutorials... I am exited... to watch. God Bless you!! and More Power... I am from the Philippines.
This is really great. I am sort of a self taught designer. I haven’t seen this shadow technique before, but I have used Procreate and drew in shadow edges after duplicating the text layer. Also used a directional blur to get a similar effect. I just watched your paint drip video, and I create something similar last night in Procreate just by fiddling with the effects. I love how you’re showing us all these different ways to use Actions.
I really enjoy your channel! I'm a Photoshop pro (20 yrs) and I still pick up great tips. Thank you!
Hey Brady, pretty slick technique. Thanks for sharing ! I graduated from uni a little over a year ago and studied graphic design. I especially like working with hand lettering and a little calligraphy, but I still have not been able to get myself a job in the field. Working up to hopefully getting to that point sooner than later, and learning a lot from your videos and resources is pushing me towards that. Thanks !
Thanks Josh, cool congrats on finishing up with uni. I hear you, it can take a little while to get things rolling, that's probably especially true right now. My only unsolicited advice would be - when you're at a point where you feel really ready to show off your work, be shameless about it... post it anywhere you can, email every contact you can find online, send your work in the mail even! It can be a bit of a soul crushing process, but you just need one good opportunity to show off your skills!
@@Texturelabs Soul crushing indeed jaja. Thanks so much for the wisdom !
Best channel for photoshop tutorial out there.
You've so much clarity in your tutorials...i love it
Ok I'm in love! i was looking for a stencil effect and found you, now I'm just watching all of your videos! This channel is amazing! I'm not here for my job or something, I just have fun with photoshop and right now I'm using it to design and personalize christmas presents.
My friends will definitely be happier lol
Awesome... making some of these videos has actually made me remember how fun it is to experiment in Photoshop and not just be cranking out stuff for work. Thanks for the post, very cool to hear!
Your tutorials are some of the best I've seen and they're not long either.
Thank you!
Yeah they are really good, short, to the point, all the information you need and no fluff, they are actually so refreshing
Very cool tutorial. Thank You 😁
Thank you for sharing~ your tutorials are so helpful 💕
I was getting stair-stepping on sharp corners when I tried this. Here's an alternative: Record an action with Motion Blur 45 degrees, 100 pixel blur (or whatever you want, depending on document resolution), then float the layer, Merge Down, Float, Merge Down, Float etc. enough times until the transparent edges go away. This gives a smoother result. It also allows you to change the angle of the shadow this way, although 45 is the most natural looking.
OHHH That was Owsm great I really enjoyed it Thank you sir
I'm a desinger from india your tutorials was always helpful 🤗
i am a graphic designer across a variety of mediums (streetwear, corporate, artistic). love the content as always :)
Right on, it’s cool to hear that people watching are a little more seasoned… opens up some possibilities! Thanks!
Hi! I'm a student in Sound and Image! Loving the way you explain your photohsop technics! One think I would like to see is integrate text in (photos with) billboards, street signs, etc. Thanks a lot for the videos!!!
Very cool thanks for the post! That's a cool idea, noted!
Your tutorials are so awesome and delightful. Thank you.
Great Tutorials Buddy! I am a Media Designer/Webdesigner/Developer and Streamer. :D I like your tutorials a lot. keep on doing them!
Very cool - I love getting a sense of what everyone is up to... Thank you!
I'm an aspiring freelancer and I'd like to learn how to design good! Thank you so much!
awesome teaching, I don't get bored listening to your videos. just one question about this, do I have to do this all over again if I want the shadow a different color?
excellent tutorials !! keep them coming! best regards from the netherlands!
I think i'm back to photoshop to keep learning ! Thanks for sharing such valuable content... 👏🏻👏🏻👏🏻👏🏻
So simple yet so good, nice job with the cast shadow action!
Awesome and cool! The real fun started when you converted the font into Retro! Amazing, simple and beautiful!
We used to create these 'cast shadows' on handwritten lettering with Poster Colors. I learned to draw the first type, 'Narrow Gothic'! on the hand-drawn grid of 0.25" in the size of 0.75" x 1.5" for the letters which fits in three strokes alphabets like B, C, D, E and Q, R, S etc during the First Year of our studies. I still remember the excitement now at the teenage about knowing and learning the technicalities to create a perfect FONT, now I am 70 and still learning! At that time, composing was done with the fonts made with 'lead' (sizes were from 6 Points to 72 Points) were phasing out and Monotype and laser-composing getting popularity in our region. This was in the late 60s. Pretty soon, the lead-cast fonts completely vanished within no time! I still enjoy modifying the fonts according to my visuals! Thanx ... you are a great Guru! 😍
What a great post! Ah, hence the term leading? I have a family member who's now 72 and introduced me to the world of design. I still remember all those graphs and grids and little Helvetica transfer letters. All great stuff to reappropriate into a puck rock band flyer as a teenager! Thank you so much for the kind words - it's exciting for me to get a sense of who's out there on the other side of this screen!
@@Texturelabs Hi Brady! thanx for your kind words. You just reminded me about the great stuff from Letraset! I was the biggest fan and perhaps my company, (for which I was working as 'Creative Head, Illustrations Division'), was one of the big clients for Letraset Products. Although transfer sheets were also great, my favorites were 'Letrasign' which were self-adhesive PVC alphabets, these were produced with such precision that if you place different alphabet to create a sign, you simply place them and the visual spacing between the letters was done automatically, they termed this as 'Spacematic'!!!
O Brady!!! there are so many fond memories of yesteryears to share, but I know you are a busy Guru. My regards to your family member who is 2 years senior to me! Wish him and all of your wonderful family the best ... ... always!!! 💖
I love all your tutorial. So helpful. Thank you so much!
My thoughts watching this tutorial "Oh, that shadow is pretty easy, I already do that... wait what is he doing? Oh... I didn't see that coming. Wait what?? OMFG That's fricking brilliant!!!"
Hahaha that's great!
This was a really fun tutorial. Thank you so much!
Wow! So awesome & well explained 🙏 Designer from BK NY here & a happy new subscriber!
Very cool, greetings from the west coast!
Amazing tutorial! Life Saver! Greetings from Brazil
Very cool! It's really awesome to hear from people from all over the place, especially when we haven't been able to go anywhere for ages!
This is What i was looking for today, u make my day thanks
I'm a professional designer and teacher - brilliant tutorial!
Hey, good job son. Love from Mum.
I absolutely love how you are showing support.
I`m in love with your content, i'm a student from Mexico!
Ah that's really cool to hear, thanks!
Insane. Loving it.
For those who are making the action yourselves, once you move the shadow backwards (step 10), you do not need to move the next 10 copies down and can instead simply use Alt Shift [ (Mac: Option Shift [ ) in step 17 to select all your copies. Saves 1x10 steps!
This is ill sansei haai! ;)
Your tutorials are pure gold! The the finished results are fireeeeee. Much appreciated 🙌🏻
Right on, that's great to hear... Thanks for posting!
for the part at around 3:00 you can just hold shift+alt and press the arrow keys to duplicate and move at the same time.
I hear ya... I made the error of not doing it that way, since each arrow press makes a new copy... But ya, should have been shift-alt down, let go and hit the arrow to the left! Good call!
I'm a tshirt designer and I love your channel although I wish I could learn more... faster... lol
Ah that's awesome. Yup I know the feeling, trying to learn Blender and I feel like I'm in grade school again
Love your content!
Awesome thanks!
WOW, now I have a couple of custom vintage shadows - thank you Brady, you've made a wonderful job (as always on this channel :-) btw can anyone explain the need for creating multiple layers shifted a bit down&left each time instead of just moving a shape e.g 20 pxl left and 20 pxl down on one shadow layer? thanks!
Wow! I completely ignored the highpass filter, thats gonna come SUPER in handy in the future!
Unrelated, this is just off the top of my head, (away from photoshop) what would you think of a combination of motion blur + inner glow? I feel like that'd also work too.
Thankzz!
Great as usual, but I just can't make it work. After the 4th copy, Command [ sends the layer down in the stack, but the V/arrow keys stop working. The shadow just stays in place on the layer. Always after 4 copies! What the? Any suggestions? Thank you so much!
I'm trying to design for a clothing brand and trying to learn new things through youtube.
I couldn't open the "Filter Gallery" and then I realized that option is only available when working at 8 bits and not 16, as I use to do.
Hope it can help someone.
Okay, right about :49 - :50, you move the cursor out to the doc and you brought the doc dimension screen up. How do you do that???
why I cannot do the step 28? the select and mask button is not active
It worked, BUT, hitting "play" over and over does not make my shadow longer!!! What did I miss??
07:05 shortcut to adding TEXTURE step.
I use the fx panel. Drop shadow. Faster easier and you can change direction of the shadow.
The minus of this action is that the shadow angle is set at only 45 degree, so if you want to change the angle you have to make another action.
just use the move tool with alt key it will automatically duplicate
Hello,
I've tried to find a solution for a while now, but unfortunately I can't find any. I hope I can be here
one please help. this video is no longer the latest and
I think that the problem is why this one keyboard shortcut no longer works. I have carried out all the steps as described to activate the "cast shadow"
action create. now i am at the point that i want to merge the 10 layers. for this I should always start from the bottom Alt Shift ] until I'm at the first one.
but Alt Shift ] is either not taken or I don't know how, because ] is Alt Gr 9 and neither Alt Shift Alt_Gr 9 nor anything else works and under Edit .. Keyboard
Schortcuts .. layers I don't find anything either. of course i can select the layer by hand with the mouse but when i get the pictures merged At the end of
the action, I get an error message that the merge does not work. Please please please help me, I'm desperate still.
You light up the room, want to be youtube friends?
Haha thanks, you know, just trying to bring a little joy into the world with some Photoshop Tutorials... sure!
move layer down shortcut doesn't work..
I am a truck driver :D