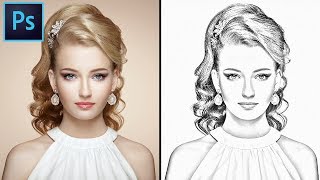
Photoshop: How to Quickly Transform a Photo into a Woodcut!

HTML-код
- Опубликовано: 5 фев 2025
- Click: storyblocks.com...
to receive your FREE 7-Day Subscription to Storyblocks.com!
Photoshop CC 2017 tutorial showing how to transform photo of someone or something into the look of a woodcut portrait.
Wood texture: 1drv.ms/i/s!Ar...
Photos provided by www.storyblocks...
High-resolution, royalty-free images
Royalty-Free Music provided by www.beatsuite.com
High quality, copyright-free music for RUclips.
Music track: "Uplifting Time"
Give back some love to Blue Lightning TV by becoming my Patron for as little as $2/month:
/ bluelightningtv
BLTV TV Channel:
/ bluelightningtv
BLTV Website:
www.bluelightni...
BLTV Facebook:
/ blue-lightning-tv-3307...
BLTV Facebook “Subscriber Page”:
/ bltvsubscribers
Tumblr:
/ bluelightningtv
Twitter:
/ bluelightningtv
Google+:
plus.google.co...
Pinterest:
/ bluelightningtv
LinkedIn:
www.linkedin.com/in/martygeller


Great tutorial! I clicked Liked
this is probbably the clearest instruction video made in over 15 years
Hi Marty! You're the best! You have been my best friend since the last couple of months! Thank you so much!
Very impressive tutorial with emphasis on finishing quality.
So cool
Thanks brother
YOU ARE AWESOME!!!!!!!!
супер спасибо
Nice... Ur tutorials always teaches mr somethin new
Glad to hear that!
Prefect video, load,
clear, very well spoken. I will be turn on the bell.
Awesome, thank you!
thanks
for all the essentials tutorials
very useful - thank you
Really so Excellent .... Thanks.
Thanks Sir we will wait a next amazing tutorial.
I am intrigued..
That's super cool. Thank you!
thank you very much.....
Fantastic! Thanks for sharing!
well done😍
thanks
Awesome !!!
VERY HELPFUL
thank you soo mch sir u r such a great teacher ....hat's off to u
Nice
Very Nice..
hi sir this is shyam photography from INDIA so nice and than Q sir
thank you
very nice
u my teacher thank u sir
Thanks for the help, i appreciate it. You deserve to get subscribe
Amazing !!!
Which kind of cnc machine is this
This video shows how to recreate the LOOK of a Woodcut in Photoshop.
What to do if the color range shadow does not work? my photoshop is cs6
Do Highlights and Midtones work in Color Range?
Nice one
Filter Gallery was greyed out, nvm just went to Image -> Mode and changed it to 8 bit which helped me.
Helpfull
Thanks a lot.
In color range it is not only the picture of the face that got marked, even the wood it self get marked (with marching ants on its black areas.) How do I get the marks on the face only??
Help.. when I apply the filter, the effect turns red, how i fix it pleaseeee. nice video by the way
Serendipity! I need to produce some portraits like this for a project that came in today. Thanks!
sir when i select sketch folder then green layer apper on the image
Check your foreground and background colors.
Sensacional
verry clear video. but the end came with a twist.
here i am with a laser engraving machine watching the video to find out how to turn a picture into a wood engraving. and you just faked it XD (method works btw. i just need to stop a couple steps early and then i have a file to use for laser engraving)
Hi darak Can you tell me how you did it please
what should be the actual resolution of that wood texture
150 ppi
hie ,thanks for the tutorial so when i select color range and then shadows the settings sliders for fuzziness and range are grayed out . is there any other way besides color range ?
It may be grayed out because your Image Mode is incorrect. Go to Image > Mode > RGB color, 8 bits/Channel
you are using 32 bits?
My image mode is correct..still fuzziness nd range r faded
Wow let's talk genius OMG
which software you used for photo editing?
Muhammad saadullah photoshop cc
When i choose photocopy filter.. the face is getting black instead of white just like urs in the video.. what is wrong i am doing?
Invert your foreground and background colors.
@@BLTV_Photoshop thanks it worked.. but when i choose shadows.. i am unable to change fuzziness and range.. i can't select them at all..
How much it will cost
How to transform this to an orginal wood. For example as a gift for someone
could you please make a tutorial how to cartoon pictures
Go to my RUclips channel & click on the magnifying glass icon (next to “About”). In the “Search Channel” field, type in, “cartoon” or "comic"
Would I be able to export a copy of this into Inkscape?
Sorry, don't know. I never used Inkscape.
@@BLTV_Photoshop No problem; Thank you.
when i select the photocopy filter (and most of the scetch filters other then chrome) my image just becomes a uniform gray and messing with the value's changes nothing
Go to Image > Mode > RGB color, 8 bits/Channel. Also, make sure your foreground and background colors are black and white, respectively.
@@BLTV_Photoshop
oh it was already set to those. and the background is transparent.
but it did make me look at mode. i selected grayscale. then klicked ok on all the warnings. wich removed any adjustments and rasterised the image.
i then converted it back into a smart object. went to the filter gallary and now the sketch things work. photocopy now works.
When I get to 4.15 after clicking on sketch/photocopy my image dos`nt change to a pencil image. can you advise me please Marty.
So, your image remains the same?
Yes Marty
I'm sure there's a very simple explanation, but it could be any one of a dozen reasons. The first thing I'd do is close PS and restart it. Secondly, check your Image Mode (Image > Mode > RGB color, 8 bits/Channel). See if the Filter Gallery works on your image without converting it into a Smart Object.
Mine does the exact same, when i turn em into smart objects Photoshop seems to ignore the black thite filer, does work fine when i dont use smart object though
Thank you Michael, i`ll try that
Hey, wait a minute...I think I just saw this guy's photo on my local Post Office's "FBI's Most Wanted List"! (ONLY KIDDING, FOLKS!!! IT'S A JOKE!!!) But, does anybody else out there also remember the pre-computer/internet days and actually flipping through the "FBI's Most Wanted List" in your local post office, because you had nothing better to do while you were standing in line? (In the little town we once lived in, you anxiously awaited the moment when you could finally move up far enough so you could finally look through it yourself, and just when you thought you MAYBE recognized someone....you heard the word "Next!") How times have changed!
Tooooooop
loudest video on youtube lolll was watching a video before this and clicked on this one....literally scared the F*** out of me
4:27 I have the fuzziness and range turned off
Mine also, what to do
Can i engrave this on actual wood?
There may be companies out there that will laser-engrave high-contrast, black on white images onto wood.
My adventure with the tree began with projects from Stodoys plans.
where is the wood photo?
Whenever I state that a link is in my video's description, follow these instructions: Directly below the title of the video, you will see "Show More". Scroll down. You will see all the links to the files.
Like
شرحك حلو ، لكن احنه ما نفهم انگليزي ، عاشت إيدك
تعلمت دروسي التسميات التوضيحية. انقر على الرمز "سيسي" أسفل الفيديو، ثم انقر على "العربية" لترجمته. الترجمات ليست مثالية، ولكن الكثير منها لا يزال مفهوما.
Blue Lightning TV Photoshop شكراً لك ، انت شخص رائع
@@BLTV_Photoshop we understand your great work by art
Press cntrl alt delete shift # x, y, t F12, right arrow, and release left mouse button while scrolling backwards on mouse wheel. Adobe sucks ass for leasing their products. Buy Corel Draw instead and own it forever. Or get the free GIMP software.
I've tried and tried again but this has failed to work black faces... At this point I'm starting to think photoshop is racist 😢😢😢
Sorry for not explaining how to adjust tones in this tutorial. There are many ways to do it. For example, you could go to Image > Adjustments > Shadows/Highlights and increase the Shadows amount. Or you could open the Curves adjustment layer and brighten the midtones and shadows. You could also open the Dodge Tool and brush over the face to brighten the shadows and midtones.
@@BLTV_Photoshop Thanks Mr Matty I'm gonna try it out!
Thank you very much