I would suggest putting a metal bolt in the threaded area and laying the parts over the bolt and threads to help hold everything in place, then braze over the pieces and they would align better and require less retread work etc
I saw a lumiweld demonstration at a motorcycle show once he put a stainless steel nut on a thin sheet of aluminium them flowed the rod into the nut left to cool and then removed the nut leaving an ally thread fused to the sheet then he put the nut back on and tightened the nut to show how well it had melted into the ally sheet it didn't sheer off and it deformed the back of the ally sheet as it pulled on it very impressive. It works by having a lower melting temperature than aluminium but when it melts into the parent metal it lowers its melting temperature also so you do need to know how to use it, I would of put a bolt in the thread and reattach the broken pieces after cleaning with acetone
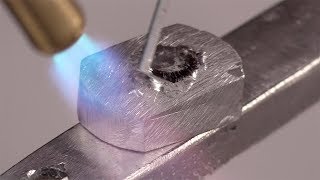
First of all you should have clamped the part down for better stability with non heat absorbing retention material . Don't hold the flame so close to the work and the rod would have been easier to control , you created more work for yourself . The metal will flow into the crevices more freely with better heat control otherwise you end up with a bulging lump of runny metal . I have done many aluminium repairs in my life time and believe me the heat can get away from you , and a word for your safety , always wear eye protection when dealing with extreme heat on any type of metal weather welding , brazing , soldering , whatever , metal can pop into your eyes faster than you realize ! Keep practicing you will get better at it !
I really like your stick with it work ethic despite the odds. You did say however tig welding would have been easier thank you for your hard work in showing. Glad it worked
Looks good thanks for showing us ,I've a bracket broke on the headstock of my motorbike gonna try this but not sure wether I might need to take yolk apart with bearings in ,the break us in the centre of bike frame yoke ????
If you had inserted the stud into the existing thread and then tinned the faces then build up the missing part with the rods. It won't adhere to the steel stud but will fill the threads Allow to cool then unscrew the stud. Reshape the filler and repair is done. Far easier and stronger than fiddling with the little bits.
I have used these rods to repair a cracked KTM 250 crankcase. The hole was approx 1 inch. Dont bother trying to use the broken out bits. Use pieces of thin sheet steel to create a dam around the hole. Heat up the casing and pick away at the edges with the stainless steel pick. The pick gets white hot and it creates a key for the new weld material to grab onto. Then just fill up the dam with the weld rods. Keep picking as you fill up the hole. Melting the rod is easy. Creating a key is the crucial step. This job was easy but you made a pigs ear of it. Should have put a bolt in first and welded around the bolt. Then back the bolt out.
i hope that would be strong enough... once i was installing a used engine off of ebay for a costumer ... torqued the block to the frame and swing arm to spec...while tightening the pinch bolt for the swingarm mounting to the engine the damn thing snapped on me...you can imagine my stress ..on closer inspection the thing was probably involved in a serious crash and was welded i guess half-assed
Close that cap on the rods buddy, I'm the weld engineer, they were hemostaticly sealed. Dont expose AL to atmospherics. This is when I chime in. I see that tube wide open!! Keep up the good work!!
The alloy? No idea but something with high silicone content like nearly all casting. Something like/or close to A390 As for Interpass temperatures - who fucking knows LOL it was a long time ago. "Pre heat and post heat?" Preheat - again don't know the temperatures because I didn't get out the temp sticks. Instructions for Lumiweld say just to air cool once repair has been done. We'll be revisiting this soon
The Workshop certainly has kid. I've just been watching the vids you posted the last few days. Seems like I missed a lot lol. Bikes still running although not on road at the moment. Hopefully get it back on next month.
it's not welding,even though it's called lumiweld,it's hard soldering,some would say brazing,but seeing as there is no brass used,it is hard soldering,welding is two parent metals melted with a filler rod used to build the weld,stops the parent metal from collapsing,though i used to seam weld 16,18 and 20 gauge stainless sheet metal,butting the sheets together and using tig at low current fuse the two together ,flatten the very small bead then polish or re-grain the finish to hide the weld. As for hard soldering a crank cradle,or any other stressed part,i would be very dubious of it's ability to remain intact,a crank case or clutch case might be ok,just depends on the direction of force applied to it. Like any repair,it needs to suit the need,rather than looking ok. I'm not however knock the ability to fix stuff that a machine shop with ally welding plant would charge an arm and a leg for,just that we should be aware of the limits of the repair medium and it's suitability for the job in hand,as some people can expect too much from readily available products which are relatively easy to use,than being a prick about a youtube video,to see how the product fairs.
I'm thinking now that I would have put the bolt in and just built up the cracked piece with zoomie weld. Not having the underside of the pieces exposed is killing the process. Like trying to solder a dirty copper pipe. The more you heat it, the worse it gets. Maybe pre tin the pieces.
This Lumiweld product seems to act more like solder than weld in the way that it all melts at once and goes solid at once. After preparing the parts etc. It may have been better to tin up each part first then clamp and position the whole piece of work together in its final position then lumiweld the gaps. If that makes sense.
"This Lumiweld product seems to act more like solder than weld in the way that it all melts at once and goes solid at once." - that's just how close you are to freezing by using a Propane torch.
Yes but I thought the whole point of using the Lumiweld was not to melt the brittle and possibly un-weldable casting. If so, and as you have demonstrated, the Lumiweld is the answer. Just the technique of applying it could be made easier.. Although you are bloody good at it anyway, especially for a first attempt..
What i saw was the same result you would get if he used bidy filler. Yes the solder stuck with huge amounts of heat applied. But zero penetration took place. Where was the low temp they say these rod need... It was a failure. I would like to see a stress test on the hole when its put back in commision
I have done a lot of this,if i may give a bit of my exp,you started well but when it was coated you should have wire brushed the excess away.The done the same with the broken piece,this leaves a small layer on both parts to act as flux,to drag the lumiweld in.And the inserted a bolt(carbon steel)then brought it all together and then reheat and watch the lumiweld get drawn in making a strong joint. You will need to press the broken parts to get them to seat well.OR,messure where the hole should be exact,and coat all the threads on all parts,wire brush away excess,fit,and fill the hole completely.Then drill and tap a new hole,and machine the face.
This was pretty much my thought when watching the struggle of getting that bloody chunk to take, much like making a solder joint on copper surface it often helps to "tin" both surfaces. Another consideration is that oxide layer you were talking about is now a structural weakness running along the entire surface area of the original break.
You should pull your flame back a bit so that the tip of the blue cone is on the job or you're just wasting heat. Before the gas reaches this cone, all it's doing is cooling not heating!. (I used to do a lot of brazing!)
I once welded a home made aluminium carb neck and manifold onto an Amal 18mm. carb from a Triumph T21 / 3TA / 5TA, 12 years ago to go onto my then 16 year old son's café racer geared moped, as I didn't have the correct carb. I'd practiced on scraps before having a go and it worked first time. Didn't use Lumiweld though, the rods I used were made in Canada. I'd built him the whole bike, frame and all, and installed a 1970's European 50cc circuit racing engine bought from a Dutchman. I'd even managed to register it with the DVLA so it was completely road legal. Do you think a 16 year old kid would appreciate all this hassle?? No he constantly complained that it did less than 40 miles per (true) imperial gallon!! The fastest 50cc in town (at the time) and he whinged about fuel economy!! No son of mine was going to ever own or ride a 50cc sc**ter!! Alloys used in carbs and engine cases vary. Jap bikes use Kaypak for carbs and aluminium with a high Magnesium content (cos its cheaper & lighter) for cases. Jawa and CZ use a Mazak for carbs and Duralumin (an impossible word to say when drunk) for engine cases, which is expensive but tough. Duralumin also polishes up to a mirror finish. Back in the Communist days they could afford to spend more making bikes than they were sold for. New 4 stroke Jawa and some CZ bikes use Honda engines. Ye olde British bikes use Mazak for carbs and Aluminium / Magnesium alloy for engine cases. Rotax use pure Magnesium for engine cases. Any welding need to be done in a oxygen free environment..... or else the Fire Brigade will need to be called. Puch Bing carbs are very high magnesium alloy. I discovered this whilst attempting to weld a manifold on one. Let's just say the carb was reduced to a deformed lump of metal within a minute. Chinese bikes use Crapite (Tm.) for both carbs and engine cases. Metals used are a mystery to western science. 1970's Russian motorcycles used some form of alloy with a high cheese content on engine cases, so I've been informed. It is very easy to puncture with an impact, strip threads, etc. and is a bastard to weld back up, so I've been told by those that have tried. I watched a French expert aluminium / alloy welder actually taste the metal to determine what he was dealing with and how he was going to weld. Apparently all metals have a distinctive taste and with practice one can tell them apart.
Your comments are sooo much appreciated and not just for the fine entertainment value. The Honda lawn tractor carburetor threaded center tube that holds the bowl to the body cracked off when someone over torqued it and I’m considering cold soldering as no replacement carbs are found so far. Knowing the possible manufacturer may help a pro determine their approach if I can find one that will take the job. If not I’ll do it myself because the attachment stress on the bolt can be replaced by an external scaffolding, plus I’m in the habit of trying and dealing with the consequences vs giving up.
If the small part was the one put in first, with the bolt in place to be a guide, and hold the heat in the work-area, you would've saved yourself time and machine-work drilling and tapping the hole you filled in. Good camera-work though, cheers from America.
James Dougan expensive waste of time if you ask me. Del has a great vid of a similar repair. All you need is blutac and electricians tape, much less faff.
It would have been a lot easier if you didn't hold the torch so close to the pieces. For most of the time, you were trying to heat it with the unburnt fuel (cold) part of the flame.
You should be wearing a pair of safety glasses to begin with.when filling the outside of the bolt hole,screw a brass or steel bolt in first before you fill up outer hole.0
+Pony Power that may be so, yet if you compare the videos where flux was used from the ones where it was not... you will see that flux does seem to help the metal flow ... like water... thus it does seem to get into all the cracks in a better way
O.M.G.what a f**c up Put the bolt in the hole and build up the casting over the bolt it will not stick to the bolt but will make the thread in the hole then unscrew the bolt 5 minit job
@@wyattwaid3353 Replying way later, but for anyone coming across this comment aluminum is a very good conductor of heat, also if you are putting your piece to be repaired in a metal vice it will also conduct heat away. Having the piece at a consistent hot temperature will keep it from cooling your work area as easily meaning you will have a much easier time getting it to the required 720+ degree F working temperature and keeping it there.
Well not so fast - this application you'd probably get away with super glue LOL this is a very low stress application - I'll be doing some 'proper' tests on this stuff - starting with a combustion chamber
I suggest you learn how to use this stuff before you tell everyone how to do it You made an easy repair far more difficult. Yes it comes with instructions that you clearly didnt read Where are your safety glasses and gloves
"I suggest you learn how to use this stuff before you tell everyone how to do it" - this is a how to video? "Yes it comes with instructions that you clearly didnt read" - which bit - point it out please
+Gren. Hansen No, this isn't welding but obviously YOU know that. I've never done it before and I was showing how the process went and how difficult/easy it was, but you already knew that.
Virginia Calayan A new one costs £80 and the repair has been working in dudes moped for the last year now without a problem so not a waste of time, saved alot of money.


![Sean Rii, Karyon, Sharzkii - Taungule [My Love] (Official Music Video)](http://i.ytimg.com/vi/eJoMuypbSzQ/mqdefault.jpg)

![Jelly Roll - Dead End Road (From Twisters: The Album) [Official Music Video]](http://i.ytimg.com/vi/_Mb8CqKW4R8/mqdefault.jpg)


I would suggest putting a metal bolt in the threaded area and laying the parts over the bolt and threads to help hold everything in place, then braze over the pieces and they would align better and require less retread work etc
I was thinking the exact same thing - use a steel bolt and build-up the material around it.
I saw a lumiweld demonstration at a motorcycle show once he put a stainless steel nut on a thin sheet of aluminium them flowed the rod into the nut left to cool and then removed the nut leaving an ally thread fused to the sheet then he put the nut back on and tightened the nut to show how well it had melted into the ally sheet it didn't sheer off and it deformed the back of the ally sheet as it pulled on it very impressive. It works by having a lower melting temperature than aluminium but when it melts into the parent metal it lowers its melting temperature also so you do need to know how to use it, I would of put a bolt in the thread and reattach the broken pieces after cleaning with acetone
First of all you should have clamped the part down for better stability with non heat absorbing retention material . Don't hold the flame so close to the work and the rod would have been easier to control , you created more work for yourself . The metal will flow into the crevices more freely with better heat control otherwise you end up with a bulging lump of runny metal . I have done many aluminium repairs in my life time and believe me the heat can get away from you , and a word for your safety , always wear eye protection when dealing with extreme heat on any type of metal weather welding , brazing , soldering , whatever , metal can pop into your eyes faster than you realize ! Keep practicing you will get better at it !
I really like your stick with it work ethic despite the odds. You did say however tig welding would have been easier thank you for your hard work in showing. Glad it worked
He's trying to show everyone what you could do, kinda of a R&D, awesome work
Gives me the confidence to do it myself but realising how hard it is good video
Thanks for taking the time to explain the process thoroughly. It's been a great help this video, cheers.
+Mick Miller no worries mate thanks for the comment
OMG that was 7 years ago! great video.
Looks good thanks for showing us ,I've a bracket broke on the headstock of my motorbike gonna try this but not sure wether I might need to take yolk apart with bearings in ,the break us in the centre of bike frame yoke ????
If you had inserted the stud into the existing thread and then tinned the faces then build up the missing part with the rods. It won't adhere to the steel stud but will fill the threads Allow to cool then unscrew the stud. Reshape the filler and repair is done. Far easier and stronger than fiddling with the little bits.
I have used these rods to repair a cracked KTM 250 crankcase. The hole was approx 1 inch. Dont bother trying to use the broken out bits. Use pieces of thin sheet steel to create a dam around the hole. Heat up the casing and pick away at the edges with the stainless steel pick. The pick gets white hot and it creates a key for the new weld material to grab onto. Then just fill up the dam with the weld rods. Keep picking as you fill up the hole. Melting the rod is easy. Creating a key is the crucial step.
This job was easy but you made a pigs ear of it. Should have put a bolt in first and welded around the bolt. Then back the bolt out.
How has the hole held up since the repair? I've a crack in my R6 crankcase and was thinking of trying this to repair it
Ml
i hope that would be strong enough... once i was installing a used engine off of ebay for a costumer ... torqued the block to the frame and swing arm to spec...while tightening the pinch bolt for the swingarm mounting to the engine the damn thing snapped on me...you can imagine my stress ..on closer inspection the thing was probably involved in a serious crash and was welded i guess half-assed
Close that cap on the rods buddy, I'm the weld engineer, they were hemostaticly sealed. Dont expose AL to atmospherics.
This is when I chime in.
I see that tube wide open!!
Keep up the good work!!
What parent alloy are you welding??
Interpass temps??
Pre heat and post heat ?
Not bad for an engineer, you can walk the talk. Honorable
The alloy? No idea but something with high silicone content like nearly all casting. Something like/or close to A390
As for Interpass temperatures - who fucking knows LOL it was a long time ago.
"Pre heat and post heat?"
Preheat - again don't know the temperatures because I didn't get out the temp sticks. Instructions for Lumiweld say just to air cool once repair has been done. We'll be revisiting this soon
Interesting lol
What is the Lumiweld rod actually made of? Is it just an aluminium welding rod?
No, its a blend of Magnesium, Aluminium and some other metals and a few acids and a flux.
And it's still working. Just goes to show what a great job Matt did for me. My hero hehe
Hello Andy mate - hows things? And good to hear - been a bloody long time now lol
The Workshop certainly has kid. I've just been watching the vids you posted the last few days. Seems like I missed a lot lol. Bikes still running although not on road at the moment. Hopefully get it back on next month.
it's not welding,even though it's called lumiweld,it's hard soldering,some would say brazing,but seeing as there is no brass used,it is hard soldering,welding is two parent metals melted with a filler rod used to build the weld,stops the parent metal from collapsing,though i used to seam weld 16,18 and 20 gauge stainless sheet metal,butting the sheets together and using tig at low current fuse the two together ,flatten the very small bead then polish or re-grain the finish to hide the weld.
As for hard soldering a crank cradle,or any other stressed part,i would be very dubious of it's ability to remain intact,a crank case or clutch case might be ok,just depends on the direction of force applied to it.
Like any repair,it needs to suit the need,rather than looking ok.
I'm not however knock the ability to fix stuff that a machine shop with ally welding plant would charge an arm and a leg for,just that we should be aware of the limits of the repair medium and it's suitability for the job in hand,as some people can expect too much from readily available products which are relatively easy to use,than being a prick about a youtube video,to see how the product fairs.
What a way to treat your tools
Whatever you learned from this video you need to forget and read the instructions
I'm thinking now that I would have put the bolt in and just built up the cracked piece with zoomie weld. Not having the underside of the pieces exposed is killing the process. Like trying to solder a dirty copper pipe. The more you heat it, the worse it gets. Maybe pre tin the pieces.
if you removed oxide from one side, wouldn't it make sense to clean scratch the small part also?
+Oleg Loginov I did at 10:25, thanks for the comment - matt
Sorry Matt. Didn't notice.
This Lumiweld product seems to act more like solder than weld in the way that it all melts at once and goes solid at once. After preparing the parts etc. It may have been better to tin up each part first then clamp and position the whole piece of work together in its final position then lumiweld the gaps. If that makes sense.
"This Lumiweld product seems to act more like solder than weld in the way that it all melts at once and goes solid at once."
- that's just how close you are to freezing by using a Propane torch.
Yes but I thought the whole point of using the Lumiweld was not to melt the brittle and possibly un-weldable casting. If so, and as you have demonstrated, the Lumiweld is the answer. Just the technique of applying it could be made easier..
Although you are bloody good at it anyway, especially for a first attempt..
Thank u 8 year ago
Welcome
Hola que gas utilizas?
What i saw was the same result you would get if he used bidy filler. Yes the solder stuck with huge amounts of heat applied. But zero penetration took place. Where was the low temp they say these rod need... It was a failure. I would like to see a stress test on the hole when its put back in commision
Good skills, utilized experience l shall give it a go, on some scrap that is ! Cheers .
Would this work to fix a broken carb float post on an 82 GS850?
Yes but its very small - you have to be careful with the heat
Yup, just give it what it wants, no more, unlike a woman
Were you able to make this work? I'm hoping to do the same thing on my carburetor.
can you believe i paused this video to take a piss, what was i thinking.
SMH
a threaded carbon rod in the hole and tin all surfaces first i think
I have done a lot of this,if i may give a bit of my exp,you started well but when it was coated you should have wire brushed the excess away.The done the same with the broken piece,this leaves a small layer on both parts to act as flux,to drag the lumiweld in.And the inserted a bolt(carbon steel)then brought it all together and then reheat and watch the lumiweld get drawn in making a strong joint. You will need to press the broken parts to get them to seat well.OR,messure where the hole should be exact,and coat all the threads on all parts,wire brush away excess,fit,and fill the hole completely.Then drill and tap a new hole,and machine the face.
This was pretty much my thought when watching the struggle of getting that bloody chunk to take, much like making a solder joint on copper surface it often helps to "tin" both surfaces. Another consideration is that oxide layer you were talking about is now a structural weakness running along the entire surface area of the original break.
You should pull your flame back a bit so that the tip of the blue cone is on the job or you're just wasting heat. Before the gas reaches this cone, all it's doing is cooling not heating!.
(I used to do a lot of brazing!)
Just completely fill the area with the brazing rod material, drill and tap it out.
It would have been easier to use a band of safety wire from the beginning to hold the piece in place before brazing.
You could put the bolt in it and line up all the threads making it much easier. 👍🏼👍🏼
Well no, because that would be dumb, you'd never get the threads lined up properly.
@@dirtygarageguy drill and tap.
I once welded a home made aluminium carb neck and manifold onto an Amal 18mm. carb from a Triumph T21 / 3TA / 5TA, 12 years ago to go onto my then 16 year old son's café racer geared moped, as I didn't have the correct carb. I'd practiced on scraps before having a go and it worked first time. Didn't use Lumiweld though, the rods I used were made in Canada.
I'd built him the whole bike, frame and all, and installed a 1970's European 50cc circuit racing engine bought from a Dutchman. I'd even managed to register it with the DVLA so it was completely road legal. Do you think a 16 year old kid would appreciate all this hassle?? No he constantly complained that it did less than 40 miles per (true) imperial gallon!! The fastest 50cc in town (at the time) and he whinged about fuel economy!!
No son of mine was going to ever own or ride a 50cc sc**ter!!
Alloys used in carbs and engine cases vary.
Jap bikes use Kaypak for carbs and aluminium with a high Magnesium content (cos its cheaper & lighter) for cases.
Jawa and CZ use a Mazak for carbs and Duralumin (an impossible word to say when drunk) for engine cases, which is expensive but tough. Duralumin also polishes up to a mirror finish. Back in the Communist days they could afford to spend more making bikes than they were sold for. New 4 stroke Jawa and some CZ bikes use Honda engines.
Ye olde British bikes use Mazak for carbs and Aluminium / Magnesium alloy for engine cases.
Rotax use pure Magnesium for engine cases. Any welding need to be done in a oxygen free environment..... or else the Fire Brigade will need to be called.
Puch Bing carbs are very high magnesium alloy. I discovered this whilst attempting to weld a manifold on one. Let's just say the carb was reduced to a deformed lump of metal within a minute.
Chinese bikes use Crapite (Tm.) for both carbs and engine cases. Metals used are a mystery to western science.
1970's Russian motorcycles used some form of alloy with a high cheese content on engine cases, so I've been informed. It is very easy to puncture with an impact, strip threads, etc. and is a bastard to weld back up, so I've been told by those that have tried.
I watched a French expert aluminium / alloy welder actually taste the metal to determine what he was dealing with and how he was going to weld. Apparently all metals have a distinctive taste and with practice one can tell them apart.
wow. a screaming, fun little 50cc cafe racer that gets 40mpg. im afraid of motorcycles, but even i would enjoy that.
Your comments are sooo much appreciated and not just for the fine entertainment value. The Honda lawn tractor carburetor threaded center tube that holds the bowl to the body cracked off when someone over torqued it and I’m considering cold soldering as no replacement carbs are found so far. Knowing the possible manufacturer may help a pro determine their approach if I can find one that will take the job. If not I’ll do it myself because the attachment stress on the bolt can be replaced by an external scaffolding, plus I’m in the habit of trying and dealing with the consequences vs giving up.
Brilliant video thank you 😎👍👍👍👍👍👍👍👍👍👍👍👍👍👍👍👍👍👍👍👍👍👍👍👍👍👍👍👍👍👍👍👍👍👍👍👍👍👍👍👍👍👍
what an incredible job...holy fuck,,,, that's nice and strong. guarantee .... genius .
If the small part was the one put in first, with the bolt in place to be a guide, and hold the heat in the work-area, you would've saved yourself time and machine-work drilling and tapping the hole you filled in. Good camera-work though, cheers from America.
maybe put a little rod on the small part your joining before mating them?.
You need to let go that little piece of with them pliers drawing all the heat out of that small piece you could have been done almost instantly
hey good job no liquid nails or any wood in sight lmao
James Dougan expensive waste of time if you ask me. Del has a great vid of a similar repair. All you need is blutac and electricians tape, much less faff.
I would be concerned about warping the entire casting.
What is that to, a gy6 China scooter?! A new head costs as much as that silly kit
It would have been a lot easier if you didn't hold the torch so close to the pieces. For most of the time, you were trying to heat it with the unburnt fuel (cold) part of the flame.
You should be wearing a pair of safety glasses to begin with.when filling the outside of the bolt hole,screw a brass or steel bolt in first before you fill up outer hole.0
"You should be wearing a pair of safety glasses to begin with"
- Fuck off - last time I checked it's called PPE, i.e 'personal'
humm it seems like you forgot to use the flux
+Robert Ostman No flux needed dude
+Pony Power that may be so, yet if you compare the videos where flux was used from the ones where it was not... you will see that flux does seem to help the metal flow ... like water... thus it does seem to get into all the cracks in a better way
+Robert Ostman I'm totally with you their, I'm just doing it as instructed. But good point none the less
O.M.G.what a f**c up
Put the bolt in the hole and build up the casting over the bolt it will not stick to the bolt but will make the thread in the hole then unscrew the bolt
5 minit job
"but will make the thread in the hole then unscrew the bolt" - LOL what a fucking bodge bandit you are
PreHeat your parts in an oven first, might save you.....
What does preheating do?
@@wyattwaid3353 Replying way later, but for anyone coming across this comment aluminum is a very good conductor of heat, also if you are putting your piece to be repaired in a metal vice it will also conduct heat away.
Having the piece at a consistent hot temperature will keep it from cooling your work area as easily meaning you will have a much easier time getting it to the required 720+ degree F working temperature and keeping it there.
NO SAFETY GLASSES OR GLOVES
Safety glasses for fire? And gloves? - Ah, you're a pussy
If it fails its gonna eat your motor up
5 and a half years later and it's still fine - with another 32k miles on it to boot
@@dirtygarageguy that shit really works then!
Well not so fast - this application you'd probably get away with super glue LOL this is a very low stress application - I'll be doing some 'proper' tests on this stuff - starting with a combustion chamber
Butane torch on a wood bench thats clever
HMMMMM
你跟牛逼。。
LOL
I suggest you learn how to use this stuff before you tell everyone how to do it
You made an easy repair far more difficult.
Yes it comes with instructions that you clearly didnt read
Where are your safety glasses and gloves
"I suggest you learn how to use this stuff before you tell everyone how to do it" - this is a how to video?
"Yes it comes with instructions that you clearly didnt read" - which bit - point it out please
so he is showing us how to weld ??? perhaps he should have practised first.
+Gren. Hansen No, this isn't welding but obviously YOU know that. I've never done it before and I was showing how the process went and how difficult/easy it was, but you already knew that.
wasting a lot of time, i buy a new one.
Virginia Calayan A new one costs £80 and the repair has been working in dudes moped for the last year now without a problem so not a waste of time, saved alot of money.