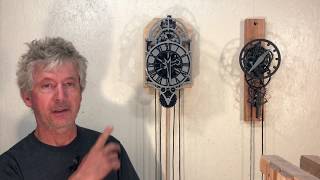
3D Printing a working mechanical Clock

HTML-код
- Опубликовано: 2 окт 2024
- Shows a mechanical Clock, created with a 3D-Printer. Illustrates, how the design was done with Blender, the printing process, the assembly, and the final run.
Blender- and STL-files can be downloaded here:
www.thingiverse...  Наука
Наука


This is a beautiful addition to the internet!
It's hard to appreciate designs like this as you don't see the failed parts that are slightly misaligned or simply don't fit. The box of waste is what really demonstrates the frustration of the process.
Thanks for the clock!
Very nice job (finally). And the speed the printer churns out parts, that box of 'duds' must represent a mass of time expended; blood; sweat; and tears. I salute your dedication
I can't believe you used Blender for this! Must've taken ages, and would have been a lot easier in a CAD software like Inventor or Solidworks.
Nonetheless, this is an amazing design :)
+ISeeFurther when I saw the blender clip, I mouthed "wow" to myself. I've made very basic 3d printed designs in Blender (little figures and such), but getting precise mechanical parts modelled up must have been an absolute nightmare.
Using OpenSCAD to "program" gears is the easiest way I've found so far
+Gareth Crispin (MrHolozip) initially I found it indeed painful with Blender. But finally I got the "trick" how to use the array-modifier for gear-teeth. Now I'm using Fusion 360 - it has a very convenient script to generate involute gears, however if you need to tune the tooth shape, it is equally clumsy like Blender.
If you want to use Open source software like "Blender", you can use "FreeCAD". Also I think there are mods for blender that make it better for CAD with things like dimensioning being added.
Anyways thanks for sharing this wonderful project with us!
Astounded, that you pulled it off with blender!
@@ChristophLaimer if you add a planetary gears to slow down the soeed at what the weight drops cant you increase the clocks runtime between winds?
Nice job. Must have taken many hours, both in Blender and afterword. I like the pulley mechanism that the weight hangs from, much better than having the weight hanging down one side with a counterweight hanging down the other side. I'm going to have to remember that trick. Thanks!
NOT-WORKING !!! All the people who wrote "wonderful" comments, did-not try to print it !!! I printed it (about 2 weeks of work !!!) but this clock is-not-working . i watched the mounting instructions very carefully, many times, second-after-second, but the assembled clock doesn't work. the video is too fast , i had to stop it many times, but the worse is that 16 printed parts are not in the video !!!
Nah, that's not a box of crap. That's a box with 100 ways not to make a 3d printed clock inside ;)
How well dose it keep time?
tested 30 minutes with my smartphone. the seconds-ticks-sound was still in synch then
Is it possible to create a mechanical clock without using the spring.
Wow, this is a great project - thanks for showing it!
Wow, absolutely amazing! A lovely timepiece!
I suppose that before you have had experience doing wooden gears with a CNC machine, if so please tell me in your experience with which you got better results.
This clock is amazing! Very well done! But I must commend you on the video as well. Your video is really well made. I like how you demonstrated the clock, showed the blender software, and also a time lapse of the assembly. Thank you for explaining how the whole thing works.
And lastly, I can say I fully appreciate the very end where you showed how many iterations of pieces you had to go through to arrive at a working product.
Awesome!!!!
Where does one find the sizes and lengths of the pins that are needed for assembly?
can you tell me where i can buy PINS: 1 x Balance wheel: 1.5mm diameter, 40mm length
1 x Escape wheel: 2.0mm diameter, 28mm length
1 x Reduction gears: 2.0mm diameter, 60mm length
1 x Drum Transmission: 3.0mm diameter, 60mm length
1 x Drum Axis: 3.0mm diameter, 60mm length
1 x Crank transmission: 3.0mm diameter, 30mm length
4 x Planets Axis: 3.0mm diameter, 39mm length
1 x Weight Axis: 3.0mm diameter, 15mm length
Hi Christoph, are you still available to give advice on your clock.?
your clock is SO Awesome!!! PLEASE PLEASE PLEASE can you put the STL files on Thiniverse ? i would worship you as a god if you made them available! (i dont know how to use the ones you are currently linking)
Well done on your clock! I've completed many many experiments of my own on this clock project, still ongoing.
wyolum.com/evolution-of-a-gear-clock/
***** the world is your oyster! You can have/do whatever you can dream up. Make a plan, make it happen.
omg i found the files on thingyverse and started prining and found this video
I am still in process of printing mine and hope to be done today or tomorrow. Thanks so much for providing this! I have always wanted to build a mechanical clock. This is the most awesome thing I have printed with my 3D printer, thus far.
Hi Christoph, Just realized that you made the files available, but I still would be pleased to pay you for them and sell them for you. People don't understand the incredible amount of work and engineering that goes into a product like this, not to mention debugging and jigging things. Great Job!
Hi Francois. I don't intend to earn money with selling that clock model, because I wouldn't be able to provide appropriate support if there are issues. I'm happy with glory and honor. Feel free to sell the files or any printed parts, if the general clock design remains my intellectual property.
This is very beautiful. Amazing talent and ingenuity.
Thanks for such a great project.🥰 It will be a great birthday present, but I can print all parts 50% smaller so that the model has shrunk by half ? Sorry my english is not that good (Germany) 😅
I really liked it, beautiful design, does it work for 12 hours?
pretty nice job here, and seems very educative to do :)
Hope you'll find a way to make the working time go a little longer ;)
Wel done anyway and thanks for the video ;)
How did you model this in Blender? I can't even imagine. Then again, I'm a newbie to Blender. Nice work, thanks for sharing :)
I still can't get mine running. Have tried multiple different weights but the darn thing doesn't kick up any near as perfect as it does in the video.
this is incredible! love that 1940's style face too.
ty for the desing
2:56 for start of assembly
I checked the dictionary for a word that describes my impression. The word(s) that comes closest is: WOW! GR8T work.... Amazing :) Cheers.
Printer is "Rapman 3.2" - technology to print watches for giants ;-) ... Maybe the reason, why this printer is no longer manufactured.
Try to pour cold water on your parts to release them from the print-bed !
+Théry S. Cool :-) ... I'm using an UM2 since 1 year, building on a heated glass plate. Initially I was following the official hint and used the glue stick. Then I tried to print directly on the glass, which I cleaned with a mix of alcohol and water with a microfiber cleaning cloth before printing. PLA and PETG stick like hell - it's almost impossible to remove it from the glass, even after completely cooling down, and waiting for several hours. Inspired by your hint I sprayed my alcohol-water-mix onto the sticking parts. Miraculous! The liquid gets sucked between glass and plastique, it cracks like melting ice, and then you simply lift off the printed parts without applying any force.
@@ChristophLaimer You could also try putting a layer of masking tape on the surface.
I tried making this years ago, and could never get it to work. The lack of a safety roller in the escapement makes troubleshooting very frustrating. I would recommend you designing a pendulum clock next time, a pin pallet escapement is just more complicated than it needs to be, especially with the limitations of 3D printing.
Wow. Very nice work! So... People were printing clocks before they were printing Glocks?? Who knew?!! XD
Building this beauty as we speak. Robox Dual making larger parts and FormLabs 1+ for the smaller components. Interesting little engineering project to see if I can add my own ultra low power micro-controller POWERED by the escapement mechanism (no battery, just charging a capacitor) to dampen the balance wheel to keep it synchronized to the crystal reference it is powering. Gravity powered by the weights, the balance spring is the main oscillator kept in check by a quartz crystal reference and no battery of any kind. Lots of little precision ball bearings to minimize friction and hopefully have a real conversation piece and plastic heirloom functional clock as well. Kudos to this gorgeous design and thanks for making it available.
Why isn't this applied to a watch movement? I would pay a lot if someone could design me an automatic 3D printed ABS plastic watch movement.
jai fini d'imprimer l'horloge pourriez vous svp faire un schema pour les tiges merci
i am in the process of making this but i dont know what kind of axis and screws i need, can anyone help me with getting the right ones for the print? i would really appreciate it.
I love it, it's so cool, where can I buy it? thanks
Good job! Take my like, take my subscribe and take me comment! Well earned friend.
I love your clock(don't hide the "l") Wonder where can I buy those pins and screws
Printed all parts, but curious to know why all the holes are the same size, yet require 3 different sized rods ? its hard to open up holes without drilling into the part, specially the second hand
BTW the box of garbage would be gold to some artist ;)
really a very nicely designed mechanical part! I was really looking forward to it and invested many hours in printing and post-processing...I don't know what I'm doing wrong, because unfortunately the escapement mechanism just doesn't work for me! the spring doesn't fit either, has hardly any tension and looks different than in your video...a shame :( still a great job because it worked for you.
i have printed and built the clock, looks wonderful but, am having trouble making it tick. Any idea how much weight you added to the escapement balance? and what positions. looks like something at top, bottom, left and right?
Liked & Subscribed. Blender? Why not CAD?
why didn't I succeed? flywheel not working, what should I do?
you should build a recycling fliment machine to reuse unused printed part
I have made it. It works with planetary drum V1 and 2 kilos of weight but when it counts 1 minute the real time is 1minute and 20 seconds. I change weight to 1,5 kilo until 3 kilos but the loss of time is the same. I think I have to change the spring of the balance wheel, but I dont know what to do exactly. Any ideas?
amazing, you did that in blender, I used blender for animation, video editing, rendering and some simple 3D printing stuff, but never something that complicated, nice work!
I have spent many hours printing this clock, but I have a problem with the balance wheel.
it appears that this has some kind of weight in this part.
I have no experience with clocks but understand the assembly.
Any help with this would be much appreciated.
Thank you very much for your demonstration and explanation!
Looks like a pendulum clock from the ‘30s !! ( the mechanical parts)
just found the clock on thingivers and am planning on trying it.
question: how to make adjustments if the timing is off?? im used to these types of escapement clocks having pendulums to adjust up and down to speed or slow the escapement. if this one comes off the printer not accurate, how would you adjust it? preload on the spring, maybe? idk
Super cool design. Have you thought of using fusion 360 seems like it would allow for a more precise design? I’m trying to make my own clock and was wondering how did you go about designing the mainspring and hairspring? Any help would be greatly appreciated
how do you adjust the spring rate to amke it tick in time?
The accuracy of the spring isn't as relevant. There are small screws in the balance wheel, which allow fine-tuning the frequency.
I was tested rotate gear o use hand
but its sometime stuck and gears waste
What will i doing now?
Oh man, youre an absolute genius !
Im an watch-enthusiast, especially mechanical watches so i found you by your 3D printed torubillion! And im absolute blown out of my mind.
I wish i could have one of these watches! Unfortunately im an absolute No-Printing guy, though im very interested in that topic.
What would you say, is it necessary to print this watch with the same printer model like you?
Is the tourbillion needs an better printer, because of its fineness?
*wow "100 useless parts"!
Dear Christopher, I have printed your 3d print file with normal PLA material, but the clock can't work, do you have to use special materials or what is the solution?
Thanks
Hi, I really like the design and would like to 3d print and use the clock. However I would like to know how I could enhance the runtime. Maybe with a different pully system?
It is beautiful.
I plan to print this clock
What part can i tune if the clock speed is not accurate?
Any ideas on storing more energy to let it run little over 24 hrs?
So, next up design a pulley with a good ratio so that it can pull a few meters of string in the same distance with a heavier weight and run the clock for more then a day :)
Can anyone help with the gears and pins.
I think there are extra gears.
The video is fast and can not understand.
I'm curious on the 2 hr run time, could it be extended with a heavier weight and a more sophisticated block and tackle setup?
This is a great clock and i have had fun building it but, i have ran into a problem. Everything is together and the weight is on but its not turning the gears. I was wondering if this is a problem with the spring or if 600g isn't enough for the simple ratchet mechanism
You can make the time last longer with 70 cm if you run the string back up to a smaller spool on the same axis. Allowing the string already used to come back up and give the weight more space.
Wow what's the 3D printer your use for after fusion 360
YoU mAdE THiS uSiNg bLeNdEr?? 😳😲
Really pleased I found your channel today! But I see the "garbage" as pieces for a sculptural moving mecanism imo Laurie
This is fantastic, and a 3D printing milestone I will remember. The next one will be when I see a working 3D printed wrist or pocket watch!
Luke Perkin not to mention a lot of money from wasted pla
How do you set the time? Do you just set it before you add the weight?
Ottimo lavoro. Ho costruito l' orologio grazie ai modelli riportati in rete. Alla fine mi sono però accorto che la molla di 'SCAPPAMENTO' non può essere realizzata in PLA perchè troppo flessibile e a conti fatti i componenti dello scappamento (molla e bilanciere) sono stati progettati in materiale PLA. Sono al momento allo studio di una modifica da apportare per far funzionare l' Orologio. Grazie comunque per i modelli che sono per me stati uno stimolo a costruire un orologio e anche capire il funzionamento dal punto di vista fisico.
Hi. First of all I want to tell that this is one of the best project that I've seen.
I just want to ask you, what is the diameter and lenght of shaft thaht you been using ?
That's absolutely awesome, you created a clockwork mechanism, stunning. (are you a clockmaker by trade?)
Is there anyway to print even the metal parts? I know you can do screws and nuts and bolt and Taulman's nylon 910 would be strong enough for that, so how about the pins also from nylon? Is there a reason you chose metal pins and screws or is it just a structural consideration? 910 wasn't available when you made this video.
Either way, what a lovely project. Thanks for sharing it. :)
Bonjour monsieur
je trouve extraordinaire votre pendule, je suis horloger et je trouve votre création très jolie, juste un petit conseil ;( si vous me le permettait )pour que la pendule marche longtemps, vous devriez recouvrir l'encre et les axes de la roue d'encre avec des fines plaques de métal inox , et les graisser ......cela évitera l'usure de la résine plastique de l'imprimante. encore bravo pour votre travail
Hi. Please share where did you purchase the dowel pin 1.5mmX40mm Thanks
this needs more views. excellent job! I have wanted to do something like this for some time, and possibly cast the parts in aluminum.
This is inspiring and helpful. Thank you.
I have printed this clock, but it doesn't work:(:((((((((((
All successes come with a box of failures. Great work. I always use Blender....does everything I need and more.
I'm geeking out so hard to this. Awesome video!
Wicked skills all around. Impressive! Thanks for posting this.
InTeRlAcEd!?!?!?! wHy?!?!
Hi, could you give me information about the axes? in the video you use 3 thick and 3 thin.
Fantastic, I want to printed your clock
Christoph, thanks very much for this model. I am currently about 1/2 way printing this on my mendel prusa and I am delighted by your attention to detail, and design-for-3D-printing details. I look forward to designs in the near future that have snap-fit details similar to injection molded parts, and minimal use of fasteners.
I can't even make a milkshake in blender. A clock . amazing build
Hallo, habe auch die Uhr gedruckt sieht wirklich tolle aus. Nur die Feder ist zu schwach, hat dünnere Linien als die im Video zu sehen. Gibt es da eine Einstellung die ich falsch habe? Bitte um einen Tip!
i'm printing right now your clock, really a great project, thank you!
I like the design of this clock very much! I wish I could 3D print it... A reccomendation maybe... add a striking train :D Is the pendulum adjustable so that it can be made more accurate?
the "pendulum" is the weighted wheel behind the spring. i think the creator put a certain amount of bolts/ screws in it to increase / decrease weight which slows down/ speeds up the clock respectively.
This is incredible! Just optained a cheap 3D printer, i think i am eventually going to try this! :)
Will probably take me a couple of weeks to print though :)
That's pretty neat. If you had a regular pendulum, you could get more accurate timing with a sliding weight to help adjust the escapement period. Looks like this one uses a balance wheel, so the method of correcting that doesn't seem so obvious. (Maybe an adjustable friction brake perhaps?)
Friction has not much influence on the timing. The combination of spring strength and the mass distribution from the balance wheel are relevant: en.wikipedia.org/wiki/Balance_wheel#Period_of_oscillation
On some watches I've looked at, they seem to have a rotatable lever thingy to alter the effective working length of the balance-wheel spring ??
mount slowly.I HAVE made all the pieces but you too quickly
Very nicely done Christoph! It's also very beautiful. I'm going to be starting a repository for 3D printed parts. Just building the site now. www.3dMP.com. I would like to buy your design and feature it on my website. I will also pay you a commission or royalty for each clock assembly file that gets sold. Your thoughts?
Your a fucking MORon Trying to sell STL files! Piece of shit! Its for free on Thingerverse! your page is fake! Stop trying to come off as some 3d printing drug dealer NO ONE PAYS FOR STL files and if you do your a fucking Moron! its all Opensource!
My anchor mechanism does not start :(
Hi Christoph. What model of 3D printer you used for the clock parts?
This is probably the coolest thing I have seen 3D printed. And you did a great job putting the video together. Thanks so much for sharing. What are the chances a novice 3D printer could replicate the clock?
Great project! Very good to learn how a clock mechanism functions.
Beautiful. Thank you for sharing
Superb! Thank you so much for sharing!
very nice and interesting model. Nice job. Congrats.
All this print time work..no...way to work this...impossible to work..
Great design. I have a few parts printed currently. What size(s) of rod or wire did you use for the gears?
1.5mm for the balance wheel, 2mm for the escapement, 3mm for the rest. I recommend to drill the gears with 0.1mm larger diameter.