Making a Carved Chisel Rack From White Oak, Dave Foss Colab

HTML-код
- Опубликовано: 10 сен 2024
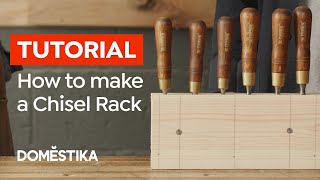
- Dave from Dave's woodworks and I both made Chisel racks. I made mine with all hand tools and he made his with power tools so you could see two different methods for the same thing.
If you want to see his video here is the link.
• chisel rack,collab wit...
Patreon Supporters:
Patrick Martin - / mrpatrickmartin1985
Help this channel grow Patreon:
/ woodbywright
SUBSCRIBE
www.youtube.co...
You Can find me:
Lumber Jocks: lumberjocks.com...
Instagram: / woodbywright
Facebook: / woodbywright
Beme: WoodByWright
Periscope: @WoodByWright
Website: WoodByWright.com
Patreon: / woodbywright
Personal Vlog
/ @jamesloyalwright6544
Wright Flyer: Design and build an airplane from scratch
/ @wrightflyer1566
Acoustic Guitar 1 by Audionautix is licensed under a Creative Commons Attribution license (creativecommon...)
Artist: audionautix.com/


You Sir are a true craftsman. Not only do you make projects anyone would be proud to own and use, You also share your knowledge with others. You explain what you do very clearly and you are easy to understand. Thank you for showing what a true craftsman is. There aren't too many like you around any more.
+christopher dustin you are too kind. Thanks for all the encouraging words. They really mean a lot.
Well I'm54 years old and I remember watching my granddad work with his hands he would take the time to explain what what he was doing to anyone who asked and was willing to listen. He would take time to teach them as well. I remember him saying anyone can make things. But only a true craftsman will take the time to teach another how to build something. And that something will last a life time.
So watching your videos i see you fullfilling what my granddad use to say. You are a true craftsman.
I think I would like your granddad! it really is my goal to share the joy of hand tools with anyone I can. thanks for the encouragement!
I had not thought about hiding the tips but you make a good case for that design. You are having way 2 much fun. Thanks
LOL thanks! after using it for a while I am happy with it. I have made two more locations for it to go in the shop. thanks for watching.
Every time I watch your videos, I think to myself... I LOVE THIS!!!! Thanks.
Thanks Michael! that means a lot!
This turned out great. I really like how you don't use any powertools.
Even the resawing with a bow saw. You just don't ever see that anymore
+Lennard Hartman thanks. That is one of my favorite parts of the project.
This is one of the best looking chisel holder I've seen. Awesome job!!!
thanks. I love giving a simple tool a little something extra!
Nicest chisel rack I've ever seen. Gorgeous man. Thanks for the inspiration.
+Jared Hughett thanks Jared! Love this thing!
Thanks for sharing that
That turned out great! I like that you mention how long certain tasks take you to complete. It makes projects seem less daunting. Mounting idea was very clever also.
thanks! I try to put in that info when I remember it. but I am forgetful.
Very nice chisel rack James! Really like the way you mounted it.
thanks! I think I am going to make other mounts for other places so I can use the chisels at other stations.
Really nice job
Looks awesome!!! Thanks to Dave's woodworks for suggesting your video and channel. Much respect for the use of all hand tools.
Thanks! Glad to have you here! I love working with dave on this. Ya Hand tools
i really dig your work because you keep it simple and just kinda go with it... what do you mean imperfection... that's character! your channel is therapeutic for me in the literal sense.
+The Cordless Carpenter thank you! That means a lot.
Turned out great, James. You came to mind today while I was at a roadside sale. I picked up a Stanley No. 4 and 5 that were in decent shape, but need a little cleaning up. I knew that I could get it done by watching some of your videos. Just thought I'd share.
Sweet man I am looking forward to what you have. if you have any questions feel free to contact me any time! I would love to help out any way I can.
Wood By Wright Cool. I'll keep that in mind once I crack them open and start cleaning them up.
looking forward to seeing your work!
Very nice and very smart, I like this setup very much.
+Robert Brunston thanks! I have been enjoying using it.
Very well done, and great design. I will give this a try for my carving tools, thanks.
Sweet. looing forward to seeing it.
awesome, i mounted my chisel and hand tool rack on the side of my bench. it didnt live there long.
I bet. I am thinking of making other mounting slots so that is can easily move to a different uses.
I came here form the French cleat video for this rack. I am a subscriber and really enjoy your videos. They're informative and inspiring. I think I'm gonna build my son a bench when I'm done with mine. The ONLY comment I ever have about your videos is that there is NO T IN ACROSS! ARG
Thanks Andy. I love having the kids in the shop at their bench. it was a lot of fun letting them help make it. what do you mean? of course there is a T at the end LOL
WOW! Somebody famous replied to me! And he called me by my name. I hope I'm not coming acrosst as sarcastic (okay, that was) but I really do think it's cool that you replied to me. Thanks.
Very nice job. Thanks for sharing.
thanks! we both had fun making them.
Looks lovely and works great... I wouldn't mind trying it myself one day - Plus, you get bonus points for doing it with hand tools - That's real woodworking!!
I was wondering why you had the tips enclosed but you even answered that, around the 7:20 mark.
Top stuff, fella!!
Thanks love working with my hand tools!
Awesome
nice, I like the medieval design
+7AllWorks “le Cévenol” _ thank you. I am going to have to do that more.
Hand tool woodwork is all over the head, without it not to manage. For the video a Like!
thanks. It is a joy for me to make things with hand tools and to make these videos.
I dont remember seeing this video, good job I really like it.
thanks! I love that rack.
That turned out even better than I thought James. I got to see it after u resawed it and I'm telling you its great. The carving really made it pop. nice job
+Opa's Workshop thanks. Carving really is a fun finish.
your carving in continuous evolution, nice result. nice de idea of use the same chisel that will be housed in the house, and so good idea the mounting system
Thanks! this was a fun project that solved several solutions at once.
Excellent video James! That is a slick idea to have that removable from the bench. Nice work.
Thanks. I am thinking of making other hanging points around the shop like the other end of the bench. lol
+Wood By Wright lol! I'll be making slips to cover the chisel edges soon as well, for the same reasons.
fun! that should be an interesting little build!
Looks great!
+The Russian Woodworker thanks! We both had fun making them!
Really like this! I think I’ll have to make one for my shop.
Thanks William looking forward to seeing what you make.
looks good James turned out really well I might have to copy of this idea for my new tool cabinet
thanks! I love being able to move it around. I have thought of putting holders for it it at the other end of the bench.
+Wood By Wright thatd be a good idea- because that way if you're at the end of the bench you just pop it in place if need be..really like the carving i wish..lol
Interesting, useful and clear. Thanks.
thanks, My pleasure.
Hey James, not only functional but looks great. The carving is looking great. Getting better.
Thanks. I am having a lot of fun playing with the carving. hoping to do a lot more.
Excellent, good job...
Cheers...
+Adam Quincey thanks. Glad you like it.
glad I found this, great job
thanks. did you see the video where I put in your planing stop?
No I'll go look for it
here you go. ruclips.net/video/KefwKuvJEb4/видео.html
Great design and execution again. My project for tomorrow 😀
Sweet! have fun with it!
Did this today using macrocarpa, which works and looks like maple. No carving, as mine would spoil it. I angled it forward slightly for easy access in my new tool cabinet based on your other video. It preserves the blade better than the dangling on a rack system, and is safer. The cabinet really has smoothed out my accessing my most commonly used tools. It has planes, saws in a till, screwdrivers and chisels. I have yet to add doors, but I like to get on more than beautifying the workshop, so they will be done in a couple of weeks time. Thanks for your videos. You tube is a great medium.
another beautiful build!
thanks. I am glad to get it off my list!
Very cool. Again, love the carvings. You really went medieval on that chisel rack! HaHa.
LOL ya. I really want to play around with a few medieval ideas in some of the upcoming designs. I enjoy it.
Great design and build!
Thanks!
I love that it's removable, very cool idea. Mine is currently screwed to my wall and I do often wonder "what if I wanna move that in the future?", which I probably will! Please keep it up!
thanks. I have thought of setting up other mounting locations so I can move the whole rack as needed.
Sounds like a good plan, would be interesting to see that.
Thats beautiful James!!!
thanks! I just got your sticker today! looking forward to putting it on the wall tomorrow. you do have one of mine, Right?
Wood By Wright Oh great you got it, i dont actually.. we did talk about it once but i forgot to send you my address lol. if u already threw out the envelope let me know : )
Sweet! I just put it in the mail box!
Wood By Wright your quick my friend! Thank you!
Very nice project James!
thanks Donny! this was a fun one.
Great video and great collaboration, it's nice to see do one with a fairly new RUclipsr. Class act.
+Lyle Kobberstad thanks. I am always open for fun colab ideas.
looks great!
thanks!
That looks very cool James, i like it can be moved if needed.
Thanks for sharing.
Chuck
thanks! I have thought of putting other mounting locations so I can have chisels at the other end of the bench.
I am so glad I found your channel, keep it up!
+hizo64HH thank you. I am just having fun. I will.
So much dank ness.
The best kind
Nice work James!
Thanks Fred. I love this rack!
3 to 4 minutes per groove? So that will be 3 to 4 hours for me then! This one is definitely on my to do list, I want mine to fit on the back of my bench which is against a wall.
Lol. Sounds like a fun one for you man!
Great job, love it! Now make one for holding various types of rasps. Widen that gap and you can put both units in the same slot................ :) Steve
you are reading my mind. I have already resawed the boards for files and rasps.
Loved it, hope you dont mind me borrowing this. I love the idea that its removable
Go for it! I would love to see what you come up with! by the way love your image. I have quite a few hours in a Cub, but not as many as the champ.
turned out great james..
Thanks man. same to you! I love your wood choice!
Looks fantastic!! great carvings too :)
+Cactus! workshop thanks. It was fun to put together.
I found you from Dave's Woodworks and I'm glad I did! Subscribed!
thanks! we had fun on that one!
That is so nice! The symbols remind me of apotropaic marks (symbols scratched into buildings to ward off witches!)
cool project. medieval carving looks very nice. Circles going with and across the woodgrain looks to be difficult free hand. Are there such things as a cutting/blade compass to make a crisp knifewall for circles?
My instinct tells me not to rest the tips of the chisels against a wood surface but maybe that doesn't really matter (obviously they can cut right through wood so the wood isn't going to damage them). Did you give any thought to putting something like a rubber stop in the bottom of each holder? Probably I'm over-thinking it!
Ya that one catches a lot of people. But it causes no problem at all.
Loved it! You put me to shame with your cool rack. I keep my chisels on that "modern" strip magnet! :( And I consider myself an antique woodworking tool lover/collector after this...:))
+CrazyRussianWoodShop I was playing around with a mag idea but went with this in the end. Thanks again!
I use titebond II. And some squeezed glue in the "chisel pocket" makes the chisel rust. Anyway to prevent this?
Thanks.
It should not affect the chisel once it cures. The most common problem people have is doing this with green wood or pine from the lumber yard. Or if they are stored in a space with large temperature swings. Those can all hold moisture near the chisel.
awesome
thanks Eric. and happy Thanksgiving!
And Happy Thanksgiving to you and your family hope you have a great holiday
nice that's my next job to do
sweet! sounds like fun!
Is it ok to keep the bottom part and ok for the chisel to hit the bottom every time you accidentally drop it down the rack? Thank you so much for your video
Yep. There's no problem there at all. It's no different from hitting the bottom of a mortise. But in that case you actually jam it down in by hitting with a mallet.
@@WoodByWright gotcha! Thanks! My chisel are getting more and more I need to make one.. give me an idea
Great Idea...thanks for sharing.
on a side note , i'm not the type to tell you what to do in ur own shop but...please wear capped toed shoes....when something drops...not pleasant.
please don't take it the wrong way...love your videos!
+nmssis lol. I am going to be making some clogs here soon to fix that problem.
Wood By Wright hahaha...be sure to show us a step or two
Oh ya. I have been wanting to do this for a wile now.
Phenomenal idea/project! do the chisels dull faster by bottoming out on the oak?
thanks. not really. because there is no force on them there is little or no noticeable difference. Also, the first thing I do is strop them when I go to use one. great question I wish I would have thought of it when I was doing the voice over would have made great info.
Nice rack! Another idea I may steal when I build a proper work bench.
One question.....Does the BLO you use have metallic dryers in it? If it does you may want to consider using gloves when applying it. There are still a very few brands that do not contain metallic dryers that are safe for skin contact.
+Jim Dockrell (Watertone) thanks. My BLO is made by a friend so it is pure.
That is awesome. I should have figured you would come up with a cool solution.
I did something similar to this recently using redwood and just discovered rust on my chisels...have you had any problems with rust on yours since storing yours this way? Maybe it is because of the wood I used?
No fun. If there is rust from contact with the wood that means the wood is still wet. If it is store bought wood it can still be drying for another year after you bring it home as it reaches the same moisture level as the house. if it is old wood than I do not now what would be getting water in there other then if there are large temperature swings in the shop it could cause condensation on the cold steel. but that would be kind of wild.
@@WoodByWright it was store bought...thanks so much for your thoughtful response!
Apparently redwood is high in tannins which can cause corrosion. This is pretty academic but does show that the choice of wood can make a difference www.fpl.fs.fed.us/documnts/pdf2011/fpl_2011_zelinka003.pdf. Maybe I will try again with some other wood!
Yup redwoods have about the same amount of tannin as oak (what is used here) but both need water to interact with the steel. It is actually interesting to play with when you get some water and steel you can make eather board turn black because of the reaction with the tannin
Do you really need to have a customized slot for each chisel, or could you just have one long slot, nearly the length of the piece, and put all the chisels in that slot?
you can do that, but then the chisels can fall over or get tipped out. plus having a custom slot for each one makes them go back in the same slot every time, making it easier and quicker to find them when all have the same handle.
Nice work.
I think you might have more chisels than that ...
+Willem Kossen I think you are right. Lol.
I was just about to send you a nice set of Sorby chisels but now you don't seem to have any room for them! Lol ;-)
+hernanc lol there is never enough room in tool storage.
you may have said this, and I missed it, but, I assume the 'channels' you created are slightly deeper than the blade length...so your cutting edge isn't bouncing against the bottom of the channel. This would mean it hangs from the shoulder of the handle, I'm assuming. I'm thinking of doing something similar, but, with only 1-2" of channel, and just an open space below. The open area won't be exposed, but, the maine part of the holder will only be 1-2" deep. Plus something ornamental, to protect little fingers. (Okay, my little fingers! My kids are safer than me....)
thanks! they are closed on the bottom. They are meant to go into wood and it won't harm the chisel.
Wood By Wright figured as much...but, wasn't sure if did something special to protect the tips. I'm looking for ideas on that, in case I go 'full lenght' on the cahnnels.... Love your videos and work, sir! Thanks for your generosity in sharing....
Well done, James. How did you keep the glue squeeze out from getting into the chisel "compartments" ?
I kept the glue light as there was a lot of surface for contact, and I designed it so the flat of the chisel was away from the glue joint so the little bit of glue squeeze out would fit around the champhers of the chisel. but I am sure over time it will get chipped out y the chisels.
Thanks.
Great video. Any issues with glue creeping into the channels?
+schnooder thanks. As long as you don't our in too much ther is no problem the chisel will soon clean it out anyway.
Sweet Design 👍👍
But Why do you have a Google Cardboard Thingy first on your Workbench and than on your Sharpening Station ?
you might have to find out! do you use it?
+Wood By Wright Yep I have one but don't really use it.
I somehow got it for free 😂
Where did you get your chisels from and what brand are they.
+Brian Smith mine are from all over. My go to Chisels are from Aldi. I also have a set from Harbor Freight. Also have alot of antiques. And most of my carving chisels are two cherries.
I couldn't help but laugh about the Harbor Freight chisels. I'm still trying to figure if I'll be on earth long enough to ever get them true ;) Thank goodness the wife gave me the blessings to acquire a shiny new set of Wood River socket chisels, which are a D-R-E-A-M to use btw. As for the HF chisels, I refuse to admit defeat, so I'll continue my nightly ritual of grinding away at them on my granite block while I watch your videos. If I die before I finish them, I'm willing them to you hahaha
James, great work. Where are you from? I see you wearing Packer gear.
thanks! I am not from anywhere as I have lived in 9 states and moved 25 times, but I currently live in northern IL
Awesome. I'm in South Milwaukee, WI. My sister lives in Huntley, IL. We're out there at least once a month. I'm looking forward to seeing more of your work.
Nice idea - and cool carvings! But man! what is UP with people applying boiled linseed oil with their fingers! lol this is like my biggest pet peeve right now! Is this just because you dont want to dirty up a rag and then run the risk of that spontaneous combustion that boiled linseed oil can cause curing its curing process on things like paper towels/rags?
At least wear a rubber/nitrile glove! lol Good work tho! looks awesome
With Homemade BLO there is no problem with using your fingers. And it feels really good. the rag can not apply as much as my hands can. Just no reason to pull a rag out for it.
interesting - im going to give it a try lol ;)
cool project. medieval carving looks very nice. Circles going with and across the woodgrain looks to be difficult free hand. Are there such things as a cutting/blade compass to make a crisp knifewall for circles?
I find going across the grain easier as there is less a tendency to slip and go too far. just have to make sure the gouge is sharp. I am sure you could make a compass to mount the gauge on but that would take the fun out of it. LOL
It's rustic handmade with character :-)
I ment more a compass to create a knife wall. I remember there being a very skilled female carver I saw on Highland Woodworking (no offence).
oh yes Marry May Love watching her stuff. yes they have a marking compas that does just that.