I watched this video a week or two ago. I went out and got some cans and I made one. It works awesome! I took it ice fishing and I cooked on it in my cast-iron pan and it was great for keeping my hands warm. Thanks for this awesome video and the good information!
Pete, when I used the one I made I was ice fishing and it was a little bit windy so I burned it inside of a very large old stock pot the large pot I had and that also worked as a holder for my cast iron pan. I used it another time and I just used a metal stand for a potted plant
Thank You for the tip re the fit of the grate to a oné gallon can ; I noticed this when I'd built a couple of larger size stoves and was able to use a "discarded" grate I'd kept for when the family went camping. A lot of folks may not know this fact, so I'm sure a few will "go" with making the one gallon stove than the smaller one, it they have room to pack it when going camping.
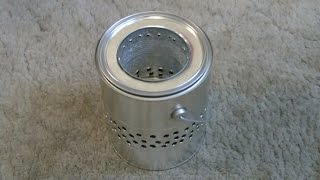
Any can that fits inside the one gallon paint can. Try different sizes to see what works best. The one gallon paint can is used mainly for one reason, the circular stove grate fits perfectly in the paint can lid groove
Dude I just spent $29.99 for the dura flame 5.5” pit lol you spent $4.08 for basically the same thing😂 gonna try this and have multiple for the campsite. Make good gifts for fellow campers!
I am truly impressed. Great job!!! I have made a few stoves and bush pots, but I just stumbled on these wood stoves. You have truly organized, improvised, and overcome. Nice job. Hope you don't mind but I believe I will make one of these for my survival pack. I believe that if you could arrange it, these would sell like....well you know.
you could heat the bigger can and freeze the smaller one, then fit the smaller inside and get a more permanent join once they both acclimatise. You might only get one shot at this so be quick before they cool and warm.
Nice! I made some of these a couple of years ago, the work well and were done in the same way. I just punched a hole in the can and used the food as well. And You have the advatage of a closed bottom, so no burning debris can fall out! Regards, Jan
On the second can, rather than deal with the tape, centre punch and drilling...if you open the can first, you can use a regular hand held paper punch* to punch each hole ..these old paper punchs work great for this!
Good instructions. This could be a game changer if one had a need for a small stove and no way to buy one. Resourcing cans is easier than finding any other stove material. An ice pick in your possession is useful too; and a person could double the small holes to create the best airflow.-> ( if you only had an icepick, nail, or an awl on a survivor knife)
Couple of ideas/tips: Use one of those can openers that cuts into the side of the rolled bead (they come in both hand and electric models). This leaves the lids able to sit down a bit inside their respective recesses with a good air seal, remaining easily removable when needed. This allows you to make a better stove, re-purpose trash (the cans), and not waste food. Cut the hole as shown in the larger can's lid, fit the smaller can into the hole, and now you have a fire box with an attached sealing ring at the top, that can be easily lifted out of the larger can for modifying the stove with extra holes, dumping ash or whatever reason. Do the same thing to the smaller one's lid, cutting a large hole leaving about 1/2" or so inside the edge, and you have a flame ring that builds a bit of compression above the 'jets' and helps 'nozzle' the flame toward the center. Both lids will sit perfectly inside their respective cans with a good air seal, without sliding side to side, because of how the can opener cuts them free.
I've made three so far of varying sizes. the latest uses a one gallon paint tin with 900g baby milk powder internal. tried it last night and it works great ! {on my youtube channel}
Just made one but haven't tried it yet. Appreciate the video bud. The only thing I did different is taking the big can lid off to be able to remove the small can to clean out the big can. Other than that went by your video. Thanks alot!
I love this type of thing, and the top of yours look very professional, like from a factory. I think doing this with a combination of a rocket stove would really work well. That way you can cook on it and get no smoke. The rocket stoves are supposed to be smokeless, but I really like this inner and outer can style. Can we build a better rocket stove like this?
heat big can it gets bigger, freeze smaller can it gets smaller, then they both reach an equal temperature and the smaller can expands and the bigger can contracts forming a permanent join.
I've used it about 15-20 times. Still holding up fine. But I have noticed that ash builds up in the bottom, so it's handy to keep some tongs handy to tap it out every so often.
Thing is, after all that work, you're gonna get bits of ash in between the two cans at the bottom. Will that affect its performance during the use? You can just shake it out after use but it's during that could be an issue.
What are you using for fuel? If it's charcoal or wood then the ashes will drop down to the lower can making clean-out perhaps difficult. Smdall pieces of wood/charcoal could get stuck in the interior cans' holes.
I know I'm late to this, but isn't the point of the holes on the bottom of the outside can and the holes at the top of the inner can supposed to warm the air and use it to re-burn gases at the top? with the holes drilled in the bottom of the inner can most of the air being drawn in from the bottom will be sucked directly into the fire. Instead of drilling holes I'd put in some sort of wire grate, this will also help keep the ash in the inner can only and make it a bit easier to clean.
Paint cans seem better for this cuz the metal is usually thicker and should last longer. And not having those horizonal ridges on the sides thy allow for a little better airflow, though not much. You could also use some high temperature paint (like those for grills) and that should help preserve it from rust and somewhat from the heat
There's also this gent on RUclips, heath, who made a whole series on these food can wood gasifier stoves, explaining the science behind it and going over almost every detail of them scientifically to find what works best.
For the sizes that are available to me locally, the size difference between 1/2 pint and 1 pint seem like it might be too big of an inner channel. But you might be on to something.
Good evening. I'm just wondering what the recommended or suggested gap between the cans should be? I'd like to maximize the burn can but I want to make sure I don't restrict the air flow. Any suggestions?
its just best to keep an even spacing around the perimeter of the can. Just know that bigger holes means less holes to drill, but needs even spacing all around. Don't wanna go crazy big with the holes cause then it'd probably wouldn't work efficiently. But you do need to keep in mind the size of the project too.
So the sizing of paint cans, I feel like the inner wall would be too spacious. However, I'm working on making one with cooking pots and lids. Still collecting and comparing.


I watched this video a week or two ago. I went out and got some cans and I made one. It works awesome! I took it ice fishing and I cooked on it in my cast-iron pan and it was great for keeping my hands warm. Thanks for this awesome video and the good information!
Yeah, for what it is, it works pretty well! Glad to hear it 👍
What did you use as a pot stand?
Pete, when I used the one I made I was ice fishing and it was a little bit windy so I burned it inside of a very large old stock pot the large pot I had and that also worked as a holder for my cast iron pan. I used it another time and I just used a metal stand for a potted plant
I plan to make one out of a 1 gallon paint can. Every circular stovetop burner grate I have found fits a 1 gallon paint can perfectly
Let us know how it turns out 👍
Thank You for the tip re the fit of the grate to a oné gallon can ; I noticed this when I'd built a couple of larger size stoves and was able to use a "discarded" grate I'd kept for when the family went camping.
A lot of folks may not know this fact, so I'm sure a few will "go" with making the one gallon stove than the smaller one, it they have room to pack it when going camping.
What can will you use for the inner burn chamber?
Any can that fits inside the one gallon paint can. Try different sizes to see what works best.
The one gallon paint can is used mainly for one reason, the circular stove grate fits perfectly in the paint can lid groove
They make can openers that will take the lid off cleanly at the seal, so you can re-use the lid. Handy for smothering the fire.
Did this but without the dremel. I took it straight outside to test it out and it works like a charm. Awesome instructional video man
Thanks man, for feeding sticks, it trucks along.
thank you, for being clear, and using simple cheap things for a great thing!
Dude I just spent $29.99 for the dura flame 5.5” pit lol you spent $4.08 for basically the same thing😂 gonna try this and have multiple for the campsite. Make good gifts for fellow campers!
the $26 you spent is for aesthetic
@@JackRoyal82 honestly it serves its purpose. I was just being cheap😂
Very clear instructions. I made one with a paint can (outer part) but basically followed what you put down. Thank you very much!
I am truly impressed. Great job!!! I have made a few stoves and bush pots, but I just stumbled on these wood stoves. You have truly organized, improvised, and overcome. Nice job. Hope you don't mind but I believe I will make one of these for my survival pack. I believe that if you could arrange it, these would sell like....well you know.
Life lesson sometimes sometimes you just have to hit your problem with a brick
you could heat the bigger can and freeze the smaller one, then fit the smaller inside and get a more permanent join once they both acclimatise. You might only get one shot at this so be quick before they cool and warm.
Nice!
I made some of these a couple of years ago, the work well and were done in the same way.
I just punched a hole in the can and used the food as well.
And You have the advatage of a closed bottom, so no burning debris can fall out!
Regards,
Jan
Nice! That worked out much better than I expected. I really like the tape template you added for uniform holes as well.
On the second can, rather than deal with the tape, centre punch and drilling...if you open the can first, you can use a regular hand held paper punch* to punch each hole ..these old paper punchs work great for this!
Гарна робота, дякую! Добра та Миру!
Beautiful simple build. Thanks.
Good instructions. This could be a game changer if one had a need for a small stove and no way to buy one. Resourcing cans is easier than finding any other stove material.
An ice pick in your possession is useful too; and a person could double the small holes to create the best airflow.-> ( if you only had an icepick, nail, or an awl on a survivor knife)
Great video man! Perfectly executed 👌🏻
I was thinking the same idea out in my head! Glad to see it works
Excellent work ! I can see the second burn from the inner ring of holes.
Great detail on this project. Thanks!
Gotta love American ingenuity. Great job bud.
Very nice. Simple and seems to burn the wood gas pretty well.
Thanks! I learned something along the way, that's it's a gasifier stove. Something new every day..
Couple of ideas/tips: Use one of those can openers that cuts into the side of the rolled bead (they come in both hand and electric models). This leaves the lids able to sit down a bit inside their respective recesses with a good air seal, remaining easily removable when needed. This allows you to make a better stove, re-purpose trash (the cans), and not waste food.
Cut the hole as shown in the larger can's lid, fit the smaller can into the hole, and now you have a fire box with an attached sealing ring at the top, that can be easily lifted out of the larger can for modifying the stove with extra holes, dumping ash or whatever reason.
Do the same thing to the smaller one's lid, cutting a large hole leaving about 1/2" or so inside the edge, and you have a flame ring that builds a bit of compression above the 'jets' and helps 'nozzle' the flame toward the center.
Both lids will sit perfectly inside their respective cans with a good air seal, without sliding side to side, because of how the can opener cuts them free.
Pretty cool, man. Good work.
Nice work……gotta try it! Thanks
Excellent tutorial bro. 👍👏✌️
Thanks ✌️
Dw5600 gshock...and cool diy firepit. Great video!!!
I noticed that too. Cheers fellow watch nerd!
Thanks for the love!
Awesome DIY
Not that im going to do this, but i enjoyed this video so much. Thank you sir
Good build. Let's see you make the paint can stove. Like to see them working side by side.
I'm torn on the sizes for paint cans, like a bigger gap in the inner wall...I'm leaning more towards cooking pots w/lids for the next one.
Empty cans and fill with water, freeze it then pop dimples.
Thats a brilliant idea and no food wasted.
I've made three so far of varying sizes. the latest uses a one gallon paint tin with 900g baby milk powder internal. tried it last night and it works great ! {on my youtube channel}
That beats the $80 one for sure. Nice build.
Out here tryn to save a buck
Love your watch!
Thanks! Appreciate the love!
Just made one but haven't tried it yet. Appreciate the video bud. The only thing I did different is taking the big can lid off to be able to remove the small can to clean out the big can. Other than that went by your video. Thanks alot!
Awesome! Takes a second to get the feel for how many sticks, how often...but it gets going!
Nice details. This would be a great prep item. Saving money and can be built with minimal tools out of commonly available parts.
For sure. I mean a punch and a file, it would just take a bit more effort.
Sorta pushing the edge over with a screwdriver might be called "burnishing"
Thanks, I just guessed at what that would be called. Knowledge is power 👍
Great idea brother I will try
Let us know how it goes! 👍
I love this type of thing, and the top of yours look very professional, like from a factory.
I think doing this with a combination of a rocket stove would really work well. That way you can cook on it and get no smoke. The rocket stoves are supposed to be smokeless, but I really like this inner and outer can style. Can we build a better rocket stove like this?
This is amazing I did the same video 4 years ago and only got 1K views Well done
Yeah. I gotta build one now.
I love making these things
I've been waiting for an extremely in depth review of this tent! Thank you. Most reviews are more accurately unboxing videos.
That’s awesome thank you
No problem
Thanks for sharing.
you could use a round file to push the lip in a bit too. might be a little easier. Just a thought.
My thought while watching him go over it several times.
Your center punch should be adjustable. You can adjust it for different materials. The pressure needed to activate the punch is adjustable.
If you have a lady in the home....she gonna pissed if she sees all those metal shavings...😂😂😂
Nice job.
heat big can it gets bigger, freeze smaller can it gets smaller, then they both reach an equal temperature and the smaller can expands and the bigger can contracts forming a permanent join.
Very cool!
Good project
For how long it can light up. Because I want to make it for my room heat in winter season at the night .
nice job
So cool! No smokes!
What size drill bits did you use? Or what size would you recommend?
I don’t notice the type of metal but if it’s possible to get that can hot enough it could melt.
The steel won't melt. It will burn, limiting the life of the stove.
Any metal can melt...mine hasn't, yet.
Thumbs up for the idea. Thumbs down for the food waste
perfect flame
Nice work. You could spend months making so many versions of these things. I think I will!
For sure! It's a very pliable design! 👍
quite good
Very cool, roughly how many times have you used it and is it still holding up?
I've used it about 15-20 times. Still holding up fine. But I have noticed that ash builds up in the bottom, so it's handy to keep some tongs handy to tap it out every so often.
4:12 "Do It Yourself Projects with Cousin Itt."
It looks like it needs more bottom air holes for a stronger flame.
Very nice but please re-post the yams with tomato sauce recipe. I guess I missed it.
Use a car exhaust high temp sealant to ensure air tightness at the top end connection.
Excellent! Thank you!
Thing is, after all that work, you're gonna get bits of ash in between the two cans at the bottom. Will that affect its performance during the use?
You can just shake it out after use but it's during that could be an issue.
Great job, I also made a video on how to build a stove ( different design )
What are you using for fuel? If it's charcoal or wood then the ashes will drop down to the lower can making clean-out perhaps difficult. Smdall pieces of wood/charcoal could get stuck in the interior cans' holes.
After it's unable to be cleaned, throw it away and make a new one. It's 10 min of work and $4 in parts.
well done
Question. If there are holes in the bottom won't the ash fall in there and then can't get out?
You can tap the ashes out through the larger vent holes along the bottom of the outer can.
They collect in the bottom...so prolonged burns, it helps to keep some tongs handy to tap the ashes out.
Are those aluminum or steel?
I know I'm late to this, but isn't the point of the holes on the bottom of the outside can and the holes at the top of the inner can supposed to warm the air and use it to re-burn gases at the top? with the holes drilled in the bottom of the inner can most of the air being drawn in from the bottom will be sucked directly into the fire. Instead of drilling holes I'd put in some sort of wire grate, this will also help keep the ash in the inner can only and make it a bit easier to clean.
you need both. primary combustion, then secondary combustion.
I guess you could size this up to a couple of 44 gal drums.. cut one side ways to make it fit inside the other one.
Paint cans seem better for this cuz the metal is usually thicker and should last longer. And not having those horizonal ridges on the sides thy allow for a little better airflow, though not much.
You could also use some high temperature paint (like those for grills) and that should help preserve it from rust and somewhat from the heat
There's also this gent on RUclips, heath, who made a whole series on these food can wood gasifier stoves, explaining the science behind it and going over almost every detail of them scientifically to find what works best.
Depends on what metal the cans are
@@yummyherbicide7296 i only use cans made of vibranium!
@@pedroclaro7822 what’s his channel? I’d like to make a paint can one.
For the sizes that are available to me locally, the size difference between 1/2 pint and 1 pint seem like it might be too big of an inner channel. But you might be on to something.
Uh, your couple and my couple seem to differ , widely. 😂🎉
Best 11:04 minutes I have spent on RUclips. Well maybe.
Well just to be nominated is such an honor lol!
I didn't quite hear what you said did you say Squeek squeek or did you say squeek Squeek?
maybe a 45° slant tube to feed twigs ?
Noice!
Nice Casio watch
this is what it looks like when they take metal shop out of the high school curriculum.
Lol! This one got the guys rolling! A welding machine is on my wishlist.
what ya gonna do if you dont have a can?
Good evening. I'm just wondering what the recommended or suggested gap between the cans should be? I'd like to maximize the burn can but I want to make sure I don't restrict the air flow. Any suggestions?
its just best to keep an even spacing around the perimeter of the can. Just know that bigger holes means less holes to drill, but needs even spacing all around. Don't wanna go crazy big with the holes cause then it'd probably wouldn't work efficiently. But you do need to keep in mind the size of the project too.
Does what he says with the tins
Next step is to add a heat deflector. I'm sure you have thought about it. Please make a video.
Burn the table down haha. Thanks, it's a great idea :-)
NAME OF THE EQUIPMENT USED ????)
4 bucks for the cans plus what it cost for the tools to make it.
This is you.
NIce work! But using it on a wooden table ...
Great video, I just use my 20 dollar Amazon knock offs because I don’t get the skills
Where do you see them for $20? What’s the brand name?
Whatever works
Try with paint cans.
So the sizing of paint cans, I feel like the inner wall would be too spacious. However, I'm working on making one with cooking pots and lids. Still collecting and comparing.
You never showed what the fuel source was? What do you put in it to burn?
There's a pile of sticks next to it while it going.
Unleaded Petro
Sticks and leaves. Anything that rests below the inner ring of holes at the top, should remain mostly smokeless.
awesome
Thanks 👍
My grocery store didn’t have bricks ☹️
What are you burning inside of it?
Wood. It's a wood gasifier stove.
So what fuel is used?
Plutonium
milions of this stoves are on YT..
Yep, means they're worth trying 👍