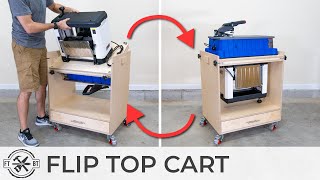
How To Build A DIY Flip Top Tool Stand Workstation // Woodworking Shop Project

HTML-код
- Опубликовано: 6 окт 2024
- DIY Flip Top Tool Stand plans : gumroad.com/a/... // Check out Rockler's awesome tools and accessories here: bit.ly/rocklerc... // Check out Festool's amazing power tools here: bit.ly/festoold...
I built this DIY flip top tool stand and workstation based on plans from my buddy Brad at Fix This Build That (gumroad.com/a/.... This stand holds my oscillating belt sander and hollow chisel mortiser (amzn.to/2IjLtv1), but it's great for almost any bench top tool, including lunchbox planers, sanders, drill presses, etc.
👕 Get your Build It Yourself merch! bit.ly/BuildItY...
📦 Materials Used On The (affiliate):
(1) 4’x8′ 3/4″ Plywood
(2) 8′ 1×2 Poplar/Pine
1-1/4″ pocket hole screws : amzn.to/2zw31RQ
1-1/4″ wood screws : amzn.to/2Dw7WWT
3/4″ wood screws : amzn.to/2OkT81D
3 ½″ lag screws : amzn.to/2OcKmCt
(4) 5/16″ x 3-1/4″ eye bolt : amzn.to/2Dvv0or
(4) 5/16″ fender washers : amzn.to/2IiyKs9
(4) 5/16″ threaded knobs : www.rockler.co...
(1) 3′ x 3/4″ steel tube : amzn.to/2DtFtkm
(4) 3/8″ x 1-1/2″ hex bolt : amzn.to/2OcSjry
(8) 3/8″ flat washers : amzn.to/2ObUL1h
(4) 3/8″ nuts : amzn.to/2xOs7sY
(4) 3″ locking casters : www.rockler.co...
(1) pair 20″ full extension drawer slides : www.rockler.co...
🛠 Tools Used On The (affiliate):
Glue Application Kit : amzn.to/2wIcmmR
Bench Cookies : amzn.to/2PCt7HZ
Table Saw : amzn.to/2LZI5pj
Festool Kapex Miter Saw : bit.ly/festoold...
Festool CXS Cordless Drill : amzn.to/2wOFM2S
Festool PDC 18/4 Cordless Drill : amzn.to/2M09OWU
Festool ETS EC 150/5 Sander : amzn.to/2oHOmg7
Pocket Hole Jig : amzn.to/2OcfD5p
Arrow Pin Nailer : amzn.to/2IhO9Jr
Parallel Clamps : amzn.to/2OjcdRs
Woodpecker's Square : amzn.to/2Dyspu5
Starett Combination Square : amzn.to/2DztGRB
Amana Countersink Bit : amzn.to/2DwsHS5
📹 SUBSCRIBE : goo.gl/V5gcNJ
💰 SUPPORT ME : goo.gl/pmmpTQ
📲 FOLLOW CRAFTED WORKSHOP!
INSTAGRAM: / craftedworkshop
FACEBOOK: / craftedworkshop
TWITTER: / craftedworkshop
PINTEREST: / craftedworkshop


Great work on this one, Johnny! Glad you dig the plans, it's such an awesome space saver. If anyone wants the plans with detailed cut list to get this all out of one sheet then hit that link in his description!!
Looks like lots of folks have been buying the plans, it’s an awesome addition to most any shop!
What does is mean imperial measurement?
hey I would say sideways support is an issue on this table, yet easily fixed by a cross structure which you'd have to assemble and dissassemble everytime you'd flip the station, if such stability would be desirable
I just don't see the thumbs down on this one. Space saver, nice looking, has drawers, two tools. Excellent build
I build one of these recently from Brad's plans as well, but I made one modification. I put some small springs on each one of the locking knobs before the washer so every time i loosen it the washer stays close to the knob and I dont have to mess with them while trying to lock the platform back in. Helped out a lot. Great job on the build as well!
Good idea!
Brett, do you have any pics or vid showing how this works? in the planning phase of a modified build!
@@aussiefreediver I do not, but I am working on setting up a channel and putting some videos out. I will see if I can get a picture uploaded for you!
Pretty flipping nice!
What you did there... I see it. :)
Jonny wins the Pun-off!
Berry punny.
🤦🏼♂️
That's such a dope design Johnny!
A very simple flip top table, very cool, easy to build with just a few material.
Thanks for that!
Thanks Sergio!
Great video Johnny! I love mine, and people are always asking me about it. Now I can just refer them to your video for how to build it! That locking mechanism is rad, I just used a sliding bolt latch like the kind you put on a gate but it doesn’t work that great... to much play and it rocks back and forth when I use the planer. I’m going to modify it with your solution.
Thanks man! Brad’s design is really clever and works extremely well. I think the mechanism is from an old Shop Notes, those things are gold!
I built this same stand. I made my knobs out of plywood with a 2" hole saw and T-nuts. For the drawer, I didn't use any slides at all.
Sounds cool!
This is a great build. Someone like me that have limited space in their garage but want things fixed to a stand really appreciate this. Can we get more space saving builds like this?
This is definitely a great build for that kind of thing! We'll see if I come up with anything similar.
Very cool! Now I’m wishing I made one last weekend instead of the rolling stand I built. 🙈
They’re pretty sweet!
Brad's design is fantastic
Definitely!
Such a solid design. Good point about the casters
Yup, Brad did a killer job with it!
Crafted Workshop that Brad... Always fixing this and building that. Just ever ends with that guy.
That's pretty neat. Looks like one more thing to add to my "I need to build one of those" list
Kerja bagus saudara ku..sungguh menginsfirasi banyak orang... terus lah berkarya..
Wow, nice idea !
Thanks!
Very good creativity looks well designed and built.
Thanks Tony!
I made one of these recently. So handy.
For sure!
You could also make a door like, which turns 180 degrees, but you need special hardware for that.
I built this from Brads plans too. Great space saver!
For sure!
Pure genius.
Excellent piece of shop furniture!
Definitely!
Very good job here. Well explained. Bought the plans, need some carts. 1st project turned out nice. Adjusted the drawer height to accommodate a taller tool, easy especially working off the plans. Thanks again, keep up the good work.
I've watched a lot of these builds over the years & yours is one of the best! Great job!! I built 2 of these a few years back & they come in very handy indeed.............. :)
Thanks, they are super handy!
Looking really great 👍
That’s really nice work. I could do with one of these in my wood garage too
Thanks, super useful for sure!
That is an awesome space saving solution!! Very well done!
For sure, thanks!
I have the same problem with space being golden. I have to make myself one of those. Great job Johnny
Have fun Frank!
Dude great idea thanks for sharing.
Loved it!!! I know you said it wasn’t your idea but loved it.
Thanks!
I've been eying this plan for a while . It looks great
Go for it!
! Buenazo, felicitaciones, gracias por el video, un abrazo !
Nice design, I'm going to be building some tool stands and this is certainly going to be an option. My only concern with that design is lateral strength, you literally just have two pieces of plywood standing vertically. I would think with two heavy tools attached to the top you would get quite a bit of swaying. A couple of ribs dadoed into the sides on the outside should solve any issues though.
I think he secures the pipe which in effect turns it into a box structure.
Nice project
Nice! I've been need to do this.
The Ridgid sander and maybe my drill press
That’d be perfect!
This is really genius!
Thanks Neil!
Rockler, Festool, ... $$$ ... but you have a nice build there, I love the draw pulls ... really. Check out Fisher's ... how he handles the cord problem ... cool.
I need one for my Craftsman table saw!
Build it!
OK I'm going to built this cart but with changes... going to use 1/2" black iron pipe threaded to add caps or EMT rings on each end which would prevent the pipe from sliding or the side from splaying out while flipping
another option would be to cut the pipe flush with sides and drive a screw straight down through the end of the side and not have to put those side covers on
Excellent job great video
Great work mate thx for sharing
Very good! Thank you.
Thanks Robert!
Brilliant! Nice job!
Thanks Daniel!
Nicely done! 👍👊
Thanks Fred!
dude you’re using Festools, that’s awesome
Hah, thanks! Love their tools.
Very nice !! Space saver idea👌like it and thank you for the short tutorial 😊
Thanks!
Awesome!
Very nice
Thanks!
Enjoyed!!
Thanks Russell!
good build man 👍🏻👍🏻👍🏻
Thanks!
Awesome! Few modifications and it will be perfect.. Lol. Thanks for sharing.. Great vid.
That's the beauty of building stuff yourself, enjoy!
That is really tall. I bet you end up swapping out those casters. Nice work though. I'd love one of these for my spindle sander and scroll saw.
Thanks!
its fantastic! nice idea
Sweet Baby Jesus ... that's what a easy $1 mill in Festool products ? Lucky dog ;)
Hah, not quite. Thanks!
Question and comments.
Question - Does the "swivel " bar have to stationary?
Comment - Was thinking some of the caster fasteners would be better attached than into the end grain of the plywood.
Also - Nice build!
Bellissima idea
Thanks!
Good
Great build, will need to add that to my shop to-do list!
Dear John, love the concept and can see that this has significant applicability in my tight-spaced workshop. One thine of concern is that it does look quite flimsy and with me putting a good load on the machines would create issues. Now that you have used it in the field for a while, how has it performed? Again, nice idea well constructed.
Sears Craftsman had a rotating table for three bench tools years ago.
I remember those
I have one! The weight of a planer & an old belt/disc sander makes it almost impossible to flip. I’m going to make a flip top and ditch the “tank” craftsman!
Nice!
Nice
Excelente ideia e execução. Parabéns!
What if you need to use BOTH tools almost simultaneously? In the present design, you’ll develop your biceps!
Fantastic job..BTW..where can I get ‘\”thank orange large purchase block..
Nice! How sturdy is this setup? Is it wobbly? Or pretty solid? I think I'm gonna use this for my Bench top joiner and bench top band saw.
looks great but TALL for sander!!
Definitely tall!
You missed to show us how you connect the electric wire through the metal pipe. and how you connected electrically the two tools, since there was a little space between the two boards. In any case I have enjoyed the wood built. Thank you.
SPECIAL REQUEST
Kindly make table saw , and all cutting,sanding table in the form of MURPHY TABLE on wall, for space saving..
Thankful
Nice build Johnny. I have also purchased and built Brad's flip top. I love it and need to build a few more. I have a mortiser on the way. I called the manufacturer to ask what the assembled height is,,, it is 29-1/2" with the handle. What is the height of your Jet with the handle installed?
U ar so cool end i love ur videos
Hah, thanks man!
great
Thanks!
Thanks O
i am guessing on the sander if you leave the accessories they will fall out when you flip it over.
The Amazon link for the steel tube/pipe pionts to a solid rod.
Good build , thanks for sharing
Thanks!
Nice build
Thanks!
looks like the one shown in woodsmith magazine issue 111 back in 1998
Garry Waters you must have a really good memory to remember something like that for over 20 years😂😂
A nice simple build and super well explained :-)
Thanks Maria!
Ive been wanting to build one of these for yrs now!!"/ THis is the best video on this project I've seen.no offense brad;) Saved to my future builds playlist good stuff as always Johnny! I have the same mortise machine so works out great.gonna add my drill press though or 12" disc sander not sure yet.#futurebuild later bro!
Thanks! Brad’s video isn’t a build video, just an overview, so I’m sure he won’t be offended, hah!
@@craftedworkshop always bro AMD ahh okay havent seen it😬 so that's good.have seen alotnof his other videos Though. Good guy and good stuff
Damn it!!!! I just got done building my flip table. I used Brad plans without making any adjustments. i'm mounted a Ridgid planer and sander.
just like Brad's. it turns out the planer i have is a newer one, and has a handle mounted on the top, which makes it an inch too long. Now it can not flip. The table came out great, but now i will have to do it again, Damn!!!
Dang! Could you lower the top of the drawer compartment and just cut the drawer down?
Johnny.... You are a genius! I've cut materials for two flip tables. My issues was, i did not have enough materials to cut side pieces, which would've been longer to accommodate the planer . Now i can build the second one and lower the draw top. That will work!!! You saved me money and space, now I do not have to buy another sheet of 4"X8" board.
Awesome! Glad I could help and you didn’t use glue 😊
Crafted Workshop no, no I didn’t😏
came here expecting something to do with beach sandals, was not disappointed
Hah, thanks!
I’m not a sub, I’m a hobby machinist and hobby woodworker - you actually called the drill a “twist” drill.... good boy...
In theory, could you just use 3 pieces of plywood with a gap for the swivel pipe, and cut gaps for the table locks for the table top instead of all of the strips of 1x2?
Thanks for watching, y'all! If you're interested in building this, here's the DIY Flip Top Tool Stand plans : gumroad.com/a/937473139/ajVYN // Check out Rockler's awesome tools and accessories here: bit.ly/rocklercrafted // Check out Festool's amazing power tools here: bit.ly/festooldealers
sweet, what kind of plywood is this?
Had been considering a flip top just to have a home for my scroll saw, but haven’t decided what to put on other side since I really don’t think it would fit my needs for the miter saw because of outfeed needs. Considered putting my 1” x 30”/5” sander on the opposite, but that’s a relatively tall tool.... only other idea is to build a router station while making it exactly workbench height so outfeed isn’t an issue when need it can be rolled over to the bench. Thoughts?
I'm wondering; I can imaginge that the table is very unstable when turning it over. When locked it looks very sturdy.
And how about the weight when the clamps are released... if it turns to fast the whole table falls on the ground.
nice
Thanks Steve!
I loved your flip top stand but I couldn’t find the plans, can you help me? Thanks, Bruce
My next project
any idea about weight limitations? my tools are old and heavy
Are you using a hollow steel pipe/tube or a solid rod? The video makes it look and sound like a hollow tube, but the amazon link looks like a solid rod.
If it’s a tube, does it flex at all? Seem strong enough?
Can this hold a dwalt portable tablesaw?
and if you don't need that stability, you could just not engage the crossed structure
I can’t believe you used different screws for the casters. #ocd
Gotta get that extra holding power! 😂
I can't believe he lost the cap to his Rotring (mechanical pencil)
Quite observant! 😁
LOL 😂
These look great and the space saving is nice... but how hard is it on your power tools to hang upside down are there certain tools that you should never hang upside down????
I would hate to lose out on the lifespan of my tools just to save some space.... I simply don't have money to waste replacing my power tools.
I hope Festool sponsored you.
Great project! If I have one concern.....I didn’t see you use any glue on the build, just pin nails and pocket screws. Wouldn’t glue have added to the strength of the unit? Other then that, I can see myself building one of these in the near future.
Thanks! Typically, I don’t use a ton of glue on shop projects, as I like to be able to take them apart if needed to modify them as tools change, or if I ever need to move. Pocket holes were plenty strong for this project and it’s holding up great.
awesome video, where did you get your countersink bit and your half moon plastic featherboard? keep up the videos !