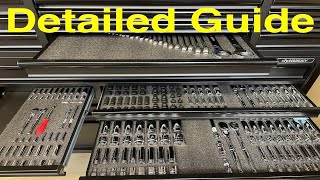
Make Your Own Socket Trays for $3.00

HTML-код
- Опубликовано: 22 дек 2014
- Hot Glue Gun
US: amzn.to/2lD9ENV
CDN: amzn.to/2ncmAuH
Hot Glue Stick
US: amzn.to/2lFQ03J
CDN: amzn.to/2l32RNc
OLFA 5019 SVR-2 9mm Stainless Steel Knife
US: amzn.to/2GuHutS
CDN: amzn.to/2o2mFBi
Buy 6mm Thick Foam Sheets 9"X12"
US: amzn.to/2ldOGzL
CDN: amzn.to/2JaFhqT
Buy 2mm Assorted Color Foam Sheets 8.5" X 11"
US: amzn.to/2lvAepe
CDN: amzn.to/2OSeMdf
Buy 2mm Black Foam Sheet 12" X 18"
US: amzn.to/2kR4TP3
CDN: amzn.to/2IWLNkF
Buy Assorted Thickness Foam Sheet (Canada)
amzn.to/2mGY04A
Silver Color Sharpie
US: amzn.to/2qbXpd0
CDN: amzn.to/2MP3wMb
=======
In this video I will show you how to make your own socket tray for very little money. This will help you organize all your tools so you can find what you need quickly and easily. Follow the step by step tutorial in the video for full instructions.
=======
Shop Dial2Fast Store For List Of Tools & Parts
US: www.amazon.com/shop/dial2fast
CDN: www.amazon.ca/shop/dial2fast
=======
Support Dial2Fast on Paypal
www.paypal.me/Dial2Fast
Support Dial2Fast on Patreon
www.ptreon.com/dial2fast
Dial2Fast website
www.dial2fast.com
Like us on Facebook
/ dial2fastofficial
Shop Amazon
US: amzn.to/2LqTtuk
CDN: amzn.to/2L5QASt
Join Amazon Prime
US: amzn.to/31i05mP
CDN: amzn.to/3kG0D0R
Try Amazon Prime 30-Day Free Trial:
US: amzn.to/2S3GjHI
CDN: amzn.to/3kG0D0R
========
As an Amazon Associate, I earn commissions from qualifying purchases with the links provided here.  Хобби
Хобби


![CENTRAL CEE - GEN Z LUV [VERTICAL VIDEO]](http://i.ytimg.com/vi/VIbidJm9q34/mqdefault.jpg)


I prefer dumping all my sockets in one drawer. Then I created a fun little game called Find the Socket. I time myself to see how long it takes to find a certain size socket. This tray idea would totally rob me of this fun little game.
Then you should try my little memory game... When you're done with a project, don't immediately put your tools back where they belong, then when you start something new, it becomes a fun and challenging game to find the tool you currently need.
cbr1000rr4u2nv when you become experienced at those games you can play my game. It's a fairly simple game. While working on a project simply place your tool down next to yourself on the floor or any surface that seems convenient. Now without moving search everywhere except the area where you placed your tool. If you find your tool you are cheating.
ThisIsSolution as a bonus round loan a few tools out without writing down who you loaned them to, then try to figure out "who has your tool". The upside to this is you wind up rekindling friendships with people you haven't spoken to in months, as you call everyone you can think of that may have your tool.
MrSlodez buy some yard sale or cheap tools. place them in a separate box for your loaner tools! now you don't care what comes up missing
All these games and variations are fun. But the best is when you have the "wildcard" game. For me the game is when one of my 3 sons borrows a tool or tools but doesn't tell me. This is how I end up with multiple sockets- like 3 7/16" deeps. I buy a new one, then the original item is returned. WTF?
Super cool idea. The addition of the colors for standard and metric from one of the commenters adds another dimension of cool!
Been searching for cheap but highly effective socket organizer idea, and this is it!
Thanks so much for sharing.
Excellent idea and tutorial. I did this and it came out great!
A SUGGESTION: Instead of using a hot glue gun, I went to my local art store and purchased "spray mount". It's basically just a spray-on adhesive you use to mount artwork on different types of backing. It works perfectly as it is not permanent, it allows you to peel off and adjust if necessary, there's zero dry time and it's made to work with lots of different surfaces. It worked perfectly for this foam and if I need to create a new template, I can just peel off the back/colored foam and reuse it for the new template.
Thanks again for the tutorial. I'm very pleased! :^)
Very good info. Thank you!
Dave Vander Pol: Great suggestion. I had thought using 2-sided carpet tape (which I posted in another reply), but the spray adhesive is quite possible an even better alternative. Especially for a non-permanent bond!
A word of caution though, to others who consider doing this: you'll want to test a scrap of your foam with the adhesive first. Depending on the adhesive used, some types of foam may dissolve a bit, or otherwise sustain surface damage. It worked for Dave's combination of products, but be aware this can be an issue.
Definitely! :^)
Was about to suggest spray mount much easier
I've been looking at socket organizers for a while. This is by far the best looking option for me. Thanks for the video
Andrew Burley foamfittools.com/Csocketorganizers.php
Nice that you did this video for our benefit. I've actually done this before, and I'd add a few tips to your good methodology. Like someone else mentioned, spray adhesive works really well. Lay the black piece good-face down over some of that brown paper everyone is shipping with now, and put your pre-cut colored piece just off to the side. As soon as you have sprayed the adhesive on, leave the black piece exactly where it is and lay the colored piece carefully over the top - then put a big book some something similar on top until it dries. This will give you no glue "run off", and offers less chance for a messy result. Hope that is equally useful. Thank you!
This is the exact storage method I’ve been thinking for so long. Visually and actually retrieving the sockets I personally don’t love the vertical methods even though obviously you can buy those pre made. This is a perfect afternoon project for a medium size chest.
Great idea! I'll be doing this too, but think I'll go with spray adhesive.
I been trying to come up with something for my tool box for weeks and glad I found this video so thanks!!
This is one of the nicest tool organizers I have seen. Price is right to very thrifty and common tools.
Really cool idea Mate !!
I will definitely following your lead and making these up for my tool chest.
I really enjoyed the clear concise instructions.
A very well made and produced video.
I have subbed to see more from you.
Regards Matt
Matthew Gischus Thanks for your comment and thanks for subbing Matt!!
When laying out your sockets, make sure to reverse the order if you want them to read smallest to largest --because when you flip them over whatever your original layout was when tracing will be reversed.
Awesome video. Thank you :-) You can also get large sheets of magnetic backing to use in place of the blue coloured backing. This can help during transport or if things get bumped around a bit. I haven't tested this by going vertical with the sockets and ratchets but if it was a strong enough magnetic backing, I'm sure it would work a treat! Very cheap to buy too.
Going to be doing this after I finish with finals. Thank you so much for this. Liked and subscribed!
this is perfect for my tool chest, to customise each area. thank you, great video.
thanks for taking the time to share this simple yet "everyone needs it" solution to a very common problem
Thanks for your comment!
Thanks for the idea! I have a tool box I carry in my car that always rattles. This will help greatly to reduce noise and keep all in order.
Great video.
Simple, yet very effective.
Thanks
Nice video, I like how neatly everything is laid out, this is what most people think of when they hear the phrase "professional mechanic", (even though the toolboxes of actual professional mechanics are barely organized chaos).
I'd love to do this to my tools/toolbox, but as a full time mechanic, I'm constantly adding more sockets, wrenches, and other tools, so this is isn't practical for my work tools, I'd be constantly making new foam patterns. However, this would be great for the tools I keep at home.
That’s awesome!
Great share and great idea. Thanks for posting this! I’m going to make a couple of them for my tools!
I'm getting ready to do this, in the next couple days. When I do, I'm going to set up a space heater to buy a little more time on the gluing portion.
love this idea. Will be doing this for my own storage cabinet
I really love the organization here. Bravo. I personally don't use this kind of socked organization as I just can't give up the space. But I like this idea and maybe I can use it to hold shallow sockets upright.
Thanks for your comment!
over here in Australia interlocking foam from Bunnings (4 pack $12) are great for the cutout top layer then a yoga mat from Kmart ($10) for the underside.Like someone else said below red/blue for metric or brands.I have Kinchrome on the blue sheets and Sidchrome on the red.Raining today so it might be a good time to finally organise the new box!
Perfect my friend. Although a foam friendly spray adhesive will probably give you more time to glue both foams together. Will be doing this to my tools
Thank you very much sir
Great idea. Although, I think I would prefer to get slightly thicker foam, and just cut circles so I can stand them up instead of laying them down.
Another fine how to video ! And I was going to ask if you made one for sockets , fantastic.👍🏻
Left handed people are so creative! Nice solution.
Great idea. I love things organized. It is not a waste of time doing these things if you enjoy doing it.
The people saying it is a waste of time seem to have time to make negative comments. If this is not for you then don't do it but for those who want ideas on how to organize their tools this is a great one.
Waste of time is subjective in this case. Your time, your call. But if your goal is optimizing precious space in a tool chest, laying sockets down on their sides is incredibly space-inefficient.
@@chuckschillingvideos but if you are getting paid by the job, finding your tools quickly makes you money. Seeing that one is missing will help you not leave it in someone’s vehicle or, even more importantly, someone’s aircraft.
@@carljohnson4691 Laying your socket sets down on their sides is the ONLY way to keep from losing them? Seriously?
@@chuckschillingvideos that’s not what I was talking about. I’m talking about tool organization. When I worked on airplanes we always had tool foam for tool organization, but we stood the short sockets upright to save space. We also used thicker foam to hold everything in place more securely.
I’ve just bought a tool chest like yours and your video popped up. Thank you from Love 500 in the UK.
Great job! I'll be implementing this too my tool chest!
That actually looks pretty good, and doesnt look like you micky moused it. it has a professional like despite being low budget. Kudos and Grats
I agree
Great tutorial. Thank you very much for making it. I really appreciate you added links to buy all the materials...
I enjoyed your video. It was very helpful. Very much appreciated! Thank you!
not sure how well it'll work for sockets, but in my box for my lathe tools, i took one of those 1" soft foam mattress toppers and cut it up to fit the dimensions of the drawers. it's soft enough that most things will sink into the foam, leaving an impression where they will fit. it's more useful for heavier things - drill chucks, steady rests, tool holders - but it should work either way. and you can do your whole toolbox for however much the foam costs!
Sweet video man thanks. I will hate having to do this for all the tools I have but the end product will be worth it.
Sockets so shiny and clean.
This is a pretty awesome idea man! Good job.
I left a question for you about your video, which I thought was very informative and we'll done. What bothered me was I didn't read any comments until after I wrote mine, and I am really shocked at the assholes that troll you. I just wanted you to know that I respect the fact that you took the time to share this with people who actually appreciate it. Thanks!
Very cool, very cool. I like this idea you have. So cheap and easy to do. Thumbs up!
Thanks dude, I really liked your video and the simplicity of your technique. On other videos their techniques are too complicated!
Very nicely done and inexpensive, something everyone can use👍
This is so nice but it's time I dont really have to make. I would love to to do it. Literally I spent most of my time families and finishing projects. You did a really nice job
You could of used the blue for SAE and red for metric
CamaroWarrior mind blown
That's a great suggestion, CamaroWarrior!
I had another idea, regarding the hot glue and working time. If 2-sided carpet tape worked OK with your particular foam (which might require a small test to confirm), you'd have as much time as necessary to aligned your pieces and press 'em together. No racing the clock as the glue cools.
I find when I'm wanting to work fast, that's when the damned glue seems to cool off almost instantly!! And then I rush... and make mistakes... or worse, get the glue on my skin and burn myself!
However, if you had to no choice but hot glue (or simply prefer it), you could still buy yourself more working time by doing the following. Glue up one half of the mated foam sheets, and let it set until cooled. Then fold the other half back, and finish putting in glue where needed.
If you have teenagers that use your tools ,look in metric to find imperial it saves heaps of time
floobertuber, not to be rude, but if you have trouble operating a glue gun........maybe you don't need to be working on anything requiring tools. Just a fleeting thought as i read your comment.
Spray adhesive probably works better as it's more complete edge to edge coverage and won't melt the foam or cool off before it's aligned, but not everyone has it available.
Nice job, I think I will try this with a 1/2" foam. I am sure 1/4 works well too, but I really want it to be secure. Thanks for sharing
If you want vertical use a little thicker foam and draw circles. I like the idea of 1 red 1 blue. Another idea would be to use different thickness front to back angling towards the front. It would be a compromise between the two
Awesome idea and execution!
I enjoyed your video. It was very helpful. Thank you!
Mine worked great too. sears wants too much for these and they are junk. these are so cost effective its a win win. thank you.
Awesome idea !! Thanks ! Keep up the good videos !
Very nice, I like organization. Thanks for your advice.
The US Navy does this. My father was in the Navy and did it to his tool box. Come to think of it he also did this when he was working for Nadep. Here is a cheaper and faster way. Depending how many tools or drawers you want to do you can use foam sheets from the hardware store. The same stuff that is used for siding and such. A hand router with a flush trim bit and a marker. Just lay out the tools. Trace around them and set the depth you want on the hand router and just route out the foam. You can get a drawer with a hundred or so sockets done in about 20 to 30 minutes.
Leland Clayton pretty much all Military does this especially Aviation. The tools are marked and silhouetted. You take inventory at every shift change, before and after each kid assignment and if a long project a couple of times in between. The idea is to make sure that no tools get left at the work site, and tools or parts do not become stuck or loose causing binding of aircraft components, throttle cables, flight controls etc....yes theft prevention is a bonus but primary goal is to make sure tools don’t get embedded in the aircraft causing possible damage or crash.
@@stephencannon3140 A rogue 10mm in your engine bay is one thing, but a rogue 10mm in the fins of an F18 jet engine is a whole other for sure.
I wouldn't exactly say this is a cheaper method. If you do not own a router then the expense of the router would be a bit much.
@@jb3d247 lol. What if you didn't have the sockets to put in foam, this would be even more expensive, you have to buy the foam and then the sockets to put in the foam. And a toolbox. And a garage to keep the toolbox in. your right! I would not say this is cheap.
@@cassidy5099 lol. What if you didn't have the land to put the garage on, this would be even more expensive, you have to buy the land and then the building material for the garage.
Very creative idea with custom looking results. Nice video ....
Cool idea! I think this will break down very quickly when it comes in contact with solvents and oil
Olaf van der Beek
Maybe give it a quick wipe with a rag first instead of putting oil soaked sockets back in the tray?
Very nice and easy to do! Thanks!
Wowww man , u are very well organized. I will do one for myself, thanks a lot
This is a standard 5S organizational process. We did this at Boeing many years ago. They sell nice organization templates at harbor freight, or your local home stores. Lowe’s, or Home Depot!
Great idea, the only I would change is your glue. I had have poor experience with hot glue not bonding right, drying too fast, and the heat warping the material, stringy.I would 3M Super77 spray adhesive. The stuff is awesome. I AM NOT sponsored by 3M, just a fan of this product.
Very Cool. Looks great!
I just use large ice cube trays, you can write sizes at the start/end of each row. Quite compact. Like this idea for larger items that are taking upspace anyway.
Very cool Idea, thank you.
Best tutorial for organizing tool box. 5 stars.
Just an idea here. Ive done something similar but i used anti fatigue matting from harbor freight. Its really thick and holds up well. I just trimmed it to the drawer size. After that i traced out the tools and cut them out like you. Nice work.
Thanks! I've been trying to figure out a cheap solution to this!
Thanks for your comment!
Nicely done!
That's really cool and a great idea!
Cool idea. Thank you.
great idea! thanks for sharing.
I wish my tool chest was that tidy! Nice idea
Great idea for organizing and keeping the weight low in the draws
Wow thanks for the ideas
This is fantastic idea 👏
great idea! nice work!
To attach the (blue) backing foam, you can cut it into smaller sections that can be glued individually. Then you don't have to worry about the glue cooling too quickly. Since the backing foam will be on the bottom, the cuts will not be visible.
A great idea, good, informative video.
Legend. Looks very slick. Thanks for making and sharing buddy
Thanks for your comment!
mature navajo bitches
dial2fast
dial2fast could you please email me dial.... Julio.e.ortiz75@gmail.com
I understand those that say just buy a premoulded one for 3 to 5 bucks. But you all need to understand that sometimes it is really cool to create your own product. I also did the blue underlay because BLUE IS CALMING😄 Maybe stop some tools from flying across the shop!!😄.
this is me looking for premolded for that cheap
@@poet99999 for real. if you can get pre-cut shadow foam inserts for $3-$4 I'd like to know where!
Paint your shop Pink. That's calming too,!
Great Idea. Thank you 👍
Wow very nice,very smart!!
Looks like that silver marker would make a great label maker too.
Great idea it looks very nice. I have 21 more years before I retire. Maybe then I will have time to do something like this.
Thats really cool and good job and vidio, thank you much.
Again - thank you for another great tool hack!
Good idea thanks
I gotta do this ! Nice job😊
375 thumbs down? Why? Jealous and way to lazy to do this? It’s a great idea
Awesome video!
Great idea!
Nice job great idea
Thanks, very cool hack for your toolbox.
Great video and an awesome idea, only point I'd make would be contact adhesive is better for joining your sheets ;-)
Excellent, but I did see a couple of things I would do differently. Marking the lines before adding the dots and using contact cement to bond the pieces together.
Very interesting, thanks for sharing.
Very well done!!
Great Job👍
Great Idea!! Really simple and very handy! Thanks for sharing. I subbed your channel - Great Videos!!
+Hawaiian F150 Thank you very much!
That's cool guess what I'm doing this weekend.... Thanks for the awesome idea.
Clean!! Well done
Had to do this when the plastic tray broke in my teng tools set. Tools should come with this as standard
Pretty clever idea