When pasting the half tone to the mask after copying. Press Alt+ Left Click first on the mask layer after that, it should turn white on the screen indicating that you are now actively in the mask layer and when you paste it there it will paste the black and white layer and then just turn the visibility of the layer back on and it should do the trick!
Best tutorial.. Totally to the point and a nice explanation with practical implications. Also, your support and answers to the questions in the comments are beneficial. Thank you so much for this. :)
Great video ❤ Thank you very much❤ . It is very useful for my t-shirt design. Is this the best way? I am also an amateur designer. 😄 I will apply it to my designs.
I tend to lose purples reds and blues but sometimes they work perfect. Can you go into more detail on using levels and curves and how they interact with the final half tone? Thanks
Great video, I've learned a lot. Something I'd like to know is about the color profile to use for DTF to look cool. In one of your videos you mentioned CMYK COATED FOGRA39 @300dpi ... I noticed a good shift in colors when I used that profile, not on DTF but on glossy coated paper but on DTF colors appeared good then less vibrant. What to say about and what is the best standard overall CMYK color profile for both DTF or sublimation. I mean this is crucial to know and your advice can save a lot of businesses Thanks for making us become superstars
It starts off with where and how you are creating the artwork. If you create as RBG then save as CMYK FOGRA39, the color profile will shift. If you start your artwork creating in CMYK FOGRA39 and thats how your DTF printer prints from, then you will have more accurate colors.
@@transfersuperstars thanks a lot, to make it more cool I actually created a preset already CMYK COATED FOGRA39 @300dpi so I don't forget to do so, and today I printed my best sublimation ever, didn't even required me to go pantone color for some objects and it cames out really vibrant before and after pressing it and my clients are actually satisfied and even impressed. So thanks for your advice and for making us become superstars
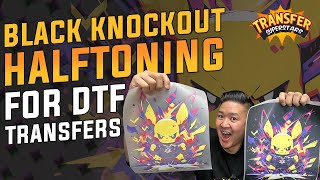
With White shirts, you want to do what's called white knockout. Here are 3 videos of us performing the task: ruclips.net/video/09Ywy7UQYZE/видео.html ruclips.net/video/B6d7is_4aKE/видео.html ruclips.net/video/vkLvcDiXy78/видео.html
Great tutorial on Halftoning using simple process. This should work great for DTG printing as well right? ARe there any other recommendations for dTG or would this exact method work fine? Im working with POD :)
Great video, question… how do you avoid white outlines around the halftone dots after pressing T-shirt….I halftone a lot of my designs but when I press them… you can see the white outline around the dots which then makes the halftone look weird.. any help?
I can think of 3 issues, it mainly stems from the artwork. 1. Graphic resolution and size (analyze dpi & size of graphic), this is extremely important when you start to knockout some of the original artwork. 2. choke adjustment, minimum 2, maybe 3 contact depending on the artwork. 3. DTF Printer needs to be highly calibrated in all directions. Solve the problem by working backwards 1. Is the printer the issue when printing fine details 2. Try more choke (contract 2-3) 3. Upscale the image (use a free upscaler program like UPSCYL) I will have a video on this soon.
Hi, do you mind sharing the white color settings on your prints? In my experience, using just 1 pass of the white color isn't good enough for printing on black-colored t-shirts. 2 passes usually work, but it takes too long.
It really depends on your printer setup. I print on commercial machines at 6-8pass. The % of white ink also depends on your films ability to hold without puddling. You can print at 100% white but if it drips, it doesn't do you any good.
@@transfersuperstars hi i manually post process like you but theirs a white solid rectangle around the art it hasnt recognised the white channel what am i doing wrong like the question above not sure what your doing on output
Our newest film is both hot and cold. Cold peel film generally has a better coat on the film, allowing for more saturation in ink. Which makes for more vibrant prints. Ours has the advantage of both.
what does it mean for it to be "halftoned"? When you say the gray areas will be halftoned, does that mean the gray areas will become either black or white? thanks!
Halftone is a printing technique that simulates continuous-tone imagery through the use of dots, varying either in size or in spacing, thus generating a gradient-like effect. Here’s a detailed explanation of how it works and its significance: Key Points of Halftone: Purpose: Halftone is used to reproduce images that contain gradients and varying tones of color or grayscale. Since printing presses typically use only a single color of ink per pass (such as black for monochrome prints), halftone enables the illusion of different shades by controlling the density and arrangement of dots. Dot Patterns: The technique involves breaking down an image into a series of dots. These dots can vary in size (amplitude modulation) or in spacing (frequency modulation) to create the perception of different tones. Larger dots appear darker, while smaller dots appear lighter. Color Printing: In color printing, halftone is used in conjunction with the CMYK color model (Cyan, Magenta, Yellow, and Key/Black). Each color layer is halftoned and printed with a specific dot pattern, often rotated at different angles to minimize moiré patterns and achieve a smooth gradation of colors when combined. Screen Angle: When printing in color, each halftone screen for the different color inks is rotated to a specific angle to avoid unwanted patterns. Standard angles are usually 45° for black, 75° for magenta, 90° for yellow, and 105° for cyan. Resolution: The quality of a halftone image is determined by its resolution, measured in lines per inch (LPI) or dots per inch (DPI). Higher resolutions result in finer detail and smoother gradients. History and Usage: The halftone process was developed in the late 19th century and became a standard in the printing industry. It allows newspapers, magazines, and books to reproduce photographs and other detailed images efficiently. Overall, halftone is a vital technique in graphic design and printing, allowing for the effective reproduction of complex images using simple binary processes (ink or no ink).
hey how does a 11x11 dtf film image feel on a bella canvas shirt, would it feel super heavy? could i add little tiny knockouts on the design to allow shirt breathability.
@@transfersuperstars Yes its a solid box image i could also make it smaller to like 8X8.5... would that help, but before you answer that does the 11x11 impact the feel that much? cause i thought dtf was light....
Is this photoshop? This is the only place I can do this? I’m trying to make the Viral Girlfriend shirt where there’s lighting bolts & gradient smoke effects.
Yes we can knock out the black background to make it breathable, but Halftone effect possible on dtf? really possible? can you breathe through the image ?
This tutorial gets confusing around the 4:10 mark. It says to do stuff (copy and paste on layer mask), however, the video does not demonstrate this action. Perhaps this is for someone more proficient with photoshop than I am.
It should be the black and white layer that is on the original document that you are working on and then once you're there you can press alt + left click to directly select it and paste the black and white layer from the other document.
Im following all of the steps and it works until I click on bitmap. The image turns into background and I can't unlock. So frustrating.. what is going on? anything helps!!
You won't need to unlock the layer after the bitmap. You can still ctrl + a to select all and ctrl+c to copy the layer even if it's locked and it is indeed supposed to be black and white so that we can use the layer as a layer mask
I can think of 3 issues. 1. Graphic resolution and size (analyze dpi & size of graphic), this is extremely important when you start to knockout some of the original artwork. 2. choke adjustment, minimum 2, maybe 3 contact depending on the artwork. 3. DTF Printer needs to be highly calibrated in all directions. Solve the problem by working backwards 1. Is the printer the issue when printing fine details 2. Try more choke (contract 2-3) 3. Upscale the image (use a free upscaler program like UPSCYL) I will have a video on this soon.
Aynı sorunu ben de yaşıyorum Ömer, İspanyol bir youtube kanalından sorunu araştırdım. Fason olarak yaptırdığımız 60cm geniş format DTF yazıcılarında iki baskı kafası olduğu için bunların hizalanmasını çoğu baskı firması doğru düzgün bir şekilde ayarlamamış oluyor ve bu yüzden beyaz mürekkep kaymış oluyor. 2-3 farklı firma denedim ama beyaz lekeler yine aynı şekilde kalmaya devam etti. Sorunu çözebildin mi ?
We have been printing DTF for a few years now and have gone through many printers already. We current import our own printer parts and have upgraded/configured our own setup.
You'll need to color calibrate beforehand to make sure you're using your brightest colors. Here is a video on our color matching. ruclips.net/video/0d0jpOVroiw/видео.html
@@transfersuperstarsHi! Yes, I have a Pro subscription to Kittl and an Education subscription to Canva. Do you have any videos on how to blackout/whiteout and halftone images for dtf using these platforms?
Yes, you can create a black knockout effect using Procreate, a versatile digital illustration app for the iPad. The black knockout effect involves removing or "knocking out" portions of a design, usually text, to reveal a background or an underlying image. This creates a visually striking contrast, especially when using a dark or black background. Here’s a basic guide on how to achieve a black knockout effect in Procreate: Step-by-Step Guide: Background Preparation: Open Procreate and create a new canvas. Start by setting your background color. For a knockout effect, a darker color works best, so you might choose black or another dark hue. Add Your Base Image or Layer: If you want the text to reveal an image beneath, import or draw your image on a new layer. This image will be "revealed" through the knockout text. Position and scale the image as desired. Adding Text: Add a new layer above your image for your text. Select the Text Tool and type your text. Choose a font and size that will work well for the knockout effect - bold and thicker fonts usually work best. Position your text where you want the knockout effect to happen. Creating the Knockout Effect: Once you’re happy with the text placement, tap on the text layer to bring up the options. Select "Rasterize" to convert the text to a pixel layer. This is necessary because Procreate currently doesn’t support direct knockout effects on text layers. Now, go to the layers panel. Tap on the thumbnail of your text layer and select "Select" to create a selection based on the text. With the text selected, go to your image layer. Tap the layer thumbnail and select "Clear." This will remove the part of the image where the text is, effectively creating a knockout effect. Refining the Effect: If needed, you can refine the edges of your knockout effect using the eraser tool. Additionally, you can add effects like shadows or outlines to your text layer to enhance the visual impact. Final Adjustments: Adjust the colors, add filters, or apply any final touches to your design. Once you're satisfied with the result, you can export your creation from Procreate. Tips for Best Results: Contrast: Ensure there's good contrast between the text (knockout area) and the background or image you're revealing. This contrast is what makes the knockout effect visually appealing. Font Selection: Bold, chunky fonts usually work better for knockout effects because they reveal more of the background image or color. Thin fonts might not showcase the effect as prominently. Layer Management: Keep your layers organized. It's easier to adjust or correct parts of your design if each element is on a separate layer. Experiment with Colors: While black or dark backgrounds are common for a knockout effect, experimenting with different colors or gradients can lead to unique and eye-catching results. Save Originals: Before rasterizing and clearing parts of your image, it's a good idea to duplicate layers. This way, you have the original layers intact in case you need to make changes. Creating a black knockout effect in Procreate can be a fun way to add depth and interest to your digital artwork. With the versatility of Procreate's tools, you can experiment with various styles and complexities in your designs.
Thank You Very Much for the reply. I was told that to print anything, it has to be a vector. Wouldn't the image pixelate after printing if it's raster? I am new to design. Thank You Very Much
You don't have to unlock the layer. You can just CTRL + A and select all then CTRL+C to copy and go back to the other document to paste it. It will work even if the layer says it is locked.
You may have adjusted the levels too much and lost a lot of the details that caused it to look like it has lost a lot of colors. You may also try adjusting the frequency you're using for the bitmap to get the half tone effect.
2nd press is recommend to increase longevity. You can use various sheets for different finishes. www.transfersuperstars.com/products/the-matt-finishing-sheet-matte-2nd-press-cover-sheet?_pos=1&_psq=matt&_ss=e&_v=1.0
When I click ctrl v on the mask it doesn't get fit, It will copy smaller than the original size of the design, and when I try the tranformation, it won't give me that transparency of the design, do you know what should I do ?
You may have changed the size or resolution of the artwork after you have made the copy and made edits on the new document. Increase the resolution of the artwork before you take it to the new document
Pls Help.. STUCKED in 4:16 can't paste the half tone layer that I made. When I tried to paste it in the Layer Mask.. it didnt go the layer mask instead its going in the new layer. pls help.. thanks
Right click on the mask layer. You may be copying it and pasting it immediately without clicking "Alt+Left Click" on the layer mask. It should first take you to a white screen then you paste the halftone layer. Give that a try and let me know if that works.You should still be able to CTRL+A select all then CTRL+C to copy even if the layer is locked.
im realy confused, im doing print on demand and they use DTG to print, i always used blending options to remove background an it worked perfect, is very easy to do and looked good, why ppl even wanna use halftones? this black dots looks bad in my opinion, or is this just good for DTF, and for DTG blending is better?! im not realy into it
Tried to follow the video but I’m using PS 2024 and the steps in the video don’t work. When I go to image mode grayscale I get an error message saying that I have to Rasterize the image and then it tells me to go to adjustments and levels and choose black and whites. What am I doing wrong. I so need to learn this technique for my AI images. Any help will be greatly appreciated.
Certainly, if your artwork involves a smart object or multiple layers, you'll need to rasterize it. Simply select "Rasterize" from the three options that appear. It's worth noting that this won't impact your original file; instead, a duplicated version will be created, as demonstrated in the video. This duplicated version is only utilized for the specific selection.
I tried that but it still does not work for me. I must be missing something in between. I will try it again!!! Will you be able to create a video with the rasterize and what to do after? The steps change because they next message is to go to adjustments and chose black/white. Can I send you the screen shots of what I get?
They are not telling a whole step in this video for pasting into a mask hold alt then select the mask why you hold atl edit then past directly into the mask
@@Angel-vm7sl thanks for the info. But even before the mask my options are not the same as the video. I get totally different options. I cannot figure out what I’m doing wrong. Does it work for your images?
Little tip. If your going to print on both sides of your t-shirt always put parchment paper on your press mat otherwise you will press the print on to it .Notice the mat is not on the press at the end of video he most likely ruined it .. Still a great video tho
@@transfersuperstars I can see that but that's not I was taking about ? I said put parchment paper on the mat on the bottom of the press before you put the t-shirt on it .if you have just done a image on one side then put that t-shirt face down on your mat to Press the other side .that first image will transfer on to the mat. That's why you removed the mat Right? I only know this because I did this mistake myself and now have a heat press with a unicorn on it.
Halftoning and knockout might help with certain artwork. finishing sheet might also help with the finish. www.transfersuperstars.com/products/the-matt-finishing-sheet-matte-2nd-press-cover-sheet
My bad brotha, we'll get better at these. If you were referring on how the layer was copied it was CTRL+C or CMD + C on mac and then paste it by CTRL+V or CMD+V in the layer mask.
@@JShip-xk9si Hi, Here's what you need to do: go to Select > All, then Copy. Then go to the original layer, add the mask & Alt/Option + Click the mask to open it. Then you can paste it in there and return to the main image by clicking its thumbnail. If it still doesn't work, I found I could unlock the layer by returning to bitmap from Greyscale mode. All the best.
For the 2nd press? As long as you flip it, should be ok but you are right, using a parchment or kraft for the 2nd press would be better in this scenario with gradients
Hey after I pressed control d remove the selection nothing happened I’m not sure how to do it passed 4:28 it gets confusing then just jumps to the design change it didn’t explain the hole control d part well like what am I unselecting please help
The deselecting part is very subtle but it should be the broken lines around the selection. After that it's just left clicking on the layer mask and pasting the copied selection.


Your technique for the design turned out nice against the black shirt. Dope
Thank you!
I’m going to try that. I only have done it in screen printing, not transfers yet.
Let me know how it goes!
@@transfersuperstars Well do. I just subscribed as well.
I tried doing it and I guess I was not able to do it. Different step from screen printing
I'm confused at 4:08 about copying the halftone and pasting it to the mask.... Could you describe that in a little more detail
When pasting the half tone to the mask after copying. Press Alt+ Left Click first on the mask layer after that, it should turn white on the screen indicating that you are now actively in the mask layer and when you paste it there it will paste the black and white layer and then just turn the visibility of the layer back on and it should do the trick!
@@transfersuperstars you said, "Click on the Layer, Make a copy...", how do you make a copy? It does not have the "copy" option..
@@MrJonatski You can still copy it even if it's locked. Just press CTRL + A then CTRL + C on windows.
it is not letting me copy the halftone layer on a mac while it/s locked. the "no" symbol shows up even when I try to copy it using my keyboard.
@@angelsierra2656 this helped thanks
Meu vídeo faviroto 🇧🇷 ainda mostrou ma pratica. Obrigada
awesome! was wondering how to do this!
Glad I could help!
Best tutorial.. Totally to the point and a nice explanation with practical implications. Also, your support and answers to the questions in the comments are beneficial. Thank you so much for this. :)
We're here to help, i'm grateful you found this helpful. It keeps us on our toes and motivated to keep making videos for you guys. Thanks a bunch!
Great video ❤ Thank you very much❤ . It is very useful for my t-shirt design. Is this the best way? I am also an amateur designer. 😄 I will apply it to my designs.
Keep us in mind if you need a transfer provider. www.transfersuperstars.com/products/dtf-gangsheet-builder
I’m having problems with my prints from my own edits coming out very dull when using half toning. Particularly red.Any suggestions?
I tend to lose purples reds and blues but sometimes they work perfect. Can you go into more detail on using levels and curves and how they interact with the final half tone? Thanks
We'll cover it on future video topics. Thanks for letting us know
Very nice design! Great tutorial, thanks…now I will follow you.
Thank you! Much Love!
Great video, I've learned a lot.
Something I'd like to know is about the color profile to use for DTF to look cool.
In one of your videos you mentioned CMYK COATED FOGRA39 @300dpi ... I noticed a good shift in colors when I used that profile, not on DTF but on glossy coated paper but on DTF colors appeared good then less vibrant.
What to say about and what is the best standard overall CMYK color profile for both DTF or sublimation.
I mean this is crucial to know and your advice can save a lot of businesses
Thanks for making us become superstars
It starts off with where and how you are creating the artwork. If you create as RBG then save as CMYK FOGRA39, the color profile will shift. If you start your artwork creating in CMYK FOGRA39 and thats how your DTF printer prints from, then you will have more accurate colors.
@@transfersuperstars thanks a lot, to make it more cool I actually created a preset already CMYK COATED FOGRA39 @300dpi so I don't forget to do so, and today I printed my best sublimation ever, didn't even required me to go pantone color for some objects and it cames out really vibrant before and after pressing it and my clients are actually satisfied and even impressed.
So thanks for your advice and for making us become superstars
Thank you for this video. Just getting into this and have lots to learn.
What program were you using for the artwork mods?
We still mostly use adobe programs like photoshop and illustrator
I think doing multiple knock out to create a picture albulm effect would look pretty kool
That might work!
SUPER COOL. Thanks for the details. Earned a sub!
Thanks for the sub!
Perfect. Thank you
You're welcome!
Big Fan here. Come To Brazil! :D Tks, bro!
Thank you!
this is awesome. I like the design. HOw can I get the softcopy?
This one isn't available but stay tuned for our future videos, we're going to start giving them away
Thanks for the teaching
Thank you
Great video… Can you show how it’s done on a white shirt without the colors fading please
With White shirts, you want to do what's called white knockout. Here are 3 videos of us performing the task:
ruclips.net/video/09Ywy7UQYZE/видео.html
ruclips.net/video/B6d7is_4aKE/видео.html
ruclips.net/video/vkLvcDiXy78/видео.html
@@transfersuperstars thank you very much. I will go watch it now. Keep up the amazing job
Great tutorial on Halftoning using simple process. This should work great for DTG printing as well right? ARe there any other recommendations for dTG or would this exact method work fine? Im working with POD :)
Yes, absolutely.
Yes it will be the same process to remove the black however with DTG, you can get away with printing gradient effects
This was so dope
Thank you! Glad you enjoyed it
Awesome print 👌😎
Thank you! Cheers! www.transfersuperstars.com/products/dtf-gangsheet-builder
great video, im also thinking how to do this on a white shirt too can you make video too?
Thanks! We do have some white knockout videos already out but we're definitely releasing more soon.
Heres one. ruclips.net/video/iUXuXdZP2RU/видео.html
@@transfersuperstars thank you hope this works for me, been trying halftone method but still can’t perfect
Great video, question… how do you avoid white outlines around the halftone dots after pressing T-shirt….I halftone a lot of my designs but when I press them… you can see the white outline around the dots which then makes the halftone look weird.. any help?
I can think of 3 issues, it mainly stems from the artwork.
1. Graphic resolution and size (analyze dpi & size of graphic), this is extremely important when you start to knockout some of the original artwork.
2. choke adjustment, minimum 2, maybe 3 contact depending on the artwork.
3. DTF Printer needs to be highly calibrated in all directions.
Solve the problem by working backwards
1. Is the printer the issue when printing fine details
2. Try more choke (contract 2-3)
3. Upscale the image (use a free upscaler program like UPSCYL) I will have a video on this soon.
what is your dtf printer size? Which size would you recommend for beginner like me?
We print on a commercial 22" printer. I always recommend commercial size and no converted printers.
@@transfersuperstars awesome!! is there any reasons not to use converted printers tho?
What printer do you use? Can a sublimation printer be used ?
We customize our own dtf printers. Sublimation is a different process and used mainly for polyesters. Sublimation on fabric is also not as vibrant.
4:16 how do I past the bit an into the mask layer? When I press paste (control + v) the bitmap copy as a new layer on top and not on the layer mask :s
i’m not sure what you mean but maybe you need to clip the layer to the layer mask…it’s alt and then click between the layers
knockout black is dope, which app do you use to design if you don't mind
This particular artwork was .ai generated.
which AI app?@@transfersuperstars
thank you!!!
Hi, do you mind sharing the white color settings on your prints?
In my experience, using just 1 pass of the white color isn't good enough for printing on black-colored t-shirts. 2 passes usually work, but it takes too long.
It really depends on your printer setup. I print on commercial machines at 6-8pass. The % of white ink also depends on your films ability to hold without puddling. You can print at 100% white but if it drips, it doesn't do you any good.
@@transfersuperstars Thank you! So far 2 Pass with 60% white ink seems ideal. More than that will drip.
Hi , can you show us the process of how making the white spot color for this design and the contract ?
People use different programs and rips but we just process the image normally in photoshop by contracting by 2.
@@transfersuperstars hi i manually post process like you but theirs a white solid rectangle around the art it hasnt recognised the white channel what am i doing wrong like the question above not sure what your doing on output
Did you apply Spot channel ?? Coz it needs to be selected first
Yes we always create a spot channel before the RIP.
is there any advantage in color results when it comes to cold or hot peal?
Our newest film is both hot and cold. Cold peel film generally has a better coat on the film, allowing for more saturation in ink. Which makes for more vibrant prints. Ours has the advantage of both.
@@transfersuperstars can you share the link to purchase it?
Great vid! Ty!!
Thank you!
What program are you using please and thanks
To do the halftoning we are using adobe photoshop.
Im confused ad some places recommended 10-15 sec on DTF cotton, so do i understand correct both together press value this?
We can only speak about our own transfers. Check with your supplier, we offer a low heat 7 sec melting point transfer.
what does it mean for it to be "halftoned"? When you say the gray areas will be halftoned, does that mean the gray areas will become either black or white? thanks!
Halftone is a printing technique that simulates continuous-tone imagery through the use of dots, varying either in size or in spacing, thus generating a gradient-like effect. Here’s a detailed explanation of how it works and its significance:
Key Points of Halftone:
Purpose:
Halftone is used to reproduce images that contain gradients and varying tones of color or grayscale. Since printing presses typically use only a single color of ink per pass (such as black for monochrome prints), halftone enables the illusion of different shades by controlling the density and arrangement of dots.
Dot Patterns:
The technique involves breaking down an image into a series of dots. These dots can vary in size (amplitude modulation) or in spacing (frequency modulation) to create the perception of different tones. Larger dots appear darker, while smaller dots appear lighter.
Color Printing:
In color printing, halftone is used in conjunction with the CMYK color model (Cyan, Magenta, Yellow, and Key/Black). Each color layer is halftoned and printed with a specific dot pattern, often rotated at different angles to minimize moiré patterns and achieve a smooth gradation of colors when combined.
Screen Angle:
When printing in color, each halftone screen for the different color inks is rotated to a specific angle to avoid unwanted patterns. Standard angles are usually 45° for black, 75° for magenta, 90° for yellow, and 105° for cyan.
Resolution:
The quality of a halftone image is determined by its resolution, measured in lines per inch (LPI) or dots per inch (DPI). Higher resolutions result in finer detail and smoother gradients.
History and Usage:
The halftone process was developed in the late 19th century and became a standard in the printing industry. It allows newspapers, magazines, and books to reproduce photographs and other detailed images efficiently.
Overall, halftone is a vital technique in graphic design and printing, allowing for the effective reproduction of complex images using simple binary processes (ink or no ink).
hey how does a 11x11 dtf film image feel on a bella canvas shirt, would it feel
super heavy? could i add little tiny knockouts on the design to allow shirt breathability.
is the 11x11 a solid box image? Definitely doing some knockouts will improve the feel.
@@transfersuperstars Yes its a solid box image i could also make it smaller to like 8X8.5... would that help, but before you answer that does the 11x11 impact the feel that much? cause i thought dtf was light....
Can you use any other software besides adobe photoshop?
We're not familiar with other programs for the halftones other than adobe products.
Hello, what did you use as a prompt for this image please?
I don't know specifically. Its been awhile since we generated these.
Is this photoshop? This is the only place I can do this? I’m trying to make the Viral Girlfriend shirt where there’s lighting bolts & gradient smoke effects.
Yes we're doing this from Photoshop. Other photo editors may have similar functions but i'm not for certain.
Will this be durable or after some time the thinner areas will fall off?
Nope, its very durable as long as you use a good heat press.
Yes we can knock out the black background to make it breathable, but Halftone effect possible on dtf? really possible? can you breathe through the image ?
Did you watch the video? This is a video about halftone for DTF. We don’t make this up, it’s real. DTF is the future.
Does this half tone trick only work with black shirts?
It can be used on other colors but the artwork and t-shirt needs to match the goal of the halftone.
I’m having trouble, after flattening image is not letting me copy
Black knockout plus half tones
yessir!
This tutorial gets confusing around the 4:10 mark. It says to do stuff (copy and paste on layer mask), however, the video does not demonstrate this action. Perhaps this is for someone more proficient with photoshop than I am.
It should be the black and white layer that is on the original document that you are working on and then once you're there you can press alt + left click to directly select it and paste the black and white layer from the other document.
Why does my histogram always show something waaaaay different. Even when my photo is just black and white?
Im following all of the steps and it works until I click on bitmap. The image turns into background and I can't unlock. So frustrating.. what is going on? anything helps!!
Gray scale again
@@Dungvuong_ what am i doing at the 4:07 mark. in the video it shows a copy of the original but mine still only has one copy of the gray.
You won't need to unlock the layer after the bitmap. You can still ctrl + a to select all and ctrl+c to copy the layer even if it's locked and it is indeed supposed to be black and white so that we can use the layer as a layer mask
I‘m getting a lot of white lines on the edges and dots although my design is very high quality. Is there any more adjustments that hast to be made?
I can think of 3 issues.
1. Graphic resolution and size (analyze dpi & size of graphic), this is extremely important when you start to knockout some of the original artwork.
2. choke adjustment, minimum 2, maybe 3 contact depending on the artwork.
3. DTF Printer needs to be highly calibrated in all directions.
Solve the problem by working backwards
1. Is the printer the issue when printing fine details
2. Try more choke (contract 2-3)
3. Upscale the image (use a free upscaler program like UPSCYL) I will have a video on this soon.
Aynı sorunu ben de yaşıyorum Ömer, İspanyol bir youtube kanalından sorunu araştırdım. Fason olarak yaptırdığımız 60cm geniş format DTF yazıcılarında iki baskı kafası olduğu için bunların hizalanmasını çoğu baskı firması doğru düzgün bir şekilde ayarlamamış oluyor ve bu yüzden beyaz mürekkep kaymış oluyor. 2-3 farklı firma denedim ama beyaz lekeler yine aynı şekilde kalmaya devam etti. Sorunu çözebildin mi ?
@@alpkazar9273 maalesef bende iyi bir üretici bulamadım. yaklaşık 10 farki üreticiye baski yaptırdım ve hiçbiri güzel basamadı.
looks good without the black
Yes!!! It looks so much better.
Wnat did I do wrong? Could not open the Bitmap
u didnt explain the first part about checking for dpi rez. how do i open to check for it?
If using photoshop. Go to image>resize and it will show size and resolution.
what printer do you use sir?
We have been printing DTF for a few years now and have gone through many printers already. We current import our own printer parts and have upgraded/configured our own setup.
Question 🙋🏻♀️ why save the design in .png(RGB) not .tiff (CMYK) ?
You can export as png with CMYK values. .tiff files are generally big.
Thank you for tech
Any time
What printer are you using ?
We import and upgrade our own fleet of printers, they are not a particular brand.
are you using black powder?
We are not using black powder. Its helps at a minimal
after the bitmap/halftone cant copy it.. its lock
You can still copy it even if it's locked. Just press CTRL + A then CTRL + C on windows.
Which printer you use?
We have a custom fleet of commercial printers.
How do you fix dullness of colors when you are doing them on black/ dark clothes
You'll need to color calibrate beforehand to make sure you're using your brightest colors. Here is a video on our color matching. ruclips.net/video/0d0jpOVroiw/видео.html
What DTF ink are you guys using?
We import our own inks but I believe dtgpro carries the same one rebranded called quantum.
So you are using Teflon paper and parchment paper?
We're using the back of the DTF film for our 2nd press. You can try different papers for different finishes.
Thanks for the response. Dope shirt by the way. Do you have a IG handle?
@@transfersuperstars What type of finish does the back of the film give?
Can I do a knock out effect in Canva or Kittl?
do you have a paid subscription for kittl or canva?
@@transfersuperstarsHi! Yes, I have a Pro subscription to Kittl and an Education subscription to Canva. Do you have any videos on how to blackout/whiteout and halftone images for dtf using these platforms?
Could you tell me why my design isn’t transferring onto black? The color changes from yellow to dark
What is happening?
Can this be done with procreate?
Yes, you can create a black knockout effect using Procreate, a versatile digital illustration app for the iPad. The black knockout effect involves removing or "knocking out" portions of a design, usually text, to reveal a background or an underlying image. This creates a visually striking contrast, especially when using a dark or black background.
Here’s a basic guide on how to achieve a black knockout effect in Procreate:
Step-by-Step Guide:
Background Preparation:
Open Procreate and create a new canvas.
Start by setting your background color. For a knockout effect, a darker color works best, so you might choose black or another dark hue.
Add Your Base Image or Layer:
If you want the text to reveal an image beneath, import or draw your
image on a new layer. This image will be "revealed" through the knockout text.
Position and scale the image as desired.
Adding Text:
Add a new layer above your image for your text.
Select the Text Tool and type your text. Choose a font and size that will work well for the knockout effect - bold and thicker fonts usually work best.
Position your text where you want the knockout effect to happen.
Creating the Knockout Effect:
Once you’re happy with the text placement, tap on the text layer to bring up the options. Select "Rasterize" to convert the text to a pixel layer. This is necessary because Procreate currently doesn’t support direct knockout effects on text layers.
Now, go to the layers panel. Tap on the thumbnail of your text layer and select "Select" to create a selection based on the text.
With the text selected, go to your image layer.
Tap the layer thumbnail and select "Clear." This will remove the part of the image where the text is, effectively creating a knockout effect.
Refining the Effect:
If needed, you can refine the edges of your knockout effect using the eraser tool.
Additionally, you can add effects like shadows or outlines to your text layer to enhance the visual impact.
Final Adjustments:
Adjust the colors, add filters, or apply any final touches to your design.
Once you're satisfied with the result, you can export your creation from Procreate.
Tips for Best Results:
Contrast: Ensure there's good contrast between the text (knockout area) and
the background or image you're revealing. This contrast is what makes the knockout effect visually appealing.
Font Selection: Bold, chunky fonts usually work better for knockout effects because they reveal more of the background image or color. Thin fonts might not showcase the effect as prominently.
Layer Management: Keep your layers organized. It's easier to adjust or correct parts of your design if each element is on a separate layer.
Experiment with Colors: While black or dark backgrounds are common for a knockout effect, experimenting with different colors or gradients can lead to unique and eye-catching results.
Save Originals: Before rasterizing and clearing parts of your image, it's a good idea to duplicate layers. This way, you have the original layers intact in case you need to make changes.
Creating a black knockout effect in Procreate can be a fun way to add depth and interest to your digital artwork. With the versatility of Procreate's tools, you can experiment with various styles and complexities in your designs.
U press 7 seconds with 300 Fahrenheit or Celsius?
300 Fahrenheit for 7seconds with our transfers. Please check your manufacture instructions as each printers instructions may vary.
Hello, is the image a vector?
no, raster
Thank You Very Much for the reply. I was told that to print anything, it has to be a vector.
Wouldn't the image pixelate after printing if it's raster?
I am new to design.
Thank You Very Much
could i know the name of printer that u used to print that photo
We customize and built our own printers + parts
Hi, when I flatten image to add halftones the layer locks. I’m not able to copy nor unlock it.. any help would be appreciated
You don't have to unlock the layer. You can just CTRL + A and select all then CTRL+C to copy and go back to the other document to paste it. It will work even if the layer says it is locked.
did everything as said in the video but when i print my image it becomes very dull. any suggestions?
Was the image dull to begin with? How did the original artwork print?
How to knockout white?
We will come out with a video on this topic shortly
why is the color not as vibrant from original image once i get the knockout/transparency in?
so sorry! this is a lot more complicated than I thought. lol
You may have adjusted the levels too much and lost a lot of the details that caused it to look like it has lost a lot of colors. You may also try adjusting the frequency you're using for the bitmap to get the half tone effect.
but why second press with the film?? Is that for efficiency???
2nd press is recommend to increase longevity. You can use various sheets for different finishes. www.transfersuperstars.com/products/the-matt-finishing-sheet-matte-2nd-press-cover-sheet?_pos=1&_psq=matt&_ss=e&_v=1.0
@@transfersuperstars right . But do you have to use the DTF sheet ? I’m trying to figure out the importance to that
You don't have to but the backside of the original DTF sheet is the easiest thing available after the transfer is made, so its quick.
🔥🔥🔥🔥🔥
Thank you!
When I click ctrl v on the mask it doesn't get fit, It will copy smaller than the original size of the design, and when I try the tranformation, it won't give me that transparency of the design, do you know what should I do ?
You may have changed the size or resolution of the artwork after you have made the copy and made edits on the new document.
Increase the resolution of the artwork before you take it to the new document
@@transfersuperstars it worked thank you
I can't paste the halftone to the layer mask
Try Ctrl+A on the half tone layer. Click on Alt+left click on the layer mask before pasting.
life saver
Thanks buddy!
Where can I find designs?
Designer
shop.transfersuperstars.com/
Pls Help.. STUCKED in 4:16 can't paste the half tone layer that I made. When I tried to paste it in the Layer Mask.. it didnt go the layer mask instead its going in the new layer. pls help.. thanks
Right click on the mask layer. You may be copying it and pasting it immediately without clicking "Alt+Left Click" on the layer mask. It should first take you to a white screen then you paste the halftone layer. Give that a try and let me know if that works.You should still be able to CTRL+A select all then CTRL+C to copy even if the layer is locked.
Thanks a lot@@transfersuperstars... it works! big help. Awesome Content.
@@transfersuperstars im having the same problem im not getting white srceen?
thank you
You're welcome 😊
Thank u
No problem
im realy confused, im doing print on demand and they use DTG to print, i always used blending options to remove background an it worked perfect, is very easy to do and looked good, why ppl even wanna use halftones? this black dots looks bad in my opinion, or is this just good for DTF, and for DTG blending is better?! im not realy into it
Different kinds of artwork require different actions. We do black knockouts and halftones to reduce the feeling of a large print
Tried to follow the video but I’m using PS 2024 and the steps in the video don’t work. When I go to image mode grayscale I get an error message saying that I have to Rasterize the image and then it tells me to go to adjustments and levels and choose black and whites. What am I doing wrong. I so need to learn this technique for my AI images. Any help will be greatly appreciated.
Certainly, if your artwork involves a smart object or multiple layers, you'll need to rasterize it. Simply select "Rasterize" from the three options that appear. It's worth noting that this won't impact your original file; instead, a duplicated version will be created, as demonstrated in the video. This duplicated version is only utilized for the specific selection.
I tried that but it still does not work for me. I must be missing something in between. I will try it again!!! Will you be able to create a video with the rasterize and what to do after? The steps change because they next message is to go to adjustments and chose black/white. Can I send you the screen shots of what I get?
They are not telling a whole step in this video for pasting into a mask hold alt then select the mask why you hold atl edit then past directly into the mask
@@Angel-vm7sl thanks for the info. But even before the mask my options are not the same as the video. I get totally different options. I cannot figure out what I’m doing wrong. Does it work for your images?
Little tip.
If your going to print on both sides of your t-shirt always put parchment paper on your press mat otherwise you will press the print on to it .Notice the mat is not on the press at the end of video he most likely ruined it ..
Still a great video tho
If you look closely at the heat press, we actually have magnets holding up the teflon sheet.
@@transfersuperstars
I can see that but that's not I was taking about ? I said put parchment paper on the mat on the bottom of the press before you put the t-shirt on it .if you have just done a image on one side then put that t-shirt face down on your mat to Press the other side .that first image will transfer on to the mat.
That's why you removed the mat Right?
I only know this because I did this mistake myself and now have a heat press with a unicorn on it.
Supercolors
Thank you!
Dtf feels like cheap plastic on top of the fabric. My blanks are expensive so the dtf feeling cheap is not a good option
Halftoning and knockout might help with certain artwork. finishing sheet might also help with the finish. www.transfersuperstars.com/products/the-matt-finishing-sheet-matte-2nd-press-cover-sheet
not clear starting from minute 4:00, if you use shortcuts put what are you pressing
My bad brotha, we'll get better at these. If you were referring on how the layer was copied it was CTRL+C or CMD + C on mac and then paste it by CTRL+V or CMD+V in the layer mask.
you skip click ALT in mask then CTRL +V or paste the information, I saw this in other tutorial, thank you@@transfersuperstars
Thank you!
@@transfersuperstars that still didnt work for me. the layer is locked. cant copy
@@JShip-xk9si Hi, Here's what you need to do: go to Select > All, then Copy. Then go to the original layer, add the mask & Alt/Option + Click the mask to open it. Then you can paste it in there and return to the main image by clicking its thumbnail. If it still doesn't work, I found I could unlock the layer by returning to bitmap from Greyscale mode. All the best.
Using the same film is sketchy lol
For the 2nd press? As long as you flip it, should be ok but you are right, using a parchment or kraft for the 2nd press would be better in this scenario with gradients
Hey after I pressed control d remove the selection nothing happened I’m not sure how to do it passed 4:28 it gets confusing then just jumps to the design change it didn’t explain the hole control d part well like what am I unselecting please help
The deselecting part is very subtle but it should be the broken lines around the selection.
After that it's just left clicking on the layer mask and pasting the copied selection.