
- Видео 11
- Просмотров 242 964
Design Build Destroy
США
Добавлен 10 май 2020
Welcome to Design Build Destroy! This channel is dedicated to random DIY projects I work on. Mostly focusing on electronics, programming (mostly C/C++ and Python), 3d Printing, life hacks and automotive fixes. I spend a lot of time tinkering so I decided why not record the projects going forward. Most of the projects are using Arduino platform, Raspberry Pi, ESP32 and ESP2866 and and a lot of hot glue!
Why is Destroy in the name? Well over the years I find myself at some point cannibalizing past projects for parts to build the next.
Starting a RUclips channel is just another project in a list of never ending projects so join me on this journey down the rabbit hole.
Follow us on Twitter: DsignBildDstroy
Support this channel on Patreon: www.patreon.com/designbuilddestroy
Arduino Halloween Cosplay True and the Rainbow Kingdom Backpack Neopixel Dfplayer Mini
#arduino #cosplay #halloween2021
Making a last minute Halloween cosplay upgrade for my 3 year old's costume. Working light and sound backpack for True from Netflix True and the Rainbow Kingdom.
Source Code and STL print files on Github:
github.com/DesignBuildDestroy/true_cosplay_backpack
Parts used in this build:
NeoPixel WS2812B: amzn.to/3BqinDT
DFPLayer Mini with speakers: amzn.to/31h7kke
Arudino Nano clones: amzn.to/3Ex7e6s
Rainbow Ribbon Wire: amzn.to/3nGFRjj
Просмотров: 1 005
Видео


Alexa controlled Curtain Robot using ESP32 Arduino
Просмотров 2,1 тыс.3 года назад
#Arduino #ESP32 #curtainbot #Electronics Automate opening and closing your curtains with a Curtain Robot using an ESP32 under Arduino framework to allow Alexa control or just by giving your curtains a little tug in the direction you want them to go. I stopped working on this project after months of tinkering with it and many different designs, but thought it was still interesting enough to shar...

Increase Flash Programming Memory for Arduino Nano? YES!
Просмотров 19 тыс.3 года назад
#Arduino #arduinonano #arduinoproject #electronics Can you add more Flash memory for large Arduino Nano sketches? I'll show you how a fuse setting in Arduino bootloader is losing you 1.5KB of space to nothingness and how to gain that space back. Even a genuine Nano is missing this extra space! You will need to reload the bootloader as part of the process so if you haven't seen the video on load...

Simple Trick for Soldering Headers Pins - For Arduino, ESP32, Raspberry Pi and more
Просмотров 12 тыс.3 года назад
#Arduino #Raspberrypi #ESP32 #Soldering I saw a few random posts on forums about having trouble soldering on header pins straight and even to their boards and thought I'd share the easy way I've done it for years. This is mostly an issue with cheaper boards and clones that tend to come with header pins unsoldered. There are a lot of ways to do it, this is what has worked best for me quick and e...

Arduino Based Digital Level Code Review - How does it work?
Просмотров 2,7 тыс.3 года назад
Follow up to the Arduino Digital Level build: ruclips.net/video/232jer4HIZc/видео.html Many have asked for a walkthrough of how the code works so here it is! The most important thing when copying my code from Github is to use the correct matching libraries that I use. If you are not sure how to install them check out this Quick Tip video, it's easy! ruclips.net/video/lGvympJcHdM/видео.html

Easily Add Arduino Custom Libraries From Github (QUICK TIP) - Arduino & ESP
Просмотров 6 тыс.3 года назад
#Arduino #ESP32 #Github Many components have multiple libraries available and some have different functionality. When following someone else's examples online it's important to use the same library that they used in their code. But how do you add a library that isn't found in the Arduino Repo and instead must be downloaded from Github?? I'll show you how easy it actually is! This also applies t...

Raspberry Pi Stock Indicator Touch Lamp with NeoPixels!
Просмотров 2983 года назад
#raspberrypi #iot #raspberrypizero A touch lamp that let's us scroll through a list of stocks to pull REAL-TIME quotes and indicate the days price change through a glowing color effect using NeoPixels and a Raspberry Pi Zero W. It can easily be adapted to show Weather or anything else you can think of. Code and STL files: designbuilddestroy.com/stock-indicator-lamp/ Parts Used: Adafruit Pi-OLED...
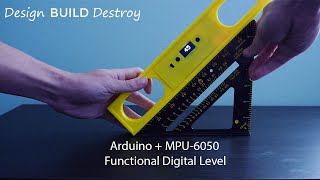
Arduino Digital Level using Nano + MPU6050 Gyroscope/Accelerometer + OLED display
Просмотров 32 тыс.3 года назад
Let's build a functional and stylish Digital Level (aka spirit level or bubble level) using an Arduino Nano, MPU-6050 6 Axis Gyroscope & Accelerometer with an OLED display to show angle value and some menu options. This is a more practical approach to building a useable device housed in a 3d printed case that looks like any standard bubble level you'd buy. Download Source Code and STL files at ...

Arduino Bootloader Update or Install - Upgrade a Clone From Old Bootloader to New Optiboot!
Просмотров 46 тыс.4 года назад
We took a look at some Arduino Nano Clones from REXQualis in the last video. Like most non genuine Arduino's (clones) they use the OLD BOOTLOADER which can get stuck in an infinite loop. I'll show you how to upgrade the bootloader to the newest version making your clone basically a true Arduino. This also applies to re-installing the bootloader on any Arduino that uses the Atmega chips like Uno...
Arduino Nano Clones Are They Worth it? YES
Просмотров 27 тыс.4 года назад
Checking out these REXQualis made Arduino Nano Clones that are SUPER cheap at about $14 for 3 boards WITH USB cables and fully assembled and well packed compared to the usual stuff you get in a zip lock bag. NOT SPONSERED BY THEM, found it on Amazon and purchased myself. So are these worth it? Do they work as expected? Let's find out! Great deal on REXQualis 3 set Nano: amzn.to/2YNt9GI Safe CH3...
BMW Brake Sensor Bypass - How it works
Просмотров 95 тыс.4 года назад
Bypassing the BMW Brake sensor with no special tools and how to clear the warning light. As well as an explanation of how the Brake Sensor works and how you can test them. This should only be done in a pinch when you really need to clear the warning light (like before an inspection).
I did this EXACT same thing to my car because my dongle is saying, "rear brake pad sensor fault", except I soldered the wires together and the light is STILL on. I reset the fault in my PCM and it's came right back on. Edit: BTW, I put brand new pads, rotors and calipers on the rear of my car, but my car has H&R lowering springs (2") and 225/40/18s on it, so the wiring rubbed through. I cut the harness all the way back to the plug and resoldered them, so we'll see.
Will it work for a bmwi3 range extender
Looks like you might need to update the Amazon nano link
Where did you learn all this? My and my kid are trying to teach ourselves but there’s so many different videos and it seems like everyone has a different way of doing this
That’s what I’m talking about a real mechanic thank you have much I figured I could do that but wanted to see if
Great tutorial! No bullsh... around. Thanks!
Ive had luck with Keyestudio and Elegoo Unos. Mune have lasted and worked for years. Hitlego Nano worked once and then overheated and was kia. Im nervous of buying the clone Nanos. Maybe thats why they sell them in 2s and 3s. 😂
Tried this on a nano that I can't upload. Turns out it has a defected chip. What a bummer.
W video thanks bro
You got me worried now, how do we check them for viruses?
How do you know which sensor is the left
Sit in the car and ask yourself which direction is left…
Car still runs fine. Found mine the end was totally off. Just a lil piece but yellow break pad light turned off.
any tips for unsoldering them
source code?
How do i get the code for this project?
all Arduino-compatible boards contribute to the growth and accessibility of the Arduino platform, and the term "clone" may not accurately reflect the collaborative and inclusive nature of the Arduino community. Instead, it might be more appropriate to refer to these boards simply as Arduino-compatible or Arduino-derived boards.
Just fantastic, I will do it, it's cool. I would like to modernize it further. here are a few ideas, and then we’ll see for ourselves, but this is already cool. Tilt Indication: Add visual and audible indication function to indicate tilt in a certain direction. Attachment Magnets: Add magnets to the level body to allow users to easily attach it to metal surfaces.
Is there a way to do this with just 1?
Extremely interesting video. Thanks! I learned a lot.
Thank you. I'm new to working with Arduino and I had a couple Nano that I couldn't upload to period, not even using an Uno as programmer. I was able to use a good Nano to flash the new bootloader to them following your video but they still wouldn't work. The tx LED was constantly lit up on both of them and I'd tried hitting 'reset' as I started an upload to no effect. Out of frustration I eventually did a double click of the reset button after I'd started an upload and surprisingly the one I did that to uploaded, so I did the same on the other and that fixed that one as well. Now they both can be uploaded to without issue, no more constant on tx LED and no more having to select 'old bootloader' either. Now all my Arduino have the current bootloader. Thank you!
3 years later and these instructions still worked! Nice!
You used two micro controllers?
@@stevee-bc1gt Yup. I used two Arduino Nano. One to upgrade the boot loader on the other one that had a old boot loader.
Replaced brake pad on my 320ied but could not reset mileage from dashboard: reset unsuccessful. Sensor seems faulty n i just removed plastic n twisted the 2 sensor wires together to close the circuit. Reset was then successful. Thks a lot
Worked perfectly, thank you!
whow, I really like this kind of ingenuity. I will do this to my 3 Nano clones too.
Its a $5 part. Why not do it right and replace it?
Whats the point of buying the "part" when it's just making a full circut? Go ahead buy all the stuff you don't need. SMH
And the delete is more like 25-30$
I went to grab a sensor at the local yunkjard yesterday and the car that was there had the sensor cut off and the wires twisted together just like this video. I was so confused as to why he did that and today i run into this video showing me why 😂 probably just going to do that with my car instead of buying a new one for $10 on rockauto
anyway to do this on portable version of IDE? Edit: got it working! Thanks And for who use oled screen like me, disable adafruit logo and delete its line from IDE
good video thanks
This warning can trip if the car has high mileage as well and can be very annoying especially when you know the brakes are good. That's why if you have an older model, this is a great fix for that annoying "service death light".
Nice build, in the related article you mention printing the case without supports. Can you detail on this (how to arrange the support etc)?
Thanks for the educational video. Unusual and useful crafts the main thing is the possibility of repeating the project. Im 65 years old and i did it.
"error 13 internal library install failed. moving extracted archive to destination dir. library not valid"
Just An over all Brilliant Solution to a free up more space, and your explanations and methodical sequence for me is spot on, a Thank you over 2 years on from original post.
Very nice upload! Thank you :) With your help I finally managed to get my rf nano's up and running by flashing a working bootloader to it 😊
+👍Nice project, I wish there were horizontal center cursor dots ruclips.net/video/POO9Zet4umk/видео.htmlsi=MTFz7LSMw3dEHl6i
Very nice video, everything clearly explained. After spending almost 5 hours on troubleshooting my AliExpress Arduino Nano, this is the only video that managed to work for me. I connected it to my original Arduino Uno and burned the new bootloader onto it. Thank you for saving my money, keep up the good work!
Excellent
When i paste link into browser, a red screen pops up and warns me the site is unsafe for my PC. What is that all about??
Good explanation, i have tried your code is working . thanks for your effort . i face one problem x angle vary continuously 0.01 degree for every second in sensor stable position .any guide for that.after few minutes it goes 5 to 20 degree.waiting for your reply.
Thanks for nice title, not click bait, already answered. Subscribed.
You appear to be the only person on the internet pointing out that for clones the old bootloader must be used, was surprised that this was so hard to get working, thanks
Tip..if you try to reset and come reset unsuccesfull..just realease parjing break and will reset...say thanks later,took me couple of week with all posible trics..f10 2014..parking break released..succes😂😂silly shit
Huh explain
Can You Send Me design file with .SLDPRT format?
Thanks for the video & the clear step-by-step instructions for both videos. Which version of avrdude are you using to skip Arduino's IDE?
I would l ike to run this on the SEEEDstudio XAio SAMD will this work?
A clamp, i normally align the pins sit it flush against the desk and solder it lol Ill give this a go ... cheers
Soldering these things on is easy gettjng them off is the difficult part lol
Can't I just stick a paper clip inside?
what's the best way to permanently solder wires to a board? onto a header pin maybe? the breadboard acts as a heat sink too, takes longer to solder
Worked as advertises. Thanks.