
- Видео 14
- Просмотров 729 181
OurHomeProjects - Karen
Великобритания
Добавлен 2 фев 2010
I'm a 45+ woman who enjoys doing DIY and renovating our 1930's Arts & Crafts house with a little help (the brawn) from my husband. I have discovered muscles I didn't know I had and can hold my own carrying 2x8 4.8m lengths of wood and 18mm sheets of ply! Along with all my sloped landscaping projects, I particularly enjoyed building my own garden room/office (75%me+25%husband) during the 2020 UK Lockdown.
Thanks to the RUclips generation, this makes building and creating things so easy and interesting - Thank you RUclipsrs! Karen
Subscribe to see the following projects -
Gabion basket retaining wall
Complete steep driveway transformation
Slatted larch fence
Garden room / office - 7mx4.7m - videos underway!
Two tier raised deck
Extra large log store
Gravel patio and pergola
Garden pod and seating
Second garden room - golf room!
More details on each project - www.ourhomeprojects.co.uk
Follow current projects on ourhomeprojectsuk
Part 7- GARDEN ROOM BUILD -Electrics & Wall Insulation | OFFICE | GYM | TV ROOM | STUDIO | CABIN
DIY Garden Room - the garden room is 7.2x4.5m (externally), with a 2"x5" frame, 120mm PIR insulation, warm roof construction with Shou Sugi Ban larch cladding. We use it as a home office, gym and tv cinema room. Built 75% by Karen and 25% help from her husband.
This episode covers the electrics and installing the wall insulation - time consuming and not much fun! I had an electrician do the work, so it doesn't go into installation specifics, but the photos are quite self explanatory and show how he ran the circuits. The timber wall insulation took me about 3 weeks to do - it was long and laborious and I think any future project will involve something less time consuming!
BACKGROUND - During...
Просмотров: 7 433
Видео


Underfloor heating in a suspended wood floor | Insulation | Screed
Просмотров 90 тыс.3 года назад
As part of our internal house renovations, we had underfloor heating installed across the whole of the downstairs. This is the method our builders used and it has been extremely effective. This has enabled us to easily keep the downstairs at a constant temperature throughout the year and has actually reduced our heating bill. The insulation is held in place with battens and a reasonable layer o...
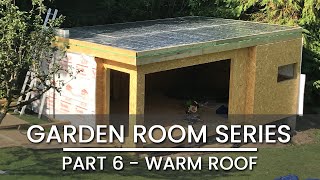
Part 6- GARDEN ROOM BUILD -Warm Roof Construction | OFFICE | GYM | TV ROOM | STUDIO | CABIN
Просмотров 14 тыс.3 года назад
DIY Garden Room - the garden room is 7.2x4.5m (externally), with a 2"x5" frame, 120mm PIR insulation, warm roof construction with Shou Sugi Ban larch cladding. We use it as a home office, gym and tv cinema room. Built 75% by Karen and 25% help from her husband. This episode covers building the warm roof construction, from installing the roof joists, adding a vapour barrier, roof insulation and ...

Part 5- GARDEN ROOM BUILD -Timber frame design & construction | OFFICE | GYM | STUDIO | CABIN
Просмотров 9 тыс.3 года назад
DIY Garden Room - the garden room is 7.2x4.5m (externally), with a 2"x5" frame, 120mm PIR insulation, warm roof construction with Shou Sugi Ban larch cladding. We use it as a home office, gym and tv cinema room. Built 75% by Karen and 25% help from her husband. This episode covers timber frame wall design and tips on building the garden room walls. BACKGROUND - During the first UK 2020 lockdown...

Part 4- GARDEN ROOM BUILD -Building and Insulating the Base | OFFICE | GYM | STUDIO | CABIN
Просмотров 14 тыс.3 года назад
DIY Garden Room - the garden room is 7.2x4.5m (externally), with a 2"x5" frame, 120mm PIR insulation, warm roof construction with Shou Sugi Ban larch cladding. We use it as a home office, gym and tv cinema room. Built 75% by Karen and 25% help from her husband. This episode covers building the base from grade C24 2"x5" (45x120mm) treated timbers and fitting 120mm PIR insulation. BACKGROUND - Du...

Our Home Projects Intro- GABION WALL | GARDEN ROOM | RAISED DECKING + New projects planned for 2021!
Просмотров 1,9 тыс.3 года назад
Welcome to our channel! Follow us on our journey renovating our 1930’s Arts and Crafts house in Hertfordshire, UK. Renovating both the inside and out has taken several years and is still a work in progress! The house definitely has its challenges being sited at the top of a hill. All projects have been the design in Karen’s eye and whilst she attempts most of the work herself, her husband is on...

Part 2- GARDEN ROOM BUILD -Retaining Wall and Final Site Prep | OFFICE | GYM | TV ROOM | CABIN
Просмотров 31 тыс.3 года назад
DIY Garden Room - the garden room is 7.2x4.5m (externally), with a 2"x5" frame, 120mm PIR insulation, warm roof construction with Shou Sugi Ban larch cladding. We use it as a home office, gym and tv cinema room. Built 75% by Karen and 25% help from her husband. This episode covers setting out post holes, building the retaining wall from 2x8 C4 treated wood rather than sleepers and preparation o...

Part 1- GARDEN ROOM BUILD -Clearing Site & Foundations | OFFICE | GYM | TV ROOM | STUDIO | CABIN
Просмотров 12 тыс.3 года назад
DIY Garden Room - the garden room is 7.2x4.5m (externally), with a 2"x5" frame, 120mm PIR insulation, warm roof construction with Shou Sugi Ban larch cladding. We use it as a home office, gym and tv cinema room. Built 75% by Karen and 25% help from her husband. This episode covers digging out the slope by hand as I couldn't hire a digger due to the covid pandemic and building block piers to sup...

Retaining wall with gabion baskets | MORE PHOTOS FOUND! | Cost saving panel with gravel bags fill
Просмотров 9 тыс.3 года назад
I found the missing photos which finish off my Part 1 video of the Steep Driveway series showing how the left section of the gabion retaining wall was built using a cost saving partition for the Scottish cobbles and a gravel bag in fill. The right hand 2m tall section was built with a recycled brick in fill. I would not recommend the gravel bag in fill on a wall over 1m tall as we had movement ...
SLATTED SCREEN FENCE | Horizontal privacy fence for your garden or yard | Quick how to build
Просмотров 25 тыс.3 года назад
How we built a Siberian Larch slatted fence in our garden. Ideal to screen off the back garden from the front. It's still missing the slatted gate, but I hope to get that built this Spring and will post a quick video on that then. We have lots more completed home projects to publish and have several new ones on the go now. Please subscribe to get notifications of new uploads. It's really apprec...
STEEP DRIVEWAY BUILD | Gravel grids, Steep slope, Larch fence, Oak garage, Marshalls paving - Part 4
Просмотров 8 тыс.3 года назад
Part 4/4 of my Steep Driveway series showing how we finished off the driveway with Core Drive gravel grids, Marshalls block paving, our DIY Larch slatted fence, Passmores oak fronted garage and laurel hedging. Larch fence 0:20 Passmores garage 1:43 Start of transformation 3:00 Core Drive gravel grids 4:36 Marshalls block paving 5:12 Amazing gravel pour! 5:36 Laurel hedging 6:36 Click here to wa...
DRIVEWAY GROUNDWORKS CONSTRUCTION | Retaining wall, Garage slab, Steep slope, Hardcore - Part 3
Просмотров 3,8 тыс.3 года назад
Part 3 of my Steep Driveway series showing how we retained the lower part of the driveway, levelled the parking area and formed a garage slab. We had to get different contractors in to do various stages of the build as no-one wanted to take on the whole job. Easier ones out there I guess...! The challenges of having a house on a hill! Don't forget to check out 4:34 and 5:25 minutes for some fun...
GABION RETAINING WALL CONSTRUCTION with cost saving panels | Full Walkthrough with Audio - Part 2
Просмотров 282 тыс.3 года назад
Part 2 of my Steep Driveway series showing in detail how we built a retaining wall from 2m high gabion baskets, using recycled brick as infill and a cost saver partition panel using Scottish cobbles. This project saved us a tonne of money by not having to dispose of our house renovation rubble and only buying a few bags of Scottish cobbles to complete the modern look. This cheap retaining wall ...
Retaining wall with gabion baskets | Cost saving panel with cobbles and recycled brick - Part 1
Просмотров 222 тыс.3 года назад
Part 1 of my Steep Driveway series showing how we built a retaining wall from 2m high gabion baskets, using recycled brick as infill and a cost saver partition panel using Scottish cobbles. This saved us a tonne of money by not having to get rid of our house renovation rubble and only buying a few bags of Scottish cobbles to complete the modern look. Please be kind as I'm only just learning how...
I love the look. Thank you for sharing this very informative video!
Happy to see the beautiful house completed. Really wonderful, your husband and children must love the house
Excellent work
Three legged cat 🐈 yrs 😂❤
She’s a star isn’t she 😻
Not a fan.
Thanks for watching. I’m sure you’ll find the right solution for your project.
overall nice but i m worried the plastic weed fabric will degrade in a few years also your distance holders seem way too thin
The geotextile has a 50 year lifespan. Not sure what you mean by distance holders? Thanks for watching.
😅😅nie vergessen was sowas kostet. Vor allem das Füllmaterial. Wenn man eine bestimmte Farbe möchte.!!!!
Thanks for watching!
post should be 50% in 50%out
Yeh, I would agree with that if it were possible. Unfortunately, our soil is full of flint, pebbles and clay, so I could only dig so far. It was a short wall and the fact the surrounding 'soil' around the posts was rock solid I decided they would be ok. Thanks for watching.
Why stop? All that effort to stop the progress
Sorry, family life got in the way. I have all the recordings, just struggling to find any time to edit. Sorry
@@OurHomeProjects don’t apologise, the videos are amazing. Im starting something similar myself. Your videos are so good and informative
Thank you for this! I'm in the US and about to do this. Annoyingly this is not a popular method of retention here it seems, so finding a good gabion source has proven difficult. Nice work!
Ours were galfan coated to prevent early corrosion. They were advertised as suitable for waterways. Hope you manage to find something and good luck with your project.
Thank you for doing this with audio. Very helpful. Love the results!
Glad you enjoyed it! Thanks for watching.
Is there a need to take special care of the base? Like using a beating machine, dont know their name? And when there is slope I guess the digger would dig a straight groove, then geotextile, then small rocks , how much height, ?, so that it is easier to level the baskets?
Yes, the gabions need to be placed on firm solid ground. As the digger removed soil from the bank for us, he compacted the earth for us going back and forth across the site. The geotextile underneath also helps stabilise things.
Excellent video, really detailed explanation of how to correctly build a warm flat roof. Watched loads of videos done by professionals who dont show the 1st steps like you have here. Half of them dont use a vapour barrier either so its very confusing and would lead to the roof failing. Thanks for uploading, the build looks fantastic. Well done! 👍
Thanks for watching. I’m not a builder myself but pieced this all together from some other videos I watched at the time. This process seemed to make sense to be scientifically! Good luck with your project 🙂
Having done this work, I must say your information was well presented and complete. Brilliantly done both as a project and as a tutorial.
Thanks so much for leaving such a lovely comment 🙂
One of the most informative videos I’ve ever seen on RUclips - Thank you and congratulations on your courage, commitment, fantastic outcome!
Thanks for watching. Good luck with your project!
This is fantastic Karen, I’m also UK based was wondering how you found your recycled bricks a little of Google searches just bring up reclaimed bricks thanks for the great video
Thanks for watching. Have you seen my second video? Has a lot more info and may help. ruclips.net/video/zIwbbXTy25A/видео.htmlsi=XNIoqSDzhX6GwzFp
And here’s me, an 18st 6’1 lump, dreading digging out a 15sqm area of soft soil by hand because it’s close to a few trees while you’ve basically opened your own miniature quarry by hand - don’t I feel put to shame lol. Grand job by the way.
Lol, it did feel like that 😂 Now would be the perfect time to do yours before the soil dries up. I started in June iirc and it had been dry a good few weeks, so have a go soon whilst it’s still easy 😂💪
I have seen a couple or three videos on creating gabion walls, and yours is certainly the most informative and ticks all the boxes. Lots of good info here. Edit: the end with the geotex on top with the plants. Great idea. :)
Thanks watching and leaving a comment!
You made so many Inteligent decisions to mitigate issues, as they arose. So much better a learning video than watching a pro and his crew. I love your annunciation and vocabulary. I understood everything you said. Lovely voice as well!
Aww thank you! Good luck with your project!
Thank you very much for sharing this project 🥇❤ we are planning to do the same and it has helped us a lot. I thought we could skip the dry screed.🥇❤️
It’s the dry screed that spreads the heat under the wood flooring. If you don’t add that then it will only be warm where the pipe is. HTH. Thanks for watching.
@@OurHomeProjects Hi Karen, thank you for your kind answer.
I am not familiar with the PUG system but it looks very similar. We used a thin layer of a very dry mix. Good luck with your project!
oh, and the series has finished. i'm sorry it has ended so abruptly and hope all is ok.... :(
Sorry Mark, I ended up getting a full time job and not much time to do video editing. I would like to finish the series at some point. Thanks for the comments and for watching 🙂
@@OurHomeProjects no worries, i'm just glad to hear that you're well. congratulations on your new job and all my best
amazing job, very inspiring thank you for sharing
It was a hard project but well worth the effort. So satisfying building something from scratch.
My plan is to define a 35' x 40' parking area with diy gabions made from hog panels sourced from tractor supply. We're trying clean up some rubble on the property. I don't feel like paying someone to haul it away and I love the idea of recycling the material into something useful and I like the idea of hiding it in plain sight. It will definitely cut down on the amount of new stone that I have to purchase
Sounds great! A suggestion would be to make sure whatever wire you use for the baskets doesn’t have a short lifespan and won’t corrode in a few years 👍
Excellent video Karen. Very easy to follow. You've given me some great ideas and above all the inspiration to crack on. Just hope I can source the gabions here in Italy. Thank you.
Thanks for watching and good luck with your project!
Un mur en gabion plus de hauteur
Thanks for watching!
After 3 years Karen, do you mind making a video or leave a comment on how is the Gabion you've built is holding up? Thanks
What a great idea! I’ll do that. It’s almost 8 years now.. still looks good.
Removed wonderful trees that took decades to grow. Could’ve just pruned them.
It was a hard decision, but they had not been looked after by the previous owner and blocked too much light and were making the bank unstable (hence the new retaining wall). Unfortunately you cannot prune fully grown evergreen trees as they just leave bald brown areas and do not refill. They were replaced with beech hedging which is growing well (many more than the 3 evergreen trees). Thank you for your concern.
Hi what's the thickness of the chipboards. Are tiles still fine on the chipboard??
Hi, unfortunately I don’t know the thickness of the chipboard. An anti-movement mesh was laid on top before the tiles. The tiles haven’t cracked, but the grout has in places.
@@OurHomeProjects what's the depth of your floor joists. Mine are 100mm and told not to use screed as joists are not that strong. Use spreader plates on top of insulation.
I believe ours are 200mm as they span quite a distance. The house was built in the 1930’s.
@@OurHomeProjectsdid you use Pex pipe or Pert. And is it 12mm or 16mm? Do you feel you should have a radiator installed aswell as pipes only heat up the floor and not the room.
I can’t answer your first questions, but we do find the UFH provides an even comfortable heating of the room. The downside is it takes a few hours to get up to temperature as UFH uses a lower temp water than radiators. We enjoy having clear wall space free from radiators, but that is personal preference.
Excellent video!
Glad you liked it! Thanks for watching.
DONT cut joists, put breathable membrain at bottom or over each joist make a pocket then put insulation inbetween joists , like you have done put more battons . wood sub floor down , t and g floor boards p5 , sub floor . Then put pipes and stuff on insulation board then screed if weight can take it or get egg shell trays, and tile on that .
Ok, I have watched maybe 20 different tradespeople do the warm roof and I still had questions... If I had found your video first, that would have been the only video I would have needed.! This deserves a Nr 1 ranking and millions of views.! Thank you, Karen.!
Thanks so much for the amazing comment! Good luck with your project.
Did you let the cement dry before screwing the walls to the post?
Yes, this was postcrete so fast drying. I did the cementing near the end of the day and secured the boards the following day 👍
What is the efficiency like in the kitchen with the chipboard? Was it 18mm chipboards?
Unfortunately I can’t remember the depth of the chipboard, but it lets enough heat through and the tiles are actually warmer than the engineered wood floor.
Great job, very satisfying I'm sure! Well done.
Thanks for watching!
Hi Karen, I know this video was a long time ago, have you had any problems with the screed cracking with just a simple battom holding it all up? I'm very close to putting underfloor heating down in my property but I'm worried the joists will move slightly and crack the screed!
Hi, once the wood floor went down we haven’t seen the screed since! I’m sure it probably has cracked in places, but we still get a constant even heat under foot, so appears to still be doing a good job. 👍
@@OurHomeProjects Right that's positive then! No cold spots at all? I might give it a go! How much support did you put under the joists in terms of how much timber to support the screed? In terms of the battens, how many did you need and far spaced were they?
@@OurHomeProjectsHi, can I ask, I'm very close to going for a joist, screed floor! But what type of timber did you use to hold the insulation boards up with and screed? I've bought a load of roofing lats.
So what happens when the metal cage rusts out?
Hi, our cages are galfan coated and show no signs of rust 8 years on 👍 Always best to do some research before ordering and buy good quality gabions.
@@OurHomeProjects Good to know, to you
Awesome, thanks so much for sharing you addressed so many of the questions we have for our project
Glad it was helpful!
Excellent video, a master class on gabion construction for us DIY'ers. I commend your detailed commentary and referral to Fine Mesh Metals.
Thanks for watching!
Do you have Part 8 filmed? very interesting
Part 8 filmed, just finding it hard to find the time to edit it all. Sorry about that.
@@OurHomeProjects no worries..thanks for replying and have a nice day
3:05 "There would also be nothing to rot over time." WRONG! The gabion cage is made of metal that will rust and eventually disintegrate. They can last for decades or as little as 10 years. Still a far better choice than wood. I love the price. Very affordable.
Agree you have to buy from a reputable seller to get the longest lifespan
Good evening from Auckland, New Zealand ...nice looking job ...
Thanks for watching!
Hi Karen, Thanks for the video. I'm looking at doing the exact same, but noticed that you did not include a structural floor in your installation (i.e. plywood or OSB board after screed to support the flooring above.) Can you confirm this please? It looks like the battens fitted below the joist are doing well to support the insulation and screed as well as the engineered wood above spreading the weight to the joist. Thanks
Hi, sorry for the slow reply. If you add another layer of wood in between your finished floor and the underfloor heating pipe, you're blocking even more heat from coming up through the floor. The engineered wood floor was nailed into the joists at various locations. HTH
Very clear and detailed audio. Excellent project. This video has really helped me come to terms with gabions. My one question as a total novice is: Is the wall stable after the metal wire of the gabion cage has corroded?
Hi, sorry for the late reply. It really depends on where you buy your gabions from. Ours are over 8 years old and no sign of corroding. HTH
Brilliant. Your video is as carefully designed and constructed--not to mention functional and delightful--as your retaining wall. If you're not a writer, you certainly could be!
Thank you for the thoughtful review! Happy New Year!
Where did you buy your Gabion baskets? I’d like to order some. Thanks
I bought mine from finemeshmetals in the UK. I give more info in this video - ruclips.net/video/zIwbbXTy25A/видео.htmlsi=hR-aEP841dAuG1zl
Awesome thank you cute cat
So pleased it was useful! (She's really cute isn't she :) )
Hello thank you for the video. How long does it take to feel the warmth from the floor? Thank you
Sorry for the late reply. UFH runs at a lower temp to radiators and it takes a couple of hours for the room to get up to temperature, but stays at a constant temp for longer due to the insulation etc.
Thank you for making this video. I think everything looks AMAZING and there was a ton of little tidbits of info that I could see myself needing to learn the hard way when I start my project.
So pleased it was useful!
Formidable this Karen! Newbie question: i noticed you did not tape with foil on your wall around each of ur PIR edges. Any reason for that?
Hi, thanks for watching. Before plasterbiarding I put up a membrane around all 4 sides rather than taping everywhere. Though taping would do the same job. I really do need to get the next few videos out. I’m sorry about the long gap!
Impressive . Thanks for sharing
Thanks for watching!