
- Видео 13
- Просмотров 404 471
DTR RTD
Добавлен 25 мар 2014
Видео


New ZebraLight headlamp was DOA
Просмотров 2967 лет назад
Received new Zebralight headlamp, and putting a battery in it for the first time revealed it was totally inoperative. Surprised, it's the first time I've had any flashlight, from the cheapest to expensive, that was completely dead right out of the box, and the last one I expected to have this problem, as I've generally had a high regard for these. Bought it for a spare because it was reduced in...


Reusing Brake Pad Wear Sensor 2010 Mini Cooper R56
Просмотров 8 тыс.9 лет назад
Reusing Brake Pad Wear Sensor 2010 Mini Cooper R56
Resetting brake pad service indicator R56 MINI Cooper S
Просмотров 390 тыс.9 лет назад
The 2010 brake pad warning uses wear sensors placed on the left front and right rear wheels that are basically loops of wire embedded in the sensor which are held at a certain distance off from the brake pad backing plate. As the brake pads wear, the sensor wears away from the abrasion from the brake rotor, until the loop of wire is broken. The sensor has two pins in the connector, and when new...

PilotMetropolitan
Просмотров 1849 лет назад
Pilot Metropolitan fountain pen writing comparison using Noodler's Baystate Blue ink, with reverse nib orientation and normal orientation.
Nice
Helped a lot
Thank you so much!😂❤😊
My brake light is still on after doing this
I love this man
Thanks Bro.
Saved me alot of problems, Thanks
Thank you!!
What are you pressing your not showing us what your pressing
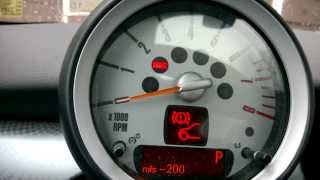
what is the -200 sign at the beginning of the video, my mini has -400
Thank you!
It can go to 2000x right? Also great footage
For some reason when I get to the brake pad sensor warning it doesn’t say reset when I hold the first time so I can’t reset it
Wish you showed what buttons you were pressing
Thank you.
This sort of worked for me.. Light went from red to yellow.. Any ideas?
U said cycle through with what ?
Mine's not resetting on the front pads, although the little clock countdown starts. The pad sensor had been cut and wires separated. Should they connect as a circuit? Doing each cheapest fault first, until the big stuff, then maybe scrapped at 81K. 😭
The wires on the sensor need to be connected together to enable the reset to work. If the wires are cut and left open, you won't be able to reset the warning light. The sensor can be purchased and replaced if you want to retain the warning function, it's a poor design setup that requires replacement as a separate item instead of prior designs that has them built in to every set of pads. Even the cheap metal screech warnings are better in not needing this fussing about. Problem is only that some drivers are clueless about the screeching sound they hear when they brake. So, they do this warning electronically, to light up a dash warning light, which may be just as cryptic to some.
your saying cylce through but how do I do that????
Added a reply with the text in the description, as it doesn't show up unless it's expanded-
Worked and happy.
You didn’t show the buttons you are pushing and this looks nothing like the 2018 clubman cooper I’m working on.
What keys are you pushing to cycle through?
thanks. As always, the manual is useless. As always, RUclips Users Deliver.
Got my cooper S front brake pads and discs both done... Got car back from garage and my brake light has been reset but it reads 31,000.... I have since tried resetting it myself but it stays at 31,000.... All the ones I have seen say 37,000.... Anyone get another number other than 37,000?
Thanks bro ❤️
Mine doesn't go away even after reseting it. Anyone know the reason why?
I actually have the same thing 😅
@@saudvlogs4103 me too! I think it was the dealership that didn't fix the sensors though, i read the description under the video and it said that if the circut didn't get recconected or something that it won't allow you to reset it
Thank you sir your a star
The countdown is done but the reset it's not!!!!!??? What can i do ?
@DTR RTD
Countdowns are usually what they do to have you do something to confirm you want to go ahead with it. In this case you have to press the reset again to confirm, otherwise it times out and assumes you got in there by accident. They should have eliminated the countdown and simply gone ahead with the reset, since there's no valid reason why someone would want to leave the warning light on if everything is replaced and working now. Poor design in my opinion-
Description -Procedure for resetting the service indicator after replacing the pads and restoring the pad sensor wire loop: -Turn ignition on without holding down the brake pedal, (no need to start) -Cycle left stalk button until it shows set/info -Press and hold button until it shows CHECK-INFO -Press once until it shows SERVICE-INFO -Press the right tach button (trip reset) for 10 seconds until display changes. -The brake pad warning should show up in red, showing in this case, "mls - 200" indicating the car was driven 200 miles past the tripped point. -While on that display, press and hold the turn signal stalk button and it should show RESET. -Release button, then press and hold button again, a timer clock will show up, as a brief confirmation period to let you change your mind and cancel the reset. -After the clock cycles around, the reset is complete, provided the two pad sensors no longer indicate an open circuit. If it doesn't reset, the pad sensor circuitry is still detecting an open circuit.
I have followed your vidio several times and I cant get it to reset,,,,,,,,i have a 2009 is it same as 2010
The reset doesnt work, what can i do next
Thank You helpfull
This video is soo bad so you magicaly scroll and get the break light off.
Thank you so much for making a no BS straightforward video.
hey question, is the handbrake light flicker supposed to be normal?
There shouldn't be normally any flickering on anything. Is that only when you pull up the handbrake?
Thank you, tried the manuals instructions but didn't work, your directions were good, clear and easy to follow in real time.
Awesome video, got that one pesky light that the service techs didn't reset!!
I’ve had both front & back brakes replaced on my 2013 Mini Cooper. Under 60k miles. Not sure why the light came on. This fixed it . Thanks!!
Is this a common thing because this just started happening in my car I need to get to the shop and they said it’s fine but do I need new sensors?
If you try the reset and it doesn't clear the warning, you may need to check the continuity of the pad sensor connections. The pads may be actually be fine but this warning indication goes strictly off the sensor connections.
These pad sensors are separate items from the pads themselves, and basically get damaged when the pads wear down and the wire rubs against the brake rotor. If you always replace the pads before the light comes on, you can save the sensor for reuse, but I don't think there are many drivers that are going to be continually checking their pads and proactively replacing the pads before they have to. That would be trading off pad life to protect the stupid sensor.
Hi has anyone a fix for the 2004 R53 model as they aren’t the same instrument clusters? TIA, brakes and discs changed but the orange lamp in the speedo clock is staying illuminated
Does this work regardless of service on the brakes...just curious.thanks for sharing.
This warning is just checking for the connection of the sensor wires on two of the wheels, and doesn't directly measure the pad thickness. They mount the sensor, which is a wire loop inside a substrate that will wear down as the pads get used up and get closer to the rotor. When the sensor is worn down from contact with the rotor, it breaks the wire loop connection and sets off the warning. If you replace the pads before it breaks the loop you wouldn't have to replace the sensor, but they didn't design it to be removed easily when replacing the pads, so it takes extra care to remove. Shops probably won't want to bother saving them for you even if they're still intact, easier for them to just bust them off and put on a new sensor. Should be about 15 to 20 bucks each.
@@dtrrtd774 THANK YOU for explaining this to me was very useful since I was thinking my back brakes have about 40% life left..any couldn't turn the light out.its funny how they let you reset the front brakes but not the rear brakes.
@@dcartellone2659 They put the pad sensors on diagonal ends, one front one back. They apparently figure both sets of pads on the front always wear evenly, and both sets on the back also wear evenly. It's a high tech solution that doesn't work as well as the old school metal clip wear warnings that screech like a banshee when the pads wear down. Those come with every set of pads and don't cost anything. And those will work if your left and right pads don't wear perfectly evenly. With this mini setup, if the pad on the unmonitored side wears down to the metal, you'll get no warning until the pads start grinding down on the rotor.
Thank you
Super helpful. Thank you!
Very helpful video! I could follow your directions in real time, as you talked through the process. Worked like a charm.
Happy it helped!
My light still on. Csn you help me
If I'm changing front and rear pads and sensors, Do I need to do this to reset the rear light as well as the front? I'm assuming so, but wasn't sure since you only showed resetting the front. And, you say that on a 2010 there are wear sensors, but it's actually the same on other years. Mine is a 2009 Clubman and it has the same sensors. The sensors are on the right rear, and left front. Only one sensor per axle..i'e..one on front and one on rear.
It doesn't distinguish between front and rear, so it trips the warning if either one of the sensors is open. As long as you restore both sensors, you should only need to reset it once.
Thanks. Already figured it out, did mine a few weeks ago. ;) Pretty easy once you do it. ;)
Is this heater still working ok?,,,,,,,,,,, is that watts?....285 watts?
Still working okay- yes, watts, used for the blower motor and ignitor system.
Have you considered Modifying in a thermostat
Thank You So Much Worked Perfectly
Ρ
Great video. thanks for the info, mate!
I have a Mini Cooper s, 2012. How do I change the date format which is set to the American format which is mm/dd/yy , and I’d like it to set it to dd/mm/yy. Please someone advise me otherwise il smash my effing dashboard 🤬😥
Show what your pressing. Video is useless
He explains that he's pressing the button on the end of the turn signal lever. I had to watch the video 5-6 times before getting the sequence just right, but it worked. 2012 Roadster
Description -Procedure for resetting the service indicator after replacing the pads and restoring the pad sensor wire loop: -Turn ignition on without holding down the brake pedal, (no need to start) -Cycle left stalk button until it shows set/info -Press and hold button until it shows CHECK-INFO -Press once until it shows SERVICE-INFO -Press the right tach button (trip reset) for 10 seconds until display changes. -The brake pad warning should show up in red, showing in this case, "mls - 200" indicating the car was driven 200 miles past the tripped point. -While on that display, press and hold the turn signal stalk button and it should show RESET. -Release button, then press and hold button again, a timer clock will show up, as a brief confirmation period to let you change your mind and cancel the reset. -After the clock cycles around, the reset is complete, provided the two pad sensors no longer indicate an open circuit. If it doesn't reset, the pad sensor circuitry is still detecting an open circuit.
Not quite correct. You have to press the Start button TWICE at the beginning. You can hear him do this if you listen. This is critical info.
Yes, turning on the ignition lights up the instrument panel display. If you just want to sit in the car and play the radio you can press it once. That's the equivalent of the accessory position in the olden days where keys were involved.
Yep, for some reason the two or three sources I checked all failed to mention that you have to press Start twice; very aggravating, because then none of the following instructions work. I would suggest adding a caption to your video, pointing this out.