
- Видео 14
- Просмотров 312 298
Engineer Unleashed
Австралия
Добавлен 18 июл 2022
I'm a software engineer with a passion for cutting-edge technology, including 3D printers, machine learning, electronics, and drones. I stay up to date with emerging technologies through ongoing self-education and exploration.
Adding touchscreen to my 5-axis 3D Printer!
Hi there! In this video, I'll show you how I added a capacitive screen to my 5-axis 3D printer, enhancing its usability and aesthetics. I'll cover the hardware modifications, software setup, and design tweaks I made, including lessons learned from reworking cables and creating a custom case.
Elecrow site affiliate link: www.elecrow.com/affiliate.html?idd=5
Capacitive touch screen link: www.elecrow.com/rc050s-hdmi-5-inch-800x480-capacitive-touch-monitor-built-in-speaker-with-backlight-control.html?idd=5
Please consider supporting my work on Patreon: patreon.com/EngineerUnleashed
---
Commands to get KlipperScreen working:
1) Update and Upgrade Your System
sudo apt update
sudo apt upgrade
2) Install...
Просмотров: 1 503
Видео
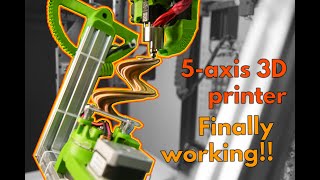

It's Finally Working! 5-Axis 3D Printer Upgrades
Просмотров 151 тыс.Месяц назад
Hello everyone! After months of hard work, I’m thrilled to share the latest progress on my 5-axis 3D printer. In this video, I walk you through the steps and upgrades that made this possible. 🛠️ Despite unexpected issues, moving houses, and taking a holiday, we’re finally here! I’ve made several mechanical and software improvements that I can't wait to show you. 🔧 Highlights: - Added a motor fo...

3D Probe and Infinite Rotation Heatbed into 5-axis 3D printer prototype
Просмотров 59 тыс.7 месяцев назад
Join me in this exciting video where I showcase the latest advancements in my 5-axis 3D printer project. Get top-quality PCBs and 3D Printed parts with PCBWay ($5 OFF for your first order) - pcbway.com/g/vG1srH Featuring a unique 3D probe integrated into the extruder and an innovative heatbed capable of infinite rotation, these enhancements push the boundaries of 3D printing technology. Discove...

5-axis 3D printer with Klipper finally moving!
Просмотров 35 тыс.10 месяцев назад
Has been a while since my last video! I've been busy working on the prototype and I got it to finally move and "home" all the axes! Here's what I’m going to share during this video: - The electronics and wiring. - A run-through of setting up Klipper and Octopi. - An overview of the changes I made to the prototype and the reasons behind them.

5-axis 3D printer - It moves!
Просмотров 16 тыс.Год назад
The focus of this video is to analyze the frame as it stands and talk about problems that appeared as well as potential solutions and improvements.

Building a 5-Axis 3D Printer: From Disassembly to Assembly
Просмотров 36 тыс.Год назад
In this video, I take you along my journey to design and assemble a 5-axis 3D printer. Watch as I navigate the challenges of hardware, firmware, and software. As a hobbyist and an enthusiast, I am sharing this project as open-source for others to build upon. Join me as we explore the possibilities, overcome the challenges, and push the boundaries of 3D printing! Some resources to check out: ruc...

5 axis 3D printer project intro, external stepper driver test.
Просмотров 3,1 тыс.Год назад
Welcome to the journey of building a 5-axis 3D printer from scratch! If the world of 3D printing, DIY projects, and innovative tinkering fascinates you, you're in for a treat. In this episode, I take you through my DIY Hypercube Evolution 3D printer, highlighting its strengths and weaknesses before it undergoes its transformation into a 5-axis machine. We'll explore its current issues and discu...
선생님 진도가 너무 빨라요.. 그치만 존경합니다. 당신의 기술이 너무 멋지네요
awesome. great work! congrats! looking forward to 5/6 axis coming to the average consumer
One use for 5 axis would be to reduce or eliminate supports. You might be able to get around overhang limits using the extra axis.
your design process is usually what i do .. do base minimum feature .. then once i get the main stuff figured out then i make it pretty LOL
Love it! 🎉
To your 3d scan & modeling problem: try it with 2d... The easier and less precise option would be to take a mostly parallel aligned photo with your phone, depending of the object which you want to build around decide for some key-lines/point that are easy measurable for beeing the scaling reference, import into cad as scale the image in it according to the reference measurements you took. The second method works basicaly the same, but instead of trying to take a good aligned photo and trying to measure precise... (there could be some much more weird objects than a circuit board)... you simply use the scanner of a printer, maybe print out 2 rulers, both upside down, one fitting on the longer A4 site of the scanner glass and the other on the short side to work as measurement reference. Secondly you will need some sort plastic box/container which fits around the scanner glass, of course to darken the objects surrounding room to scan succsesfully...then import as described before but scaling the image according to the printed paper rulers... Hope could give you at least some input and inspiration🤟🏻🤓
Just to add to the first method of taking a photo. If you use the optical zoom on your phone or camera and stand further away and zoom into object, this will decrease the perspective distortion of the image. So for SLR camera I would recommend a 70mm lens or longer. On phone 5x or whatever the largest setting is before going to digital zoom. As mentioned above, scanner is a great option too! I think Makers Muse uses that in his video about making an ant weight combat robot. He also uses the image scaling option, with a ruler in the scan, in fusion 360.
😲😲😲
sonas como argentino
Have you looked at software that's used for slicing files for 5 axis CNC machines?
I've got a feeling these'll start showing up on the market at some point soon-ish now. Regardless, this is an awesome project.
"Cheat codes"?
Here, your sw problem solved 😂 @visionminer
Increible trabajo Mariano! me encanto tu proyecto... Creo que esto, sumado a la Inteligencia Artificial puede realmente darle el proximo futuro a la Impresion 3D. Slicers con IA que mapeen superficies y logren conseguir los mejores caminos para imprimir segun la pieza, dandole al usuario la eleccion si quiere velocidad, mejores resultados, imprimir sin soportes... El proximo paso seria mejorar la conexion con los motores que terminan poniendo ruido en las piezas impresas. Y en 2-5 años tenemos impresoras capaces de emular cualquier pieza con gran detalle y bajo costo
this is a really solid build and design. love the setup. If I can get one working properly, would you care to deploy a metal printing print head on your 5 axis system?
Your microphone is popping
I need this
Outstanding Project Result. I need to print Model Train Parts and have wanted 5 axis for years. But now I see it working. For small parts it looks perfect. But I would have to build the whole machine, not just modify my CR10S Pro. I was thinking a table top 2 axis component to sit on top of the Y axis Table. Like on a Milling Machine. You approach is different but does achieve the objective. Great effort thank you for sharing. Dennis in Virginia USA
While I'm not entirely sure all the uses this thing has, I'm sure plenty can be done with it; hope you continue to be able to make progress 👍
Man, I'm hoping this is the next step in the 3d fdm printer evolution.
amazing proyect man!
vos sos Argentino???
One day man will build telescopes that can see atoms
I'd call this printer "Churros"
Could you make the segment on handling and build quality of the product longer than 5 seconds in 24 minute video? Thx
When I saw the rings for your bed conductivity, I just had to mention this. Take a look at how the power setup/generator cabling works in wind turbines. They do some fancy twisted cabling to enable them to turn the turbine head around as many times as it wants without tangling the wires. It'll be a much more stable connection than trying to use bearing conductivity. Robert Murray-Smith did a video on it a while ago.
A slip ring for the signal and power on your bed might be worth looking into. Reliability and longevity is higher.
A. Electroplate nickel "BB's" with copper for better voltage/current transfer w/o causing resistance (crosman sells copper plated 4.5mm "BB's") B. See if you can get a firm spring (like a recoil spring from a pistol spring) to apply tension on the bed rotational bearing, you can tighten, then the spring will allow slight flex and maintain good contact C. Ingenious design!
You’re a fucking genius 🫱🏼🫲🏽👏🏼
Possibly the second biggest benefit to your printer is the potential to utilize a *square opening nozzle* since you can overcome the x,y coordinate directionality limitation/compromise of traditional printers that require a circular opening to accommodate the non x,y coordinate movements. I'd love to see what this produces.
Yes this should be explored for the 4th axis. The 5th axis...? Not sure how useful this is in most 3d printing applications.
Bro, have u ever considered to use a slip ring? For the temperature sensor???
Is there a benefit in this style of printing?
Start your own company!
You are insane and legendary
The is amazing! Let's go!
None of the prints you made would have been much of a problem on a normal printer.
This guy is a Serious engineer. It's common for an engineer to know one "art" really well, but to be adept at electrical, mechanical, and software is very impressive. I hope some technology company has been smart enough to hire you. Resume? Point them at this video! I tip my hat to you, sir!
I agree this guy is one hell of a damn good engineer. He deserves to be very successful in his career, just on the basis of what he has done so far. If he can find allies that can help with the software to provide a system and human interface to his 5-axis prototype, it can come into its own as a truly usable tool for so many people. And his place in technology history will be assured.
Could the problem be some rounding error? This would explain why finer microsteps lower the error. Try using absolute G-Code coordinates as an easy test because the rounding error should not add up in the case of absolute coordinates.
algo
Curious: What is the reason for this? What do you wish to achieve with the 4th axis over 4? The demo prints don't tell me about the advantages of the 5th axis, especially since I'm not sure I understand correctly that there is no correction for the z-axis for the tilt axis? Or is the slicing just the next step in the journey to a true 3d-not-2.5d-printer?
Sos argentino?
This is just so cool! As soon as i can i try get behind this projekt more!
This is an amazing achievement. I am an experienced builder of 3D printers. Yet this is extremely complicated, so I will never attempt this. The slicer, yes, that is of course still a huge problem to get right. Congratulations on this result.
argentino?
You need to read the white paper on designing 3D printable gears
Bro, you're the new prusa
Awesome project! From what I see, it might be better to keep the axis of rotation stationary, and move the interior chassis holding the print bed “up/down”(inward/outward) instead of moving the rotation parts up and down. This will allow you to have a constant axis of rotation throughout the print, rather than adjusting the rotation axis up and down as you change the Z axis.
Wow this is so interesting! Regarding the layer shifting and microsteps - I might be misunderstanding something, but my imediate instinct is that it's like a cumulating "rounding error", for lack of a better term. Like, when the microsteps are set to a lower value, when the motor wants to move from say position "1.2" to position "1.5", but the low microsteps setting means it's only allow it to move in "0.2" increments, then it can only move to "1.4" or "1.6". Whereas larger microstep number means (if I understand correctly) a higher "resolution", so it can move in say "0.02" increments instead, so it can reach "1.48" or "1.52" which is much closer to where it wants to be. If the difference from where it wants to be to where it actually goes to is large enough, it will cause the shifting you see. This makes me wonder if you could potentially solve the issue by adjusting gear ratios in certain places, because they might be amplifying those small discrepancies to a point where it becomes a problem. That's just my imediate instinct though, and I might be wildly misunderstanding what microsteps actually mean 😅
You could make some things normal printers cant make like airless basketballs
3d printing is just cnc with a glue gon on the end instead of an endmill. It may be cost prohibitive for the hobbyist, but using off the shelf cnc hardware and adapting a hotend onto the spindle axis may yield a more rigid and precise result.
A axis?!