Create a TEXT FIELD Component With an ANIMATED Label (Figma Tutorial)

HTML-код
- Опубликовано: 31 май 2024
- Get the SOURCE FILES for this project ($1.99): payhip.com/b/w2AhL
Visit my STORE: bit.ly/mavi-design-store
Explore Mavi Design COURSES : bit.ly/mavi-design-courses
Get FIGMA for FREE: bit.ly/get-started-with-figma
Take FULL advantage of ALL FIGMA's features: bit.ly/figma-professional-plan
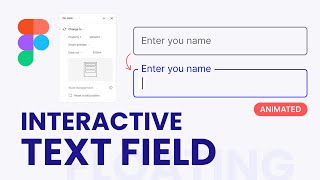
In today's Figma interactive component / prototyping tutorial, we're going to take a look at a material design type text input form field with a moving label (click-activated) with a blinking cursor & hover state. You'll be able to easily change the label by setting up component properties and also change color of the field & generally do any changes you need. This text input form field is animated - when you hover over the inactive instance, it will react to your hovering by changing its border color and then when you click it, it's going to move the label to the uppermost side with smart animate. You'll then be able to click again to deactivate the form field.
How to create / design build an interactive / animated material design text input form field component with a moving label, hover state and a blinking cursor in Figma (step-by-step explanation tutorial)
Topics: Figma prototyping, figma interactive components, Figma animation, form fields, design system in figma
--------
© 2022 Mavi Design  Хобби
Хобби


Absolutely amazing. I was looking around for how to create the auto adjusting border based on text length. This tutorial was perfect.
Thank you, I am still in school and we are learning about Figma. We haven't learned about this yet and that means i can show it to my teacher and get bonus points. Thank you so much!
I swear this is the best FIGMA TUTORIAL on youTube please go ahead 🍇
14:09 mine didn't adjust, you know why?
Thank you for making such clear, easy to understand videos.
I am so glad I found your videos. Its been amazing. Thank you so much for all the amazing things you teach
It’s great to have you here Emmanuel! Welcome!
@@mavidesign Please help. When I turn on the animation and when I click on the input(first and second click), very narrow spaces appear on both sides of the bottom line and top line and immediately disappear, although I made those lines back to back, there are no spaces there, and why does this happen during animation - I don't understand (
And also only for some reason on the 2nd example (with a long label) during animation and I don’t know how many% of the scale is increased, the bottom line seems to separate downwards from the main parts and then everything is ok again, it’s seconds and with clicks.
This is awesome. I had fun playing with this😁
Its Amazing tutorial and Easy to Learn floating labels without interrupted Thanks you so Much 👏
Wow, this is mind blowing. Thanks for video!
Thanks for the video. After adding auto layout to the small label autolayout and the top line, my frame one had a misaligned top line, it didn't balance with the right bracket anymore. Please what did I do wrong?
The video is really nice. I like how you're crisp and to the point, no filler information or anything that distracts from the content.
However, the subscibe alert in the lower left corner is highly distracting and spammy.
Feedback appreciated!
This is awesome, was easy and i loved it
Loved this. Thank you!
This is awesome! Thank you so much!
Thanks alot, was easy and i loved it
amazing tutorial but very complicated process for me as a beginner!
At 4:31 how did you adjust the height of larger frame. I am trying to do this but it's contracting with the top part frame.
thanks, I could do it, it was well-explained
Extreme good guide! Also for beginners very worthfully! Thank you!
love this tutorial
Nice, thanks for sharing!
This is great work.
And what if I would like to have right icon (eye for example for password field)? Thanks.
amazing tutorial
Looks nice! Now I'm curious how bad of a headache this would be for front-end devs :D
11:01 Why cursor can't change property from Invisible to Visible at Design Mode? Only change at Play Mode. If I setup "defaul is Visible" is same your demo.
Thank you so much!
i think i'm missing something, the lenght of top part can't adjust by the lenght of the label, while i try to make a new one, it always the line didn't fit with the left rectangle
awesome! thanks a million
Very Useful 🔥
thank you so much brother
Amazing tutorial. I learned so much! Is there a way to create a floating label so that the input field is not transparent? My form background has some slight color, and I would like for the input field fill to be white. I am not sure if it is possible but thought I'd ask.
You can make the parent (main) frame colored. Hope it helps!
When I add auto layout to the small label and the line…the line moves from the alignment😭 why is this so hard
Keep fighting
Someone knows how to fix It? 🤔 im haver The same problem...
i was having the same problem too but what seemed to work for me is to add .5px padding to either the top or bottom padding of the top vector itself
hope this helps
I have made some mistake, the length of top line can't adjust by the length of the long label. Could you please help for this concern?
finally a good form design found.....😊
Great🔥
I may be being dumb.. but when I draw the line to make the ends meet, i cannot make the line aligned with the end sections, its about half a pixel off - any tips?
You have to make the hight of the small label auto layout an even number for example if the hight was fifteen turn it to sixteen and it should work and make the line only two pixels as mentioned in the video
And the text box, inside the text field?
Please can someone tell me what i am doing wrong? When i try to put the label text and the top bar in an autolayout it doesn’t align with the right bracket.
Thank you! Do you also know how to set bottom navigation bar disappear when scroll down and re-appear when scroll up as well?
You're welcome! 😊 By "bottom navigation bar" do you mean something like this?
ruclips.net/video/5XZ-X5ewo9c/видео.html
@@mavidesign No, it's about hiding bottom navigation bar when user scrolls down the screen, and the bar re-appear when scroll up the screen.
content menu is not there when selecting the text boxes.
Noted
4:31 Shift + Enter
6:59 I have a issue here... the text "Default Lebel" it's goes beyond the lines on the left after I add "create component property"... how to fix this? help
Same problem here tooo
same here, how can you fix this??
At 3:15 how did you combine the top line and the small label auto layout into that split frame?
Select both of that and press Shift A ( for Add Auto Layout ). It will be like what he said
I have a technical question. Which software do you use to display pressed keys in the lower left corner of the video?
KeyCastr:)
thanks for this! when I made the autolayout that includes the small label autolayout and the top line of the box, the line moves up by half a pixel or something and i can't seem to align it back. any idea how to troubleshoot?
yes do that once again, first, u draw a line pen tool change inside or outside to the center in the stroke, and make sure the stroke is centered that s it got it ?
I change the size of the small label font to 13 px and it works to align it
need to adjust the text. vertical trim - choose standard
Hi, it awesome...bt I want full interactive form field using variables
Hi, thank you for this. Is it possible to make a text box that you can type into?
I'm afraid that's beyond Figma's capabilities
Now it is possible using variables....can you please make a video about it
will it use keyboard???????
resolve my problem
on prototype its not workout in mobile why
15:37 Why is the blinking getting enabled on both the fields? Can someone kindly tell how do we avoid this mistake when it comes to creating two or more interactive inputs field components.
its the same for me too
at 8:29 when I try to resize the frame of the small label, the text moves to the left and doesn't stay at the same place, do you know how can I fix that?
same for me, is yours fix now?
6:45 you say to click content. that isnt there for me. any solutions?
same
at 8:27, how did the top line overlap on the top/small default label?
the one i tried creating, the text keeps shifting to the left hand side
I've edited it twice and it's still the same issue I'm encountering.
I'm encountering the same issue with this step. Maybe Figma has changed the way the components interact since this video was created. I can't find a workaround.
Update: when he does that, he forgets to mention that on the right side of the screen, the auto layout box has to have the top left selected. For me, I had the middle selected, which produced your same issue. Once I changed that, it worked the same way as he demonstrates in the video.
@@ryanmaas_ thank you. I’d try it out
Why I do not have property 1 when i am clicking on change to in interactive option for the blinking cursor?
Please help
I made this mistake too (took me 2h to figure out why). When you renamed the line variant to "invisible" and "visible" you probably deleted "Property 1=". So I suggest you add it again. It should look like: "Property 1=Visible" and "Property 1=Invisible".
One problem that took me almost half an hour solving is the state of the cursor component. It wouldn't show when I create an instance of it. I felt so dumb after realizing that I only need to change the state to visible😭
Unfortunately this doesn't appear to work anymore (February 2024). For instance, when I try to create a secondary autolayout as demonstrated at 3:19, I have no 'fill to container' option, only 'Hug and 'Fixed width', and I expect a legion of other problems will follow after that as well. 😕
Man, really was looking forward to replicating this, and there are no other tutorials on YT for it that I found so far.
Still working. If there's no fill to container option your line probably isn't in a frame with auto-layout applied.
at 4'30" - when you adjust the height, the whole frame moves down...
okay - I missed that part that the contents of Frame 1 need to be constrained to the bottom.
I have a question, can you ACTUALLY put text on the final result ?
No
Thank you
Is this hard to code for developers?
if you are a mobile developer it's not that hard cause there's presets for that
Unable to create a frame after creating one label for constraints 😭😭😭😭😭
WOOOWWWWW
why didnt you just use a normal rectangle and thn use a text with the same background colour and put that text on the top of the rectangles top line?
Because that wouldn’t be transparent :)
Watch me get beaten up by my dev in the parking lot when I try this in a project 😂
Why is this so hard to do compared to XD . They really need to simplify the text field process because, its not like every single designer and website does this.
it is kind of confusing :/
Right I also thought ...he just told many thing like do this and that and didn't told why he did that
Unfortunately the file doesn't open in any way...I'll follow the tutorial, I was hoping to save some time.
Search Google “how to open a .fig file”. I’m sure it’ll help :)
But it should open it directly having figma (also the paid version). Now I'm looking for tutorials, but I'll first follow yours to create a label. Thank you@@mavidesign
@@eugeniabrini not the case unfortunately. You need to import that using the import feature
Your file won't download.
Hi, please reach out to my email or use the contact form on my store to sort this out. Thank you.
Seriously? And autolayout?
Porque hiciste todo esto de esta manera 😅, te complicaste más de la cuenta, el video debió durar tan solo 5 minutos. Hay formas mucho pero mucho más fácil de hacerlo.
too fast and many errors
The source file is paid 🥺
Yes it is! Fortunately following the tutorial to create it is absolutely free and achieves the same result so that my designs are accessible for absolutely everyone. The paid source file is here for those who want to save time and support the channel 😊
I can't see the fill container option when I click on the vector line🥹😔. What might be the problem?