Wow, you are definitely in the top tier of tutorial creators, this is clean and concise, and I don't have a single question, you gave all the info necessary and no random chatter. Love it.
Nice clear concise tuition and refreshing to not have daft music playing, we can actually hear you crystal clear and actually see exactly what you are doing, thank-you, great tutorial
This was fantastic. So many videos don't say what the tools or or what size, but your whole video was so easy to understand and simple to watch! I appreciate all your info!
I discovered this channel a few years ago. Im glad he has posted videos for leather working as well as all the tying videos. I have learned many knots for paracord from him. Thank you for having a broad set of hobbies and interests
Hi Mark, thanks again for the great tips. this is the first video I found which has the step by step way of leather edge burnishing that make sense and it really works. please keep on going with you videos. I enjoy the a lot watching them
Thank you for this video. I really appriciate the demonstration and information. I got into leatherworking a couple years ago. But i had never made anything i had a need to burnish before. As they were just made for myself.
New at the craft & I am looking how different how to videos - I really love yours! It's slowed down & great for newbies such as myself when understanding!
Superb tutorial. I did at first think you had used some sort of electronic voice track, but realised it was the combination of your accent and your very precise pronunciation of English that fooled me! Anyway, you have quickly and thoroughly answered all of my questions about burnishing methods and it is a pleasure to watch such an eloquent presentation of technical facts. I am now going to check out your other videos 😀
Hey.! Thank you so much, You made it really easy to understand. I will use it for my leather bags. Can I use the water and wax burnish method for a thick rexine too?
2:18 - but what if it's softer leather like something for a bracelet? will i still be able to do that in a straight line? or will it accidentally cut it at the wrong angle?
Very useful information. Thanks for taking the time to help us out. I have used these methods and they work well on heavier leather, say 8 oz. When I try to burnish the edge on 2-3 oz, it's too thin to do this way. Do you have any tips for burnishing edges on lighter weight leather? Thank you again for the video. It has helped my edge a lot.
Great video! It was easy to follow and understand!! Thank you so much!! I have one question… If I am using the wax or the gum trag method, do I still diet after I'm done burnishing?
Excellent video. I just wish you had expanded on what you meant by recommending a top finish at the end. A 'top finish' could mean any number of things.
First of all thank you very much for this video, it is the best I saw. At the end of it, what kind of finish would you recommend appart from waxing and burnishing it? You meant like dyeing or painting?
Hi great video but your last comment is "I would highly recommend you use a coating to protect the leather." I thought the burnishing + wax/gum was the finish. So its still not finished. What type of coating do you recommend for finishing? Acrylic? PU? Other? Thanks !
Good eye there! Generally with leather the amount of time and care you take, the better the end result. Wax+gum can be considered a primer, so the base application. It works decently well standalone, but for a further step you can apply some sort of kote. Edge kote for example works well, you could also use Tan kote. Mark
In a different comment he said that he usually uses beeswax but sometimes uses leftover wax from their candles. I would probably use beeswax if it was me. I have some that I got a couple years ago at Hobby Lobby. You could also probably find it elsewhere, bee keepers probably sell it too!
Thank you for these great leather working videos! Honestly, the best I've seen so far for beginners, like me! I wanted to ask what type of wax you used in this video? Thank you
Hey there! Thank you for your kind comment! The wax I use is usually beeswax (you can find it quite affordably with a beekeeper, in a beekeeping store or online). I often improvise by using the remains of the candles we use. Have a great day! Mark
@@markthebraider6720 Hello Mark. I live in Colombia and bee wax is quite difficult to fine around. i wonder if you could use other kind of wax instead, like some made of artificial compounds. Will them affect the quality of the leather on the long run? Regarding the remains of the candles you use, are they paraffin candles or beeswax candles?
Yes and No Babbity, yes in the sense that friction will melt most anything - so you can technically burnish many things But NO in the sense that in leather work Burnishing usually refers to a specific "harder darker" edge that is used on Vegetable Tanned (VegTan for short) leather. Some people call VegTan leather tooling leather because it is the stiff leather that can be tooled (stamped and carved) the biggest reason it is only used on VegTan is that is the only type of leather that will maintain the burnished edge --- soft leathers can't be stamped or burnished because they don't maintain their shape - but get vegtan wet and push a thumb dent in and its there for a very long time
I was a little confused on the gum trag method because at the end you suggested that the water method needed to be done first before the track method, so, to be clear in order to do the gum track method do I need to First do the water method?
Hi, thank you for the tutorial. I have a few questions. 1. Does the leather need to be beveled? I am currently burnishing on the straight cut edge. 2. I first stain the edges, then burnish. Should I reverse this process? 3. How much pressure should I put on the wood slicker? 4. There's a little indented ditch in the middle of my edge. Should I press harder on the slicker or keep applying gum until it fills up? 5. I find that the wood slicker leaves a mark on the front and back of the leather, even with the largest slot. Is there a way to avoid that? Out all these questions, the thing that bothers me the most is the fact that the slicher leaves a mark on the grain and flesh side, about 1cm on each side. Thank you for your time!
Creative Endeavours it would be smart to bevel because when you burning you compress the edges of leather and if you don't bevel it can cause a ridge to form that is not visually appealing and for the marks caused by the burnishing tool try to use less water you want the edges damp not soaked you know you have the right amount of water when you hear a slight squiking noise when you burnish . only light pressure should be used on the tool that is all it should need. And I dye before burnishing because when you burnish it compress the leather and there is a chance will not let the dye to penetrate. Hope this helps
THE DEATH you could sand after beveling if you wish it wouldn't hurt but the purpose of sanding is just to even the edges out before beveling and burnishing hope this answer your question
Nice video. Could this method be used to take off 4 mm from a leather strip? It is a little too wide. Could I take 2mm off from each side? If not, can you recommend how I could do that? Thanks a lot.
Hello everyone, i'm the new and i have some question. Is it possible to use this way on ever, leather, or not... I try to make edge on leather, and i use sandpaper, wather and cream, but not workk😢 Can same on help me.. Tnx
You're not ready for this one. I'm a pro pool player and the tip we use at the end of the pool cue is made of leather. Layered or laminated leather to be more exact. What glue is used between the layers? No clue. Anyway, when we finish the installation, we burnish the sides of the tip - usually that's made with the cue spinning on a lathe. Most old school cue makers use a little bit of spit (or water) and a leather piece to final burnish the sides of the tip. It absolutely leaves a slick, mirror-like finish, but since the cue often comes in contact with the pool table cloth, the burnished barrier doesn't last much time and the tips tends to fluff up. What would you, dear leather experts, recommend for burnishing the sides of the tip so it last as long as possible. Thanks for your consideration :)
Hey! Well, you can, but it is not always useful. Thin pieces of leather are harder to burnish. Also, you usually do not burnish leathers for other objects, for example chrome tanned leather for sofas. Generally, burnishing is most useful on "vegetable tanned" leather projects where the edges are fairly thick and where you want a smoother edge. So, use it on bags, straps, belts, wallets, things like that. I hope that helps. Mark
if use sandpaper what grid need use ? and can burnish only water and beeswax good ? thailand i learn first time leather work now and no know sure, but no found dye colour and trafalcant anywere. i think need use sandpaper first then water burn and then bees wax. i not has try work yet because i no sure can make.


Wow, you are definitely in the top tier of tutorial creators, this is clean and concise, and I don't have a single question, you gave all the info necessary and no random chatter. Love it.
He did not even stretch over 10 minutes for more ad revenue. What a lad.
Simple, informative, fast. And you did not even stretch over 10min.
You deserve every bit of attention man. Thank you!
Nice clear concise tuition and refreshing to not have daft music playing, we can actually hear you crystal clear and actually see exactly what you are doing, thank-you, great tutorial
Excellent, clear and concise presentation! 👍
This was fantastic. So many videos don't say what the tools or or what size, but your whole video was so easy to understand and simple to watch! I appreciate all your info!
I discovered this channel a few years ago. Im glad he has posted videos for leather working as well as all the tying videos. I have learned many knots for paracord from him. Thank you for having a broad set of hobbies and interests
One of the better videos! Short, to the point, an excellent tutorial. Thanks!
Very quick precise and to the point! Thank you so much. It was exactly what I needed when I needed it
With that tutorial, you sir have gained a subscriber!
Hi Mark, thanks again for the great tips. this is the first video I found which has the step by step way of leather edge burnishing that make sense and it really works. please keep on going with you videos. I enjoy the a lot watching them
Thank you for this video. I really appriciate the demonstration and information. I got into leatherworking a couple years ago. But i had never made anything i had a need to burnish before. As they were just made for myself.
A meticulous hobby for the thoughtful shut- in. I'll leave this tool work to the pro's !
That's exactly what I needed to know. Thank you.
me too
Thank you very much for this clear and helpful video. Very much appreciated. No other clearly showed all 3 possibilities.
Precisely!
I always learn something good from your vids. Thanks, Marko!
Hvala vam na video! This was extremely helpful in doing my first leather project. Hope you are well and safe in Slovenia!
This guy is friggen awesome. Glad I clicked on this video. Well made man!
Excellent tutorial !!!
U r a great teacher and artist
Thank you! That was a great introduction to burnishing!
cavokdotcom n
Thank You for posting this. I am new to Leather Works, and this video has really provide a lot of information
Great tutorial! Thank you!
Answered all my questions, thanks for a great video.
New at the craft & I am looking how different how to videos - I really love yours! It's slowed down & great for newbies such as myself when understanding!
Well done video. Thank you for sharing
good explaination very useful, thank you.
Thanks, great vid. What type of top finish to use when we are done burnishing? Specifics please.
Good video my friend. Glad to see you enjoying leather work like I am.
Great tutorial, thank you
Very simple n nice learning.. 👍
This an an excellent tutorial, very clear and precise.
Superb tutorial. I did at first think you had used some sort of electronic voice track, but realised it was the combination of your accent and your very precise pronunciation of English that fooled me! Anyway, you have quickly and thoroughly answered all of my questions about burnishing methods and it is a pleasure to watch such an eloquent presentation of technical facts. I am now going to check out your other videos 😀
Very helpful. Thank you
Thanks for the information 👍
That was super useful, thank you
Hey.! Thank you so much, You made it really easy to understand. I will use it for my leather bags. Can I use the water and wax burnish method for a thick rexine too?
Excellent video, thanks for the tutorial
Great tutorial !!
2:18 - but what if it's softer leather like something for a bracelet? will i still be able to do that in a straight line? or will it accidentally cut it at the wrong angle?
Hi, thanks for your informative video, can I use boot polish cream or liquid shoe polish or leather cream as a substitute of dye….? Thanks
Thank you
Very useful information. Thanks for taking the time to help us out. I have used these methods and they work well on heavier leather, say 8 oz. When I try to burnish the edge on 2-3 oz, it's too thin to do this way. Do you have any tips for burnishing edges on lighter weight leather? Thank you again for the video. It has helped my edge a lot.
Try a 2000 wet/dry sandpaper with the burnish cream. You’ll want to keep the sandpaper moist while sanding down.
Great video! It was easy to follow and understand!! Thank you so much!! I have one question… If I am using the wax or the gum trag method, do I still diet after I'm done burnishing?
Thank you. This was a great video.
Great tutorial. Thank you.
Outstanding thank you
Thank you, this is very helpful!
Thank you very much, is this possible to elaborate how to use the Tokonole thing?
Very informative, thank you so much
Good video
Tank you! 🙋🏾♂️ Brasil
excellent
Excellent video. I just wish you had expanded on what you meant by recommending a top finish at the end. A 'top finish' could mean any number of things.
Great video!!! Thank you
Does these techniques work also on cheaper genuine leather?
First of all thank you very much for this video, it is the best I saw. At the end of it, what kind of finish would you recommend appart from waxing and burnishing it? You meant like dyeing or painting?
Hi great video but your last comment is "I would highly recommend you use a coating to protect the leather." I thought the burnishing + wax/gum was the finish. So its still not finished. What type of coating do you recommend for finishing? Acrylic? PU? Other? Thanks !
Good eye there!
Generally with leather the amount of time and care you take, the better the end result.
Wax+gum can be considered a primer, so the base application. It works decently well standalone, but for a further step you can apply some sort of kote. Edge kote for example works well, you could also use Tan kote.
Mark
Very nice and clean video! Just a question... what kind of wax you use? Beewax?
In a different comment he said that he usually uses beeswax but sometimes uses leftover wax from their candles. I would probably use beeswax if it was me. I have some that I got a couple years ago at Hobby Lobby. You could also probably find it elsewhere, bee keepers probably sell it too!
Thank you man really helped me out
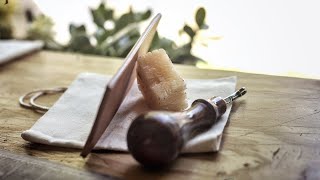
I wonder if the other two wood tools are the same as the one that you uses in the video. Thanks!
Thank you!!
The hand burnisher has different grooves for leathers of varying thickness. Is there a reason you are using the widest groove on such thin leather?
I thought the same thing.
Whats your thoughts on using neatsfoot oil for leather holsters? Thanks
Thank you for these great leather working videos! Honestly, the best I've seen so far for beginners, like me! I wanted to ask what type of wax you used in this video? Thank you
Hey there!
Thank you for your kind comment!
The wax I use is usually beeswax (you can find it quite affordably with a beekeeper, in a beekeeping store or online). I often improvise by using the remains of the candles we use.
Have a great day!
Mark
@@markthebraider6720 Hello Mark. I live in Colombia and bee wax is quite difficult to fine around. i wonder if you could use other kind of wax instead, like some made of artificial compounds. Will them affect the quality of the leather on the long run? Regarding the remains of the candles you use, are they paraffin candles or beeswax candles?
@@markthebraider6720
Thank you, it is clear that the lesson was good, but I was hoping there would be a translation into Arabic
Yea, but what do you use for a
"top finishing"?
Cause I always find my edges getting a little fuzzy after a while.
thanks!really good tutorial!!!😉
thanx for this video! can this method be used on synthetic leather too?
Yes and No Babbity, yes in the sense that friction will melt most anything - so you can technically burnish many things But NO in the sense that in leather work Burnishing usually refers to a specific "harder darker" edge that is used on Vegetable Tanned (VegTan for short) leather. Some people call VegTan leather tooling leather because it is the stiff leather that can be tooled (stamped and carved)
the biggest reason it is only used on VegTan is that is the only type of leather that will maintain the burnished edge --- soft leathers can't be stamped or burnished because they don't maintain their shape - but get vegtan wet and push a thumb dent in and its there for a very long time
When using the gum trag, should you let it dry between coats? Thanks for the great education on this subject!
I do let it dry. But make sure you do not use too much of it will not dry evenly. Treat gum trag much like water.
Mark
hello! can you assist me in understanding how I can burnish the SURFACE of a piece of leather to improve the surface finish
I was a little confused on the gum trag method because at the end you suggested that the water method needed to be done first before the track method, so, to be clear in order to do the gum track method do I need to First do the water method?
playback 1.5x
great information! thank you!
WOW! Thank you! Just a clarification, can I just use wax alone to burnish and put dye after the wax?
The waxed areas will resist the dye, dye your leather first.
is the bevel necessary in order to burnish?
What's the best for bendable items like journals? Will the wax crack?
you said method 1,2,3 as they are independent options, but in reality i should always do a water burnish first before wax or gum??
Hi, thank you for the tutorial. I have a few questions.
1. Does the leather need to be beveled? I am currently burnishing on the straight cut edge.
2. I first stain the edges, then burnish. Should I reverse this process?
3. How much pressure should I put on the wood slicker?
4. There's a little indented ditch in the middle of my edge. Should I press harder on the slicker or keep applying gum until it fills up?
5. I find that the wood slicker leaves a mark on the front and back of the leather, even with the largest slot. Is there a way to avoid that?
Out all these questions, the thing that bothers me the most is the fact that the slicher leaves a mark on the grain and flesh side, about 1cm on each side.
Thank you for your time!
Creative Endeavours it would be smart to bevel because when you burning you compress the edges of leather and if you don't bevel it can cause a ridge to form that is not visually appealing and for the marks caused by the burnishing tool try to use less water you want the edges damp not soaked you know you have the right amount of water when you hear a slight squiking noise when you burnish . only light pressure should be used on the tool that is all it should need. And I dye before burnishing because when you burnish it compress the leather and there is a chance will not let the dye to penetrate. Hope this helps
why do you sand before beveling? wouldn't it help to sand the edge AFTER beveling as well?
THE DEATH you could sand after beveling if you wish it wouldn't hurt but the purpose of sanding is just to even the edges out before beveling and burnishing hope this answer your question
Creative Endeavours aljazeramubasher
hello, do you think that the tool you use back and forth also works well for burning the corners of calfskin or just leather? Many thanks
Nice video.
Could this method be used to take off 4 mm from a leather strip? It is a little too wide. Could I take 2mm off from each side?
If not, can you recommend how I could do that?
Thanks a lot.
Does it make a difference if I apply the Gum Trag and allow it to almost dry - where it is tacky then Burnish??
About how much pressure while burnishing should be used?
How to do this with soft leater?
I have a question when you bevel the edges do you press down hard
Cant you stick the water burnish on veg tan and just move into the dye burnish for the same effect?
Question: What grit sandpaper are you using during 1st Step (Time Stamp Approx: 1m10s)?
How do you sharpen your edge bevellers? Gracias. Anaco, Anz.
Thank you so much
Hello everyone, i'm the new and i have some question.
Is it possible to use this way on ever, leather, or not...
I try to make edge on leather, and i use sandpaper, wather and cream, but not workk😢
Can same on help me..
Tnx
hi, can I use tokonole before dye, or after??? thanx
Can you please tell me what is the purpose of edge beveller ?
You're not ready for this one. I'm a pro pool player and the tip we use at the end of the pool cue is made of leather. Layered or laminated leather to be more exact. What glue is used between the layers? No clue. Anyway, when we finish the installation, we burnish the sides of the tip - usually that's made with the cue spinning on a lathe. Most old school cue makers use a little bit of spit (or water) and a leather piece to final burnish the sides of the tip. It absolutely leaves a slick, mirror-like finish, but since the cue often comes in contact with the pool table cloth, the burnished barrier doesn't last much time and the tips tends to fluff up. What would you, dear leather experts, recommend for burnishing the sides of the tip so it last as long as possible. Thanks for your consideration :)
Can I apply gum trag/wax and use the slicker to any type of leather? Thanks!
Hey!
Well, you can, but it is not always useful. Thin pieces of leather are harder to burnish. Also, you usually do not burnish leathers for other objects, for example chrome tanned leather for sofas.
Generally, burnishing is most useful on "vegetable tanned" leather projects where the edges are fairly thick and where you want a smoother edge. So, use it on bags, straps, belts, wallets, things like that.
I hope that helps.
Mark
Mark the braider thanks for your response! If the leather is not very thick, which edge polishing option is adviseable? Thann you again!
well said!
if use sandpaper what grid need use ? and can burnish only water and beeswax good ? thailand i learn first time leather work now and no know sure, but no found dye colour and trafalcant anywere. i think need use sandpaper first then water burn and then bees wax. i not has try work yet because i no sure can make.
Can I do it on soft leather too??
Thx
How do I prevent the dye coming off on pants?
What grit sandpaper?
if you use wax or gum - do you not have to dye the leather first? i don't see how you can dye once you have wax or gum applied.
Indeed. I'd recommend using dye after the water burnish at the latest.
Mark
How do I burnish 550 paracord Mark.
I stuck the hand slicker into the chuck of my drill lol