Strobe light effect with 1 transistor
US
Войти
Top 5 Elctronics Projects with Bc547 Transistor
9:01
How To Make a Police Strobe light
5:20
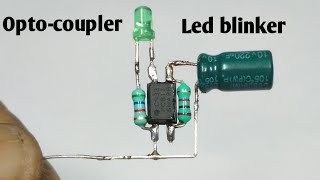
Optocoupler led blinker/strobe light effect
3:39
Manchester City v. Manchester United | PREMIER LEAGUE HIGHLIGHTS | 12/15/2024 | NBC Sports
12:20
Rio Da Yung OG - RIO FREE (Official Video)
03:21
SIDEMEN AMONG US MAGE ROLE: CAST A LIGHTNING STRIKE TO WIN
45:06
Strobe light effect with 1 transistor
Tech Ideas
Подписаться
466 тыс.
Скачать
Готовим ссылку...
Просмотров 836 тыс.
0
0
Добавить в
Мой плейлист
Посмотреть позже
Поделиться
Поделиться
HTML-код
Размер видео:
1280 X 720
853 X 480
640 X 360
Показать панель управления
Автовоспроизведение
Автоповтор
Опубликовано: 27 дек 2024
Комментарии • 487
Следующие
Автовоспроизведение
9:01
Top 5 Elctronics Projects with Bc547 Transistor
ZAFER YILDIZ
Просмотров 1,6 млн
5:20
How To Make a Police Strobe light
R.U.H.
Просмотров 4,1 млн
3:39
Optocoupler led blinker/strobe light effect
Tech Ideas
Просмотров 472 тыс.
12:20
Manchester City v. Manchester United | PREMIER LEAGUE HIGHLIGHTS | 12/15/2024 | NBC Sports
NBC Sports
Просмотров 1,3 млн
03:21
Rio Da Yung OG - RIO FREE (Official Video)
Rio Da Yung OG
Просмотров 4,9 млн
45:06
SIDEMEN AMONG US MAGE ROLE: CAST A LIGHTNING STRIKE TO WIN
MoreSidemen
Просмотров 3,9 млн
12:21
Neville, Keane & Richards DEBATE Amorim leaving Rashford & Garnacho out of Man United squad
Sky Sports Premier League
Просмотров 1,9 млн
7:50
LED Flasher Circuit
Creative creator
Просмотров 1,7 млн
23:51
Making a Fully Functional Jet Engine from Soda can | diy Jet Engine | homemade Jet Engine
Gab tech expo
Просмотров 1 млн
5:21
LED Flip Flop With Speed Controller Using one transistor
TECH IDEAS CENTER
Просмотров 66 тыс.
13:14
Top 3 Simple LED Flasher Circuits
Creative creator
Просмотров 103 тыс.
21:52
10+ Single BC547 Transistor Projects for Beginners
ES Tech Knowledge
Просмотров 543 тыс.
5:03
led flasher circuit with optocoupler
D-ELEC
Просмотров 263 тыс.
9:10
LED Blinking Adjust 1Transistor 12-24V ┃LED Flasher ┃ blinking circuit
Radal 05
Просмотров 81 тыс.
9:57
Blinking LED circuit or Astable Multivibrator | AKA Blinking LED circuit | Simple but not easy.
Prof MAD
Просмотров 159 тыс.
6:02
Flip flop LED flasher circuit using transistor BC547 | How to make Flip flop LED with BC547
ELECTRO MAX CREATION
Просмотров 36 тыс.
22:39
ТАРО ПРОГНОЗ НА СУПЕР НОВОЛУНИЕ 30 декабря 2024 для всех знаков зодиака от ANGELA PEARL
Angela Pearl
Просмотров 266 тыс.
00:14
Современная ветеренарная клиника
Официальный канал КВН
Просмотров 31 тыс.
12:18
Что говорят официальные лица и что известно об основных версиях крушения самолета в Актау
DW на русском
Просмотров 512 тыс.
41:09
Капсула времени из Чечни! Land Rover Defender с пробегом 10 000 км
Автосалон Синдиката
Просмотров 351 тыс.
00:25
Жених нашел невесту с закрытыми глазами #свадьба #wedding #невеста #жених #bride #weddingphotography
LIFE WEDDING
Просмотров 441 тыс.
00:32
ДОВЕРЕННОЕ ЛИЦО НОВОГОДНЕЙ ПРЕМИИ #праздник #новыйгод #юмор #спб #мечта
KURUCHBRO
Просмотров 218 тыс.
01:55
"Oksigen balonu partlasaydı, sağ qala bilməzdik"
Xəzər Xəbər
Просмотров 237 тыс.
00:56
Factory Assembly Line, Water Transfer #hydrographic #craftshorts #printing #DIY #shorts
HYDRO DIPPING ARTIST
Просмотров 1,3 млн