HOW TO Quickly Test a LED (including SMD LEDs)

HTML-код
- Опубликовано: 27 сен 2021
- Today, we show you a quick method to check if a standard LED and / or SMD LED works or has been damaged (burnt through). A LED is a Light Emitting Diode, so essentially a special diode that emits light. A Digital Multi-Meter (DMM) has quite often a diode test mode / functionality, and this is what happens when you use it on LEDs!
Note: while this quick test works with most standard LEDs and SMD LEDs, it does not work on ALL the LEDs since new design, packing up more and more energy (like the COB, the 9V / 18V / 36V packages...) with ever increasing power requirements are now continuously released... nevertheless, still handy to know!
► DISCLAIMER
Always make sure you operate in a safe and secure manner.
Disconnect anything you want to test
▬▬▬▬▬▬▬▬▬▬▬▬▬▬▬▬▬▬▬▬▬
► SUBSCRIBE (weekly content)! bit.ly/SubscribeTheLabOtomy
▬▬▬▬▬▬▬▬▬▬▬▬▬▬▬▬▬▬▬▬▬
► CATCHUP! All Videos bit.ly/AllTheLabOtomy
▬▬▬▬▬▬▬▬▬▬▬▬▬▬▬▬▬▬▬▬▬
▼ CONNECT!
► Facebook: bit.ly/CauseIHaveNoFriends
► Twitter: bit.ly/LikeASheep
► Instagram: bit.ly/NarcissisticByNature
► Tumblr: bit.ly/AnotherCatGif
► Pinterest: bit.ly/SniffDaMoodBoard
▬▬▬▬▬▬▬▬▬▬▬▬▬▬▬▬▬▬▬▬▬
▼ MUSIC
► "Bluebird" by E's Jammy Jams
▬▬▬▬▬▬▬▬▬▬▬▬▬▬▬▬▬▬▬▬▬
╔══╦╗╔╦═╦╗╔═╦╗╔═╦══╦═╦╗╔╦╗╔╗
╚╗╔╣╚╝║═╣║║═║╚╣║╠╗╔╣║║╚╝╠╗╔╝
═║║║╔╗║═╣╚╣╦║║║║║║║║║║╠╣║║║═
═╚╝╚╝╚╩═╩═╩╩╩═╩═╝╚╝╚═╩╝╚╝╚╝═  Хобби
Хобби


Great video. I use it to test my backlight. Can you give me an expect answer for few short questions?
1.Few LED on my string are broken, one have dot, but t he other look great and have 860 Ohms resistance when measured in the wrong way (just like the working leds). What's the deal with that?
2. The LED with a dot have no resistance in the wrong way, 100% burn. Could I bridge the path with a resistor or a wire for temp solution until replacement unit arrive?
Thanks, happy new year :)
There is a general tendency for manufacturer to run the LEDs are their max current for more light, but the side effect is too much power means the LEDs are warming up more which means they are more likely to burn up prematurely .
By their construction and design , LEDs fail in a different ways (I have a vid on where I check what is inside an SMD LED if you find it interesting
ruclips.net/video/O0laaq289Wo/видео.html )
They either fail creating an open circuit or a closed one. Bridging the path with a wire can work as a temp solution but this means extra current will flow through the remaining LEDs which could result in more failures. A better solution is indeed to choose an appropriate size resistor. Maybe this video can here help:
ruclips.net/video/h6-EnP5ArSo/видео.html
@@TheLabOtomy Thanks for the reply. I ended up using wire as a bridge. Maybe I mess up the diffuser layers or too many leds are damaged but the screen is light up more at the top. I run it on the min brightness to ease the load on the working leds.
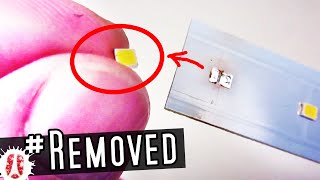
What do you think the dark spot is on the first one? Also, does the whole strip not turn on based on these individual LEDs not working?
The dark spot is the actual burnt through Surface Mount Device (SMD) LED under the yellow phosphor coating. This is typically due to the LED having been overdriven, i.e. having been exposed to too much current (which tend to be what manufacturors like doing lately, so that you end up having to buy new LED lamps... more often... 50000 promised hours of light, I do not think so...).
After failing, depending on the failure, the LED will either act as a short (direct wire) and conduct current (and possibly overstressing its neighboring LEDs), or act as an open circuit if burning through resulted in damaging the conducting path. One failure should result in a brighter string, the other in an unlight string.
Having the same problem with higher wattage bulb not lighting the led with multimeter. Thank you for confirming need more voltage
OMG that music is sooo annoying.. cant concentrate
Turn your volume down
Vid on new types would be cool
Indeed, the standards are changing so fast!
I would assume the light has to be plugged in to test?
No, do not plug the light! The multimeter generates a small voltage that is enough to light up a 3V LED
2:34 So how do you test one of these LEDs where this method doesn't work?
Would need to be submitted to a higher voltage (not provided by default by DMM), so would need a different power source
@@TheLabOtomy thanks for the quick response, do you know of any way I can provide that kind of voltage with home equipment? I'm also finding that resistance readings with the multimeter don't seem to work either for these newer lights
i eventually figured out that I could locate the broken LED by running a soldering iron through the little numbers next to each LED, which let me touch the bare copper underneath. this is probably bad for the lifespan of the LEDs but, the bulb was already dead so, that's a win in my book
so tired of chinese leds
I can see that...