@@mitchlosier Most companies don't have the manpower and time to let someone just sit in a panel and make it really pretty for a few hours. Also in a commercial setting no matter how pretty you make it eventually some knucklehead will come behind you and undo all your hours of work with a couple snips of their side cutters. I have a feeling it's residential guys that are spending this much time in a panel and that I can understand but I think it's something that you don't see in a commercial setting because it wastes a lot of time that you could be applying to something else.
Retired plumber here, fantastic workmanship. I treated my work the same way, I wish I had a dollar for every time a fellow plumber said to me "Why are you making everything so perfect? No one's gonna see it when the drywall is up!" Pride in one's work.
That's the same way I feel about my work! I feel everyone of my jobs has my name on it. I always like to leave some extra wire, at least a couple of inches, for just in case oppsys lol! You can still make it look nice and have the peace of mind!
Sparky here, I enjoyed working next to and with Plumbers that took pride in their work I was doing a Commercial job for a Daycare and the plumber was installing fixtures in the bathrooms, I went in there and installed the light right on top of him. He was so Kind and understanding I took the exact route for each bathroom he was working on so before he put in each fixture he had a light so he didn’t have to work in the dark!!!
I've been an IBEW journeyman for over 40 years and I agree with 95% of what you showed. However, I have encountered both main, branch circuit breaker and buss tab failures that have required relocation of the breakers. With the mains, the issue was with conductor damage due to loose connections requiring cutting back an inch or so of the conductors. We were taught to make a circular loop that exceeds the code minimum requirement to facilitate that need. With the breakers, I have sometimes encountered situations where a buss tab has been damaged beyond use and a new breaker must be relocated elsewhere in the panel as that tab is no longer usable. I was taught to always leave a neat loop long enough to reach any position on that side of the panel. I've been using a Brady shrink tube labeler for wire ID for years, highly recommend it. I concur with others about spacing breakers that can generate heat to help extend their life. The last thing, and oh so important, is to do load calculations to balance the main feeder loads equally.
another reason for the loops or mouse ears on SE conductors is to prevent any water that could accidently travel down the cable to go directly into the lug and down the bus ,and then the breakers , the loops allow the water to drip away from the lugs and bus , i do the same practice especially in a meter socket . The most puzzling to me is the use of the bushing on the connector , why thats code is beyond me , pulling into a pipe yes absolutely but into a connector kind of a unnecessary .
@@ncooty The Labeler: I'm not sure of the type. My employer bought a whole new system and offered me the old one. It came with a couple dozen boxes of both labels, shrink tubes, transfer "ink" of various colors, the PC link cable and CD with the program on it. You don't need to use a PC to enter data into the unit, but it makes it easier to setup and how it prints, i.e.- Type size, vertical or horizontal, font type, consecutive numbering, etc. The unit will store several different print jobs so when you're out in the field you can pickup printing consecutive numbering where you left off or modify the print data. If you do a lot of motor control, data or any other type of job requiring labeling ID's it's great to have.
Agreed. It's a little ridiculous to be making a video for educational purposes while not showing a single loop. Kinda just advertising a bad practice for anyone in the field trying to learn from this video.
A thought about not using the wire brush as instructed... I think the manufacturer specifies a wire brush or emery cloth because they're both able to abrade aluminum oxide and get the NoAlOx in contact with bare aluminum. A nylon brush isn't capable of achieving this. Besides, using a nylon brush instead of using a wire brush, as specified by manufacturer, technically means that practice isn't code compliant. I've found a 4-in-1 plumber's brush to be really handy for quickly working NoAlOx into the ends of large conductors Thank you for making this video, I picked up quite a few tips to make my work cleaner :)
Yes indeed. I see so little common sense on this topic. Aluminum oxide forms in milliseconds after the surface of the aluminum is disrupted. One could then argue that this minimal oxidation that occurs is surface an unlikely to lead to a significant increase in resistance if NoAlOx was applied right after. But I like what Dustin and manufacturer recommends. Get it in between the strands. Aluminum oxide is tough stuff. Maybe the wire brush and emery cloth remove a little, I don't know, but probably not much. What is going to remove it is tightening up the lug and forcing those strands to rub up against each other and the screw under a lot more pressure. The the NoAlOx sort of seals the deal by keeping oxygen in the air from getting to those newly abraded surfaces.
I recently replaced an existing panel with an updated one. I tried my best to keep it neat (thanks to your videos). But it was impossible to put breakers in an orderly fashion as is the case with a new build. I would like to see a video of how you would tackle a similar situation. Also power is coming in from bottom as well as several branches. Thanks again and keep up the good work!
New student. Just started my night classes in September. Waiting until probably after the set of classes to find an apprenticeship. This is all so new to me…..but I’m enjoying learning all of this so far! Thanks again, Electrician U.
if I had to guess, diagram what each hole in the breaker box has which wires and in what order. Since they are secured that placement shouldn't move even with stripping the sheaths.
@@Circle14 That's ridiculous. The ends should be labeled before it even enters the panel. Just keep a piece on each one before removing the rest of the sheathing.
well this video is just a demonstration i’m guessing. normally all the wires will be labeled and you’ll put the label back on the wires after you strip it
I’m not an electrician but do some repair work on my home and other family homes. I have had some training, enough to do the things that I do, and have been formally trained in electrical safety. I never re engineer anything, just replace. So I really enjoy learning from you and your lessons have been very valuable to me. Thanks for what you’re teaching.
I’ve been an electrical contractor for years. I’m annal about workmanship. Rarely do residential work anymore, but my/our panels always look like a draftsman drew them. Some of your techniques dovetail with mine, minor differences, but I would allow you on our team. That was meant to be taken as a compliment. We always land our grounds and neutrals first towards the outside of the panel. Our ungrounded conductors move in slightly towards the center/breaker so we have a tier effect. We also zip tie into neat bundles. I’ve also used the technique of zip tying cables to staples, depending on the circumstances. Enjoyed your video!!!
What a well laid out panel! This is what I’ve seen in aircraft, but rarely see in residential work. I prefer industrial panel work, but your work is impressive. Press on sir and keep up the good work.
Im finally sparkying sparky. Spent the last year apprenticed under an electrician with high standards and amazing skill, my son in law. Your panel here looks alot like my first panel did, so this video is just extra verification that my boy is doing it how it should be done. Thanks for your work and im gonna be nerding out from here on your content.
Dustin you do clean work and I like that. I'm the same way with my plumbing, I've been a plumber for 51 years so when I see work you are doing I take notice. I watch other trades doing their work and not many do as well as you do. You're a Texas electrician and I'm a Alabama plumber. Yes we are both Southern Boys...haha
I like the mention of the torque marks. I've watched a lot of other videos and haven't seen anyone mention this. It's used often in the telecom industry that I've working in but not in these residential type install videos. Permanent sharpie and for RF and large ground bars we have used red tshirt 'puffy paint' that shows up well in close out photos or feet away and partially breaks off once the connection is moved.
I didn't know that electrical wiring can be so nice and tidy, I can see that you really like what you do. Thank you for your video, now I have a more clear vision of how an electrical panel looks (not just on a plan/drawing)🌸
Excellent work. I wish more tradesmen took as much pride in their finished product. There are a lot of similarities between this and wiring an industrial control panel. One thing I tell new guys is to watch the "flow" of the wiring to keep things from crossing any more than absolutely necessary. I use painters' tape for temporary tags on the wires above then put heat shrink labels on the panel wiring.
Dustin, what about a video on load calculations and how to do them? I know some people have struggled with that and the Code book doesn’t do a very good job of breaking it down to where that most beginners/apprentices can understand how to do it. Thanks.
Great suggestion,I know Mike holt has good info on that portion of code 220, and his material is being used in my masters electrician prep class for the exam
Bro I’ve been following you a long time. I can’t tell you how much you’ve taught me. I’ll never stop learning and really appreciate that you share your knowledge with the world. God bless you, and stay safe and please keep the content coming! ❤
I always take the meter and check for continuity between the ungrounded conductors and the grounded and grounding conductors. Had a problem as a 1st year apprentice where the romex bushing had a burr in it and it poked through the sheathing into the hot conductor and shorted out!
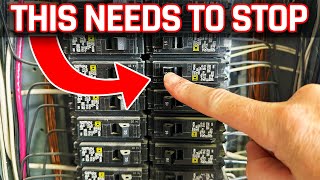
As nice as it is to keep all the arc faults and combos and gfcis together to keep uniformity, they tend to radiate A LOT of heat, causing them to go bad fast. I run into that a lot in new builds in Dallas. I've started to stagger just to give the other breakers more life.
They don't radiate a LOT of heat, no more than a standard breaker. Current flow is what generates heat, not the fact it's a breaker than contains electronics. Current flow generates heat through all breakers, staggering does nothing..
Great demonstration. Some of the basics that I have seen are not really trained into new electricians. Love the grounding at the bottom. And that is really helpful when you need to add new circuits in the future. I think you could’ve spent a little more time on circuit labeling, but all in all great job.
Not an electrician, really just trying to build my knowledge, but that just looks so organized and aesthetically pleasing. I really appreciate you putting out this content brother, keep up the good work 👍🏻
You make no mention of balancing, All the 240 volt breakers on one side of the panel, is fine because by their nature, they balance the loads automatically. But when laying out the single pole breakers, do you look to try to balance at this point, or wait until panel is fully operational?? I didn't notice you terminating the breakers, so my question is if you provide a "slack loop" to easily allow moving breakers up or down to aid in load balancing? I used to use the idea of loads going down past the probable breaker and looping back up, before turning to connect to the breaker. Being able to move a couple slots up or down usually allows for adjusting breaker order. But I have seen guys leave enough slack to get to anywhere in the panel too. How do you usually do it?
the plugs alternate between the two poles as they go down the box. I've heard of the balancing theory and once "practiced" it myself but it makes no sense given how the box is designed.
Awesome work.. been watching your videos for almost a year while I've been in EEST training. Always detailed and for the most part I actually understand what you're talking about 😂😂. Thanks for what you do‼️
Omg my panel is a mess. Renovating is adding more tasks than I'm completing 😂 Since I'm rewiring the house, might as well clean up my box. Thanks crazy guy!
Question, at 13:55, it seems there are more than 2 cables in contact passing through a wood member. Not sure if the holes will be sealed or the stud bay insulated. Either way, my question is should the ampacity be reduced per 334.80?
I'd love to see a video from you on how to properly fold wires into a regular receptacle/switch box. I'm very good with electrical work but that's still a skill I've never figured out.I wind up just smashing the wires in.
I went into a government building once, to do a safety inspection, and saw a panel at the top of the wall, right at the 20-ft ceiling. The government doesn’t pull permits, and the road crew had added their own new lights. When I first saw it I thought it was j-box. But after getting a ladder to climb up and check, they had a sub panel with eight 20-Amp breakers, and the ground and nuetral bonded. I made them hire a licensed electrician to clean it up. Three months later I went back to verify the inspection, and they had put a work bench under the new panel. I made them move the bench, and mark a clear zone, in yellow traffic striping paint. It will be bright reflective yellow, “KEEP CLEAR - NO STORAGE”, until the concrete gets torn out.
6:28 mark. Keep a rag handy and grab the wire and run it through your hand, thumb side down, like your pulling it but let it slip through with tension. It will straighten that wire right out.
8:09 mark. You should always square off your wires with a minimum radius of 4 times the thickness of the wire. I like to use my index finger to make the bend radius. If you bring wire straight out from the breaker with a slight bend towards back wall of the box, and then bend up 1/2" from the side wall of the box and then back in towards the buss bar using index finger again to make the radius it will be a much cleaner install. Reverse order when landing your hots or neutrals that land on the breaker. Also a good rule of thumb when installing neutrals and grounds is land your wire in descending order as you terminate to your breakers. So top Breaker #2 (breaker space #6 in your case because of the surge protector you put in. So maybe start 3rd terminal down in case of future add and relocation of the surge protector.) would have neutral on top terminal of inside buss bar, its ground would go on top terminal of outside buss bar. On down the line. Then if you have to remove a circuit wire for whatever reason later on it is easier to find the ground and neutral wire that goes with its hot wire. Always think of the next guy when you install something to make it easier to trouble shoot, change or fix. The next guy just may be you.
16:20 that seam relatively time consuming I always us the proper size plastic conn with nails . I have to say that is a very versatile method that I have used for other things .
Great video! Why do you use a razor knife to strip your Romex , especially the larger three or four wire? Why not an electrician’s knife (foldable with the hooked blade) ? Also keep in mind that the has the required minimum wire-bending space in the cabinet gutter . Today cabinets have generous gutters compared to the panels in the past and by bundling current carrying conductors and the short bending radius that installers insist on doing in today’s panels create two issues 1) impeding heat dissipation 2) bends can exceed the maximum bending radius of conductors. Granted the panels look neat, but we can’t create bigger problems by not utilizing the gutters and gradually bending conductors and leaving some slack…sorry so long.
Awesome! Your work is beyond “neat” it’s beautiful. I thought I was anal about neatness but you just took it to a whole new level! Thanks. Love your videos.
New subscriber here, so happy to have found your channel. I'm a licensed swimming pool contractor in Central Florida. I specialize in automation and equipment troubleshooting. Lots of electrical involved and I absolutely love it. Your channel is very informative. Keep up the great content!
Those Ty-Raps are awesome. A lot of the guys at the phone company used those to strap down their ladders. One day a guy used zip ties to strap his ladder and got lucky no one was behind him when his ladder decided it wanted to fly.
Sparky need to learn how to service loop those pigtails so it looks awesome, showcases his skill, shows the effort, and future proofs a breaker move. That’s the ultimate brother. Shorten but leave some.
Duston, how do you identify your home runs when pulled? How do you preserve that identification as you rip out the Romex and then land the wires where they go? Do you use any system other than a sharpie to do your panel directories?
A good way is to label the cable above the panel, at the end of the cable, and in between. I also think using a labeler is a neat way to do the panel directory.
one electrician told me the sharpie disappears on the plastic jacketing after years the plastic chemicals fade it, he went back to a house and all the markings had disappeared. @@illestofdemall13
Dustin, I've watched a lot of your videos and most are very well done. This video, however, is very well done with great detail. I'm wiring panels for 33 years and I learned something too! The feeder cable with the ty wraps and staples is a terrific work tip that I know I'll be using next time. That ABB Ty wrap cut off tool looks great. I just looked real quick and saw they want $500 for that tool? LOLOLOLOL. What do they think they are, Milwaukee?
i have Klein ty wrap tool and it works great for tightening and cutting off Ty wraps neatly and flush but will not go in tight spaces as easy as that Ty wrap tool.
only thing I'd change about your panel layout and would prefer to see on most. is leaving a 2 pole space open at the top for generator interlock kit, the proper side or better yet leave 2 pole empty spaces at both left and right, to also allow for future sub panel/high current device feed. I hate when sub panel feeds end up added to the bottom of the panel because everything is smashed full.
Dustin I’ve been a subscriber since very early on in your channel and I love your videos. That being said I would debate with you about that bushing. It is not required on cable assembly’s with the SER is a cable assembly. As long as you have 1/4in or more of the jacket past the connector entry you are fine. Those bushings are needed when pulling in individual conductors so you don’t damage them (like pulling THWN through EMT).
aluminum needs the oxide broken … steel wire brush it oxidizes as soon as air hits it. no lox keeps the air off the aluminum surface pvc glue will too. i used it in costal areas
I like to organize the circuits logically in the home. So like all the kitchen circuits together, bedroom circuits together, etc. I feel like that makes it easier for the homeowner to find a breaker quickly if needed.
Have you ever tried a Plumbers "Pex Cutter" to strip your bigger gauges? works like a hot damn. 1st yr apprentice 45yrs old. Old dog learning new things. Great video by the way!!
On my main lug terminal I initial them to ensure they are not moved & I write the torque ft lbs on the inside of the panel above the wires. Had my first city inspector look at and he laughed at the fact that I also put a RED marker point on all of the beaker connections after I torqued them .
Newest code requirements from the NFPA now says you can "not" bundle the conductors together as it will not allow heat to dissipate and could cause overheating. You would have to de-rate your conductors if you bundle them.
Not a new code requirement and there is no prohibition on bundling them together, but if you bundle/wrap conductors for more than 24" they must be derated
The Ty-rap gun by T&B. is a life changing tool. The Tyraps them selves are nylon, not plastic. Have A Stainless tooth and the black version are UV resistant.
I don't know what it is with my inspector but he doesn't like the wire ties in panels, he said it causes heat, like taping wire nuts onto wires. Also, he doesn't mention anything about bushings on conductors unless it's coming from a conduit raceway, since there is sheathing. One last bit, he noted that according to the NEC, when a grounding conductor leaves a dwelling to go to a ground rod, it needs to be in some sort of conduit due to it being exposed to damage. I'm not sure if you cover grounding in a video or not.
What's your thought on using that extra sheathing as a surface for marking the various lines? Write "Kitchen" with a sharpie on the yellow plastic and pass the wire through before connecting it to the breaker. It also acts as an extra breaker map once you've taken the front panel off.
Awesome video like always! I learn a lot from your videos and i appreciate all the information. Just one thing, the maximum height for the breaker handle is 6’7 not 6’6. Other than that, thank your for all the tips I know I’ll be using them 👏


Refreshing to see someone that takes pride in their work
I rarely come across neat panels , I don’t get it
Agreed it’s surprising how little extra and sometimes less time it takes to be near and tidy
Workmanship!!! Yay!!!
@@mitchlosier Most companies don't have the manpower and time to let someone just sit in a panel and make it really pretty for a few hours. Also in a commercial setting no matter how pretty you make it eventually some knucklehead will come behind you and undo all your hours of work with a couple snips of their side cutters. I have a feeling it's residential guys that are spending this much time in a panel and that I can understand but I think it's something that you don't see in a commercial setting because it wastes a lot of time that you could be applying to something else.
It doesn't really take any longer to do good work. Maybe 30 minutes in a full 42 circuit panel.
Retired plumber here, fantastic workmanship. I treated my work the same way, I wish I had a dollar for every time a fellow plumber said to me "Why are you making everything so perfect? No one's gonna see it when the drywall is up!" Pride in one's work.
You can be proud of your work if it isn’t pretty too.
Theres a reason they said that... Made them feel bad. Also, they were probably only concerned with time/money.
That's the same way I feel about my work! I feel everyone of my jobs has my name on it. I always like to leave some extra wire, at least a couple of inches, for just in case oppsys lol! You can still make it look nice and have the peace of mind!
Sparky here, I enjoyed working next to and with Plumbers that took pride in their work I was doing a Commercial job for a Daycare and the plumber was installing fixtures in the bathrooms, I went in there and installed the light right on top of him. He was so Kind and understanding I took the exact route for each bathroom he was working on so before he put in each fixture he had a light so he didn’t have to work in the dark!!!
@@josue24 good point.
I've been an IBEW journeyman for over 40 years and I agree with 95% of what you showed. However, I have encountered both main, branch circuit breaker and buss tab failures that have required relocation of the breakers.
With the mains, the issue was with conductor damage due to loose connections requiring cutting back an inch or so of the conductors. We were taught to make a circular loop that exceeds the code minimum requirement to facilitate that need.
With the breakers, I have sometimes encountered situations where a buss tab has been damaged beyond use and a new breaker must be relocated elsewhere in the panel as that tab is no longer usable.
I was taught to always leave a neat loop long enough to reach any position on that side of the panel.
I've been using a Brady shrink tube labeler for wire ID for years, highly recommend it.
I concur with others about spacing breakers that can generate heat to help extend their life.
The last thing, and oh so important, is to do load calculations to balance the main feeder loads equally.
Great suggestion re: the labeller. What size do you use (e.g., 0.75", 1"...) and which type (vinyl, polypropylene)?
another reason for the loops or mouse ears on SE conductors is to prevent any water that could accidently travel down the cable to go directly into the lug and down the bus ,and then the breakers , the loops allow the water to drip away from the lugs and bus , i do the same practice especially in a meter socket . The most puzzling to me is the use of the bushing on the connector , why thats code is beyond me , pulling into a pipe yes absolutely but into a connector kind of a unnecessary .
@@ncooty The Labeler: I'm not sure of the type. My employer bought a whole new system and offered me the old one. It came with a couple dozen boxes of both labels, shrink tubes, transfer "ink" of various colors, the PC link cable and CD with the program on it.
You don't need to use a PC to enter data into the unit, but it makes it easier to setup and how it prints, i.e.- Type size, vertical or horizontal, font type, consecutive numbering, etc. The unit will store several different print jobs so when you're out in the field you can pickup printing consecutive numbering where you left off or modify the print data.
If you do a lot of motor control, data or any other type of job requiring labeling ID's it's great to have.
Agreed. It's a little ridiculous to be making a video for educational purposes while not showing a single loop. Kinda just advertising a bad practice for anyone in the field trying to learn from this video.
New apprentice here; your videos and podcast have been such a blessing to better my work even at such a basic level!
Agreed.
A thought about not using the wire brush as instructed... I think the manufacturer specifies a wire brush or emery cloth because they're both able to abrade aluminum oxide and get the NoAlOx in contact with bare aluminum. A nylon brush isn't capable of achieving this. Besides, using a nylon brush instead of using a wire brush, as specified by manufacturer, technically means that practice isn't code compliant.
I've found a 4-in-1 plumber's brush to be really handy for quickly working NoAlOx into the ends of large conductors
Thank you for making this video, I picked up quite a few tips to make my work cleaner :)
Yes indeed. I see so little common sense on this topic. Aluminum oxide forms in milliseconds after the surface of the aluminum is disrupted. One could then argue that this minimal oxidation that occurs is surface an unlikely to lead to a significant increase in resistance if NoAlOx was applied right after. But I like what Dustin and manufacturer recommends. Get it in between the strands. Aluminum oxide is tough stuff. Maybe the wire brush and emery cloth remove a little, I don't know, but probably not much. What is going to remove it is tightening up the lug and forcing those strands to rub up against each other and the screw under a lot more pressure. The the NoAlOx sort of seals the deal by keeping oxygen in the air from getting to those newly abraded surfaces.
A lot of new lugs are alloy and don’t require it
Aircraft mechanic here. Rule of thumb we were taught in school. Its gotta look good to be good. Craftsmanship is determined by this.
I recently replaced an existing panel with an updated one. I tried my best to keep it neat (thanks to your videos). But it was impossible to put breakers in an orderly fashion as is the case with a new build. I would like to see a video of how you would tackle a similar situation. Also power is coming in from bottom as well as several branches. Thanks again and keep up the good work!
Wow. I wish every electrician would aspire to install as cleanly and neatly as you have here. Well done sir
New student. Just started my night classes in September. Waiting until probably after the set of classes to find an apprenticeship. This is all so new to me…..but I’m enjoying learning all of this so far! Thanks again, Electrician U.
How do you keep track of which wires are for which circuit when you strip all the romex sheaths at once? I have wondered this for a long time.
if I had to guess, diagram what each hole in the breaker box has which wires and in what order. Since they are secured that placement shouldn't move even with stripping the sheaths.
@@Circle14 That's ridiculous. The ends should be labeled before it even enters the panel. Just keep a piece on each one before removing the rest of the sheathing.
I usually will put a circuit number at the top on the sheath I won't cut off.
Cut the label of the insulation and put it on the hot wire. Or just label it after the power is on
well this video is just a demonstration i’m guessing. normally all the wires will be labeled and you’ll put the label back on the wires after you strip it
Amazing setup. I'm not an Electrician... but I love seeing somebody take pride in their work.
Amazing! helping other/future electricians with tips, explanations , things to know/consider and tutorials.
I’m not an electrician but do some repair work on my home and other family homes. I have had some training, enough to do the things that I do, and have been formally trained in electrical safety. I never re engineer anything, just replace. So I really enjoy learning from you and your lessons have been very valuable to me. Thanks for what you’re teaching.
Beautiful panel
Gives me a template for quality
Thank you
Big fan of your videos! Thanks for all you do
Running down right now to mark the lugs in my subpanel with a sharpie. Inspection in a few days. Thanks!
I’ve been an electrical contractor for years. I’m annal about workmanship. Rarely do residential work anymore, but my/our panels always look like a draftsman drew them. Some of your techniques dovetail with mine, minor differences, but I would allow you on our team. That was meant to be taken as a compliment.
We always land our grounds and neutrals first towards the outside of the panel. Our ungrounded conductors move in slightly towards the center/breaker so we have a tier effect. We also zip tie into neat bundles.
I’ve also used the technique of zip tying cables to staples, depending on the circumstances.
Enjoyed your video!!!
Loved the feeder nail trick. Brilliant
I'm doing my own install in my garage, and this - by far - is the best out of maybe 100 youtube videos i have watched about panel boxes.
Taking pride is NEVER A BAD THING!!!! Fantastic!!
What a well laid out panel! This is what I’ve seen in aircraft, but rarely see in residential work. I prefer industrial panel work, but your work is impressive. Press on sir and keep up the good work.
Im finally sparkying sparky. Spent the last year apprenticed under an electrician with high standards and amazing skill, my son in law. Your panel here looks alot like my first panel did, so this video is just extra verification that my boy is doing it how it should be done. Thanks for your work and im gonna be nerding out from here on your content.
Dustin you do clean work and I like that. I'm the same way with my plumbing, I've been a plumber for 51 years so when I see work you are doing I take notice. I watch other trades doing their work and not many do as well as you do. You're a Texas electrician and I'm a Alabama plumber. Yes we are both Southern Boys...haha
I like the mention of the torque marks. I've watched a lot of other videos and haven't seen anyone mention this. It's used often in the telecom industry that I've working in but not in these residential type install videos. Permanent sharpie and for RF and large ground bars we have used red tshirt 'puffy paint' that shows up well in close out photos or feet away and partially breaks off once the connection is moved.
I didn't know that electrical wiring can be so nice and tidy, I can see that you really like what you do. Thank you for your video, now I have a more clear vision of how an electrical panel looks (not just on a plan/drawing)🌸
Excellent work. I wish more tradesmen took as much pride in their finished product. There are a lot of similarities between this and wiring an industrial control panel. One thing I tell new guys is to watch the "flow" of the wiring to keep things from crossing any more than absolutely necessary. I use painters' tape for temporary tags on the wires above then put heat shrink labels on the panel wiring.
Wow, that is one of the cleanest panel I have ever seen ! Nice !
That wire management is amazing. Great job!
Great primer as I am going to place a panel and meter base for power to my workshop.
Dustin, what about a video on load calculations and how to do them? I know some people have struggled with that and the Code book doesn’t do a very good job of breaking it down to where that most beginners/apprentices can understand how to do it. Thanks.
Great suggestion,I know Mike holt has good info on that portion of code 220, and his material is being used in my masters electrician prep class for the exam
that tool cutting the Ty-Rap is very cool
Bro I’ve been following you a long time. I can’t tell you how much you’ve taught me. I’ll never stop learning and really appreciate that you share your knowledge with the world. God bless you, and stay safe and please keep the content coming! ❤
I always take the meter and check for continuity between the ungrounded conductors and the grounded and grounding conductors. Had a problem as a 1st year apprentice where the romex bushing had a burr in it and it poked through the sheathing into the hot conductor and shorted out!
My wife had the todays show on, I saw you on TV brother. Way to make electricians known!
As nice as it is to keep all the arc faults and combos and gfcis together to keep uniformity, they tend to radiate A LOT of heat, causing them to go bad fast. I run into that a lot in new builds in Dallas. I've started to stagger just to give the other breakers more life.
I agree with this comment.
I was surprised to see that. I was always taught to stagger the 220s
I always heard breakers with most draw at top of panel to get rid of heat and low draw at bottom.
They don't radiate a LOT of heat, no more than a standard breaker. Current flow is what generates heat, not the fact it's a breaker than contains electronics. Current flow generates heat through all breakers, staggering does nothing..
@@ranger178 Doesn't matter where the breaker is as the buss bars are designed to handle the heat generated by any and all breakers wherever they are.
Learned a lot of good tips from this video!
Great demonstration. Some of the basics that I have seen are not really trained into new electricians. Love the grounding at the bottom. And that is really helpful when you need to add new circuits in the future. I think you could’ve spent a little more time on circuit labeling, but all in all great job.
Dustin, THANK YOU!!! every lil detail matters and your content is very planned/thought out!
Nicest videos I have seen. A professional rather than want to be RUclipsrs, thanks
Beautiful, I love it when the panel looks like yours does!
Not an electrician, really just trying to build my knowledge, but that just looks so organized and aesthetically pleasing. I really appreciate you putting out this content brother, keep up the good work 👍🏻
if it fits it ships, or if it works it twerks,,,best of luck to the next guy
Awesome information! I was always told to leave it nice for the next guy - that guy might be you!
Very well done panel, Dustin. Really like the name tag sleeves you put on your conductors for ease of clarification
Great video bro!! You explain how to do electrical work very well. I’ve been watching your videos for about three years.
You make no mention of balancing, All the 240 volt breakers on one side of the panel, is fine because by their nature, they balance the loads automatically.
But when laying out the single pole breakers, do you look to try to balance at this point, or wait until panel is fully operational?? I didn't notice you terminating the breakers, so my question is if you provide a "slack loop" to easily allow moving breakers up or down to aid in load balancing? I used to use the idea of loads going down past the probable breaker and looping back up, before turning to connect to the breaker. Being able to move a couple slots up or down usually allows for adjusting breaker order. But I have seen guys leave enough slack to get to anywhere in the panel too. How do you usually do it?
the plugs alternate between the two poles as they go down the box. I've heard of the balancing theory and once "practiced" it myself but it makes no sense given how the box is designed.
You are so awesome! Been watching this from time to time since video was posted. Learning something every watch. Thanks man. Will get that ABB tool.
Awesome work.. been watching your videos for almost a year while I've been in EEST training. Always detailed and for the most part I actually understand what you're talking about 😂😂. Thanks for what you do‼️
Now, that's a neat panel!
Omg my panel is a mess. Renovating is adding more tasks than I'm completing 😂 Since I'm rewiring the house, might as well clean up my box. Thanks crazy guy!
This is next level OCD, nice work, always appreciate good electrical work
If ground and neutral buses only take 10-12 awg how do you attach 6 awg ground and neutral? Great videos. Very clear explanations. Thank you.
Good workmanship.
Question, at 13:55, it seems there are more than 2 cables in contact passing through a wood member. Not sure if the holes will be sealed or the stud bay insulated. Either way, my question is should the ampacity be reduced per 334.80?
I'd love to see a video from you on how to properly fold wires into a regular receptacle/switch box. I'm very good with electrical work but that's still a skill I've never figured out.I wind up just smashing the wires in.
I learned a lot of new things, although I had a lot of experience assembling electrical panels, Thank you
I went into a government building once, to do a safety inspection, and saw a panel at the top of the wall, right at the 20-ft ceiling. The government doesn’t pull permits, and the road crew had added their own new lights.
When I first saw it I thought it was j-box. But after getting a ladder to climb up and check, they had a sub panel with eight 20-Amp breakers, and the ground and nuetral bonded.
I made them hire a licensed electrician to clean it up. Three months later I went back to verify the inspection, and they had put a work bench under the new panel. I made them move the bench, and mark a clear zone, in yellow traffic striping paint. It will be bright reflective yellow, “KEEP CLEAR - NO STORAGE”, until the concrete gets torn out.
6:28 mark. Keep a rag handy and grab the wire and run it through your hand, thumb side down, like your pulling it but let it slip through with tension. It will straighten that wire right out.
8:09 mark. You should always square off your wires with a minimum radius of 4 times the thickness of the wire. I like to use my index finger to make the bend radius. If you bring wire straight out from the breaker with a slight bend towards back wall of the box, and then bend up 1/2" from the side wall of the box and then back in towards the buss bar using index finger again to make the radius it will be a much cleaner install. Reverse order when landing your hots or neutrals that land on the breaker. Also a good rule of thumb when installing neutrals and grounds is land your wire in descending order as you terminate to your breakers. So top Breaker #2 (breaker space #6 in your case because of the surge protector you put in. So maybe start 3rd terminal down in case of future add and relocation of the surge protector.) would have neutral on top terminal of inside buss bar, its ground would go on top terminal of outside buss bar. On down the line. Then if you have to remove a circuit wire for whatever reason later on it is easier to find the ground and neutral wire that goes with its hot wire. Always think of the next guy when you install something to make it easier to trouble shoot, change or fix. The next guy just may be you.
16:20 that seam relatively time consuming I always us the proper size plastic conn with nails . I have to say that is a very versatile method that I have used for other things .
Great video! Why do you use a razor knife to strip your Romex , especially the larger three or four wire? Why not an electrician’s knife (foldable with the hooked blade) ? Also keep in mind that the has the required minimum wire-bending space in the cabinet gutter . Today cabinets have generous gutters compared to the panels in the past and by bundling current carrying conductors and the short bending radius that installers insist on doing in today’s panels create two issues 1) impeding heat dissipation 2) bends can exceed the maximum bending radius of conductors. Granted the panels look neat, but we can’t create bigger problems by not utilizing the gutters and gradually bending conductors and leaving some slack…sorry so long.
If only all electricians did a clean job like this.
I use Eaton panels and I can’t find feeder lug covers for the panel. It’s a bit frustrating. It was nicely done and thanks for the tips.
Another great video with tons of detail.
Very thorough presentation. I learned a lot. Thank you for sharing your knowledge and expertise .
Awesome! Your work is beyond “neat” it’s beautiful. I thought I was anal about neatness but you just took it to a whole new level! Thanks. Love your videos.
Great job! That panel work is excellent looking!
New subscriber here, so happy to have found your channel. I'm a licensed swimming pool contractor in Central Florida. I specialize in automation and equipment troubleshooting. Lots of electrical involved and I absolutely love it. Your channel is very informative. Keep up the great content!
Those Ty-Raps are awesome. A lot of the guys at the phone company used those to strap down their ladders. One day a guy used zip ties to strap his ladder and got lucky no one was behind him when his ladder decided it wanted to fly.
Great, thanks for sharing. Keep creating more content like this one
Great video this guy is a pro
Love your content brother! Keep these types of videos coming!
Great video in detail, thanks Dustin!
Top notch all the way through!
Nice job instructor and craftsman my man 2 in one
Sparky need to learn how to service loop those pigtails so it looks awesome, showcases his skill, shows the effort, and future proofs a breaker move. That’s the ultimate brother. Shorten but leave some.
What do you think about the lock ring wrenches. I find I'm able to get a much tighter connection and my inspector really appreciates it.
Beautiful install and explanation.
Duston, how do you identify your home runs when pulled? How do you preserve that identification as you rip out the Romex and then land the wires where they go? Do you use any system other than a sharpie to do your panel directories?
A good way is to label the cable above the panel, at the end of the cable, and in between. I also think using a labeler is a neat way to do the panel directory.
one electrician told me the sharpie disappears on the plastic jacketing after years the plastic chemicals fade it, he went back to a house and all the markings had disappeared. @@illestofdemall13
Great Video upcoming electrician going to school in January
Dustin, I've watched a lot of your videos and most are very well done. This video, however, is very well done with great detail.
I'm wiring panels for 33 years and I learned something too! The feeder cable with the ty wraps and staples is a terrific work tip that I know I'll be using next time.
That ABB Ty wrap cut off tool looks great. I just looked real quick and saw they want $500 for that tool? LOLOLOLOL. What do they think they are, Milwaukee?
i have Klein ty wrap tool and it works great for tightening and cutting off Ty wraps neatly and flush but will not go in tight spaces as easy as that Ty wrap tool.
Hey! What about manipulating the feeders AS you torque them to get the strands to Lay correctly??? 21:14
Great tutorial. Best I've seen.
Very nice sir.comming from a carpenter- handyman.
Great Video. Thank you for sharing. I would like to see commercial panel install
only thing I'd change about your panel layout and would prefer to see on most. is leaving a 2 pole space open at the top for generator interlock kit, the proper side or better yet leave 2 pole empty spaces at both left and right, to also allow for future sub panel/high current device feed. I hate when sub panel feeds end up added to the bottom of the panel because everything is smashed full.
Excellent forethought.
yes, i always heard keep hottest breakers with most load at top and the surge protector.
@@ranger178 You may have heard that, but where the breakers are is irrelevant. Every part of the bus bar is rated for the same amperage.
Truly nice work.
Dustin I’ve been a subscriber since very early on in your channel and I love your videos. That being said I would debate with you about that bushing. It is not required on cable assembly’s with the SER is a cable assembly. As long as you have 1/4in or more of the jacket past the connector entry you are fine. Those bushings are needed when pulling in individual conductors so you don’t damage them (like pulling THWN through EMT).
Very nice... Good workmanship indeed! Trade craft...
aluminum needs the oxide broken … steel wire brush it oxidizes as soon as air hits it. no lox keeps the air off the aluminum surface
pvc glue will too. i used it in costal areas
I like to organize the circuits logically in the home. So like all the kitchen circuits together, bedroom circuits together, etc. I feel like that makes it easier for the homeowner to find a breaker quickly if needed.
Wouldn't every breaker have to be labeled anyway? Sorry, still learning!
Great video! One other code tip is the bottom of the panel has to be at least two feet from the floor.
Have you ever tried a Plumbers "Pex Cutter" to strip your bigger gauges? works like a hot damn. 1st yr apprentice 45yrs old. Old dog learning new things. Great video by the way!!
On my main lug terminal I initial them to ensure they are not moved & I write the torque ft lbs on the inside of the panel above the wires. Had my first city inspector look at and he laughed at the fact that I also put a RED marker point on all of the beaker connections after I torqued them
.
Beautiful work! I am impressed!
Newest code requirements from the NFPA now says you can "not" bundle the conductors together as it will not allow heat to dissipate and could cause overheating. You would have to de-rate your conductors if you bundle them.
Not a new code requirement and there is no prohibition on bundling them together, but if you bundle/wrap conductors for more than 24" they must be derated
The Ty-rap gun by T&B. is a life changing tool. The Tyraps them selves are nylon, not plastic. Have A Stainless tooth and the black version are UV resistant.
I don't know what it is with my inspector but he doesn't like the wire ties in panels, he said it causes heat, like taping wire nuts onto wires. Also, he doesn't mention anything about bushings on conductors unless it's coming from a conduit raceway, since there is sheathing. One last bit, he noted that according to the NEC, when a grounding conductor leaves a dwelling to go to a ground rod, it needs to be in some sort of conduit due to it being exposed to damage. I'm not sure if you cover grounding in a video or not.
Other than the torque wrench for vehicle tire lug nuts, I am unfamiliar with any other type. What does the one for an electrical panel look like?
I just watched a nice video on this by Karly the Sparky, so I'm glad to see you following her leadership! ;-)
What's your thought on using that extra sheathing as a surface for marking the various lines? Write "Kitchen" with a sharpie on the yellow plastic and pass the wire through before connecting it to the breaker. It also acts as an extra breaker map once you've taken the front panel off.
That is what I do.
he did that on wires but i heard that the sharpie fades over time on wire jacketing.
Awesome video like always! I learn a lot from your videos and i appreciate all the information. Just one thing, the maximum height for the breaker handle is 6’7 not 6’6. Other than that, thank your for all the tips I know I’ll be using them 👏