Exactly what PBS#007 said. Don't be worried about if you bore people. People won't watch the video if they think you're boring. Excellent video! Keep them coming please bud 👌🤙
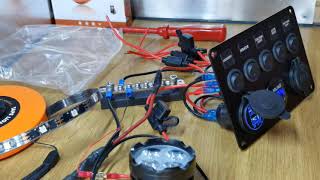
I bought one of these 5 gang power hubs for my camper van and was a bit confused about how everything wired in properly. I watched your video and replicated every single aspect on your video all the way down to the isolation switch. Everything is working 100%. I would just like to say that this video is Brilliant and you made my job a hell of a lot easier by the way you explained everything to me. Thank you so much for this video….👌🏻👌🏻👌🏻
You made this look easy and easy to understand maybe do another explaining what size fuses and how to work what size fuse you need for ie watts divided by volts equals amps
Follow up: I was doing what you showed and I thought I only needed 2 spare switches. So I took the 12 v meter positive wire from the meter and pulled it off and took the #6 switch fuse wire and attached to the positive lead on meter and it worked. So i did the same procedure for the USB and it worked. Beings the 12v utility socket isn't alive till you plug something in I left it alone. If you didn't make your video I would have never thought of any of this. Thanks again, Mike.
You do the same as he done in the video but instead of adding the extra switch you just do it on to one of the switchs on the panel I didn’t use a fuse as there is already one on the switch
Surprised the switch panel doesn't come with a block like that to connect the negatives coming from your loads, so glad I found this video! Awesome job explaining it!
You sir are a legend hats off to you explaining it so easy. And its neater than fuse box and can have it where u want it in van makes it nice looking and in back can just have solar set up. The isolation button a must ie when not in use.
echoing the comments below really, thanks for posting this video! when searching this topic, many videos show how to poke wires through holes 🤦.. not helpful! For a novice like me, your video is so helpful. To the point, spelling out what might be obvious to some, not me. thanks.
Like many below I am not an electrician , you explain how and straight easy terms I was wondering how the negetive was going to work , now I do well done KP
You couldn't have illustrated this any better! I took delivery of my panel today, took it out of the box and had no idea what was going on 🤣 You, my friend, have just saved me a whole lot of confusion and swearing. Thanks!
I had a go with using one of the switches to control power to the voltmeter. Here is how I did it: ruclips.net/video/NTErvErgJEE/видео.html. To isolate the whole panel, extend that concept by having the rest of the power coming from the first switch load.
Outstanding video! Really struggled to understand my antique bass boat renovation wiring to include this same panel ! Very clear, I’ve got a control panel antique now! Very clear, easy to understand video ! Thanks so much! Incredibly helpful! Well done Sir !! This WORKS FINE !!
Brilliant! I just purchased an older conversion van and the 4 gang switch panel controlling lights throughout the van is a bit worse for wear. I will be replacing the panel with a 4 gang version of the panel you wired in this video. Your explanation has saved me a tremendous amount of searching for an original wiring diagram for this older vehicle. I am now confident I can install the new switch without starting a fire or shorting out the electrical system! Thanks, mate!
Thanks Mark, this was just what i was looking for. an easy to understand video for someone who has no idea about wiring. Like Gordon, i have just picked up an old camper van and the wiring is non existent of lethal! so I'm starting again. thanks for the video and a pointer in the right direction.
I had in mind to do better battery connections for my telescope setup, but I had doubts because it's my first DIY project for me, but your explanations gave me the confidence to go with it and ... it worked ! :D Thank you for the video!
@@MrMeltedwellies l followed your instructions and everything worked perfectly, before I watching your presentation I thought l had a faulty pump and tap having said that l was wrong You saved the day Thanks, so much, keep up the good work kind regards Terry
Thanks from me too. I have this panel in my van already but needed the method of connecting a new device clarified which you did perfectly. Appreciate the assist,
Can you use a bus bar instead of a connector block or are they basically the same thing a little confused of which is better thank you great video by the way
Straight forward and simple, great, could you update with a newer version of the negative plastic wiring block though. ? Someone mentioned another method (a post ?)
Hi there! I just wanted to reach out and let you know that I loved your video, thank you so much! I learned a lot from it, especially as a first-time boat owner with limited electrical knowledge. The video was a tremendous help. However, I had a question regarding the switch that you mentioned in the video. Is that switch connected using an SAE connector to an O ring? I didn't quite grasp that concept and would appreciate some clarification on how it works and connect the cables Once again, thank you for creating such an informative video. It's been incredibly valuable to me as I navigate my new role as a boat owner.
I've always hated electrics, always struggled with them in my previous camper...this is a gem, cheers ! I've successfully wired in my switch panel to 10 LEDs, 1 strip light and some fairy lights....
This is outstanding i was trying to figure out the approach to setting up to battery and i would have totally missed that it remains live until done. This video also shows that a panel like this would be better if a power toggle switch to battery was already on this panel. This shows you're still better off buying the isolation switch and connector as well as block connector for negative. Thanks for links that also helps. 👍👍👍👍👋👋👋
Very helpful thank you Mark. The online fuse to the battery. Is that calculated depending on the max load if every appliance was turned on through the control panel.
get the same switch panel today but with green LED‘s 😁 thanks for helping me how to do it the right way and not like the most times like may way 😜 cause that takes more time and some flashes to my fingers 😂
They do, 4-5 prong switches have switch and device negative prongs, you can save wire grounding to metal, I run relays so the switch is just a positive interrupter grounded in the cab of my 4x4
I like how you keep things simple. I'm yet to do this. Have you done a blog on wiring up start to finish? It's great that you get to the point. Keep them coming. Thank you very much 😊
Thanks for taking the time to make this video. As most people said, it is very helpful. I would like to ask few questions if you allow me. Note: As I have no experience with electricity, some of them may not make sense at all. 1. What is the role of the additional in-line fuse you added near the extra switch, as each switch on the panel has its own fuse? 2. What cable size would you recommend to connect the battery to the panel? 3. I have read somewhere that car accessories do not need to be connected to negative. Instead, I could ground them to the vehicle. Is that true? 4. I am not planning on using it for heavy stuff, only led lights, so I assume I do not need to upgrade any wires or fuses. What specification should I look for to make sure it will not exceed the capacity? Many Thanks
I've just come across this excellent useful video. Does it not matter which side of the negative block you put the sequential wires as you placed them on the opposite side of the block to where the negative comes in from the battery, or that is what it looked like to me?
Brialliant video, exactly what I was looking for, quick question, could you not have used one of the switches on the panel as the isolator ? To provide power to the whole panel like you’ve done with the 3 way
Great video, really helpful! Could you advise exactly where I would add one of those small battery level monitors? Between the battery and rocker switch? Or between the rocker switch and the switch panel?
Great video!! Thanks. Quick question?? How does the leisure battery charge? As I’m connecting my leisure battery to my campervan starter battery…does the rocker switch isolate the charge from the starter battery? Thanks
my leisure batteries are charged via one 100w solar panel if i want to isolate my battery i would use a 30amp isolating switch plus the only time i would link my starter battery to my leisure battery is via a split relay so keeping my starter battery safe hope this helps
Thanks so much for taking the time and making the effort to create this video. It has helped me very much in wiring up my boat. This has made the whole process a lot easier. God bless you.
This was the best video on how to wire up a rocker panel!! One question.... is it possible to make one of the rocker switch the MAIN... so that it would turn all the other switches on and off?


![Felix "Unfair" | [Stray Kids : SKZ-PLAYER]](http://i.ytimg.com/vi/Oswujxm2Ag0/mqdefault.jpg)


Because you took the time to explain the wiring, that makes this video a great video, that is why people watch these videos thanks.
I appreciate that thanks
Exactly what PBS#007 said. Don't be worried about if you bore people. People won't watch the video if they think you're boring. Excellent video! Keep them coming please bud 👌🤙
What gauge wire do you use? @@MrMeltedwellies
I bought one of these 5 gang power hubs for my camper van and was a bit confused about how everything wired in properly. I watched your video and replicated every single aspect on your video all the way down to the isolation switch. Everything is working 100%. I would just like to say that this video is Brilliant and you made my job a hell of a lot easier by the way you explained everything to me. Thank you so much for this video….👌🏻👌🏻👌🏻
Thank you Richie
Nice and simple. Tells us the basics without either patronising or assuming we know more than we do, really helpful. Thanks
Glad it was helpful Andy
I never write on these things but compelled to with this ,excellent ,simple and concise. I understood it completely,well done !
You made this look easy and easy to understand maybe do another explaining what size fuses and how to work what size fuse you need for ie watts divided by volts equals amps
Hi, I noticed how old this video is but it was exactly what I was after! Thanks for taking the time to upload, super helpful 😁👍
You're so welcome!
Wow! Finally instructions in layman’s terms. Well done pal this is a great help for a novice like me. 👍
Follow up: I was doing what you showed and I thought I only needed 2 spare switches. So I took the 12 v meter positive wire from the meter and pulled it off and took the #6 switch fuse wire and attached to the positive lead on meter and it worked. So i did the same procedure for the USB and it worked. Beings the 12v utility socket isn't alive till you plug something in I left it alone. If you didn't make your video I would have never thought of any of this. Thanks again, Mike.
Mike you are so welcome thanks for watching
Very helpful. So many confusing 😕 videos on RUclips on this subject. To the point and simple to follow. Thankyou
This was so helpful. I couldn't figure out what to connect all the negative wires from my lights to to complete the circuit. Thanks so much.
Glad it helped!
Very nice instructional video. Thorough explanation without being too technical....Cheers
I just made one of the switches on the panel a off/on switch to power it instead of running a separate switch works great
Did you run it off a relay or just an inline fuse to a switch to the panel?
How
You do the same as he done in the video but instead of adding the extra switch you just do it on to one of the switchs on the panel I didn’t use a fuse as there is already one on the switch
Same,, works fine
I was wondering why he didn’t do that.
Surprised the switch panel doesn't come with a block like that to connect the negatives coming from your loads, so glad I found this video! Awesome job explaining it!
This is great! Making a truck camper and trying to figure out electrical,, Much appreciated!
Glad it was helpful!
thank you so much ,,I bought exactly this ,,saw the positive wires and thought ive been ripped off ,,,thank you for helping one dumb lad ❤👍👍👍
You sir are a legend hats off to you explaining it so easy. And its neater than fuse box and can have it where u want it in van makes it nice looking and in back can just have solar set up. The isolation button a must ie when not in use.
echoing the comments below really, thanks for posting this video! when searching this topic, many videos show how to poke wires through holes 🤦.. not helpful! For a novice like me, your video is so helpful. To the point, spelling out what might be obvious to some, not me. thanks.
This completely helped me understand how to install this panel and how to utilize the bus bar. Excellent tutorial. Thank you
Glad it helped
Like many below I am not an electrician , you explain how and straight easy terms I was wondering how the negetive was going to work , now I do well done KP
You couldn't have illustrated this any better!
I took delivery of my panel today, took it out of the box and had no idea what was going on 🤣
You, my friend, have just saved me a whole lot of confusion and swearing.
Thanks!
Glad it helped!
Thanks for this! I’m about to rewrite my T5 camper. Previous wiring was done really badly! Not one fuse to be seen!! Thank you again
No problem 👍 Rebecca
Mark, could you please show us how you would use the 1st switch as the power on/off switch, video is great, very simple to follow, thanks.
got a new video coming this weekend
Are you asking if it's possible to make one of the switches an isolation switch for the panel?
This would be ideal
I had a go with using one of the switches to control power to the voltmeter. Here is how I did it: ruclips.net/video/NTErvErgJEE/видео.html. To isolate the whole panel, extend that concept by having the rest of the power coming from the first switch load.
Outstanding video! Really struggled to understand my antique bass boat renovation wiring to include this same panel ! Very clear, I’ve got a control panel antique now! Very clear, easy to understand video ! Thanks so much! Incredibly helpful! Well done Sir !! This WORKS FINE !!
Glad you liked it Dennis
Thanks mate. This really helped with understanding how to wiring this up and wiring in general. Appreciate the help
Glad it helped
This is well explained, and without any type of music in the background.
Extremely helpful. I didn't know how to ground all of my wires. Great video.
Brilliant! I just purchased an older conversion van and the 4 gang switch panel controlling lights throughout the van is a bit worse for wear. I will be replacing the panel with a 4 gang version of the panel you wired in this video. Your explanation has saved me a tremendous amount of searching for an original wiring diagram for this older vehicle. I am now confident I can install the new switch without starting a fire or shorting out the electrical system! Thanks, mate!
Thanks for watching Gordon
Thanks Mark, this was just what i was looking for. an easy to understand video for someone who has no idea about wiring. Like Gordon, i have just picked up an old camper van and the wiring is non existent of lethal! so I'm starting again. thanks for the video and a pointer in the right direction.
I had in mind to do better battery connections for my telescope setup, but I had doubts because it's my first DIY project for me, but your explanations gave me the confidence to go with it and ... it worked ! :D
Thank you for the video!
Really helpful , shed loads of light on it for me and answered all my questions ! Top fella !
Glad it helped
Outstanding.... I finally understand connector boxes and bus bars properly..... thankyou, that was the perfect demo for what I needed
Thank you for sharing this. Greetings from Romania, you saved my day!
You're welcome!
Fantastic. I have the same type of panel you have and "Now" it all makes sense, Thanks so much and I also downloaded your video.
You're welcome Michael
Extremely well presented kind regards Terry
Thank you Terry
@@MrMeltedwellies l followed your instructions and everything worked perfectly, before I watching your presentation I thought l had a faulty pump and tap having said that l was wrong You saved the day Thanks, so much, keep up the good work kind regards Terry
Instaling this same panel in my van next week great vid well explained feel more confident after watching thankyou
Brilliant made it so easy, no technical jargon,, just straight forward 👍👍👍👍
Great video but instead of using a block for your negative could you not just connect all the black wires to a busbar?
I used a block for the negative.
Thanks from me too. I have this panel in my van already but needed the method of connecting a new device clarified which you did perfectly. Appreciate the assist,
You're welcome!
Can you use a bus bar instead of a connector block or are they basically the same thing a little confused of which is better thank you great video by the way
Perfect. Thanks. Wired my van up with confidence
Glad it helped
Brilliant. Just bought this exact gang panel and this was the perfect explanation, many thanks
Glad it helped Matt
Brilliant, thank you. Just bought one of these to build a solar trailer setup and the clarity of your explanation really helped. Cheers! Mick.
Straight forward and simple, great, could you update with a newer version of the negative plastic wiring block though. ?
Someone mentioned another method (a post ?)
will do
Best explanation on you tube
Much appreciated
Wow, thanks Ryan
Something I learned today about that box, but what? I really was looking for is how to wired up car lights, but thanks for the tip 😊
Glad I could help
Hi there! I just wanted to reach out and let you know that I loved your video, thank you so much! I learned a lot from it, especially as a first-time boat owner with limited electrical knowledge. The video was a tremendous help.
However, I had a question regarding the switch that you mentioned in the video. Is that switch connected using an SAE connector to an O ring? I didn't quite grasp that concept and would appreciate some clarification on how it works and connect the cables
Once again, thank you for creating such an informative video. It's been incredibly valuable to me as I navigate my new role as a boat owner.
this might explain it better then me typing a load of waffle thank you for your comment and watching ATB Mark
ruclips.net/video/wpnqvNS5jqg/видео.html
Geat video. Explained well and easy to understand. Thank you very much
I've always hated electrics, always struggled with them in my previous camper...this is a gem, cheers ! I've successfully wired in my switch panel to 10 LEDs, 1 strip light and some fairy lights....
Nice little control panel, just got the same type. Another option for - wires is to run them to a post. Saves a bit of wiring on the plastic block.
This is outstanding i was trying to figure out the approach to setting up to battery and i would have totally missed that it remains live until done. This video also shows that a panel like this would be better if a power toggle switch to battery was already on this panel. This shows you're still better off buying the isolation switch and connector as well as block connector for negative. Thanks for links that also helps. 👍👍👍👍👋👋👋
Thanks Vince
Great video. Thanks for the instructions. You have given me the confidence to giving this a go.
so calm ,clear, and simple excellent
Many thanks!
Very helpful thank you Mark. The online fuse to the battery. Is that calculated depending on the max load if every appliance was turned on through the control panel.
yep
get the same switch panel today but with green LED‘s 😁 thanks for helping me how to do it the right way and not like the most times like may way 😜 cause that takes more time and some flashes to my fingers 😂
Perfect man! Just what I was looking for. Cheers!
Installing the same panel in my camper. Great job.
Good luck!
Brilliant clip, I have this panel, and plan to wire in various 'off grid' electrics in my Land Rover. Perfect clip for a beginner like myself.
They do, 4-5 prong switches have switch and device negative prongs, you can save wire grounding to metal, I run relays so the switch is just a positive interrupter grounded in the cab of my 4x4
Thanks for sharing just fitting one in my camper van and was wondering how to earth everything just the ticket nicely explained 👍
Glad it was helpful Bob
Well done!!! This will help many people. Good Show.
Cheers!!!
Mine comes tomorrow. Thank you for the video 😊
Thank you for this video Awesome information and helped me wire my truck
Thanks for this simple instruction, instead of the negative block can I just use a blade fuse holder?
Good job mate, thankyou. Clear and easily to follow..
Glad it helped James
I like how you keep things simple. I'm yet to do this. Have you done a blog on wiring up start to finish?
It's great that you get to the point. Keep them coming. Thank you very much 😊
Perfect explanation!!
Just rewired my boat with everything you explained.. love it 👍🏼👍🏼
Great simple video .. straight and to the point. Thank you for sharing
Excellent video .building a day van very helpful thank you .
Glad it was helpful! Mr Chill
Thanks for taking the time to make this video. As most people said, it is very helpful. I would like to ask few questions if you allow me. Note: As I have no experience with electricity, some of them may not make sense at all.
1. What is the role of the additional in-line fuse you added near the extra switch, as each switch on the panel has its own fuse?
2. What cable size would you recommend to connect the battery to the panel?
3. I have read somewhere that car accessories do not need to be connected to negative. Instead, I could ground them to the vehicle. Is that true?
4. I am not planning on using it for heavy stuff, only led lights, so I assume I do not need to upgrade any wires or fuses. What specification should I look for to make sure it will not exceed the capacity?
Many Thanks
Brilliant video, thanks! Copied everything you've done today and it was a big help
That was the instruction I needed. Thank you
Very simple, straight forward video, thank you!
Thanks for watching Donald
Thank you so much ! I’m trying to add some lights to my bass raider ! This seems simple !
Glad I could help Erica
Thanks so much mate for this video... simple and easy
You're very welcome!
Excellent video nice and simple thanks👍🏼
Glad you liked it! thanks for watching
Great video. Explanation was well done. Thanks for posting.
You're welcome!
Probably could have used a bus bar instead of a terminal block for the negative side, but good to see all all the same. Nice video Mark.
Thanks 👍 just boughtt a bus bar so ill give it a go
@@MrMeltedwellies so with the bus bar there would be no reason to loop those wires? Correct? Just connect negative from load?
straight forward and easy to follow thanks
very same panel on its way and now i am prepared to wire it correctly thank you
All the best
Installing this exact model in my boat next week. Cheers for the breakdown.
Thank you for this really informative video Mark. A great help and really appreciated .
Very welcome Pete
What sort of things can you wire to these plz
Thanks so much finally a video I can understand ! :)
Thanks so much. This is the best video i´ve ever seen about wiring a switch panel on youtube. Thank you again
thanks for the very helpful video, can you share the link where you purchased the connection block
Thanks...just the job...clearly and calmly presented 👍
great tutorial,explained so simple.thank you👍👍
I've just come across this excellent useful video. Does it not matter which side of the negative block you put the sequential wires as you placed them on the opposite side of the block to where the negative comes in from the battery, or that is what it looked like to me?
Brialliant video, exactly what I was looking for, quick question, could you not have used one of the switches on the panel as the isolator ? To provide power to the whole panel like you’ve done with the 3 way
Awesome, thank you for this. I'm in the middle of fitting this in my van, this has really helped. Liked and subscribed 👍🏻👏🏼
Thanks for the sub ATB
Brilliant so patient and detailed 👌🏻
subbed after watching this fantastic explanation.
Great video, really helpful! Could you advise exactly where I would add one of those small battery level monitors? Between the battery and rocker switch? Or between the rocker switch and the switch panel?
Awesome video, very helpful
Want to give you a round of applause for doing this... Well done Mark!
Great video!! Thanks. Quick question?? How does the leisure battery charge? As I’m connecting my leisure battery to my campervan starter battery…does the rocker switch isolate the charge from the starter battery? Thanks
my leisure batteries are charged via one 100w solar panel if i want to isolate my battery i would use a 30amp isolating switch plus the only time i would link my starter battery to my leisure battery is via a split relay so keeping my starter battery safe hope this helps
Best video of this nature I've seen, and as I'm sure you're aware how this works, I've seen many!
Love this thank you made it so much clearer on how to wire up the van!!
You're welcome Holly
Thanks so much for taking the time and making the effort to create this video. It has helped me very much in wiring up my boat. This has made the whole process a lot easier. God bless you.
You're very welcome thank you very much for watching
What a excellent video. Really well explained. Thank you
This was the best video on how to wire up a rocker panel!! One question.... is it possible to make one of the rocker switch the MAIN... so that it would turn all the other switches on and off?
Awesome explanation very simple
Glad you liked it thanks very much for watching