Arduino Tutorial: Menu on a Nokia 5110 LCD Display Tutorial

HTML-код
- Опубликовано: 3 июл 2024
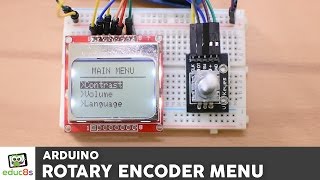
- In this easy Arduino Tutorial we are going to learn how to create a Menu on a Nokia 5110 LCD display. We are using an Arduino Uno today but you can use any Arduino you like. Let's get started!
This is the project we are going to build. In the display a simple menu appears, and with the help of three buttons I can navigate up, or down and select a menu item. Let's select the first option. As you can see a new a UI screen is displayed and by pressing the up and down buttons we can change the contrast of the display. If we press the middle button again, we go back to the main UI screen. If we now select the second menu item and press the middle button we can turn the backlight of the display on or off. Lastly if we navigate to the last menu item we can reset the settings for the display to the default values. Of course this is just a demonstration project, you can modify it to build your own more complex menus if you wish. Let's now see how to build this project.
💻 Code & Parts: educ8s.tv/arduino-nokia-5110-menu
Want to learn to code?
👨💻 Check my new RUclips channel: bit.ly/3tku2n0
🎮 My Android Game: bit.ly/QuizOfKnowledge  Наука
Наука


Just getting my parts out now and looking forward to playing.
Keep up the great tutorials, and a happy new year
Super! I was waiting for such a video a long time! Bravo Nick!
This project is very useful. I always appreciate your videos/tutorials! Thank you so much for sharing with us!
Thanks for this great tutorial! It shows how useful and easy to program the 5110 is. I ordered one right away, projects in mind :)
Nice work. Nice to see the display driven by a simple Menu. Thanks
I'm SO going to steal this for my SSD1303 oled project. Thanks man !
Thank you for all the videos about Arduino applications. By combining all info supplied in your videos I can create my own projects and I do it.
Thanks a lot, for explaining the code... I needed this for my project and u happen to help me just on time. great content
Thanks for a very nice and clear presentation.
Very educational.
Good instructional video. This can be used in many projects. I always enjoy your videos! Thanks for sharing it!
Nice work!!! And a happy New Year! :-)
Thanks! Happy New Year to you as well! Cheers!
Very helpful. I have been trying to do this exact thing for some time. I have been playing with Arduinos for a couple of years. I have read books and watched 100's of videos. I still don't do coding well. Having a starting point like this sketch is a big help. Thanks Nick for making and sharing your videos. Looking forward to the interrupt video.
Thanks Danny for the comment! I am glad that this video was helpful!
Hi Nick, thanks very much for sharing your work, it's quite tedious coding a menu etc. so thanks for providing such a useful example :)
Great explain of the menu function. Thank you very much. Keep up the good work
very useful, thanks!
this is outrageous n helpful thank u my guy
"if you want to fully understand it you have to make your own menu and see how it works"
could not agree more awesome job! Also love the quotes at the beginning of the vid's
what a great quote at the beginning.
Beautiful, simple clean and i like that part about interrupt state to conserve energie i will try to modify this for Oled 0,96" screen with buttons, but for now just learning slowly KUDOS
Thank you very much this tutorial will help me a lot for my project.
Thanks. It's always good to share knowledge
Great video! Really easy to understand. Thanks!
Hi Nick,
Another great project, Thanks
Stan
Oh nice, j'avais deja fait un menu pour ma smart watch, mais cette librairie va vraiment optimiser mon code ! merci :)
Thanks for the very clear instructions and explanations. Great website as well and one of the best formats that I have seen. Very clean and good navigation.
Nice. simple and illustrative video, Seth PiP. nice detail
I really like that project. And i choose different buttons. And it Really Worked. Thank You 🤣
Very good video. Well done!
Thank you verry verry much Nick for this great Project with my favorit Display .. Nice Work as allways !
Excelent, great work..
Got everything to work just like you said in the video....Thanks
I'm getting an error setsize class member is missing
Excelent work, thanks a lot for sharing , greetings from El Salvador, Central America
+Carlos Zapata Hola Carlos! Muchas gracias. Saludos desde Grecia..
crazy tutorial crazy menu
Good Job. Thank you
Thank you so much
Very nice tutorials you have on your channel. I subscribed imediately.
Welcome to our community! Cheers!
Cool project !!!
thanks for the project
+orlando molina you are welcome!
Thank you!
Don't forget to include #include at the beginning of your project :) thanks !
thank you!
great project. you could use Finite State Machine (FSM) for better management of the Menus.
it is an Arduino Library .
Once again we are reminded how much it's possible to do with such a tiny and abundant microcontroller.
excelente vídeo
Cool video! Like for you!
very very beatiful... tnx.
Thank you again for your video yes buttons are better than a rotary encoder and want to use the small color 1.8" TFT screen and buttons to make a temperature controller for my boiler with a clock and menu to set temperature high and low with two relay output and possibly Bluetooth for remote control
Oh, there seem to be more Stepahns in Germany...
I did not do anything with a menu by now, but i allready considered about that. Thanks :-)
Μπράβο παιδιά !!
Nice project! Easy on the coffee next time. lol
Terima kasih banyak
ótimo vídeo show ...
thank!
Excellent project Nick, please keep up the good work my friend. Did you de-bounce the switch buttons with a separate de-bounce routine or is this embedded in the display code?
Give us a project combining your old rotary encoder tutorial with this one __thank you
Great idea....
Wonderful Video. Hey can you make a tutorial about Arduino sleep mode? I find it very difficult to understand that code
good project, please tutorial hourmeter with arduino
Good computer
Nice.
Hey Nick - I bought some of these 5110 displays when I saw your "favourite displays for Arduino" video. I don't know if it's a phase or not, but every single one I bought from dfferent suppliers had the same problem. The display is not soldered to the PCB - there is a flexible connector pad, and the display is pressed against it and the PCB by the metal frame we see in your video. The problem is that this frame is very often not pressing correctly to get a good connection, and even when it is - it is not reliable.
This makes debugging a nightmare, It took me 2 days to work out there was nothing wrong iwht my electornics or my coding -the problem was this intermittent fault.
There is a similar display - the HK1230 - with the same size LCD technology, SPI interface and pinout which does not rely on this metal frame pinch - in fact, there IS not metal frame It is a little more expensive, but Im hoping it's a lot less hassle.
Also - regarding the 5110 and I'm hoping the HK1230 too - you can get 2 pins back by connecting RST to the rpocessor reset and CE to Vcc if you're on a 3.3v processor like the ESP8266.
Can you make a tutorial, how to build line-follower robot which use only two line sensors,please?
Thanks for the video.
Maybe you build a System sensors will be used with nRF24L01
Thanks
My requirement is to select options in a led display using aurdino or raspberry pi... Using switch push statement
nice
Thank you. I'm a beginner and I'm trying a project like yours too. but menu has different options and lights up leds when selected. Could you tell me where you get the documentation (link please) for the function commands for the display? I would like to use that as reference but can't find it anywhere. Thank you
Ohhh... u r so so helpfull bro..... will u help me if I mail u a problem???
sir can you make a project controll relay ,leds with display contrll
Hello, great video! Please help me, I am trying do a code for a Hidden Menu that can be accessed by holding a button and power on the Arduino. Do you know how can I do it? Thank you!
hello και καλη χρονία.
How about making some videos for Nextion touch screens.If you dont know what it is, its a screen that you can really easily make menus on tft touch screens.It has its own pc program to make menus as easy as drag and drop.I would like to see it interact with Arduino using this screen ,buttons,sensors and more .You can make some kind of tempreture controller with it?
Estaría bueno un tutorial dónde un display manejado con un encoder rotativo, poder definir un encendido de un led de una salida con un pulsador, um ejemplo sería poder tener 3 pulsadores y tres led y con el menu definir que pulsador quiero usar para encender uno de los led, eso se puede cambiar por relay y usarlo para domótica, maquinaria de una fábrica etc, es muy práctico pero para los que no entendemos mucho es un dolor de cabeza
Very useful tutorial! I have been watching a lot of your videos focusing on the Nokia 5110, but can you make one about using bitmaps? My project requires this and I have been having trouble with it. Anyway, thanks!
Thank you Arthur, have you seen this video? ruclips.net/video/aUZP0nzxc0k/видео.html
No, but thanks a lot! It helped me through my troubles!
after I watched it!
Hi Nick!
It says that 'display' was not declared in this scope line 36
Might have missed it but I don't see a 5V -> 3.3V level shifter in this video. If yours isn't working it's possible that this missing component has killed your LCD.
Can you create main menu with lcd 20x4 ?
I had a big issue while connecting the system to my pc... Nothing or just bugged out stuff happened until I connectid it to 3 batteries...
Could you run the same program for an Arduino Nano 33 BLE?
Can i use adafruit library with arduino mega
Why the code is not compiling after installing libralies also
will be that I can change the screen by a 16x2
Hi Nick - another great project. There is a correction needed to your commentary as follows: CLK pin (pin 5 on 5110) is connected to Arduino pin 13 as you have done physically but your commentary first says it is connected to Arduino pin 13 but then you change to saying pin 12. This is important to point out for any newbys following your work because the program won't run if CLK pin is connected to Arduino pin 12. Cheers Ian
Hello Ian, at which point do I make this mistake? I can't find it
Yep - you clearly say pin 13 at 2:18 clearly my mistake and my humble apologies. So I then checked your previous 5110 video (Oct 14 2014) and this is where the pin number mixup occurs at 4:28.; I was watching both simultaneously because I can't get the contrast to change up and down as yours? I see that you do not include " #include " in your code and am wondering if this should be and might be the reason for the non-changing contrast or might be some other problem with my set up [[I have my buttons on a separate little board which is grounded to the BB]] and I note one other commenter raised this same "SPI" query - I didn't include this information in my previous comment because I simply don't know as yet?? Once again my humble apologies for my mistake here and I look forward to your reply in due course to (hopefully) clear up these two issues. Cheers
Nick - a point of clarification on my last comment is required - the contrast numbers can be changed up & down according to your program but the actual contrast level does not change accordingly - nothing seems to be wrong with my 5110 as it works perfectly with the graphics programs etc??? Got me totally tossed? cheers.
+Ian Brown After publishing the video, I noticed that you can't set the contrast to the Nokia 5110 displays with the blue pcb. Maybe your version of the display is also affected?
Thanks Nick but I used the red Nokia 5110 because I have both and have had problems previously with the blue version. Any answer for the #include issue please? Cheers
I want to make a gameboy with this screen can you help
could it set to page = 3 ? I tried it but it didnt work. : /
What font did you use for the text?
thanks for this video, it is very helpful, I want to make one with several menus and parameters that I can modify and save in the arduino eprom, also with password, I am just starting any help I will be grateful (if I have errors it is that I use the translator of Google :) )
i got a question.. i want to make server node with arduino with plugged with realtime clock, esp8266, nrf24, 433MHz module and microsd. which is suitable for my application? arduino uno or mega?
Hey.. just tried this. It says X addresses outside of 0 to 83 are not allowed when trying to run on a Proteus. How do I fix this?
On supplier's page there is a remark: "You will Need: ( NOT Included in this Listing ! ) Set of Two 1K Resistors ( For Safe Operation ) Set of Four 10K Resistors ( For Safe Operation )".
Where exactly these resistors should be connected?
Wow
Hi. Can you do it with 0.96 OLED display I2C?( and rotary encoder)
I really need a complex menu but I'm quite a noob ...
Hi
I connected Nokia 5110 to Arduino UNO exactly as in this video and used the code and library provided by the link but nothing shows on the LCD. Then I tried the software SPI method instead of the hardware SPI and it worked. I didn't change anything except for reassigning the pins in the code. How should I explain this. Have you had similar experience with this issue?
how to change the code in your menu in 16x2 i2c ??
button does not work on the port (2)
(0) and (1) are working fine
Please Help me!
Connecting an LCD display
// pin 13 - Serial clock out (SCLK)
// pin 11 - Serial data out (DIN)
// pin 5 - Data/Command select (D/C)
// pin 7 - LCD chip select (CS)
// pin 6 - LCD reset (RST)
// pin 12 - LCD Light
Adafruit_PCD8544 display = Adafruit_PCD8544(13, 11, 5, 7, 6);
int lcd_light = 12;
there is an error: draw.menu is no declared in this scope. how do i get the drawmenu function with a 2x16 LCD
Hi Nick can i use the nokia 3310 and how
why dont use lib lcd5110_graph.h?
i have done everything as you intructed but my nokia 5110 lcd does not display anything can i get some help.
Yes please , give us an FM radio receiver with TEA5767 and a choice of screens if possible.
+Giorgos Stolis yes that's coming but first we have to learn how to use interrupts wit Arduino .
3.3 on Vcc and 5.0 on data pins? Is that legal?
Hi, I tried to use another similar screen and my code does not run, it gives an error "'display' was not declared in this scope", anyone can help me ? others programs are running normally =/
my problem is: when reset item is selected it goes to contrast adjust page, when contrast item is selected goes to backlight adjust on/off and when backlight is selected, it resets..
can anyone help?