Electronics & Physics Learning in 5 Simple Projects (with ELEGOO Upgraded Electronics Fun Kit)

HTML-код
- Опубликовано: 12 май 2020
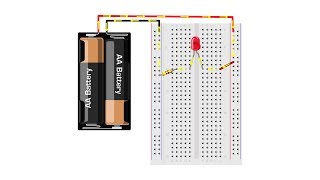
- For our customers who are electronics learning beginners or STEM classroom users, we made a new tutorial video for our ▶️ELEGOO Upgraded Electronics Fun Kit besides the original instructions.
This video includes 5 simple projects that don't require an Arduino control board but still can practically implement some daily-life functions. Users can now start the journey of electronics & physics learning in the most direct and convenient way.
Download all schematic and wiring diagram here:⚡️ bit.ly/2Z0grCM
Shop this kit here: ⚡️
[US] amzn.to/3cvhcHB
[DE] amzn.to/2LGYH57
[UK] amzn.to/2K5Mwzw
[FR] amzn.to/2Orprs7
[ES] amzn.to/2WqtD1O
[CA] amzn.to/2xZ4K47
[IT] amzn.to/2w8si1m
[MX] amzn.to/2OkmVUj
For any questions please email our dedicated Customer Service Team:
North America & Australia: service@elegoo.com
Europe & Japan: euservice@elegoo.com
☄️Subscribe to our NEWSLETTER for exclusive future promotions & more new products.: www.elegoo.com
☄️Follow us on social media for some first-hand updates and giveaways:
Facebook: / elegooofficial
Instagram: / elegoo_official
Twitter: / elegoo_official
Music:
Happy Life - FREDJI
Jay Jay - Kevin MacLeod
My Achy Heart - Audio Hertz
Positive Happy by PeriTune ( / sei_peridot )
Beat Your Competition - Vibe Tracks
#arduino #3dprinting #electronics #robotics #engineering #engineers #3dprinters #decoration #LCD #stem #arduinoprojects #makers #elegoo #steam #creation #projects #makersgonnamake #diy #hackers #hack #tech #digitalelectronics #electronicslovers #hobbyelectronics  Наука
Наука


Very disappointed. I'm new to this and want to learn. No explanations. Can't see where things connect. I'm glad there are other videos from other sources. Unfortunately I'm having to supplement by purchasing other components because I do not know what can be substituted or what the purpose is of the various parts this kit came with. I like that the kit came with so many parts but when I can't see how things are supposed to connect on the tutorial videos, its not much help.
In the second example: The capacitors need to go AFTER the resistors, like in the video, NOT the schematic. otherwise the transistors are just slammed open.
You couldn't have zoomed in any more man?
Love how you absolutely don't show where the capacitors connect to :/
they connect to ground?
why are you mute? it would be nice to get some explanations
Hi, nice kit, I have a question, is the breadboard separable on his half? Thank you so much!
Can we replace a led by a motor for the blinker?
Schematic for 4th project shows + on capacitor going to ground. Picture in bottom right corner is correct. Get it together!
I got the kit It look cool
The video and photo instructions are completely different
I'm so confused
It´s impossible to understand anything
On the 2nd example all the visualisations are messed up. Each one is orientated different and the shematics on the bottom right has one capacitator short circuted and what she is putting together isn't what's in the block diagramm (The order of the capacitators and the 100 Ohm resistors isn't the same).
hands in the way for many of the parts.
2nd example: make sure your jumpers on the PSU are set as they show in the pic...no mention
What type of transistor is used in the 2nd project?
All of them are NPN
was the kit supposed to come with the cord for the power supply? Because mine definitely did not
No cord included. This is normal.
where do i find one then
@@MrArpSolina
Damn I'm having a hard time following along lol
is it just me or is pausing the video and following the diagram easier than just watching it?
Hey what's the difference between arduino, elegoo, raspberry and others. I'm so confused. I wanted to start learning and looking for a kit but I feel like I'm dumb right now.
These are all brands, but you mean something like, Arduino is a programmable cpu to control motors etc. It has less computing power than a raspberry pi, but it's more suited for circuit control like circuits. Raspberry is a computer also capable of controlling outputs, but you need an os to run in. If you want something low power and controlling some motors etc, arduino is a good choice, if you want something with a webserver or a display, (like a full hd monitor) raspberry is a good choice. Elegoo isn't a similar thing. It's a company that sells kits. (and 3d printer stuff) they have kits to connect for example a arduino. So you can learn how to make circuits for an arduino. The arduino itself won't blink much of you just load a program. With elegoo arduino kits you can for example hook up some leds and a buzzer, and then control these with an arduino program.
@@MrSpacelyy oh wow you are so smart, where did you learn all that?
@@Voltomess I am not that smart, but I search for it sometime. I don't have a arduino yet, but have several raspberry's, mostly use them as servers for home vpn and the readout my powermeter. I actually just bought this kit to get back into electronics a bit. As a kid, I had something similar, only that had about 10 parts, but a great manual that learns important lessons.
This kit has lots of parts, but i didn't a great manual with tutorials yet. The manual they offer on their website, is actually for a different kit. I think I will ask if they have the correct one somewhere.
@@Voltomess I actaully noticed I wasn't completely correct elegoo also offers a arduino board. So they have kits and an actual arduino.
@@MrSpacelyy It still sound way to complicated for me lol I need to learn basics for example how to make a led diode switch on and off 😂
do u need code?
Hi!..To every one. I have Bought this set for my Son. I need same suggestion About Power Supply. At moment i have many power Supply..but no by 5V . I have one by 9V. can i use it?..in my case theres'nt < 12V (less 12 v)..but the LABEL report model HW-131 (POWER SUPLY MODULE). Where is a place is possible download guideline for funny circuti project for child with this Starter pack? Thankyou to everyone have i nice day!
Hello Simone, the input voltage range of the power supply module is 6.5V ~ 12V. And the polarity of the connector should be inside positive and outside negative. You can download the tutorial from this link:
69.195.111.207/tutorial-download/?t=E2&E3
Please note that the Upgraded Electronics Fun Kit is an expansion kit for Uno board or Mega 2560 board. It does not contain the controller board and cannot be used individually. The tutorial file is based on the controller board.
Why not just put a power cord in the box...
Esta todo mal ya queme mi transistor
This is THE worst example of all time. Diagram doesn't match what he's created...
oh... hi :)
tf he used to connect the boards
I don´t completely get why the third LED doesn't work in the humidity sensor
I love your kit, but your tutorial is not that good :(
It does, but it indicates a short. The blue LED lights when there's no resistance between the contacts, i.e., when you touch them. Green lights when there's moderate resistance (from moist soil), and red lights when the soil is saturated (as demonstrated by putting the contacts directly into water, so low resistance). No LEDs means the soil is too dry, which is effectively infinite resistance.
What is the actual point of this tutorial... it’s different from the circuit diagram and you cannot see what the person is actually doing!! WHY BOTHER?
Why do these how- vids always come with annoying music and no voiceover?
Really off putting for me.
rwo different boards crap
crap kit!!! where is the power cable???
i think the power adaptor adds to the cost of the kit ..
the fritzing diagram dint make the cycle blinking program work
u can use usb
@@3rkan391 Not using the power board. That's an output. But ofcourse you could just use a usb power supply cut cables and stick them in the breadboard. But I wouldn't use an actual usb port. You might damage it.
In downloads you can see a datasheet of every part. Also the powerboard. It needs 6.5 to 9 volts dc. they also sell the power supply on their website. But you could use any that has the correct voltage.
what a terrible video. The diagram of the breadboard isn't very easy to understand either. you've done a bad job making this accessible to beginners, which is what you say your company is about
Non se capiscen' cazzo
Thanks for not helping whatsoever
Not impressed. Nice monkey see, monkey do video. I just got my kit and was looking for projects that would provide some insight in what is really going on in the circuit and how each component function is contributing to make it work. Learning involves understanding the why of how things work. I did download the schematics and will do the projects, subject to adjustments mentioned in the comments. It is a nice kit and glad I got it. I'll suggest downloading the data sheets to see the specs for the components. Power supply in particular. My first impression you could supply power thought the USB. Nope, it is for output.